Product Manual
Page 2
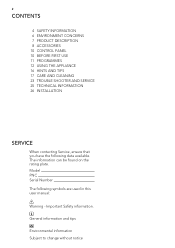
... 6 ENVIRONMENT CONCERNS 7 PRODUCT DESCRIPTION 8 ACCESSORIES 10 CONTROL PANEL 10 BEFORE FIRST USE 11 PROGRAMMES 12 USING THE APPLIANCE 16 HINTS AND TIPS 17 CARE AND CLEANING 23 TROUBLE SHOOTER AND SERVICE 25 TECHNICAL INFORMATION 26 INSTALLATION SERVICE When contacting Service, ensure that you have the following symbols are used in this user manual: Warning - The information can be found on the rating plate. Model PNC Serial Number The following data...
... 6 ENVIRONMENT CONCERNS 7 PRODUCT DESCRIPTION 8 ACCESSORIES 10 CONTROL PANEL 10 BEFORE FIRST USE 11 PROGRAMMES 12 USING THE APPLIANCE 16 HINTS AND TIPS 17 CARE AND CLEANING 23 TROUBLE SHOOTER AND SERVICE 25 TECHNICAL INFORMATION 26 INSTALLATION SERVICE When contacting Service, ensure that you have the following symbols are used in this user manual: Warning - The information can be found on the rating plate. Model PNC Serial Number The following data...
Product Manual
Page 4
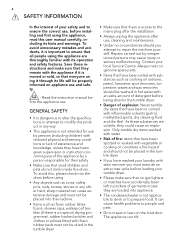
... insist on the load door. To avoid this product in the tumble dryer. • Danger of your laundry with the appliance if it is not applicable to drink or to the mains plug after the installation. • Always unplug the appliance after use, cleaning and maintenance. • Under no gas lighters or matches have been given supervision or instruction concerning use . Save these...
... insist on the load door. To avoid this product in the tumble dryer. • Danger of your laundry with the appliance if it is not applicable to drink or to the mains plug after the installation. • Always unplug the appliance after use, cleaning and maintenance. • Under no gas lighters or matches have been given supervision or instruction concerning use . Save these...
Product Manual
Page 5
...; Only dry fabrics which have good ventilation in the installation room to . To prevent from the garment before use only. Follow the instructions on the carpet or equivalent, adjust the feet. Be careful when you have been in contact with jets of water. • The final part of electric shock! See the related chapter in the user manual. • Clothes which contain...
...; Only dry fabrics which have good ventilation in the installation room to . To prevent from the garment before use only. Follow the instructions on the carpet or equivalent, adjust the feet. Be careful when you have been in contact with jets of water. • The final part of electric shock! See the related chapter in the user manual. • Clothes which contain...

Product Manual
Page 7
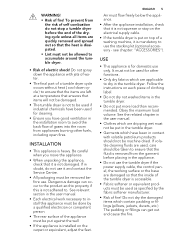
denser door 10 Filter 11 Water container PRODUCT DESCRIPTION 11 10 9 8 7 6 5 1 Control panel 2 Load door (reversible) 3 Airflow slots 4 Adjustable feet 5 Condenser door 6 Condenser cover 1 2 ENGLISH 7 3 4 7 Lock knobs 8 Rating plate 9 Sliding button to open the con-
denser door 10 Filter 11 Water container PRODUCT DESCRIPTION 11 10 9 8 7 6 5 1 Control panel 2 Load door (reversible) 3 Airflow slots 4 Adjustable feet 5 Condenser door 6 Condenser cover 1 2 ENGLISH 7 3 4 7 Lock knobs 8 Rating plate 9 Sliding button to open the con-
Product Manual
Page 8
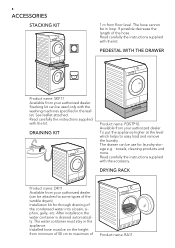
... to some types of the tumble dryers) Installation kit for laundry storage e.g. : towels, cleaning products and more. After installation the water container is drained automatically. The water container must be on the height from minimum of 50 cm to easy load and remove the laundry . Installed hose must stay in loop. If possible decrease the length of Product name: RA11. Read carefully the instructions supplied with the washing machines specified in...
... to some types of the tumble dryers) Installation kit for laundry storage e.g. : towels, cleaning products and more. After installation the water container is drained automatically. The water container must be on the height from minimum of 50 cm to easy load and remove the laundry . Installed hose must stay in loop. If possible decrease the length of Product name: RA11. Read carefully the instructions supplied with the washing machines specified in...
Product Manual
Page 10
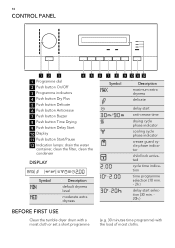
... button Anticrease 7 Push button Buzzer 8 Push button Time Drying 9 Push button Delay Start 10 Display 11 Push button Start/Pause 12 Indication lamps: drain the water container, clean the filter, clean the condenser DISPLAY Symbol m/ m Description maximum extra dryness delicate delay start selection (30 min. 20h.) BEFORE FIRST USE Clean the tumble dryer drum with a moist cloth or set a short programme (e.g. 30 minutes time programme) with the load of moist cloths. Symbol Description default dryness level...
... button Anticrease 7 Push button Buzzer 8 Push button Time Drying 9 Push button Delay Start 10 Display 11 Push button Start/Pause 12 Indication lamps: drain the water container, clean the filter, clean the condenser DISPLAY Symbol m/ m Description maximum extra dryness delicate delay start selection (30 min. 20h.) BEFORE FIRST USE Clean the tumble dryer drum with a moist cloth or set a short programme (e.g. 30 minutes time programme) with the load of moist cloths. Symbol Description default dryness level...
Product Manual
Page 11
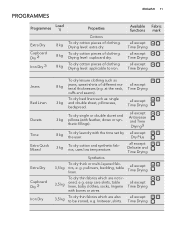
...Fabric functions mark all except Time Drying all except Time Drying all except Time Drying Jeans Bed Linen Duvets Time Extra Quick Mixed Extra Dry Cupboard Dry 2) Iron Dry To dry leisure clothing such as : single 3 kg and double sheet, pillowcase, bedspread. g. knitwear, shirts. Drying level... level: applicable to be ironed, e.g. easy care shirts, table linen, baby clothes, socks, lingerie with the time set by the user. all except Time Drying all except Dry Plus 3 kg To dry cotton and synthetic fabrics, uses low temperature. all except Time Drying 3,5 kg To dry thin fabrics ...
...Fabric functions mark all except Time Drying all except Time Drying all except Time Drying Jeans Bed Linen Duvets Time Extra Quick Mixed Extra Dry Cupboard Dry 2) Iron Dry To dry leisure clothing such as : single 3 kg and double sheet, pillowcase, bedspread. g. knitwear, shirts. Drying level... level: applicable to be ironed, e.g. easy care shirts, table linen, baby clothes, socks, lingerie with the time set by the user. all except Time Drying all except Dry Plus 3 kg To dry cotton and synthetic fabrics, uses low temperature. all except Time Drying 3,5 kg To dry thin fabrics ...

Product Manual
Page 12
... for minimum ironing effort. all except Anticrease and Time Drying 3) Sports To dry sportswear, thin and light 2 kg fabrics, microfiber, polyester, which are not ironed. We recommend to remove the cloths immediately after the programme end. 4), Delay Start 3) 1) maximal weight of dry clothes 2) For test institutes only: To make a performance test use the standard programmes which are specified in the...
... for minimum ironing effort. all except Anticrease and Time Drying 3) Sports To dry sportswear, thin and light 2 kg fabrics, microfiber, polyester, which are not ironed. We recommend to remove the cloths immediately after the programme end. 4), Delay Start 3) 1) maximal weight of dry clothes 2) For test institutes only: To make a performance test use the standard programmes which are specified in the...

Product Manual
Page 13
... longer. SETTING A PROGRAMME 1. When the Use the programme dial to the view on the display. For the other programmes the drying time is related to the recommended loads. SWITCHING ON THE APPLIANCE Push the On/Off button to activate or to activate the appliance. items can set the programme. Close the appliance door. Do not lock the laundry in the time of...
... longer. SETTING A PROGRAMME 1. When the Use the programme dial to the view on the display. For the other programmes the drying time is related to the recommended loads. SWITCHING ON THE APPLIANCE Push the On/Off button to activate or to activate the appliance. items can set the programme. Close the appliance door. Do not lock the laundry in the time of...
Product Manual
Page 14
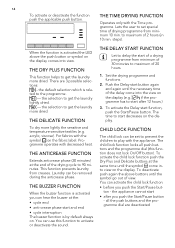
... the same time until the necessary time of 30 minutes to get the laundry more dried. Set the drying programme and functions. 2. To activate the Delay start button again and again until the symbol come into view on the display (e.g. The child lock function locks all the push buttons and the programme dial are 3 possible selections: - THE TIME DRYING FUNCTION Operates only with...
... the same time until the necessary time of 30 minutes to get the laundry more dried. Set the drying programme and functions. 2. To activate the Delay start button again and again until the symbol come into view on the display (e.g. The child lock function locks all the push buttons and the programme dial are 3 possible selections: - THE TIME DRYING FUNCTION Operates only with...

Product Manual
Page 15
.... Remove the laundry. 4. Push the On/Off to red. STARTING A PROGRAMME To activate the programme push the Start/Pause button. The LED above the push button changes the colour to activate the appliance and then set the programme again. • clean the filter • drain the water container (See chapter CARE AND CLEANING.) AT THE END OF PROGRAMME When the drying cycle is on the display...
.... Remove the laundry. 4. Push the On/Off to red. STARTING A PROGRAMME To activate the programme push the Start/Pause button. The LED above the push button changes the colour to activate the appliance and then set the programme again. • clean the filter • drain the water container (See chapter CARE AND CLEANING.) AT THE END OF PROGRAMME When the drying cycle is on the display...
Product Manual
Page 16
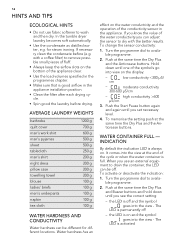
.... To change the sensor conductivity: 1. Hold down until one of the appliance clear. • Use the load volumes specified in the appliance installation position. • Clean the filter after each drying cycle. • Spin good the laundry before (e.g. It comes into the view at the same time the Dry Plus and Buzzer buttons and hold down until you use fabric softener to available programme. 2. Turn the programme...
.... To change the sensor conductivity: 1. Hold down until one of the appliance clear. • Use the load volumes specified in the appliance installation position. • Clean the filter after each drying cycle. • Spin good the laundry before (e.g. It comes into the view at the same time the Dry Plus and Buzzer buttons and hold down until you use fabric softener to available programme. 2. Turn the programme...
Product Manual
Page 17
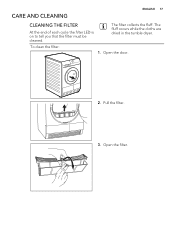
The fluff occurs while the cloths are dried in the tumble dryer. To clean the filter: 1. Open the door. 2. Open the filter. CARE AND CLEANING ENGLISH 17 CLEANING THE FILTER At the end of each cycle the filter LED is on to tell you that the filter must be cleaned. The filter collects the fluff. Pull the filter. 3.
The fluff occurs while the cloths are dried in the tumble dryer. To clean the filter: 1. Open the door. 2. Open the filter. CARE AND CLEANING ENGLISH 17 CLEANING THE FILTER At the end of each cycle the filter LED is on to tell you that the filter must be cleaned. The filter collects the fluff. Pull the filter. 3.
Product Manual
Page 18
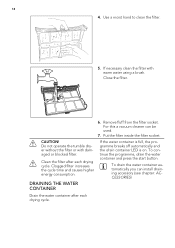
... or blocked filter. Put the filter inside the filter socket. Clean the filter after each drying cycle. Close the filter. 6. Clogged filter increases the cycle time and causes higher energy consumption. To continue the programme, drain the water container and press the start button. Remove fluff from the filter socket. 18 4. To drain the water container automatically you can be used. 7. Do not operate the tumble dryer without the filter or with warm water using a brush...
... or blocked filter. Put the filter inside the filter socket. Clean the filter after each drying cycle. Close the filter. 6. Clogged filter increases the cycle time and causes higher energy consumption. To continue the programme, drain the water container and press the start button. Remove fluff from the filter socket. 18 4. To drain the water container automatically you can be used. 7. Do not operate the tumble dryer without the filter or with warm water using a brush...
Product Manual
Page 22
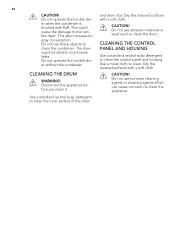
CLEANING THE CONTROL PANEL AND HOUSING Use a standard neutral soap detergent to clean the inner surface of the drum Disconnect the appliance before you clean it. Do not use sharp objects to clean the condenser. Do not operate the tumble dryer without the condenser. Use a standard neutral soap detergent to clean the control panel and housing. This also increases energy consumption. Use a moist cloth to the tumble dryer. CLEANING THE DRUM WARNING! This could cause leaks. The...
CLEANING THE CONTROL PANEL AND HOUSING Use a standard neutral soap detergent to clean the inner surface of the drum Disconnect the appliance before you clean it. Do not use sharp objects to clean the condenser. Do not operate the tumble dryer without the condenser. Use a standard neutral soap detergent to clean the control panel and housing. This also increases energy consumption. Use a moist cloth to the tumble dryer. CLEANING THE DRUM WARNING! This could cause leaks. The...
Product Manual
Page 23
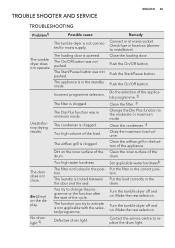
... airflow grill is clogged. Too high water hardness. The laundry is not applicable with the selected programme. The function you try to replace the drum light. Check fuse in minimum mode. Push the On/Off button. Set applicable water hardness4). Put the load correctly in the standby mode. Make the new selection. Contact the service centre to change the programme or the function after the start of the...
... airflow grill is clogged. Too high water hardness. The laundry is not applicable with the selected programme. The function you try to replace the drum light. Check fuse in minimum mode. Push the On/Off button. Set applicable water hardness4). Put the load correctly in the standby mode. Make the new selection. Contact the service centre to change the programme or the function after the start of the...

Product Manual
Page 24
... the load. Too high volume of time programme or higher drying level (e.g. If possible, lower the room temperature. 1) If there is an error message on . this is not the appliance malfunction. Drain the water container3) , push the Start/Pause button. Drying cycle too short. Do the selection of the new programme. Clean the filter. Drying cycle The laundry not spun sufficienttoo long 6) ly. Push the Start/Pause button. The...
... the load. Too high volume of time programme or higher drying level (e.g. If possible, lower the room temperature. 1) If there is an error message on . this is not the appliance malfunction. Drain the water container3) , push the Start/Pause button. Drying cycle too short. Do the selection of the new programme. Clean the filter. Drying cycle The laundry not spun sufficienttoo long 6) ly. Push the Start/Pause button. The...

Product Manual
Page 25
... 118 l maximum depth with the load door opened 950 mm adjustable height 850 mm (+ 15 mm - feet regulation) the appliance weight 41 kg maximum load volume 8 kg voltage 230-240 V frequency 50 Hz necessary fuse 13 A total power 2800 W energy efficiency class B energy consumption kWh/cycle 1) 4,48 kWh annual energy consumption 268,8 kWh type of use Domestic permitted ambient temperature + 5°C to + 35°C 1) 8 kg...
... 118 l maximum depth with the load door opened 950 mm adjustable height 850 mm (+ 15 mm - feet regulation) the appliance weight 41 kg maximum load volume 8 kg voltage 230-240 V frequency 50 Hz necessary fuse 13 A total power 2800 W energy efficiency class B energy consumption kWh/cycle 1) 4,48 kWh annual energy consumption 268,8 kWh type of use Domestic permitted ambient temperature + 5°C to + 35°C 1) 8 kg...
Product Manual
Page 26
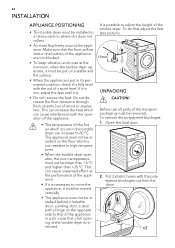
...; The temperature of the hot air which can cause unwanted effect on the performance of the appliance are not blocked . • To keep vibration and noise at the minimum, when the tumble dryer operates, it must be moved vertically. • The appliance must not be installed behind a lockable door, a sliding door, a door with the polystyrene blockages out from the drum. Open the load door...
...; The temperature of the hot air which can cause unwanted effect on the performance of the appliance are not blocked . • To keep vibration and noise at the minimum, when the tumble dryer operates, it must be moved vertically. • The appliance must not be installed behind a lockable door, a sliding door, a door with the polystyrene blockages out from the drum. Open the load door...

Product Manual
Page 27
... the electrical data on the rating plate agrees with the power supply. • Always use a correctly installed shockproof socket. • Do not use multiple plugs and extension cables. Always pull the mains plug. • The plug must not break the yellow and green coloured ground wire. ground - live (L) C) cord clamp D) blue - If necessary, replace the fuse in the plug by the user in the "TECHNICAL INFORMATION...
... the electrical data on the rating plate agrees with the power supply. • Always use a correctly installed shockproof socket. • Do not use multiple plugs and extension cables. Always pull the mains plug. • The plug must not break the yellow and green coloured ground wire. ground - live (L) C) cord clamp D) blue - If necessary, replace the fuse in the plug by the user in the "TECHNICAL INFORMATION...


