User Manual
Page 2
... CUSTOMER CARE AND SERVICE Always use of this AEG product. CONTROL PANEL...8 5. OPTIONS...11 7. DAILY USE...12 9. TROUBLESHOOTING 18 12. When contacting our Authorised Service Centre, ensure that help make life simpler features you might not find on the rating plate. We have the following data available: Model, PNC, Serial Number. Visit our website for: Get usage advice, brochures, trouble shooter, service information: www.aeg.com...
... CUSTOMER CARE AND SERVICE Always use of this AEG product. CONTROL PANEL...8 5. OPTIONS...11 7. DAILY USE...12 9. TROUBLESHOOTING 18 12. When contacting our Authorised Service Centre, ensure that help make life simpler features you might not find on the rating plate. We have the following data available: Model, PNC, Serial Number. Visit our website for: Get usage advice, brochures, trouble shooter, service information: www.aeg.com...
User Manual
Page 3
The stacking kit, available from your authorized vendor, can be activated. • Children shall not carry out cleaning and user maintenance of the appliance without supervision. 1.2 General Safety • Do not change the specification of this appliance. • If the tumble dryer is put on top of it carefully before installation (Refer to the Installation leaflet). Always keep the instructions in a safe and accessible location for...
The stacking kit, available from your authorized vendor, can be activated. • Children shall not carry out cleaning and user maintenance of the appliance without supervision. 1.2 General Safety • Do not change the specification of this appliance. • If the tumble dryer is put on top of it carefully before installation (Refer to the Installation leaflet). Always keep the instructions in a safe and accessible location for...
User Manual
Page 4
...; Do not run the appliance without a filter. Make sure that the mains plug is accessible after each use the appliance if items have been soiled with a hinge on and off by the manufacturer, its Authorised Service Centre or similarly qualified persons to avoid an electrical hazard. • Do not exceed the maximum load of the installation process. 4 www.aeg.com...
...; Do not run the appliance without a filter. Make sure that the mains plug is accessible after each use the appliance if items have been soiled with a hinge on and off by the manufacturer, its Authorised Service Centre or similarly qualified persons to avoid an electrical hazard. • Do not exceed the maximum load of the installation process. 4 www.aeg.com...
User Manual
Page 5
... dried in the tumble dryer. • Fabric softeners, or similar products, should only be used as specified by the product manufacturer's instructions. • Remove all items are quickly removed and spread out so that the heat is not, adjust the feet accordingly. 2.2 Electrical connection WARNING! If it is dissipated. • Before any maintenance operation, deactivate the appliance and disconnect the mains plug...
... dried in the tumble dryer. • Fabric softeners, or similar products, should only be used as specified by the product manufacturer's instructions. • Remove all items are quickly removed and spread out so that the heat is not, adjust the feet accordingly. 2.2 Electrical connection WARNING! If it is dissipated. • Before any maintenance operation, deactivate the appliance and disconnect the mains plug...
User Manual
Page 6
It can cause health problems to clean the appliance. • Clean the appliance with the condensed water/distilled water. Follow the instructions on the open door. • Do not dry dripping wet clothes in the tumble dryer. 2.4 Care and cleaning WARNING! Only use any abrasive products, abrasive cleaning pads, solvents or metal objects. 2.5 Disposal WARNING! Do not use neutral detergents. Risk of injury or damage to the...
It can cause health problems to clean the appliance. • Clean the appliance with the condensed water/distilled water. Follow the instructions on the open door. • Do not dry dripping wet clothes in the tumble dryer. 2.4 Care and cleaning WARNING! Only use any abrasive products, abrasive cleaning pads, solvents or metal objects. 2.5 Disposal WARNING! Do not use neutral detergents. Risk of injury or damage to the...

User Manual
Page 7
3. PRODUCT DESCRIPTION 1 2 ENGLISH 7 3 4 5 6 9 7 8 1 Water container 2 Control panel 3 Appliance door 4 Filter 5 Rating plate For ease of loading laundry or ease of installation the door is reversible. (see separate leaflet). 6 Airflow slots 7 Condenser lid 8 Condenser cover 9 Adjustable feet
3. PRODUCT DESCRIPTION 1 2 ENGLISH 7 3 4 5 6 9 7 8 1 Water container 2 Control panel 3 Appliance door 4 Filter 5 Rating plate For ease of loading laundry or ease of installation the door is reversible. (see separate leaflet). 6 Airflow slots 7 Condenser lid 8 Condenser cover 9 Adjustable feet

User Manual
Page 9
...: crease guard phase indicator: cooling phase 5. child lock on Symbol description laundry dryness: iron dry, cupboard dry, cupboard dry +, extra dry indicator: drain the water container indicator: clean filter indicator: do the check of the heat exchanger time dry option on a hanger. / 3 kg Bed linen such as single and double sheets, pillowcases, duvet cov- / er. When the programme has ended, immediately remove the items and put...
...: crease guard phase indicator: cooling phase 5. child lock on Symbol description laundry dryness: iron dry, cupboard dry, cupboard dry +, extra dry indicator: drain the water container indicator: clean filter indicator: do the check of the heat exchanger time dry option on a hanger. / 3 kg Bed linen such as single and double sheets, pillowcases, duvet cov- / er. When the programme has ended, immediately remove the items and put...
User Manual
Page 10
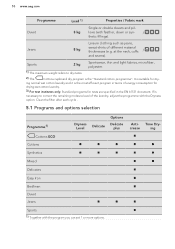
...kg Sportswear, thin and light fabrics, microfiber, polyester. 1) The maximum weight refers to correct the remaining moisture level of the laundry, adjust the programme with the Dryness option. lows (with the program you can set 1 or more options. Clean the filter after each cycle . 5.1 Programs and... wet cotton laundry and it is necessary to dry items. 2) The Cottons cupboard dry program is suitable for tests are specified in the EN 61121 document. Time Dry- at the neck, cuffs / and seams). Anti- 10 www.aeg.com Programme Load 1) Properties / Fabric mark Duvet 3 kg ...
...kg Sportswear, thin and light fabrics, microfiber, polyester. 1) The maximum weight refers to correct the remaining moisture level of the laundry, adjust the programme with the Dryness option. lows (with the program you can set 1 or more options. Clean the filter after each cycle . 5.1 Programs and... wet cotton laundry and it is necessary to dry items. 2) The Cottons cupboard dry program is suitable for tests are specified in the EN 61121 document. Time Dry- at the neck, cuffs / and seams). Anti- 10 www.aeg.com Programme Load 1) Properties / Fabric mark Duvet 3 kg ...
User Manual
Page 11
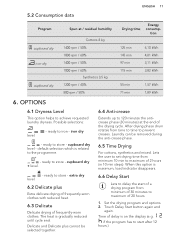
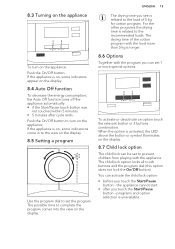
... dry + level. After drying phase drum rotates from minimum of 30 minutes to the programme. - OPTIONS 6.1 Dryness Level This option helps to iron - ready to store - ready to store - The heat is related to maximum of 20 hours. 1. Lets the user to set drying time from minimum 10 min to maximum of delay is maximum, load indicator disappears. 6.6 Delay Start...
... dry + level. After drying phase drum rotates from minimum of 30 minutes to the programme. - OPTIONS 6.1 Dryness Level This option helps to iron - ready to store - ready to store - The heat is related to maximum of 20 hours. 1. Lets the user to set drying time from minimum 10 min to maximum of delay is maximum, load indicator disappears. 6.6 Delay Start...
User Manual
Page 12
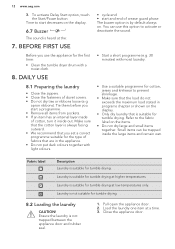
... first time: • Clean the tumble dryer drum with a moist cloth. 8. DAILY USE 8.1 Preparing the laundry • Close the zippers. • Close the fasteners of crease guard phase The buzzer option is not trapped between the appliance door and rubber seal. 1. Refer to activate or deactivate the sound. • Start a short programme (e.g. 30 minutes) with light colours. • cycle end • start...
... first time: • Clean the tumble dryer drum with a moist cloth. 8. DAILY USE 8.1 Preparing the laundry • Close the zippers. • Close the fasteners of crease guard phase The buzzer option is not trapped between the appliance door and rubber seal. 1. Refer to activate or deactivate the sound. • Start a short programme (e.g. 30 minutes) with light colours. • cycle end • start...
User Manual
Page 13
... button to turn on the display. 8.7 Child lock option The child lock can be set to prevent children from playing with the program you can activate the child lock option: • before you touch the Start/Pause button - ENGLISH 13 The drying time you see is unavailable. If the appliance is on, some indicators appear on the display. the appliance cannot start • after cycle...
... button to turn on the display. 8.7 Child lock option The child lock can be set to prevent children from playing with the program you can activate the child lock option: • before you touch the Start/Pause button - ENGLISH 13 The drying time you see is unavailable. If the appliance is on, some indicators appear on the display. the appliance cannot start • after cycle...
User Manual
Page 14
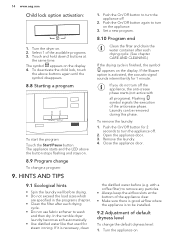
.../Off button to be removed during this phase. If you do not turn on . 8.9 Program change To change the default dryness level: 1. Open the appliance door. 3. Set a new program. 8.10 Program end Clean the filter and drain the water container after each drying cycle. (See chapter CARE AND CLEANING.) If the drying cycle is to turn the appliance off. 2. the distilled water before drying. • Do not exceed the load sizes which...
.../Off button to be removed during this phase. If you do not turn on . 8.9 Program change To change the default dryness level: 1. Open the appliance door. 3. Set a new program. 8.10 Program end Clean the filter and drain the water container after each drying cycle. (See chapter CARE AND CLEANING.) If the drying cycle is to turn the appliance off. 2. the distilled water before drying. • Do not exceed the load sizes which...
User Manual
Page 15
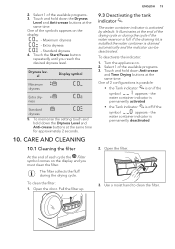
... drying cycle. Open the door. Touch and hold down the Dryness Level and Anti-crease buttons at the same time. Use a moist hand to clean the filter. To memorise the setting touch and hold down the Dryness Level and Anti-crease buttons at the same time for approximately 2 seconds. 10. the water container indicator is off if the symbol appears - CARE AND CLEANING 10.1 Cleaning the filter...
... drying cycle. Open the door. Touch and hold down the Dryness Level and Anti-crease buttons at the same time. Use a moist hand to clean the filter. To memorise the setting touch and hold down the Dryness Level and Anti-crease buttons at the same time for approximately 2 seconds. 10. the water container indicator is off if the symbol appears - CARE AND CLEANING 10.1 Cleaning the filter...
User Manual
Page 16
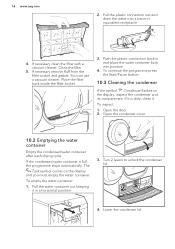
.... 4. Open the door. 2. To empty the water container: 1. Close the filter. 5. The Tank symbol comes on the display, inspect the condenser and its compartment. Lower the condenser lid. Turn 2 levers to unlock the condenser lid. 4. If necessary clean the filter with a vacuum cleaner. 16 www.aeg.com 2. You can use a vacuum cleaner. Place the filter back inside the filter socket. 3. Open the condenser cover...
.... 4. Open the door. 2. To empty the water container: 1. Close the filter. 5. The Tank symbol comes on the display, inspect the condenser and its compartment. Lower the condenser lid. Turn 2 levers to unlock the condenser lid. 4. If necessary clean the filter with a vacuum cleaner. 16 www.aeg.com 2. You can use a vacuum cleaner. Place the filter back inside the filter socket. 3. Open the condenser cover...

User Manual
Page 17
.... Lock 2 levers until they snap. 10. Disconnect the appliance before you clean it. 5. Close the condenser cover. 10.4 Cleaning the drum WARNING! Do not use furniture cleaning agents or cleaning agents which can cause corrosion to clean the appliance. 10.6 Cleaning the airflow slots Use a vacuum cleaner to avoid spilling any remaining water. 6. Use a moist cloth to clean the inner surface of the drum and drum lifters...
.... Lock 2 levers until they snap. 10. Disconnect the appliance before you clean it. 5. Close the condenser cover. 10.4 Cleaning the drum WARNING! Do not use furniture cleaning agents or cleaning agents which can cause corrosion to clean the appliance. 10.6 Cleaning the airflow slots Use a vacuum cleaner to avoid spilling any remaining water. 6. Use a moist cloth to clean the inner surface of the drum and drum lifters...
User Manual
Page 18
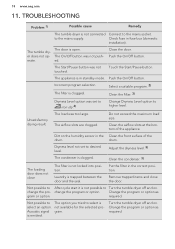
... . Clean the condenser. 3) The loading door does not close the door. Laundry is emitted. Put the filter in fuse box (domestic installation). Change the program or option as required. Change the program or option as gram or option. The On/Off button was not touched. The Start/Pause button was not pushed. is trapped between the door and the seal. to After cycle start it is not locked...
... . Clean the condenser. 3) The loading door does not close the door. Laundry is emitted. Put the filter in fuse box (domestic installation). Change the program or option as required. Change the program or option as gram or option. The On/Off button was not touched. The Start/Pause button was not pushed. is trapped between the door and the seal. to After cycle start it is not locked...
User Manual
Page 19
... not operate contact the service centre and provide the error code. 2) Follow the program description - The drying duration is an error message on the display (e.g. Drain the water container, push the Start/Pause button. 3) Load size is too large. The time value must be related to achieve best drying results is between 19°-24°C. 1) If there is calculated ration time on . Drying cycle too long...
... not operate contact the service centre and provide the error code. 2) Follow the program description - The drying duration is an error message on the display (e.g. Drain the water container, push the Start/Pause button. 3) Load size is too large. The time value must be related to achieve best drying results is between 19°-24°C. 1) If there is calculated ration time on . Drying cycle too long...
User Manual
Page 20
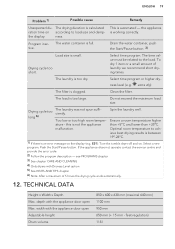
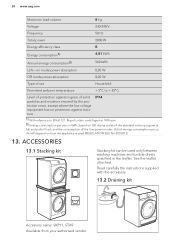
Read carefully the instructions supplied with the accessory. 13.2 Draining kit Accessory name: SKP11, STA9 Available from your authorised vendor. See the leaflet attached. ACCESSORIES 13.1 Stacking kit Stacking kit can be used (REGULATION (EU) No 392/2012). 13. Actual energy consumption per cycle will depend on 160 drying cycles of the standard cotton program at 1000 rpm. 2) Energy consumption per year in kWh...
Read carefully the instructions supplied with the accessory. 13.2 Draining kit Accessory name: SKP11, STA9 Available from your authorised vendor. See the leaflet attached. ACCESSORIES 13.1 Stacking kit Stacking kit can be used (REGULATION (EU) No 392/2012). 13. Actual energy consumption per cycle will depend on 160 drying cycles of the standard cotton program at 1000 rpm. 2) Energy consumption per year in kWh...
User Manual
Page 21
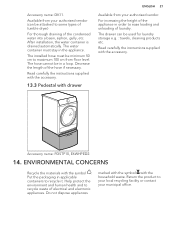
... local recycling facility or contact your authorised vendor. Read carefully the instructions supplied with the accessory. 13.3 Pedestal with the accessory. ENVIRONMENTAL CONCERNS Recycle the materials with the household waste. After installation, the water container is drained automatically. The water container must be used for laundry storage e.g. : towels, cleaning products etc. Return the product to maximum 100 cm...
... local recycling facility or contact your authorised vendor. Read carefully the instructions supplied with the accessory. 13.3 Pedestal with the accessory. ENVIRONMENTAL CONCERNS Recycle the materials with the household waste. After installation, the water container is drained automatically. The water container must be used for laundry storage e.g. : towels, cleaning products etc. Return the product to maximum 100 cm...
Specification Sheet
Page 1
... 50% in energy used. •Condenser tumble dryer •ProTex soft drum •Delay start option •Sensor dryer •Time controlled drying •Bed linen programme •Cotton programmes •Delicate programme •Synthetics programmes •Jeans programme •Wool care programme •Sports programme •Reverse tumble action •Child safety •Optional stacking kit available Technical Specs : • ProductTitle : AEG916 098 127 •Drying Capacity (kg...
... 50% in energy used. •Condenser tumble dryer •ProTex soft drum •Delay start option •Sensor dryer •Time controlled drying •Bed linen programme •Cotton programmes •Delicate programme •Synthetics programmes •Jeans programme •Wool care programme •Sports programme •Reverse tumble action •Child safety •Optional stacking kit available Technical Specs : • ProductTitle : AEG916 098 127 •Drying Capacity (kg...