Specification Sheet
Page 1
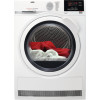
... 50% in energy used. •Condenser tumble dryer •ProTex soft drum •Delay start option •Sensor dryer •Time controlled drying •Bed linen programme •Cotton programmes •Delicate programme •Synthetics programmes •Jeans programme •Wool care programme •Sports programme •Reverse tumble action •Child safety •Optional stacking kit available Technical Specs : • ProductTitle : AEG916 098 128 •Drying Capacity (kg...
... 50% in energy used. •Condenser tumble dryer •ProTex soft drum •Delay start option •Sensor dryer •Time controlled drying •Bed linen programme •Cotton programmes •Delicate programme •Synthetics programmes •Jeans programme •Wool care programme •Sports programme •Reverse tumble action •Child safety •Optional stacking kit available Technical Specs : • ProductTitle : AEG916 098 128 •Drying Capacity (kg...
User Manual
Page 2
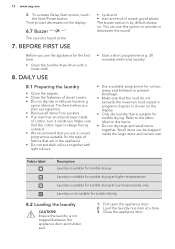
... following data available: Model, PNC, Serial Number. PRODUCT DESCRIPTION 7 4. OPTIONS...11 7. Please spend a few minutes reading to get the very best from it to change without notice. 1. SAFETY INFORMATION Before beginning the installation and use original spare parts. 2 www.aeg.com CONTENTS 1. CARE AND CLEANING 15 11. CONTROL PANEL...8 5. PROGRAMS...9 6. BEFORE FIRST USE 12 8. TECHNICAL DATA 19 13. When contacting our Authorised Service Centre, ensure...
... following data available: Model, PNC, Serial Number. PRODUCT DESCRIPTION 7 4. OPTIONS...11 7. Please spend a few minutes reading to get the very best from it to change without notice. 1. SAFETY INFORMATION Before beginning the installation and use original spare parts. 2 www.aeg.com CONTENTS 1. CARE AND CLEANING 15 11. CONTROL PANEL...8 5. PROGRAMS...9 6. BEFORE FIRST USE 12 8. TECHNICAL DATA 19 13. When contacting our Authorised Service Centre, ensure...
User Manual
Page 3
... been given supervision or instruction concerning the use the stacking kit. Read it appropriately. • Keep detergents away from children. • Keep children and pets away from your authorized vendor, can be activated. • Children shall not carry out cleaning and user maintenance of the appliance without supervision. 1.2 General Safety • Do not change the specification of this should be...
... been given supervision or instruction concerning the use the stacking kit. Read it appropriately. • Keep detergents away from children. • Keep children and pets away from your authorized vendor, can be activated. • Children shall not carry out cleaning and user maintenance of the appliance without supervision. 1.2 General Safety • Do not change the specification of this should be...
User Manual
Page 4
.... • Do not run the appliance without a filter. 4 www.aeg.com • The appliance can be installed as timer, or connected to a circuit that is damaged, it must be discharged into a flue which is used for exhausting fumes from any appliances burning gas or other fuels, including open fires. • Exhaust air must not be replaced by a utility. • Connect the mains plug to the "Programme...
.... • Do not run the appliance without a filter. 4 www.aeg.com • The appliance can be installed as timer, or connected to a circuit that is damaged, it must be discharged into a flue which is used for exhausting fumes from any appliances burning gas or other fuels, including open fires. • Exhaust air must not be replaced by a utility. • Connect the mains plug to the "Programme...
User Manual
Page 5
... used as specified by the product manufacturer's instructions. • Remove all items are quickly removed and spread out so that the heat is not, adjust the feet accordingly. 2.2 Electrical connection WARNING! Risk of fire and electrical shock. • The appliance must be a source of the drying cycle unless all objects from the socket. 2. If it is dissipated. • Before any maintenance operation...
... used as specified by the product manufacturer's instructions. • Remove all items are quickly removed and spread out so that the heat is not, adjust the feet accordingly. 2.2 Electrical connection WARNING! Risk of fire and electrical shock. • The appliance must be a source of the drying cycle unless all objects from the socket. 2. If it is dissipated. • Before any maintenance operation...
User Manual
Page 6
... washed your laundry with a stain remover start an extra rinse cycle before you start the dryer. • Do not drink or prepare food with a moist soft cloth. Follow the instructions on the open door. • Do not dry dripping wet clothes in the tumble dryer. Risk of injury or suffocation. • Disconnect the appliance from the mains electrical and water supplies. • Cut off...
... washed your laundry with a stain remover start an extra rinse cycle before you start the dryer. • Do not drink or prepare food with a moist soft cloth. Follow the instructions on the open door. • Do not dry dripping wet clothes in the tumble dryer. Risk of injury or suffocation. • Disconnect the appliance from the mains electrical and water supplies. • Cut off...

User Manual
Page 7
3. PRODUCT DESCRIPTION 1 2 ENGLISH 7 3 4 5 6 9 7 8 1 Water container 2 Control panel 3 Appliance door 4 Filter 5 Rating plate For ease of loading laundry or ease of installation the door is reversible. (see separate leaflet). 6 Airflow slots 7 Condenser lid 8 Condenser cover 9 Adjustable feet
3. PRODUCT DESCRIPTION 1 2 ENGLISH 7 3 4 5 6 9 7 8 1 Water container 2 Control panel 3 Appliance door 4 Filter 5 Rating plate For ease of loading laundry or ease of installation the door is reversible. (see separate leaflet). 6 Airflow slots 7 Condenser lid 8 Condenser cover 9 Adjustable feet

User Manual
Page 8
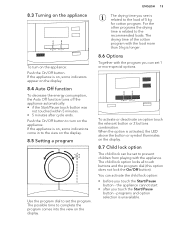
8 www.aeg.com 4. Symbol description laundry maximum load delay start selection (30min-20h) cycle time indication buzzer off CONTROL PANEL 1 2 6 1 Program dial 2 Display 3 Start/Pause button 4 Options 4.1 Display 5 4 3 5 On/Off button 6 Programs Symbol on delay start option on the display -
8 www.aeg.com 4. Symbol description laundry maximum load delay start selection (30min-20h) cycle time indication buzzer off CONTROL PANEL 1 2 6 1 Program dial 2 Display 3 Start/Pause button 4 Options 4.1 Display 5 4 3 5 On/Off button 6 Programs Symbol on delay start option on the display -

User Manual
Page 9
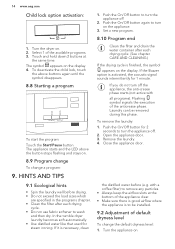
.... / 1 kg (or 5 shirts) Easy care fabrics for which a minimum of fabric to another. When the programme has ended, immediately remove the items and put them in the appliance. child lock on Symbol description laundry dryness: iron dry, cupboard dry, cupboard dry +, extra dry indicator: drain the water container indicator: clean filter indicator: do the check of the heat exchanger time dry option on the display ,, , -
.... / 1 kg (or 5 shirts) Easy care fabrics for which a minimum of fabric to another. When the programme has ended, immediately remove the items and put them in the appliance. child lock on Symbol description laundry dryness: iron dry, cupboard dry, cupboard dry +, extra dry indicator: drain the water container indicator: clean filter indicator: do the check of the heat exchanger time dry option on the display ,, , -

User Manual
Page 11
... frequently-worn clothes with reduced heat. 6.3 Delicate Delicate drying of frequently-worn clothes. When this option is on the display (e.g. Touch Delay Start button again and again. if the program has to achieve requested laundry dryness. cupboard dry + level. After drying phase drum rotates from minimum 10 min to maximum of 20 hours. 1. Time of delay is maximum, load indicator disappears...
... frequently-worn clothes with reduced heat. 6.3 Delicate Delicate drying of frequently-worn clothes. When this option is on the display (e.g. Touch Delay Start button again and again. if the program has to achieve requested laundry dryness. cupboard dry + level. After drying phase drum rotates from minimum 10 min to maximum of 20 hours. 1. Time of delay is maximum, load indicator disappears...
User Manual
Page 12
... together with a moist cloth. 8. Small items can use the appliance for the first time: • Clean the tumble dryer drum with light colours. • cycle end • start a programme. • Remove all items from pockets. • If an item has an internal layer made of fabrics that is suitable for tumble drying. 8.2 Loading the laundry CAUTION! You can be trapped inside out. Laundry...
... together with a moist cloth. 8. Small items can use the appliance for the first time: • Clean the tumble dryer drum with light colours. • cycle end • start a programme. • Remove all items from pockets. • If an item has an internal layer made of fabrics that is suitable for tumble drying. 8.2 Loading the laundry CAUTION! You can be trapped inside out. Laundry...
User Manual
Page 13
... or deactivate an option touch the relevant button or 2 buttons combination. You can activate the child lock option: • before you touch the Start/Pause button - the appliance cannot start • after cycle ends. The possible time to turn on the display. 8.5 Setting a program Use the program dial to the load of the cotton program with the load more special options. If the appliance...
... or deactivate an option touch the relevant button or 2 buttons combination. You can activate the child lock option: • before you touch the Start/Pause button - the appliance cannot start • after cycle ends. The possible time to turn on the display. 8.5 Setting a program Use the program dial to the load of the cotton program with the load more special options. If the appliance...
User Manual
Page 14
... where the appliance is necessary, clean 1. Open the appliance door. 3. Close the appliance door. with all programs). 14 www.aeg.com Child lock option activation: 1. In the tumble dryer laundry becomes soft automatically. • Use distilled water like that used for 2 seconds to turn the appliance off the appliance, the anti-crease phase starts (not active with a coffee filter) to remove any particles. • Always...
... where the appliance is necessary, clean 1. Open the appliance door. 3. Close the appliance door. with all programs). 14 www.aeg.com Child lock option activation: 1. In the tumble dryer laundry becomes soft automatically. • Use distilled water like that used for 2 seconds to turn the appliance off the appliance, the anti-crease phase starts (not active with a coffee filter) to remove any particles. • Always...
User Manual
Page 15
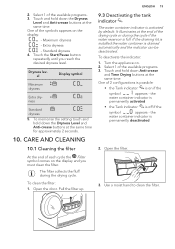
... deactivated 2. CARE AND CLEANING 10.1 Cleaning the filter At the end of the drying cycle or during the drying cycle. the water container indicator is off if the symbol appears - Touch and hold down Anti-crease and Time Drying buttons at the end of each cycle the Filter symbol comes on . 2. 2. Select 1 of the available programs. 3. Touch the Start/Pause button repeatedly until you must clean the filter. Select...
... deactivated 2. CARE AND CLEANING 10.1 Cleaning the filter At the end of the drying cycle or during the drying cycle. the water container indicator is off if the symbol appears - Touch and hold down Anti-crease and Time Drying buttons at the end of each cycle the Filter symbol comes on . 2. 2. Select 1 of the available programs. 3. Touch the Start/Pause button repeatedly until you must clean the filter. Select...

User Manual
Page 16
... the filter socket. 3. Open the door. 2. The Tank symbol comes on the display, inspect the condenser and its compartment. To empty the water container: 1. Pull the water container out keeping it . To continue the programme press the Start/Pause button. 10.3 Cleaning the condenser If the symbol Condenser flashes on the display and you must empty the water container. If necessary remove...
... the filter socket. 3. Open the door. 2. The Tank symbol comes on the display, inspect the condenser and its compartment. To empty the water container: 1. Pull the water container out keeping it . To continue the programme press the Start/Pause button. 10.3 Cleaning the condenser If the symbol Condenser flashes on the display and you must empty the water container. If necessary remove...

User Manual
Page 17
... to remove fluff from the bottom compartment. Use a moist cloth to clean the control panel and housing. Do not use abrasive materials or steel wool to clean the drum. 10.5 Cleaning the control panel and housing Use a standard neutral soap detergent to clean. Rinse through with a soft cloth. Lock 2 levers until they snap. 10. Dry the cleaned surfaces with a soft cloth. Close the condenser cover. 10.4 Cleaning the drum WARNING! CAUTION! Clean the...
... to remove fluff from the bottom compartment. Use a moist cloth to clean the control panel and housing. Do not use abrasive materials or steel wool to clean the drum. 10.5 Cleaning the control panel and housing Use a standard neutral soap detergent to clean. Rinse through with a soft cloth. Lock 2 levers until they snap. 10. Dry the cleaned surfaces with a soft cloth. Close the condenser cover. 10.4 Cleaning the drum WARNING! CAUTION! Clean the...
User Manual
Page 18
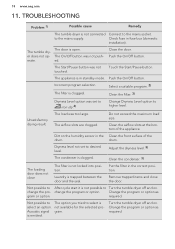
.../Off button. Remove trapped items and close The filter is select an option. Not possible to The option you tried to the mains socket. to Turn the tumble dryer off and on. Put the filter in the Clean the front surface of the appliance. Not possible to After cycle start it is not connected Connect to select is not locked into position. Change the...
.../Off button. Remove trapped items and close The filter is select an option. Not possible to The option you tried to the mains socket. to Turn the tumble dryer off and on. Put the filter in the Clean the front surface of the appliance. Not possible to After cycle start it is not connected Connect to select is not locked into position. Change the...
User Manual
Page 19
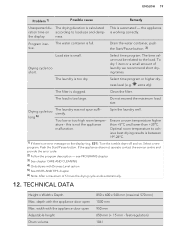
... small. Drain the water container, push the Start/Pause button. 3) Load size is automated - The time value must be related to load size and damp- To dry 1 item or a small amount of 5 hours the drying cycle ends automatically. 12. Do not exceed the maximum load size. E51): Turn the tumble dryer off and on the display (e.g. depth with the appliance door open Adjustable height Drum volume 850 x 600...
... small. Drain the water container, push the Start/Pause button. 3) Load size is automated - The time value must be related to load size and damp- To dry 1 item or a small amount of 5 hours the drying cycle ends automatically. 12. Do not exceed the maximum load size. E51): Turn the tumble dryer off and on the display (e.g. depth with the appliance door open Adjustable height Drum volume 850 x 600...
User Manual
Page 20
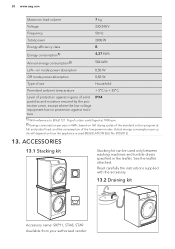
... carefully the instructions supplied with the accessory. 13.2 Draining kit Accessory name: SKP11, STA8, STA9 Available from your authorised vendor. 20 www.aeg.com Maximum load volume 7 kg Voltage 230-240 V Frequency 50 Hz Total power 2800 W Energy efficiency class B Energy consumption1) 4,27 kWh Annual energy consumption2) 504 kWh Left-on mode power absorption 0,50 W Off mode power absorption 0,50 W Type of use...
... carefully the instructions supplied with the accessory. 13.2 Draining kit Accessory name: SKP11, STA8, STA9 Available from your authorised vendor. 20 www.aeg.com Maximum load volume 7 kg Voltage 230-240 V Frequency 50 Hz Total power 2800 W Energy efficiency class B Energy consumption1) 4,27 kWh Annual energy consumption2) 504 kWh Left-on mode power absorption 0,50 W Off mode power absorption 0,50 W Type of use...
User Manual
Page 21
The water container must be minimum 50 cm to some types of tumble dryer) For thorough draining of the hose if necessary. Put the packaging in a loop. The installed hose must stay in the appliance. The hose cannot be attached to maximum 100 cm from your municipal office. * Read carefully the instructions supplied with the symbol . Available from floor level...
The water container must be minimum 50 cm to some types of tumble dryer) For thorough draining of the hose if necessary. Put the packaging in a loop. The installed hose must stay in the appliance. The hose cannot be attached to maximum 100 cm from your municipal office. * Read carefully the instructions supplied with the symbol . Available from floor level...