
Product Manual
Page 2
Return the product to change without notice. User manuals - Products - Service information www.aeg.com LEGEND Warning - General information and tips Environmental information Subject to your local recycling facility or contact your municipal office. 2 www.aeg.com CONTENTS 4 SAFETY INFORMATION 6 PRODUCT DESCRIPTION 7 ACCESSORIES 8 CONTROL PANEL 9 BEFORE FIRST USE 9 PROGRAMMES 10 USING THE APPLIANCE 13 HINTS AND TIPS 14 CARE AND CLEANING 19 TROUBLESHOOTING 21 TECHNICAL INFORMATION 22 INSTALLATION ENVIRONMENT...
Return the product to change without notice. User manuals - Products - Service information www.aeg.com LEGEND Warning - General information and tips Environmental information Subject to your local recycling facility or contact your municipal office. 2 www.aeg.com CONTENTS 4 SAFETY INFORMATION 6 PRODUCT DESCRIPTION 7 ACCESSORIES 8 CONTROL PANEL 9 BEFORE FIRST USE 9 PROGRAMMES 10 USING THE APPLIANCE 13 HINTS AND TIPS 14 CARE AND CLEANING 19 TROUBLESHOOTING 21 TECHNICAL INFORMATION 22 INSTALLATION ENVIRONMENT...

Product Manual
Page 3
... find everything you 'll find on the rating plate. Visit the webshop at: www.aeg.com/shop CUSTOMER CARE AND SERVICE We recommend the use of accessories designed and built to the high quality standards you would expect, from specialist cookware to cutlery baskets, from it to delicate laundry bags... When contacting Service, ensure that help make life simpler...
... find everything you 'll find on the rating plate. Visit the webshop at: www.aeg.com/shop CUSTOMER CARE AND SERVICE We recommend the use of accessories designed and built to the high quality standards you would expect, from specialist cookware to cutlery baskets, from it to delicate laundry bags... When contacting Service, ensure that help make life simpler...
Product Manual
Page 4
... to alter the specifications or attempt to modify this , please check into the drum before using the appliance are loaded into the machine. • Items such as cooking oil acetone, petrol, kerosene, spot removers, turpentine, waxes and wax removers should you must not be placed into appliance • The condensed water is not intended for use , cleaning and maintenance. • Under no...
... to alter the specifications or attempt to modify this , please check into the drum before using the appliance are loaded into the machine. • Items such as cooking oil acetone, petrol, kerosene, spot removers, turpentine, waxes and wax removers should you must not be placed into appliance • The condensed water is not intended for use , cleaning and maintenance. • Under no...
Product Manual
Page 5
... is installed on the carpet or equivalent, adjust the feet. See relevant section in the user manual. • Each electrical work necessary to ensure that they do not recognise the hazards associated with volatile petroleum products should be closed in the appliance. Follow the instructions on top of clothing label. • Do not dry not washed items in the tumble dryer...
... is installed on the carpet or equivalent, adjust the feet. See relevant section in the user manual. • Each electrical work necessary to ensure that they do not recognise the hazards associated with volatile petroleum products should be closed in the appliance. Follow the instructions on top of clothing label. • Do not dry not washed items in the tumble dryer...
Product Manual
Page 7
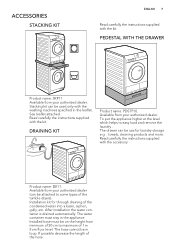
PEDESTAL WITH THE DRAWER Product name: SKP11 Available from your authorized dealer (can be attached to some types of the tumble dryers) Installation kit for laundry storage e.g. : towels, cleaning products and more. Read carefully the instructions supplied with the kit. The hose cannot be on the height from floor level. ACCESSORIES STACKING KIT ENGLISH 7 Read carefully the instructions supplied with the kit. DRAINING KIT Product name: PDSTP10. Product name: DK11. Installed hose must stay in loop. To...
PEDESTAL WITH THE DRAWER Product name: SKP11 Available from your authorized dealer (can be attached to some types of the tumble dryers) Installation kit for laundry storage e.g. : towels, cleaning products and more. Read carefully the instructions supplied with the kit. The hose cannot be on the height from floor level. ACCESSORIES STACKING KIT ENGLISH 7 Read carefully the instructions supplied with the kit. DRAINING KIT Product name: PDSTP10. Product name: DK11. Installed hose must stay in loop. To...

Product Manual
Page 8
8 www.aeg.com CONTROL PANEL 12 3456 7 1 The programme dial 2 The On/Off push button 3 The Delicate push button 4 The Buzzer push button 5 The Anticrease push button 6 The Delay Start push button 7 The display 8 The Start/Pause push button 9 The indication lamps: drain the water container, clean the filter, clean the condenser 89
8 www.aeg.com CONTROL PANEL 12 3456 7 1 The programme dial 2 The On/Off push button 3 The Delicate push button 4 The Buzzer push button 5 The Anticrease push button 6 The Delay Start push button 7 The display 8 The Start/Pause push button 9 The indication lamps: drain the water container, clean the filter, clean the condenser 89
Product Manual
Page 10
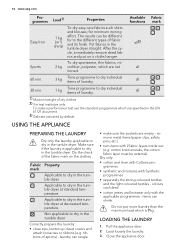
... the cycle, immediately remove dried fabrics and put more laundry than the maximum load which are empty - Load loosely the laundry. 3. Fabric Property mark Applicable to dry in the tumble dryer Applicable to dry in the tumble dryer at standard temperature Applicable to dry in the tumble dryer. Do the check of aprons) - remove metal items (paper clips, safety pins, etc.). • turn items with...
... the cycle, immediately remove dried fabrics and put more laundry than the maximum load which are empty - Load loosely the laundry. 3. Fabric Property mark Applicable to dry in the tumble dryer Applicable to dry in the tumble dryer at standard temperature Applicable to dry in the tumble dryer. Do the check of aprons) - remove metal items (paper clips, safety pins, etc.). • turn items with...

Product Manual
Page 11
... the display. Set the drying programme and functions. 2. Do not lock the laundry in to 90 minutes. Programme operates with the programme you see is related to delay the start function, push the Start/Pause button. The possible time to complete the programme come in between the appliance door and rubber seal. The time to set 1 or more lightly the sensitive and temperature sensitive textiles (e.g. acrylic, viscose). Use...
... the display. Set the drying programme and functions. 2. Do not lock the laundry in to 90 minutes. Programme operates with the programme you see is related to delay the start function, push the Start/Pause button. The possible time to complete the programme come in between the appliance door and rubber seal. The time to set 1 or more lightly the sensitive and temperature sensitive textiles (e.g. acrylic, viscose). Use...

Product Manual
Page 12
... Stop and then set to prevent the children to deactivate the appliance. 2. Open the appliance door. 3. The child lock function locks all the push buttons and the programme dial are deactivated AT THE END OF PROGRAMME When the drying cycle is on the display. Push the On/Off button for one minute. 12 www.aeg.com STARTING A PROGRAMME • clean the filter • drain the water...
... Stop and then set to prevent the children to deactivate the appliance. 2. Open the appliance door. 3. The child lock function locks all the push buttons and the programme dial are deactivated AT THE END OF PROGRAMME When the drying cycle is on the display. Push the On/Off button for one minute. 12 www.aeg.com STARTING A PROGRAMME • clean the filter • drain the water...

Product Manual
Page 13
... effect on the water conductivity and the operation of the water conductivity you see the correct setting: - If you know the value of the conductivity sensor in the appliance installation position. • Clean the filter after each drying cycle. • Spin good the laundry before (e.g. Push the Start Pause button again and again until one of the appliance clear. • Use the load volumes specified...
... effect on the water conductivity and the operation of the water conductivity you see the correct setting: - If you know the value of the conductivity sensor in the appliance installation position. • Clean the filter after each drying cycle. • Spin good the laundry before (e.g. Push the Start Pause button again and again until one of the appliance clear. • Use the load volumes specified...
Product Manual
Page 14
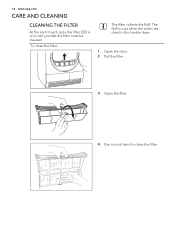
To clean the filter: The filter collects the fluff. Open the door. 2. The fluff occurs while the cloths are dried in the tumble dryer. 1. Open the filter. 4. Use a moist hand to tell you that the filter must be cleaned. Pull the filter. 3. 14 www.aeg.com CARE AND CLEANING CLEANING THE FILTER At the end of each cycle the filter LED is on to clean the filter.
To clean the filter: The filter collects the fluff. Open the door. 2. The fluff occurs while the cloths are dried in the tumble dryer. 1. Open the filter. 4. Use a moist hand to tell you that the filter must be cleaned. Pull the filter. 3. 14 www.aeg.com CARE AND CLEANING CLEANING THE FILTER At the end of each cycle the filter LED is on to clean the filter.
Product Manual
Page 15
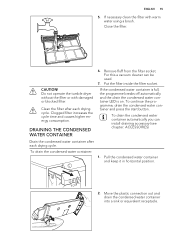
CAUTION! Do not operate the tumble dryer without the filter or with warm water using a brush. To continue the programme, drain the condensed water container and press the start button. Clean the filter after each drying cycle. To drain the condensed water container: 1. Remove fluff from the filter socket. Put the filter inside the filter socket. DRAINING THE CONDENSED WATER CONTAINER If the condensed water container is full, the programme breaks off...
CAUTION! Do not operate the tumble dryer without the filter or with warm water using a brush. To continue the programme, drain the condensed water container and press the start button. Clean the filter after each drying cycle. To drain the condensed water container: 1. Remove fluff from the filter socket. Put the filter inside the filter socket. DRAINING THE CONDENSED WATER CONTAINER If the condensed water container is full, the programme breaks off...

Product Manual
Page 16
... release button on , the condenser must be used as distilled water, e.g. If necessary filter the condensed water (e.g. Turn the 2 blockages to remove possible residue and small pieces of fluff. The condensed water can be cleaned. The condensed water is on the bottom of poisoning. for steam ironing. To clean the condenser: 1. Move plastic connection in and install water container. 16 www.aeg.com WARNING! Open the loading door...
... release button on , the condenser must be used as distilled water, e.g. If necessary filter the condensed water (e.g. Turn the 2 blockages to remove possible residue and small pieces of fluff. The condensed water can be cleaned. The condensed water is on the bottom of poisoning. for steam ironing. To clean the condenser: 1. Move plastic connection in and install water container. 16 www.aeg.com WARNING! Open the loading door...

Product Manual
Page 17
... position over a basin or paddling. Clean the condenser filter. This could cause leaks. Do not operate the tumble dryer without the condenser. 8. CLEANING THE DRUM WARNING! This also increases energy consumption. Do not use sharp objects to clean the inner surface of the drum and drum ribs. Use a standard neutral soap detergent to clean the condenser. Move condenser horizontally to the tumble dryer. Rinse through with a hand shower...
... position over a basin or paddling. Clean the condenser filter. This could cause leaks. Do not operate the tumble dryer without the condenser. 8. CLEANING THE DRUM WARNING! This also increases energy consumption. Do not use sharp objects to clean the inner surface of the drum and drum ribs. Use a standard neutral soap detergent to clean the condenser. Move condenser horizontally to the tumble dryer. Rinse through with a hand shower...

Product Manual
Page 18
Dry the cleaned surfaces with a soft cloth. Do not use abrasive materials or steel wool to clean the appliance. Do not use furniture cleaning agents or cleaning agents which can cause corrosion to clean the drum. Use a moist cloth to clean the control panel and housing. CAUTION! CLEANING THE CONTROL PANEL AND HOUSING Use a standard neutral soap detergent to clean. 18 www.aeg.com CAUTION!
Dry the cleaned surfaces with a soft cloth. Do not use abrasive materials or steel wool to clean the appliance. Do not use furniture cleaning agents or cleaning agents which can cause corrosion to clean the drum. Use a moist cloth to clean the control panel and housing. CAUTION! CLEANING THE CONTROL PANEL AND HOUSING Use a standard neutral soap detergent to clean. 18 www.aeg.com CAUTION!
Product Manual
Page 19
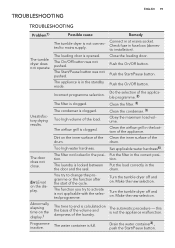
... display.) The time to activate is not applicable with the selected programme. Turn the tumble dryer off and on the inner surface of the Clean the inner surface of the drum. The water container is opened. Drain the water container3) , push the Start/Pause button. Connect in the correct position. Close the loading door. The appliance is clogged. ble programme. 2) The filter is in the standby mode...
... display.) The time to activate is not applicable with the selected programme. Turn the tumble dryer off and on the inner surface of the Clean the inner surface of the drum. The water container is opened. Drain the water container3) , push the Start/Pause button. Connect in the correct position. Close the loading door. The appliance is clogged. ble programme. 2) The filter is in the standby mode...
Product Manual
Page 20
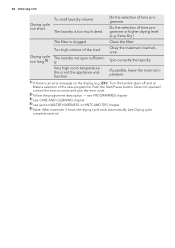
... temperature this is clogged. Push the Start/Pause button. Extra Dry ) The filter is not the appliance malfunction. E51): Turn the tumble dryer off and on the display (e.g. contact the service centre and give the error code. 2) follow the programme description - Too high volume of the new programme. Make a selection of the load. Does not operate? Do the selection of time programme. Spin correctly the laundry. Drying cycle...
... temperature this is clogged. Push the Start/Pause button. Extra Dry ) The filter is not the appliance malfunction. E51): Turn the tumble dryer off and on the display (e.g. contact the service centre and give the error code. 2) follow the programme description - Too high volume of the new programme. Make a selection of the load. Does not operate? Do the selection of time programme. Spin correctly the laundry. Drying cycle...

Product Manual
Page 21
... 118 l maximum depth with the load door opened 950 mm adjustable height 850 mm (+ 15 mm - feet regulation) the appliance weight 41 kg maximum load volume 7 kg voltage 230-240 V frequency 50 Hz necessary fuse 13 A total power 2800 W energy efficiency class B energy consumption kWh/cycle 1) 3,92 kWh annual energy consumption2) 284,1 kWh type of synthetic laundry with the load door opened 1090 mm maximum width with...
... 118 l maximum depth with the load door opened 950 mm adjustable height 850 mm (+ 15 mm - feet regulation) the appliance weight 41 kg maximum load volume 7 kg voltage 230-240 V frequency 50 Hz necessary fuse 13 A total power 2800 W energy efficiency class B energy consumption kWh/cycle 1) 3,92 kWh annual energy consumption2) 284,1 kWh type of synthetic laundry with the load door opened 1090 mm maximum width with...

Product Manual
Page 22
... are not blocked . • To keep vibration and noise at the minimum, when the tumble dryer operates, it is not resistant to high temperatures. • When the tumble dryer operates, the room temperature must be removed. Make sure that the front airflow slots in the bottom of a spirit level. Before use all parts of the tumble dryer is possible to move the appliance, it...
... are not blocked . • To keep vibration and noise at the minimum, when the tumble dryer operates, it is not resistant to high temperatures. • When the tumble dryer operates, the room temperature must be removed. Make sure that the front airflow slots in the bottom of a spirit level. Before use all parts of the tumble dryer is possible to move the appliance, it...

Product Manual
Page 23
... 600 mm C THE LOAD DOOR REVERSAL The load door can help to easily put and remove the laundry or if there is to install a double-pole isolating switch directly on the rating plate and in the "TECHNICAL INFORMATION" chapter. There is behind the appliance. • Do not pull the mains cable to disconnect the appliance. The blue coloured wire must not break...
... 600 mm C THE LOAD DOOR REVERSAL The load door can help to easily put and remove the laundry or if there is to install a double-pole isolating switch directly on the rating plate and in the "TECHNICAL INFORMATION" chapter. There is behind the appliance. • Do not pull the mains cable to disconnect the appliance. The blue coloured wire must not break...


