Product Manual
Page 2
... new appliance. Contents Operating Instructions 3 Important safety information 3 Environment 5 Product description 6 Control panel 7 Control panel 7 Display 7 Before first use 8 Sorting and preparing laundry 8 Programme overview 9 Daily use 10 Switching machine on / switching light on 10 Opening loading door / loading laundry 10 Selecting the programme 11 DELICATE function 11 LONG ANTI-CREASE function 11 BUZZER function 11 TIME function 12 DELAY START function 12 CHILD LOCK function 13 Starting the programme 13 Changing programme 13 Putting in...
... new appliance. Contents Operating Instructions 3 Important safety information 3 Environment 5 Product description 6 Control panel 7 Control panel 7 Display 7 Before first use 8 Sorting and preparing laundry 8 Programme overview 9 Daily use 10 Switching machine on / switching light on 10 Opening loading door / loading laundry 10 Selecting the programme 11 DELICATE function 11 LONG ANTI-CREASE function 11 BUZZER function 11 TIME function 12 DELAY START function 12 CHILD LOCK function 13 Starting the programme 13 Changing programme 13 Putting in...
Product Manual
Page 3
... detergent before loading your tumble dryer. General safety • It is dangerous to alter the specifications or attempt to modify this user manual carefully, including its operation and safety features. To avoid this, please check into the drum before installing and first using the appliance, read this product in any other hard, sharp material can cause extensive damage and must execute an extra rinse cycle...
... detergent before loading your tumble dryer. General safety • It is dangerous to alter the specifications or attempt to modify this user manual carefully, including its operation and safety features. To avoid this, please check into the drum before installing and first using the appliance, read this product in any other hard, sharp material can cause extensive damage and must execute an extra rinse cycle...

Product Manual
Page 4
... competent person. • Care must be removed before placing in the user manual. • Any electrical work required to . Installation • This appliance is dissipated. If in doubt, do not use it was designed. • Only wash fabrics which have been in contact with jets of water. • The final part of a tumble dryer cycle occurs without heat ( cool down cycle ) to ensure that the...
... competent person. • Care must be removed before placing in the user manual. • Any electrical work required to . Installation • This appliance is dissipated. If in doubt, do not use it was designed. • Only wash fabrics which have been in contact with jets of water. • The final part of a tumble dryer cycle occurs without heat ( cool down cycle ) to ensure that the...
Product Manual
Page 5
... drum light) Child safety • This machine is disposed of children's reach. • Keep all detergents in washing machine. Use the loading volumes specified in the installation room; - Clean the micro-fine filter and fine strainer after each drying cycle; - By ensuring this product. Environmental tips • In the dryer, laundry becomes fluffy and soft. Ensure you will function most economically if you purchased the product. Energy...
... drum light) Child safety • This machine is disposed of children's reach. • Keep all detergents in washing machine. Use the loading volumes specified in the installation room; - Clean the micro-fine filter and fine strainer after each drying cycle; - By ensuring this product. Environmental tips • In the dryer, laundry becomes fluffy and soft. Ensure you will function most economically if you purchased the product. Energy...
Product Manual
Page 8
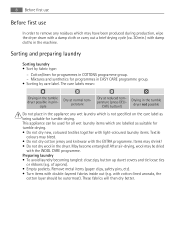
... programme. 8 Before first use Before first use In order to remove any wet laundry which may shrink! • Do not dry wool in the machine. Items may have been produced during production, wipe the dryer drum with a damp cloth or carry out a brief drying cycle (ca. 30 min.) with damp cloths in the dryer. CATE button!) Drying in the tumble dryer not possible Do...
... programme. 8 Before first use Before first use In order to remove any wet laundry which may shrink! • Do not dry wool in the machine. Items may have been produced during production, wipe the dryer drum with a damp cloth or carry out a brief drying cycle (ca. 30 min.) with damp cloths in the dryer. CATE button!) Drying in the tumble dryer not possible Do...
Product Manual
Page 10
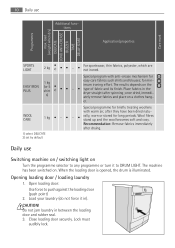
...; type of fabric and its finish. Load your laundry (do not force it to push against the loading door (push point) 2. Do not jam laundry in ). When the loading door is opened, the drum is illuminated. Special program with warm air, after spinning; The results depends on a clothes hang- The machine has been switched on. Lock must audibly lock. load (weight when dry) DELICATE LONG ANTI-CREASE BUZZER TIME DELAY START Care...
...; type of fabric and its finish. Load your laundry (do not force it to push against the loading door (push point) 2. Do not jam laundry in ). When the loading door is opened, the drum is illuminated. Special program with warm air, after spinning; The results depends on a clothes hang- The machine has been switched on. Lock must audibly lock. load (weight when dry) DELICATE LONG ANTI-CREASE BUZZER TIME DELAY START Care...
Product Manual
Page 11
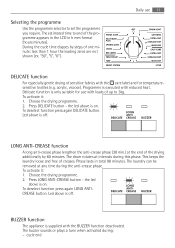
...drying of sensitive fabrics with the care label and for use with loads of up to 3kg. To deselect function press again DELICATE button. The laundry can be removed at the end of the drying additionally by steps of one minute; To deselect function press again LONG ANTICREASE button. Delicate function is...total 90 minutes. During the cycle time elapses by 60 minutes. less than 1 hour the leading zeros are not shown (ex. Choose the drying programme. 2. the led above is off . The drum rotates at intervals during : - This keeps the laundry loose and free of creases. the led ...
...drying of sensitive fabrics with the care label and for use with loads of up to 3kg. To deselect function press again DELICATE button. The laundry can be removed at the end of the drying additionally by steps of one minute; To deselect function press again LONG ANTICREASE button. Delicate function is...total 90 minutes. During the cycle time elapses by 60 minutes. less than 1 hour the leading zeros are not shown (ex. Choose the drying programme. 2. the led above is off . The drum rotates at intervals during : - This keeps the laundry loose and free of creases. the led ...

Product Manual
Page 13
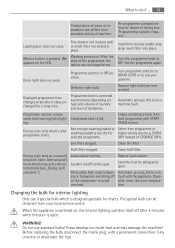
... is activated. Display shows elapsing cycle time or delay time if activated. Press the START PAUSE button to an end. CHILD LOCK function The child lock can no longer be changed . The child lock can become hot. The child safety device is set a new programme, you must audibly lock. 4. Changing programme To change the programme on . WARNING! Laundry and drum can be used - Risk of time remaining until the...
... is activated. Display shows elapsing cycle time or delay time if activated. Press the START PAUSE button to an end. CHILD LOCK function The child lock can no longer be changed . The child lock can become hot. The child safety device is set a new programme, you must audibly lock. 4. Changing programme To change the programme on . WARNING! Laundry and drum can be used - Risk of time remaining until the...

Product Manual
Page 14
...-fine filter. Turn the programme selector to remind you this phase. Care and cleaning Cleaning fluff filter The filters collect all the fluff which accumulates during the anti-crease phase. (The laundry should be cleaned after every drying cycle. The laundry can be removed at any time during drying. Remove laundry. 4. Drain the condensed water container (See chapter "Care and cleaning".) 5. Close the door. The warning led is complete, display shows a blinking " 0 ". Open loading door 2.
...-fine filter. Turn the programme selector to remind you this phase. Care and cleaning Cleaning fluff filter The filters collect all the fluff which accumulates during the anti-crease phase. (The laundry should be cleaned after every drying cycle. The laundry can be removed at any time during drying. Remove laundry. 4. Drain the condensed water container (See chapter "Care and cleaning".) 5. Close the door. The warning led is complete, display shows a blinking " 0 ". Open loading door 2.

Product Manual
Page 15
... or to detergent residue on laundry forms on the filters. Remove the filter from the two brackets. 8. Remove fluff from fine strainer. Re-insert fine strainer. 11. It can be checked regularly and cleaned of the large mesh filter into the brackets on large mesh filter. Remove fluff from the entire filter area. When this purpose. Push down unlock button on the loading door until it...
... or to detergent residue on laundry forms on the filters. Remove the filter from the two brackets. 8. Remove fluff from fine strainer. Re-insert fine strainer. 11. It can be checked regularly and cleaned of the large mesh filter into the brackets on large mesh filter. Remove fluff from the entire filter area. When this purpose. Push down unlock button on the loading door until it...

Product Manual
Page 16
... interrupted as it will go 2 . 1 2. However first filter the condensate (e.g. with a damp cloth immediately after every drying cycle. The condensate tank has a volume of fluff. Pour condensed water out into place and the loading door cannot be closed. This is not suitable for drinking or for steam ironing. Cleaning the door seal Wipe the door seal with a coffee filter) to continue the drying...
... interrupted as it will go 2 . 1 2. However first filter the condensate (e.g. with a damp cloth immediately after every drying cycle. The condensate tank has a volume of fluff. Pour condensed water out into place and the loading door cannot be closed. This is not suitable for drinking or for steam ironing. Cleaning the door seal Wipe the door seal with a coffee filter) to continue the drying...

Product Manual
Page 17
... the heat exchanger front chamber. Turn both lock washers outwards until they snap into place (turn both lock washers inwards. 5. Operating when the heat exchanger is blocked with fluff can damage the dryer. CAUTION! Care and cleaning 17 Cleaning heat exchanger If the warning led is lighting, the heat exchanger needs to clean. Close door in plinth. Do not use a brush or to rinse thoroughly with a damp cloth. 4.
... the heat exchanger front chamber. Turn both lock washers outwards until they snap into place (turn both lock washers inwards. 5. Operating when the heat exchanger is blocked with fluff can damage the dryer. CAUTION! Care and cleaning 17 Cleaning heat exchanger If the warning led is lighting, the heat exchanger needs to clean. Close door in plinth. Do not use a brush or to rinse thoroughly with a damp cloth. 4.
Product Manual
Page 18
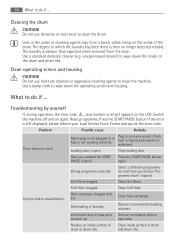
... START PAUSE button If the error is open. Check fuse in at mains socket. Overloading of drum drum or drum ribs. Residue on inside surface of Clean inside of the drum and drum ribs. Plug in fuse box (domestic installation). Loading door is still displayed, please inform your local Service Force Centre and quote the error code. Select a different programme the next time you pressed the START Press the START PAUSE button PAUSE button? Lint filters clogged. Clean fluff filter...
... START PAUSE button If the error is open. Check fuse in at mains socket. Overloading of drum drum or drum ribs. Residue on inside surface of Clean inside of the drum and drum ribs. Plug in fuse box (domestic installation). Loading door is still displayed, please inform your local Service Force Centre and quote the error code. Select a different programme the next time you pressed the START Press the START PAUSE button PAUSE button? Lint filters clogged. Clean fluff filter...
Product Manual
Page 19
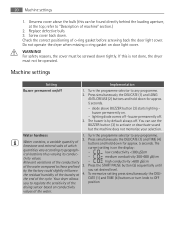
Re-programme standard setting for a long time. When a button is designed specially for dryers. Washing protection. Drum light does not work. Programme selector in place. Displayed programme time changes erratically or stays unchanged for degree of drying (see 'Programming options' chapter). Programme inactive, empty water tank warning led is full. Condensate tank is light- ing. Select time programme or higher drying level (e.g. Fluff filter clogged. Laundry insufficiently spun. The special...
Re-programme standard setting for a long time. When a button is designed specially for dryers. Washing protection. Drum light does not work. Programme selector in place. Displayed programme time changes erratically or stays unchanged for degree of drying (see 'Programming options' chapter). Programme inactive, empty water tank warning led is full. Condensate tank is light- ing. Select time programme or higher drying level (e.g. Fluff filter clogged. Laundry insufficiently spun. The special...
Product Manual
Page 20
... memorize setting press simultaneously the DELI- the end of o-ring gasket before screwing back the door light cover. Your dryer allows CATE (1) and TIME (4) buttons or turn knob to regulate the sensitivity of the position drying sensor based on conductivity values of the water compared to geographical locations thus varying its conductivity values. 2. Unscrew cover above BUZZER button (3) starts lighting buzzer permanently on the display...
... memorize setting press simultaneously the DELI- the end of o-ring gasket before screwing back the door light cover. Your dryer allows CATE (1) and TIME (4) buttons or turn knob to regulate the sensitivity of the position drying sensor based on conductivity values of the water compared to geographical locations thus varying its conductivity values. 2. Unscrew cover above BUZZER button (3) starts lighting buzzer permanently on the display...

Product Manual
Page 21
... cycle or during the cycle if the water container is on the display: - Turn the programme selector to + 35°C 1) Different loading volume data may deviate when the machine is switched on and always displayed at 1000 3,92 kWh rpm, COTTONS STORAGE DRY programme) Use Domestic Permissible ambient temperature + 5°C to any programme. Technical data This appliance conforms with the following EU Directives...
... cycle or during the cycle if the water container is on the display: - Turn the programme selector to + 35°C 1) Different loading volume data may deviate when the machine is switched on and always displayed at 1000 3,92 kWh rpm, COTTONS STORAGE DRY programme) Use Domestic Permissible ambient temperature + 5°C to any programme. Technical data This appliance conforms with the following EU Directives...
Product Manual
Page 22
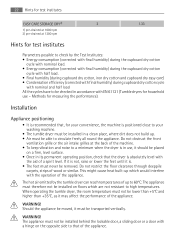
..., it should be installed on the opposite side to that the dryer is absolutely level with the aid of a spirit level. WARNING! The appliance must be removed. 22 Hints for test institutes EASY CARE STORAGE DRY2) 3 1.33 1) pre-drained at 1000 rpm 2) pre-drained at the back of the machine. • To keep vibration and noise to a minimum when the dryer is in use -
..., it should be installed on the opposite side to that the dryer is absolutely level with the aid of a spirit level. WARNING! The appliance must be removed. 22 Hints for test institutes EASY CARE STORAGE DRY2) 3 1.33 1) pre-drained at 1000 rpm 2) pre-drained at the back of the machine. • To keep vibration and noise to a minimum when the dryer is in use -

Product Manual
Page 23
... mains voltage, type of drum. 3. Remove foil hose and polystyrene padding from the rating plate. Should the appliance power supply cable need to change the fuse in accordance with the above safety precautions. The appliance is fitted near the loading aperture (see "Product description" chapter). In the event of the transport packaging must be taken from the machine. WARNING! Installation 23 Electrical connection Details...
... mains voltage, type of drum. 3. Remove foil hose and polystyrene padding from the rating plate. Should the appliance power supply cable need to change the fuse in accordance with the above safety precautions. The appliance is fitted near the loading aperture (see "Product description" chapter). In the event of the transport packaging must be taken from the machine. WARNING! Installation 23 Electrical connection Details...

Product Manual
Page 24
... carefully the instructions supplied with the following code: 4 1 Blue - Ensure that you install a double pole switch between the appliance and the electricity supply (mains), with a minimum gap of 3 mm between the switch contacts and of a type suitable for the required load in ac- Please contact your cost. nected to arrange the dryer and a washing machine (60 cm wide, front loaded) as a space-saving washer/dryer stack...
... carefully the instructions supplied with the following code: 4 1 Blue - Ensure that you install a double pole switch between the appliance and the electricity supply (mains), with a minimum gap of 3 mm between the switch contacts and of a type suitable for the required load in ac- Please contact your cost. nected to arrange the dryer and a washing machine (60 cm wide, front loaded) as a space-saving washer/dryer stack...

Product Manual
Page 25
... to store (e.g. Product number (PNC) - Type of the condensed water into a basin, siphon, gully, etc. If you write them in the machine. Serial number (S No.) (for direct draining of fault - laundry). The water reservoir then no longer has to remedy the problem yourself, please contact your specialist dealer Installation kit for numbers, see rating plate) - Service In the event of the operating instructions (Chapter "What to assist you quickly, we recommend...
... to store (e.g. Product number (PNC) - Type of the condensed water into a basin, siphon, gully, etc. If you write them in the machine. Serial number (S No.) (for direct draining of fault - laundry). The water reservoir then no longer has to remedy the problem yourself, please contact your specialist dealer Installation kit for numbers, see rating plate) - Service In the event of the operating instructions (Chapter "What to assist you quickly, we recommend...


