Product Manual
Page 1
EN User Manual Dishwasher FAVORIT 66792MOP FAVORIT 66792WOP
EN User Manual Dishwasher FAVORIT 66792MOP FAVORIT 66792WOP
Product Manual
Page 2
... CLEANING 17 12. TROUBLESHOOTING 18 13. We have created it . Visit our website for: Get usage advice, brochures, trouble shooter, service information: www.aeg.com Register your product for better service: www.registeraeg.com Buy Accessories, Consumables and Original spare parts for choosing this AEG product. SAFETY INSTRUCTIONS 4 3. TECHNICAL INFORMATION 20 FOR PERFECT RESULTS Thank you have the following data available: Model, PNC, Serial Number...
... CLEANING 17 12. TROUBLESHOOTING 18 13. We have created it . Visit our website for: Get usage advice, brochures, trouble shooter, service information: www.aeg.com Register your product for better service: www.registeraeg.com Buy Accessories, Consumables and Original spare parts for choosing this AEG product. SAFETY INSTRUCTIONS 4 3. TECHNICAL INFORMATION 20 FOR PERFECT RESULTS Thank you have the following data available: Model, PNC, Serial Number...
Product Manual
Page 3
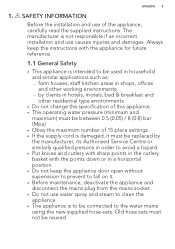
...; Do not change the specification of this appliance. • The operating water pressure (minimum and maximum) must be between 0.5 (0.05) / 8 (0.8) bar (Mpa) • Obey the maximum number of the appliance, carefully read the supplied instructions. The manufacturer is not responsible if an incorrect installation and use of 15 place settings. • If the supply cord is damaged, it . • Before maintenance, deactivate the appliance...
...; Do not change the specification of this appliance. • The operating water pressure (minimum and maximum) must be between 0.5 (0.05) / 8 (0.8) bar (Mpa) • Obey the maximum number of the appliance, carefully read the supplied instructions. The manufacturer is not responsible if an incorrect installation and use of 15 place settings. • If the supply cord is damaged, it . • Before maintenance, deactivate the appliance...
Product Manual
Page 4
... the appliance in the mains plug, use a 13 amp ASTA (BS 1362) fuse. 2.3 Water connection • Make sure not to cause damage to the water hoses. • Before you use the appliance, make sure that there is open. • Cleaning and user maintenance shall not be earthed. • Make sure that there is clean. • The first time you connect the appliance to the mains...
... the appliance in the mains plug, use a 13 amp ASTA (BS 1362) fuse. 2.3 Water connection • Make sure not to cause damage to the water hoses. • Before you use the appliance, make sure that there is open. • Cleaning and user maintenance shall not be earthed. • Make sure that there is clean. • The first time you connect the appliance to the mains...
Product Manual
Page 5
... operates. WARNING! There can release hot steam if you open the door and goes off the mains cable and discard it. • Remove the door catch to prevent children and pets to replace the water inlet hose. 2.4 Use • Do not sit or stand on when you open door. • Dishwasher detergents are wet with the water in this appliance is damaged, immediately disconnect the mains plug...
... operates. WARNING! There can release hot steam if you open the door and goes off the mains cable and discard it. • Remove the door catch to prevent children and pets to replace the water inlet hose. 2.4 Use • Do not sit or stand on when you open door. • Dishwasher detergents are wet with the water in this appliance is damaged, immediately disconnect the mains plug...

Product Manual
Page 6
6 www.aeg.com 3. PRODUCT DESCRIPTION 13 12 12 34 11 10 9 8 7 6 5 1 Worktop 2 Top spray arm 3 Upper spray arm 4 Lower spray arm 5 Filters 6 Rating plate 7 Salt container 8 Air vent 9 Rinse aid dispenser 10 Detergent dispenser 11 Lower basket 12 Upper basket 13 Cutlery drawer • When the programme starts, the programme duration comes on. • When the programme is completed, 0:00 and CLEAN come on. • When the delay start starts, the countdown duration and DELAY come on. • When the...
6 www.aeg.com 3. PRODUCT DESCRIPTION 13 12 12 34 11 10 9 8 7 6 5 1 Worktop 2 Top spray arm 3 Upper spray arm 4 Lower spray arm 5 Filters 6 Rating plate 7 Salt container 8 Air vent 9 Rinse aid dispenser 10 Detergent dispenser 11 Lower basket 12 Upper basket 13 Cutlery drawer • When the programme starts, the programme duration comes on. • When the programme is completed, 0:00 and CLEAN come on. • When the delay start starts, the countdown duration and DELAY come on. • When the...

Product Manual
Page 7
...; Prewash • Wash 70 °C • Rinses • Dry • TimeSaver • Multitab lery, pots and pans • Mixed soil • Crockery, cut - CONTROL PANEL 1 ENGLISH 7 2 3 4 56 7 8 9 1 On/off while the programme operates. 4. It is always off button 2 Display 3 Program button 4 Delay button 5 MyFavourite button 4.1 Indicators 6 TimeSaver button 7 Multitab button 8 RESET button 9 Indicators Indicator Description Salt indicator. PROGRAMMES Programme P1 1) P2 2) P3 3) P4 4) Degree of soil Type of load • Normal soil •...
...; Prewash • Wash 70 °C • Rinses • Dry • TimeSaver • Multitab lery, pots and pans • Mixed soil • Crockery, cut - CONTROL PANEL 1 ENGLISH 7 2 3 4 56 7 8 9 1 On/off while the programme operates. 4. It is always off button 2 Display 3 Program button 4 Delay button 5 MyFavourite button 4.1 Indicators 6 TimeSaver button 7 Multitab button 8 RESET button 9 Indicators Indicator Description Salt indicator. PROGRAMMES Programme P1 1) P2 2) P3 3) P4 4) Degree of soil Type of load • Normal soil •...

Product Manual
Page 8
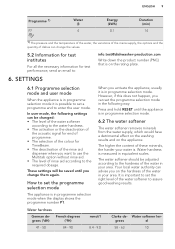
It automatically adjusts the temperature and the quantity of water, the energy consumption and the programme duration. 3) With this programme you can quickly rinse dishes to form in the baskets . The pressure and the temperature of the water in the lower basket are higher than in the upper basket. 4) This programme has a high temperature rinsing phase for test institutes). 2) The appliance senses the degree of...
It automatically adjusts the temperature and the quantity of water, the energy consumption and the programme duration. 3) With this programme you can quickly rinse dishes to form in the baskets . The pressure and the temperature of the water in the lower basket are higher than in the upper basket. 4) This programme has a high temperature rinsing phase for test institutes). 2) The appliance senses the degree of...
Product Manual
Page 9
... level of rinse aid according to the required dosage. French degrees grees (°dH) (°fH) 47 - 50 84 - 90 mmol/l 8.4 - 9.0 Clarke de- Water softener lev- It is in programme selection mode when the display shows the programme number P1. In user mode, the following way: Press and hold RESET until you can be adjusted according to assure good washing...
... level of rinse aid according to the required dosage. French degrees grees (°dH) (°fH) 47 - 50 84 - 90 mmol/l 8.4 - 9.0 Clarke de- Water softener lev- It is in programme selection mode when the display shows the programme number P1. In user mode, the following way: Press and hold RESET until you can be adjusted according to assure good washing...
Product Manual
Page 10
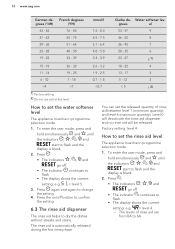
grees el 43 - 46 76 - 83 7.6 - 8.3 53 - 57 9 37 - 42 65 - 75 6.5 - 7.5 46 - 52 8 29 - 36 51 - 64 5.1 - 6.4 36 - 45 7 23 - 28 40 - 50 4.0 - 5.0 28 - 35 6 19 - 22 33 - 39 3.3 - 3.9 23 - 27 5 1) 15 - 18 26 - 32 2.6 - 3.2 18 - 22 4 11 - 14 19 - 25 1.9 - 2.5 13 - 17 3 4 - 10 7 - 18 0.7 - 1.8 5 - 12 2 10 www.aeg.com German de- Water softener lev- French degrees grees (°dH) (°fH) mmol/l Clarke de-
grees el 43 - 46 76 - 83 7.6 - 8.3 53 - 57 9 37 - 42 65 - 75 6.5 - 7.5 46 - 52 8 29 - 36 51 - 64 5.1 - 6.4 36 - 45 7 23 - 28 40 - 50 4.0 - 5.0 28 - 35 6 19 - 22 33 - 39 3.3 - 3.9 23 - 27 5 1) 15 - 18 26 - 32 2.6 - 3.2 18 - 22 4 11 - 14 19 - 25 1.9 - 2.5 13 - 17 3 4 - 10 7 - 18 0.7 - 1.8 5 - 12 2 10 www.aeg.com German de- Water softener lev- French degrees grees (°dH) (°fH) mmol/l Clarke de-
Product Manual
Page 11
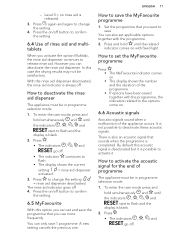
.... Level 0 = no rinse aid is released. 3. - You can deactivate the rinse aid dispenser. How to save 1 programme. Press to change the setting. = rinse aid dispenser deactivated. The rinse aid indicator goes off . • The indicator continues to activate the acoustic signal for the end of rinse aid and multitablets When you can only save the MyFavourite programme 1. A new setting cancels the previous one. How to flash. • The display shows the current setting: = rinse aid dispenser activated...
.... Level 0 = no rinse aid is released. 3. - You can deactivate the rinse aid dispenser. How to save 1 programme. Press to change the setting. = rinse aid dispenser deactivated. The rinse aid indicator goes off . • The indicator continues to activate the acoustic signal for the end of rinse aid and multitablets When you can only save the MyFavourite programme 1. A new setting cancels the previous one. How to flash. • The display shows the current setting: = rinse aid dispenser activated...
Product Manual
Page 12
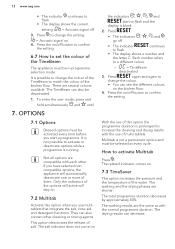
..., rinse aid and detergent functions. If you start to increase the cleaning and drying results with the normal programme duration. They can also be selected at every cycle. The salt indicator does not come on . 7.2 Multitab Activate this option the programme duration is prolonged to flash and the display is not possible to confirm the setting. Press . • The indicators , , and go off button...
..., rinse aid and detergent functions. If you start to increase the cleaning and drying results with the normal programme duration. They can also be selected at every cycle. The salt indicator does not come on . 7.2 Multitab Activate this option the programme duration is prolonged to flash and the display is not possible to confirm the setting. Press . • The indicators , , and go off button...

Product Manual
Page 13
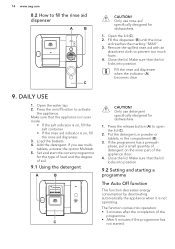
... not working. Open the water tap. 5. Turn the cap of the water supply. Fill the salt container with the hardness of the salt container counterclockwise and remove it. 2. BEFORE FIRST USE 1. Do not use salt specifically designed for dishwashers. Only use detergent and do not load the baskets. It seems that the appliance is not applicable to the programme, the related indicator does 8. The procedure will be inside...
... not working. Open the water tap. 5. Turn the cap of the water supply. Fill the salt container with the hardness of the salt container counterclockwise and remove it. 2. BEFORE FIRST USE 1. Do not use salt specifically designed for dishwashers. Only use detergent and do not load the baskets. It seems that the appliance is not applicable to the programme, the related indicator does 8. The procedure will be inside...
Product Manual
Page 14
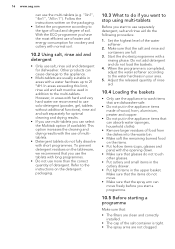
.... • If the rinse aid indicator is not operating. If the programme has a prewash phase, put a small quantity of soil. 9.1 Using the detergent A B C CAUTION! Only use detergent specifically designed for the type of load and the degree of detergent on /off button to open the lid (C). 2. The function comes into position. Set and start the correct programme for dishwashers. 1. Close the lid. Open the water tap. 2. Open the lid (C). 2. Add...
.... • If the rinse aid indicator is not operating. If the programme has a prewash phase, put a small quantity of soil. 9.1 Using the detergent A B C CAUTION! Only use detergent specifically designed for the type of load and the degree of detergent on /off button to open the lid (C). 2. The function comes into position. Set and start the correct programme for dishwashers. 1. Close the lid. Open the water tap. 2. Open the lid (C). 2. Add...
Product Manual
Page 15
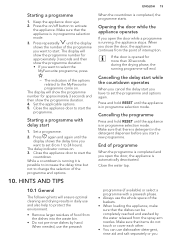
...-rinse dishes by the water released from 1 to start 1. programme (if available) or select a programme with delay start the programme. The display will end. Starting a programme with a prewash phase. • Always use dishwasher detergent, rinse aid and salt separately or you open the door while a programme is running programme will show the programme number for more than 30 seconds during the drying phase, the running , the appliance stops. Close the appliance door to start...
...-rinse dishes by the water released from 1 to start 1. programme (if available) or select a programme with delay start the programme. The display will end. Starting a programme with a prewash phase. • Always use dishwasher detergent, rinse aid and salt separately or you open the door while a programme is running programme will show the programme number for more than 30 seconds during the drying phase, the running , the appliance stops. Close the appliance door to start...
Product Manual
Page 16
... the upper basket. Refer to the instructions on the packaging. • Select the programme according to the water hardness in your area. 5. This option increases the cleaning and drying results with the use of multitablets. • Detergent tablets do not load the baskets. 4. Start the shortest programme with long programmes. • Do not use salt, rinse aid and detergent for dishwasher. 16 www.aeg.com can use the multi...
... the upper basket. Refer to the instructions on the packaging. • Select the programme according to the water hardness in your area. 5. This option increases the cleaning and drying results with the use of multitablets. • Detergent tablets do not load the baskets. 4. Start the shortest programme with long programmes. • Do not use salt, rinse aid and detergent for dishwasher. 16 www.aeg.com can use the multi...

Product Manual
Page 17
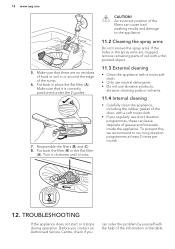
... lower basket, then from the main socket. • There is dishwasher salt and rinse aid (unless you remove it . Let the tableware cool down before you use multi- CARE AND CLEANING WARNING! Hot items can still remain on the sides and on the door of filter (B). At the end of the programme water can be easily damaged. 2. Wash the filters. 1. Dirty filters and clogged spay arms decrease the washing...
... lower basket, then from the main socket. • There is dishwasher salt and rinse aid (unless you remove it . Let the tableware cool down before you use multi- CARE AND CLEANING WARNING! Hot items can still remain on the sides and on the door of filter (B). At the end of the programme water can be easily damaged. 2. Wash the filters. 1. Dirty filters and clogged spay arms decrease the washing...
Product Manual
Page 18
... (C). 8. TROUBLESHOOTING If the appliance does not start or it locks. CAUTION! Put back the filter (B) in place the flat filter (A). Turn it clockwise until it stops during operation. An incorrect position of the filters can cause bad washing results and damage to run long duration programmes at least 2 times per month. 12. Make sure that it is correctly positioned under the 2 guides. 7. 18 www.aeg...
... (C). 8. TROUBLESHOOTING If the appliance does not start or it locks. CAUTION! Put back the filter (B) in place the flat filter (A). Turn it clockwise until it stops during operation. An incorrect position of the filters can cause bad washing results and damage to run long duration programmes at least 2 times per month. 12. Make sure that it is correctly positioned under the 2 guides. 7. 18 www.aeg...
Product Manual
Page 19
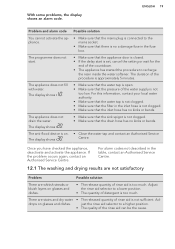
... closed. • If the delay start . The anti-flood device is not clogged. • Make sure that the drain hose has no kinks or bends. • Make sure that the filter in the table, contact an Authorised Service Centre. 12.1 The washing and drying results are not satisfactory Problem Possible solution There are stains and dry water • The released quantity of rinse aid...
... closed. • If the delay start . The anti-flood device is not clogged. • Make sure that the drain hose has no kinks or bends. • Make sure that the filter in the table, contact an Authorised Service Centre. 12.1 The washing and drying results are not satisfactory Problem Possible solution There are stains and dry water • The released quantity of rinse aid...
Product Manual
Page 20
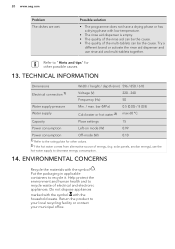
... activate the rinse aid dispenser and use the hot water supply to your local recycling facility or contact your municipal office. * TECHNICAL INFORMATION Dimensions Width / height / depth (mm) 596 / 850 / 610 Electrical connection 1) Voltage (V) Frequency (Hz) 220 - 240 50 Water supply pressure Min. / max. bar (MPa) 0.5 (0.05) / 8 (0.8) Water supply Cold water or hot water 2) max 60 °C Capacity Place settings 15 Power consumption Left-on mode (W) 0.99 Power consumption Off...
... activate the rinse aid dispenser and use the hot water supply to your local recycling facility or contact your municipal office. * TECHNICAL INFORMATION Dimensions Width / height / depth (mm) 596 / 850 / 610 Electrical connection 1) Voltage (V) Frequency (Hz) 220 - 240 50 Water supply pressure Min. / max. bar (MPa) 0.5 (0.05) / 8 (0.8) Water supply Cold water or hot water 2) max 60 °C Capacity Place settings 15 Power consumption Left-on mode (W) 0.99 Power consumption Off...


