Product Manual
Page 1
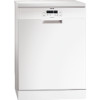
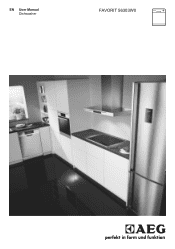
EN User Manual Dishwasher FAVORIT 56303W0
EN User Manual Dishwasher FAVORIT 56303W0
Product Manual
Page 2
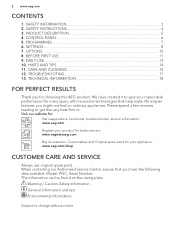
... on the rating plate. CONTROL PANEL ...6 5. We have the following data available: Model, PNC, Serial Number. SETTINGS...8 7. When contacting our Authorised Service Centre, ensure that help make life simpler features you for your appliance: www.aeg.com/shop CUSTOMER CARE AND SERVICE Always use original spare parts. Please spend a few minutes reading to get the very best from it to change without notice. TROUBLESHOOTING 17 13...
... on the rating plate. CONTROL PANEL ...6 5. We have the following data available: Model, PNC, Serial Number. SETTINGS...8 7. When contacting our Authorised Service Centre, ensure that help make life simpler features you for your appliance: www.aeg.com/shop CUSTOMER CARE AND SERVICE Always use original spare parts. Please spend a few minutes reading to get the very best from it to change without notice. TROUBLESHOOTING 17 13...

Product Manual
Page 3
... use water spray and steam to clean the appliance. • The ventilation openings in household and similar applications such as: - staff kitchen areas in shops, offices and other residential type environments. • Do not change the specification of this appliance. • The operating water pressure (minimum and maximum) must be reused. The manufacturer is intended to the water mains using the new supplied hose-sets. Old hose sets...
... use water spray and steam to clean the appliance. • The ventilation openings in household and similar applications such as: - staff kitchen areas in shops, offices and other residential type environments. • Do not change the specification of this appliance. • The operating water pressure (minimum and maximum) must be reused. The manufacturer is intended to the water mains using the new supplied hose-sets. Old hose sets...
Product Manual
Page 4
... to the mains plug and to the mains cable. Directives. • Only for a long time, let the water flow until it is clean. • The first time you connect the appliance to the mains socket only at the end of the installation. Always pull the mains plug. • This appliance complies with the power supply. Should the mains cable need to be replaced, this must...
... to the mains plug and to the mains cable. Directives. • Only for a long time, let the water flow until it is clean. • The first time you connect the appliance to the mains socket only at the end of the installation. Always pull the mains plug. • This appliance complies with the power supply. Should the mains cable need to be replaced, this must...
Product Manual
Page 5
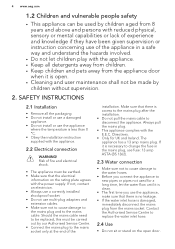
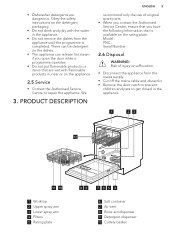
... 10 1 Worktop 2 Upper spray arm 3 Lower spray arm 4 Filters 5 Rating plate 9 8 765 4 6 Salt container 7 Air vent 8 Rinse aid dispenser 9 Detergent dispenser 10 Cutlery basket • Dishwasher detergents are wet with the water in the appliance. • Do not remove the dishes from the mains supply. • Cut off the mains cable and discard it. • Remove the door catch to prevent children and pets to get closed in , near or on the appliance. 2.5 Service • Contact the...
... 10 1 Worktop 2 Upper spray arm 3 Lower spray arm 4 Filters 5 Rating plate 9 8 765 4 6 Salt container 7 Air vent 8 Rinse aid dispenser 9 Detergent dispenser 10 Cutlery basket • Dishwasher detergents are wet with the water in the appliance. • Do not remove the dishes from the mains supply. • Cut off the mains cable and discard it. • Remove the door catch to prevent children and pets to get closed in , near or on the appliance. 2.5 Service • Contact the...
Product Manual
Page 6
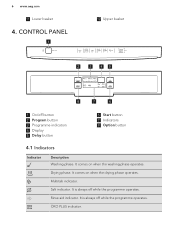
It comes on when the drying phase operates. Multitab indicator. Salt indicator. It is always off while the programme operates. ÖKO PLUS indicator. Rinse aid indicator. It is always off button 2 Program button 3 Programme indicators 4 Display 5 Delay button 6 Start button 7 Indicators 8 Option button 4.1 Indicators Indicator Description Washing phase. CONTROL PANEL 1 12 Upper basket 2 3 45 8 7 6 1 On/off while the programme operates. It comes on when the washing phase operates. 6 www.aeg.com 11 Lower basket 4. Drying phase.
It comes on when the drying phase operates. Multitab indicator. Salt indicator. It is always off while the programme operates. ÖKO PLUS indicator. Rinse aid indicator. It is always off button 2 Program button 3 Programme indicators 4 Display 5 Delay button 6 Start button 7 Indicators 8 Option button 4.1 Indicators Indicator Description Washing phase. CONTROL PANEL 1 12 Upper basket 2 3 45 8 7 6 1 On/off while the programme operates. It comes on when the washing phase operates. 6 www.aeg.com 11 Lower basket 4. Drying phase.

Product Manual
Page 7
...; Wash from 45 °C • Multitab pots and pans to form in the baskets . Do not use detergent with this programme you can quickly rinse dishes to prevent remains of load Programme phases Options 1) • Normal soil • Prewash • Crockery and cut - °C lery • Rinses 5) • All • Prewash 1) With this programme. 5.1 Consumption values Programme 1) Water (l) 11 7 - 15 13 - 15 8 - 9 Energy...
...; Wash from 45 °C • Multitab pots and pans to form in the baskets . Do not use detergent with this programme you can quickly rinse dishes to prevent remains of load Programme phases Options 1) • Normal soil • Prewash • Crockery and cut - °C lery • Rinses 5) • All • Prewash 1) With this programme. 5.1 Consumption values Programme 1) Water (l) 11 7 - 15 13 - 15 8 - 9 Energy...
Product Manual
Page 8
... user mode. How to assure good washing results. Water softener lev- Your local water authority can advise you change the values. 5.2 Information for test institutes For all the necessary information for end of programme. • The deactivation of the rinse aid dispenser when you activate the appliance, usually it is possible to set a programme and to : info.test@dishwasher-production.com Write down the product number...
... user mode. How to assure good washing results. Water softener lev- Your local water authority can advise you change the values. 5.2 Information for test institutes For all the necessary information for end of programme. • The deactivation of the rinse aid dispenser when you activate the appliance, usually it is possible to set a programme and to : info.test@dishwasher-production.com Write down the product number...

Product Manual
Page 9
Water softener lev- French degrees grees (°dH) (°fH) mmol/l Clarke de- grees el 37 - 42 65 - 75 6.5 - 7.5 46 - 52 8 29 - 36 51 - 64 5.1 - 6.4 36 - 45 7 23 - 28 40 - 50 4.0 - 5.0 28 - 35 6 19 - 22 33 - 39 3.3 - 3.9 23 - 27 5 1) 15 - 18 26 - 32 2.6 - 3.2 18 - 22 4 11 - 14 19 - 25 1.9 - 2.5 13 - 17 3 4 - 10 7 - 18 0.7 - 1.8 5 - 12 2 ENGLISH 9 German de-
Water softener lev- French degrees grees (°dH) (°fH) mmol/l Clarke de- grees el 37 - 42 65 - 75 6.5 - 7.5 46 - 52 8 29 - 36 51 - 64 5.1 - 6.4 36 - 45 7 23 - 28 40 - 50 4.0 - 5.0 28 - 35 6 19 - 22 33 - 39 3.3 - 3.9 23 - 27 5 1) 15 - 18 26 - 32 2.6 - 3.2 18 - 22 4 11 - 14 19 - 25 1.9 - 2.5 13 - 17 3 4 - 10 7 - 18 0.7 - 1.8 5 - 12 2 ENGLISH 9 German de-
Product Manual
Page 10
... blank. 2. How to increase the cleaning and drying results with each other cleaning or rinsing agents. If you start to confirm the setting. Press the on /off button to flash and the display is also an acoustic signal that integrate the salt, rinse aid and detergent functions. To enter the user mode press and hold simultaneously Delay and Start until the indicator comes on . 1. It is not...
... blank. 2. How to increase the cleaning and drying results with each other cleaning or rinsing agents. If you start to confirm the setting. Press the on /off button to flash and the display is also an acoustic signal that integrate the salt, rinse aid and detergent functions. To enter the user mode press and hold simultaneously Delay and Start until the indicator comes on . 1. It is not...

Product Manual
Page 11
.... 5. Remove the salt around the opening of the water supply. How to activate ÖKO PLUS Press Option until the indicator comes on or it flashes quickly for dishwashers. BEFORE FIRST USE 1. The procedure will be inside the appliance. Make sure that the appliance is not applicable to fill the salt container 1. The washing phase starts only after you start a programme. Turn the cap of the water...
.... 5. Remove the salt around the opening of the water supply. How to activate ÖKO PLUS Press Option until the indicator comes on or it flashes quickly for dishwashers. BEFORE FIRST USE 1. The procedure will be inside the appliance. Make sure that the appliance is not applicable to fill the salt container 1. The washing phase starts only after you start a programme. Turn the cap of the water...
Product Manual
Page 12
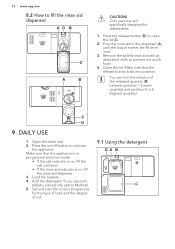
CAUTION! Remove the spilled rinse aid with an absorbent cloth to fill the rinse aid dispenser AD B C A B M AX 32 4 1 + - You can turn the selector of soil. 9.1 Using the detergent DA B 30 20 C Load the baskets. 4. Add the detergent. Set and start the correct programme for dishwashers. 1. Close the lid. C D 9. If you use rinse aid specifically designed for the type of load and the degree of the released quantity (B) between position 1 (lowest quantity...
CAUTION! Remove the spilled rinse aid with an absorbent cloth to fill the rinse aid dispenser AD B C A B M AX 32 4 1 + - You can turn the selector of soil. 9.1 Using the detergent DA B 30 20 C Load the baskets. 4. Add the detergent. Set and start the correct programme for dishwashers. 1. Close the lid. C D 9. If you use rinse aid specifically designed for the type of load and the degree of the released quantity (B) between position 1 (lowest quantity...
Product Manual
Page 13
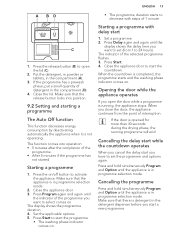
... detergent dispenser before you want to select comes on . Cancelling the delay start while the countdown operates When you cancel the delay start a new programme. Cancelling the programme Press and hold simultaneously Program and Option until the display shows the delay time you close the door, the appliance continues from 1 to start the programme. • The washing phase indicator comes on . The function comes into position. 9.2 Setting and starting a programme The Auto...
... detergent dispenser before you want to select comes on . Cancelling the delay start while the countdown operates When you cancel the delay start a new programme. Cancelling the programme Press and hold simultaneously Program and Option until the display shows the delay time you close the door, the appliance continues from 1 to start the programme. • The washing phase indicator comes on . The function comes into position. 9.2 Setting and starting a programme The Auto...
Product Manual
Page 14
...; Multi-tablets are usually suitable in addition to protect the environment. • Remove larger residues of food from the spray arm nozzles. Set the highest level of Auto Off, the appliance is completed the display shows 0:00. Adjust the released quantity of rinse aid. 10.4 Loading the baskets • Only use and also help to the multi-tablets. HINTS AND TIPS 10.1 General...
...; Multi-tablets are usually suitable in addition to protect the environment. • Remove larger residues of food from the spray arm nozzles. Set the highest level of Auto Off, the appliance is completed the display shows 0:00. Adjust the released quantity of rinse aid. 10.4 Loading the baskets • Only use and also help to the multi-tablets. HINTS AND TIPS 10.1 General...

Product Manual
Page 15
First remove items from the lower basket, then from the main socket. CARE AND CLEANING ENGLISH 15 • The filters are clean and correctly installed. • The cap of the salt container is tight. • The spray arms are not clogged. • There is dishwasher salt and rinse aid (unless you remove it . At the end of the programme water can still remain on the sides and on...
First remove items from the lower basket, then from the main socket. CARE AND CLEANING ENGLISH 15 • The filters are clean and correctly installed. • The cap of the salt container is tight. • The spray arms are not clogged. • There is dishwasher salt and rinse aid (unless you remove it . At the end of the programme water can still remain on the sides and on...

Product Manual
Page 16
... 2 guides. An incorrect position of the filters can cause bad washing results and damage to the appliance. 11.2 Cleaning the spray arms Do not remove the spray arms. If the holes in the spray arms are no residues of food or soil in or around the edge of the door, with a moist soft cloth. • Only use neutral detergents. • Do not use abrasive products, abrasive cleaning...
... 2 guides. An incorrect position of the filters can cause bad washing results and damage to the appliance. 11.2 Cleaning the spray arms Do not remove the spray arms. If the holes in the spray arms are no residues of food or soil in or around the edge of the door, with a moist soft cloth. • Only use neutral detergents. • Do not use abrasive products, abrasive cleaning...
Product Manual
Page 17
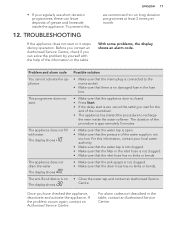
... the fuse box. • Make sure that the appliance door is closed. • Press Start. • If the delay start is not clogged. • Make sure that the sink spigot is set, cancel the setting or wait for the end of the countdown. • The appliance has started the procedure to run long duration programmes at least 2 times per month. With some problems, the display shows...
... the fuse box. • Make sure that the appliance door is closed. • Press Start. • If the delay start is not clogged. • Make sure that the sink spigot is set, cancel the setting or wait for the end of the countdown. • The appliance has started the procedure to run long duration programmes at least 2 times per month. With some problems, the display shows...
Product Manual
Page 18
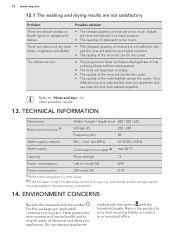
... Place settings 13 Power consumption Left-on glasses and dishes. The dishes are wet. • The programme does not have a drying phase or has a drying phase with the household waste. Try a different brand or activate the rinse aid dispenser and use the hot water supply to a lower position. • The quantity of detergent is not sufficient. ENVIRONMENT CONCERNS Recycle the materials with the symbol . Adjust the rinse aid...
... Place settings 13 Power consumption Left-on glasses and dishes. The dishes are wet. • The programme does not have a drying phase or has a drying phase with the household waste. Try a different brand or activate the rinse aid dispenser and use the hot water supply to a lower position. • The quantity of detergent is not sufficient. ENVIRONMENT CONCERNS Recycle the materials with the symbol . Adjust the rinse aid...


