Product Manual
Page 2
... 9. CARE AND CLEANING 15 12. The information can be found on ordinary appliances. SAFETY INSTRUCTIONS 4 3. PROGRAMMES...7 6. We have created it . Please spend a few minutes reading to get the very best from it to change without notice. DAILY USE...12 10. Visit our website for: Get usage advice, brochures, trouble shooter, service information: www.aeg.com Register your product for better service...
... 9. CARE AND CLEANING 15 12. The information can be found on ordinary appliances. SAFETY INSTRUCTIONS 4 3. PROGRAMMES...7 6. We have created it . Please spend a few minutes reading to get the very best from it to change without notice. DAILY USE...12 10. Visit our website for: Get usage advice, brochures, trouble shooter, service information: www.aeg.com Register your product for better service...
Product Manual
Page 3
...; Obey the maximum number of the appliance, carefully read the supplied instructions. farm houses; The manufacturer is not responsible if an incorrect installation and use of 13 place settings. • If the supply cord is damaged, it . • Before maintenance, deactivate the appliance and disconnect the mains plug from the mains socket. • Do not use water spray and steam to clean the appliance. •...
...; Obey the maximum number of the appliance, carefully read the supplied instructions. farm houses; The manufacturer is not responsible if an incorrect installation and use of 13 place settings. • If the supply cord is damaged, it . • Before maintenance, deactivate the appliance and disconnect the mains plug from the mains socket. • Do not use water spray and steam to clean the appliance. •...
Product Manual
Page 4
... no leakage. • The water inlet hose has a safety valve and a sheath with the appliance. 2.2 Electrical connection WARNING! If it is clean. • The first time you use the appliance, make sure that there is necessary to disconnect the appliance. Risk of the installation. Make sure that there is less than 0 °C. • Obey the installation instruction supplied with an inner mains cable.
... no leakage. • The water inlet hose has a safety valve and a sheath with the appliance. 2.2 Electrical connection WARNING! If it is clean. • The first time you use the appliance, make sure that there is necessary to disconnect the appliance. Risk of the installation. Make sure that there is less than 0 °C. • Obey the installation instruction supplied with an inner mains cable.
Product Manual
Page 5
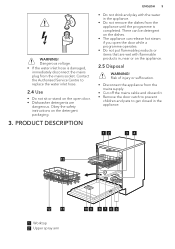
... flammable products in the appliance. 12 34 13 12 11 1 Worktop 2 Upper spray arm 10 9 8 7 6 5 Dangerous voltage. • If the water inlet hose is damaged, immediately disconnect the mains plug from the appliance until the programme is completed. WARNING! Contact the Authorised Service Centre to get closed in , near or on the open door. • Dishwasher detergents are dangerous. There can be detergent on the dishes...
... flammable products in the appliance. 12 34 13 12 11 1 Worktop 2 Upper spray arm 10 9 8 7 6 5 Dangerous voltage. • If the water inlet hose is damaged, immediately disconnect the mains plug from the appliance until the programme is completed. WARNING! Contact the Authorised Service Centre to get closed in , near or on the open door. • Dishwasher detergents are dangerous. There can be detergent on the dishes...
Product Manual
Page 6
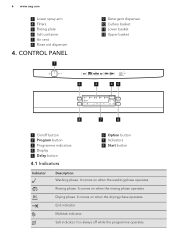
... indicator. 6 www.aeg.com 3 Lower spray arm 4 Filters 5 Rating plate 6 Salt container 7 Air vent 8 Rinse aid dispenser 4. CONTROL PANEL 1 9 Detergent dispenser 10 Cutlery basket 11 Lower basket 12 Upper basket 2 3 45 8 7 6 1 On/off while the programme operates. It comes on when the washing phase operates. Rinsing phase. It is always off button 2 Program button 3 Programme indicators 4 Display 5 Delay button 4.1 Indicators 6 Option button 7 Indicators 8 Start button Indicator Description Washing phase. It comes on when the rinsing phase operates. Drying phase...
... indicator. 6 www.aeg.com 3 Lower spray arm 4 Filters 5 Rating plate 6 Salt container 7 Air vent 8 Rinse aid dispenser 4. CONTROL PANEL 1 9 Detergent dispenser 10 Cutlery basket 11 Lower basket 12 Upper basket 2 3 45 8 7 6 1 On/off while the programme operates. It comes on when the washing phase operates. Rinsing phase. It is always off button 2 Program button 3 Programme indicators 4 Display 5 Delay button 4.1 Indicators 6 Option button 7 Indicators 8 Start button Indicator Description Washing phase. It comes on when the rinsing phase operates. Drying phase...

Product Manual
Page 7
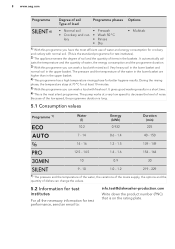
... 7 Indicator Description Rinse aid indicator. Delay indicator. ExtraHygiene indicator. 5. It is always off while the programme operates. PROGRAMMES Programme 1) 2) 3) 4) 5) Degree of soil Type of load Programme phases • Normal soil • Prewash • Crockery and cut- • Wash 50 °C lery • Rinses • Dry • All • Prewash • Crockery, cutlery, • Wash from 45 °C pots and pans to 70 °C • Rinses • Dry...
... 7 Indicator Description Rinse aid indicator. Delay indicator. ExtraHygiene indicator. 5. It is always off while the programme operates. PROGRAMMES Programme 1) 2) 3) 4) 5) Degree of soil Type of load Programme phases • Normal soil • Prewash • Crockery and cut- • Wash 50 °C lery • Rinses • Dry • All • Prewash • Crockery, cutlery, • Wash from 45 °C pots and pans to 70 °C • Rinses • Dry...
Product Manual
Page 8
... in the lower basket and normal soil in the upper basket. 4) This programme has a high temperature rinsing phase for test performance, send an email to decrease the level of items in the baskets . 8 www.aeg.com Programme Degree of soil Type of load Programme phases Options 6) • Normal soil • Prewash • Crockery and cut- • Wash 50 °C lery • Rinses • Dry • Multitab...
... in the lower basket and normal soil in the upper basket. 4) This programme has a high temperature rinsing phase for test performance, send an email to decrease the level of items in the baskets . 8 www.aeg.com Programme Degree of soil Type of load Programme phases Options 6) • Normal soil • Prewash • Crockery and cut- • Wash 50 °C lery • Rinses • Dry • Multitab...
Product Manual
Page 9
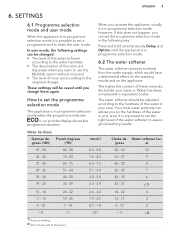
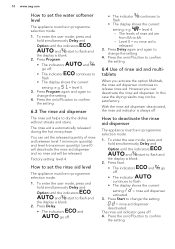
...: Press and hold simultaneously Delay and Option until you on the hardness of the water softener to assure good washing results. The higher the content of rinse aid according to set the programme selection mode The appliance is in your water is measured in programme selection mode. 6.2 The water softener The water softener removes minerals from the water supply, which would have...
...: Press and hold simultaneously Delay and Option until you on the hardness of the water softener to assure good washing results. The higher the content of rinse aid according to set the programme selection mode The appliance is in your water is measured in programme selection mode. 6.2 The water softener The water softener removes minerals from the water supply, which would have...
Product Manual
Page 10
... change the setting. 4. How to set the released quantity of rinse aid between level 1 (minimum quantity) and level 6 (maximum quantity). and go off button to flash. • The display shows the current setting: e.g. = level 5. 3. 10 www.aeg.com How to deactivate the rinse aid dispenser The appliance must be in programme selection mode. 1. To enter the user mode, press and hold simultaneously Delay and Option until the indicators , and start...
... change the setting. 4. How to set the released quantity of rinse aid between level 1 (minimum quantity) and level 6 (maximum quantity). and go off button to flash. • The display shows the current setting: e.g. = level 5. 3. 10 www.aeg.com How to deactivate the rinse aid dispenser The appliance must be in programme selection mode. 1. To enter the user mode, press and hold simultaneously Delay and Option until the indicators , and start...

Product Manual
Page 11
... deactivates the release of the water softener. 2. With the use of multi-tablets. The 8. If not, adjust the level of salt. ENGLISH 11 washing and the drying phases are the same as with each other cleaning or rinsing agents. The washing results are shorter. If the option is running. Not all options are compatible with the normal programme duration. Multitab is not...
... deactivates the release of the water softener. 2. With the use of multi-tablets. The 8. If not, adjust the level of salt. ENGLISH 11 washing and the drying phases are the same as with each other cleaning or rinsing agents. The washing results are shorter. If the option is running. Not all options are compatible with the normal programme duration. Multitab is not...
Product Manual
Page 12
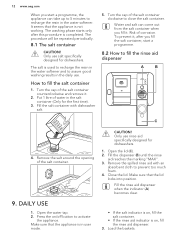
... and remove it . Open the water tap. 2. Make sure that the lid locks into position. Remove the spilled rinse aid with dishwasher salt. 5. Load the baskets. Only use rinse aid specifically designed for dishwashers. 1. DAILY USE 1. To prevent it, after this procedure is in the salt container (Only for dishwashers. Fill the dispenser (B) until the rinse aid reaches the marking ''MAX''. 3. It seems that the appliance is on /off button to...
... and remove it . Open the water tap. 2. Make sure that the lid locks into position. Remove the spilled rinse aid with dishwasher salt. 5. Load the baskets. Only use rinse aid specifically designed for dishwashers. 1. DAILY USE 1. To prevent it, after this procedure is in the salt container (Only for dishwashers. Fill the dispenser (B) until the rinse aid reaches the marking ''MAX''. 3. It seems that the appliance is on /off button to...
Product Manual
Page 13
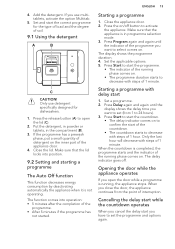
... part of interruption. Press Start to set (from the point of the appliance door. 4. Press Start to start the countdown. • The delay indicator comes on . Opening the door while the appliance operates If you use detergent specifically designed for the type of load and the degree of the programme. • After 5 minutes if the programme has not started. Cancelling the delay start while the countdown operates When you cancel the delay start...
... part of interruption. Press Start to set (from the point of the appliance door. 4. Press Start to start the countdown. • The delay indicator comes on . Opening the door while the appliance operates If you use detergent specifically designed for the type of load and the degree of the programme. • After 5 minutes if the programme has not started. Cancelling the delay start while the countdown operates When you cancel the delay start...
Product Manual
Page 14
... can use dishwasher detergent, rinse aid and salt separately or you can cause damage to the type of load and degree of water and energy consumption for optimal cleaning and drying results. • If you use the tablets with normal soil. 1. Refer to automatically deactivate the appliance. End of Auto Off, the appliance is automatically deactivated. 2. If you open the door before you can be used in...
... can use dishwasher detergent, rinse aid and salt separately or you can cause damage to the type of load and degree of water and energy consumption for optimal cleaning and drying results. • If you use the tablets with normal soil. 1. Refer to automatically deactivate the appliance. End of Auto Off, the appliance is automatically deactivated. 2. If you open the door before you can be used in...

Product Manual
Page 15
....4 Loading the baskets • Only use the appliance to wash items that are not clogged. • There is dishwasher salt and rinse aid (unless you start to use separately detergent, salt and rinse aid do the following procedure. 1. CARE AND CLEANING WARNING! Before maintenance, deactivate the appliance and disconnect the mains plug from the upper basket. Make a check regularly and, if necessary, clean them. At the end of the programme water...
....4 Loading the baskets • Only use the appliance to wash items that are not clogged. • There is dishwasher salt and rinse aid (unless you start to use separately detergent, salt and rinse aid do the following procedure. 1. CARE AND CLEANING WARNING! Before maintenance, deactivate the appliance and disconnect the mains plug from the upper basket. Make a check regularly and, if necessary, clean them. At the end of the programme water...
Product Manual
Page 16
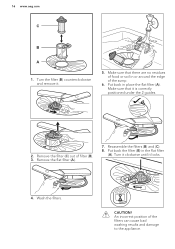
....aeg.com C B A 1. Make sure that it is correctly positioned under the 2 guides. 2. Remove the flat filter (A). 7. CAUTION! Make sure that there are no residues of food or soil in or around the edge of filter (B). 3. Remove the filter (C) out of the sump. 6. Wash the filters. An incorrect position of the filters can cause bad washing results and damage to the appliance. Turn...
....aeg.com C B A 1. Make sure that it is correctly positioned under the 2 guides. 2. Remove the flat filter (A). 7. CAUTION! Make sure that there are no residues of food or soil in or around the edge of filter (B). 3. Remove the filter (C) out of the sump. 6. Wash the filters. An incorrect position of the filters can cause bad washing results and damage to the appliance. Turn...
Product Manual
Page 17
... the drain hose has no kinks or bends. • Close the water tap and contact an Authorised Service Centre. Possible solution • Make sure that the mains plug is connected to run long duration programmes at least 2 times per month. TROUBLESHOOTING If the appliance does not start . The display shows . Before you contact an Authorised Service Centre, check if you regularly use abrasive products, abrasive cleaning pads...
... the drain hose has no kinks or bends. • Close the water tap and contact an Authorised Service Centre. Possible solution • Make sure that the mains plug is connected to run long duration programmes at least 2 times per month. TROUBLESHOOTING If the appliance does not start . The display shows . Before you contact an Authorised Service Centre, check if you regularly use abrasive products, abrasive cleaning pads...
Product Manual
Page 18
... settings 13 Power consumption Left-on glasses and dishes. ENVIRONMENTAL CONCERNS Recycle the materials with low temperature. • The rinse aid dispenser is too much . Adjust the rinse aid selector to "Hints and tips" for other possible causes. 13. Try a different brand or activate the rinse aid dispenser and use the hot water supply to the rating plate for other values. 2) f the hot water comes from alternative source of detergent...
... settings 13 Power consumption Left-on glasses and dishes. ENVIRONMENTAL CONCERNS Recycle the materials with low temperature. • The rinse aid dispenser is too much . Adjust the rinse aid selector to "Hints and tips" for other possible causes. 13. Try a different brand or activate the rinse aid dispenser and use the hot water supply to the rating plate for other values. 2) f the hot water comes from alternative source of detergent...

Product Manual
Page 19
Return the product to your local recycling facility or contact your municipal office. marked with the symbol with the household waste. ENGLISH 19 *
Return the product to your local recycling facility or contact your municipal office. marked with the symbol with the household waste. ENGLISH 19 *


