Product Manual
Page 2
... appliance: www.aeg.com/shop CUSTOMER CARE AND SERVICE Always use original spare parts. The information can be found on ordinary appliances. 2 www.aeg.com CONTENTS 1. CONTROL PANEL...7 5. USING THE ACCESSORIES 12 9. HINTS AND TIPS...14 11. TROUBLESHOOTING 25 FOR PERFECT RESULTS Thank you might not find on the rating plate. We have the following data available: Model, PNC, Serial Number. SAFETY INSTRUCTIONS 4 3. DAILY USE...9 7. CLOCK FUNCTIONS...11...
... appliance: www.aeg.com/shop CUSTOMER CARE AND SERVICE Always use original spare parts. The information can be found on ordinary appliances. 2 www.aeg.com CONTENTS 1. CONTROL PANEL...7 5. USING THE ACCESSORIES 12 9. HINTS AND TIPS...14 11. TROUBLESHOOTING 25 FOR PERFECT RESULTS Thank you might not find on the rating plate. We have the following data available: Model, PNC, Serial Number. SAFETY INSTRUCTIONS 4 3. DAILY USE...9 7. CLOCK FUNCTIONS...11...

Product Manual
Page 3
.... Always use of the appliance, carefully read the supplied instructions. SAFETY INFORMATION Before the installation and use oven gloves to remove or put in operation. Do not touch the heating elements that are hot. • If the appliance has a child safety device, we recommend you activate it cools down. The manufacturer is not responsible if an incorrect installation and use of the...
.... Always use of the appliance, carefully read the supplied instructions. SAFETY INFORMATION Before the installation and use oven gloves to remove or put in operation. Do not touch the heating elements that are hot. • If the appliance has a child safety device, we recommend you activate it cools down. The manufacturer is not responsible if an incorrect installation and use of the...
Product Manual
Page 4
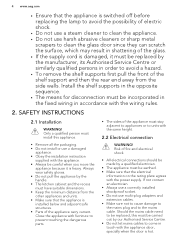
... same height. 2.2 Electrical connection WARNING! SAFETY INSTRUCTIONS 2.1 Installation WARNING! Only a qualified person must install this must be carried out by our Authorised Service Centre. • Do not let mains cables to come in touch with the power supply. Always wear safety gloves. • Do not pull the appliance by the handle. • The kitchen cabinet and the recess must be replaced by...
... same height. 2.2 Electrical connection WARNING! SAFETY INSTRUCTIONS 2.1 Installation WARNING! Only a qualified person must install this must be carried out by our Authorised Service Centre. • Do not let mains cables to come in touch with the power supply. Always wear safety gloves. • Do not pull the appliance by the handle. • The kitchen cabinet and the recess must be replaced by...

Product Manual
Page 5
... the glass panels can be permanent. • This appliance is heavy! The door is for cooking purposes only. The use of ingredients with alcohol can release. • Do not operate the appliance with the oven door closed. 2.4 Care and cleaning WARNING! do not connect the mains plug. • Do not pull the mains cable to disconnect the appliance. be careful when you open the door...
... the glass panels can be permanent. • This appliance is heavy! The door is for cooking purposes only. The use of ingredients with alcohol can release. • Do not operate the appliance with the oven door closed. 2.4 Care and cleaning WARNING! do not connect the mains plug. • Do not pull the mains cable to disconnect the appliance. be careful when you open the door...

Product Manual
Page 6
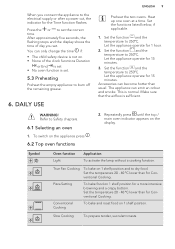
Only use it . • Remove the door catch to prevent children and pets to get closed in the appliance. 1 2 4 3 7 2 1 4 3 7 2 1 1 Control panel 2 Electronic programmer 3 Heating element 3 4 4 Lamp 5 5 Fan 6 6 Shelf support, removable 7 Shelf positions 3 4 5 6 3.2 Accessories • Wire shelf For cookware, cake tins, roasts. • Grill- / Roasting pan To bake and roast or as pan to prevent the deterioration of the surface material. • Remaining fat or food in the appliance...
Only use it . • Remove the door catch to prevent children and pets to get closed in the appliance. 1 2 4 3 7 2 1 4 3 7 2 1 1 Control panel 2 Electronic programmer 3 Heating element 3 4 4 Lamp 5 5 Fan 6 6 Shelf support, removable 7 Shelf positions 3 4 5 6 3.2 Accessories • Wire shelf For cookware, cake tins, roasts. • Grill- / Roasting pan To bake and roast or as pan to prevent the deterioration of the surface material. • Remaining fat or food in the appliance...

Product Manual
Page 7
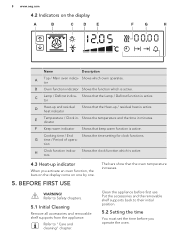
CONTROL PANEL 4.1 Electronic programmer 1 ENGLISH 7 876 5432 Sensor Field Function 1 - To set the value for the temperature and time. 3 4 DECREASE To set the clock functions. TEMPERATURE To turn the Fast heat up function ON or OFF. 5 DOWN To move down in the menu. 6 OVEN SELECTION To switch between top and main oven. 7 ON / OFF To activate and deactivate the appliance. 8 DISPLAY CLOCK 2 Description Shows the current settings of the appliance. INCREASE To set the value for the temperature and time. 4.
CONTROL PANEL 4.1 Electronic programmer 1 ENGLISH 7 876 5432 Sensor Field Function 1 - To set the value for the temperature and time. 3 4 DECREASE To set the clock functions. TEMPERATURE To turn the Fast heat up function ON or OFF. 5 DOWN To move down in the menu. 6 OVEN SELECTION To switch between top and main oven. 7 ON / OFF To activate and deactivate the appliance. 8 DISPLAY CLOCK 2 Description Shows the current settings of the appliance. INCREASE To set the value for the temperature and time. 4.
Product Manual
Page 8
... heat indicator Shows that the oven temperature increases. Shows the temperature and the time in - BEFORE FIRST USE The bars show that the Heat-up indicator When you operate the oven. Refer to Safety chapters. 5.1 Initial Cleaning Remove all accessories and removable shelf supports from the appliance. Cooking time / End Shows the time setting for clock functions. Clean the appliance before you activate an oven function, the bars on the display...
... heat indicator Shows that the oven temperature increases. Shows the temperature and the time in - BEFORE FIRST USE The bars show that the Heat-up indicator When you operate the oven. Refer to Safety chapters. 5.1 Initial Cleaning Remove all accessories and removable shelf supports from the appliance. Cooking time / End Shows the time setting for clock functions. Clean the appliance before you activate an oven function, the bars on the display...
Product Manual
Page 9
.... 1. Set the function and the temperature to the electrical supply or after a power cut, the indicator for the Time function flashes. Let the appliance operate for Conventional Cooking. WARNING! Repeatedly press until the top / main oven indicator appears on 1 shelf position. True Fan Cooking To bake on . • None of day you connect the appliance to 250ºC. DAILY USE ENGLISH 9 Preheat the two ovens. Set the...
.... 1. Set the function and the temperature to the electrical supply or after a power cut, the indicator for the Time function flashes. Let the appliance operate for Conventional Cooking. WARNING! Repeatedly press until the top / main oven indicator appears on 1 shelf position. True Fan Cooking To bake on . • None of day you connect the appliance to 250ºC. DAILY USE ENGLISH 9 Preheat the two ovens. Set the...

Product Manual
Page 10
.... True Fan Cooking Pizza Setting Slow Cooking To bake on up to 2 shelf positions at the same time and to toast bread. To roast larger meat joints or poultry with bones on 1 shelf position for a more intensive browning and a crispy bottom. Keep Warm To keep food warm. Bottom Heat To bake cakes with crispy bottom and to toast bread. Set the temperature 20 - 40...
.... True Fan Cooking Pizza Setting Slow Cooking To bake on up to 2 shelf positions at the same time and to toast bread. To roast larger meat joints or poultry with bones on 1 shelf position for a more intensive browning and a crispy bottom. Keep Warm To keep food warm. Bottom Heat To bake cakes with crispy bottom and to toast bread. Set the temperature 20 - 40...

Product Manual
Page 11
... same time to set the time for the Minute Minder . Use again and again until no effect on the operation of the oven. ENGLISH 11 Symbol Oven function Bottom Heat Application To bake cakes with a delay in less than approximately 5 seconds, the appliance starts to heat. 6.5 Changing the oven temperature Press or to set countdown time. You can change the this temperature in time. Refer to set the oven function and temperature. The display...
... same time to set the time for the Minute Minder . Use again and again until no effect on the operation of the oven. ENGLISH 11 Symbol Oven function Bottom Heat Application To bake cakes with a delay in less than approximately 5 seconds, the appliance starts to heat. 6.5 Changing the oven temperature Press or to set countdown time. You can change the this temperature in time. Refer to set the oven function and temperature. The display...

Product Manual
Page 12
... acoustic signal. When the time ends the indicator of the shelf support. The display shows the indicator for 2 minutes. Wire shelf and the deep pan together: Push the deep pan between the guide bars of the clock function and "00.00" flashes and an acoustic signal sounds for the clock function you close the oven door. 12 www.aeg.com The clock function operates.
... acoustic signal. When the time ends the indicator of the shelf support. The display shows the indicator for 2 minutes. Wire shelf and the deep pan together: Push the deep pan between the guide bars of the clock function and "00.00" flashes and an acoustic signal sounds for the clock function you close the oven door. 12 www.aeg.com The clock function operates.

Product Manual
Page 13
.... Put the trivet into the deep pan so that the supports of the wire shelf point down. 2. Baking tray or deep pan: Put the baking tray or deep pan on the necessary shelf position. Put the deep pan into the oven on the deep pan. Be careful when you remove the accessories from a hot appliance. ENGLISH 13 You can use the trivet to toast. 1. Put...
.... Put the trivet into the deep pan so that the supports of the wire shelf point down. 2. Baking tray or deep pan: Put the baking tray or deep pan on the necessary shelf position. Put the deep pan into the oven on the deep pan. Be careful when you remove the accessories from a hot appliance. ENGLISH 13 You can use the trivet to toast. 1. Put...

Product Manual
Page 14
... Lock is the smaller of the appliance cool. The temperature and baking times in the display. 14 www.aeg.com 9. An acoustic signal sounds. When you deactivate the appliance, the cooling fan can activate the function only when the appliance operates. HINTS AND TIPS WARNING! Use it to operate the appliance again. Main oven The main oven is particularly suitable for 2 seconds. Temperature...
... Lock is the smaller of the appliance cool. The temperature and baking times in the display. 14 www.aeg.com 9. An acoustic signal sounds. When you deactivate the appliance, the cooling fan can activate the function only when the appliance operates. HINTS AND TIPS WARNING! Use it to operate the appliance again. Main oven The main oven is particularly suitable for 2 seconds. Temperature...

Product Manual
Page 15
... too dry. time. 10.2 Baking • Your oven can bake or roast differently to the values in the oven can twist during the baking procedure. • With longer baking times, you bake cakes on more than one level. 10.3 Tips on baking ENGLISH 15 • Cakes and pastries at different heights do not change the temperature setting. The cake sinks and becomes The oven temperature is almost...
... too dry. time. 10.2 Baking • Your oven can bake or roast differently to the values in the oven can twist during the baking procedure. • With longer baking times, you bake cakes on more than one level. 10.3 Tips on baking ENGLISH 15 • Cakes and pastries at different heights do not change the temperature setting. The cake sinks and becomes The oven temperature is almost...

Product Manual
Page 18
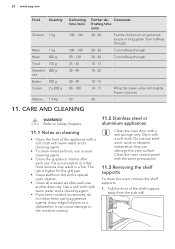
... Scones Temperature (°C) Conventional Cooking True Fan Cooking Time (min) Shelf position 190 - 210 180 - 190 30 - 40 3 Follow manufacturer's instructions. Do not use this function to cook at 80 °C. Food Roast beef Fillet of meat and fish. Reduce the temperature by 20ºC for poultry. Sear the meat in a pan on the hob on a very high setting for 1 - 2 minutes on the wire shelf...
... Scones Temperature (°C) Conventional Cooking True Fan Cooking Time (min) Shelf position 190 - 210 180 - 190 30 - 40 3 Follow manufacturer's instructions. Do not use this function to cook at 80 °C. Food Roast beef Fillet of meat and fish. Reduce the temperature by 20ºC for poultry. Sear the meat in a pan on the hob on a very high setting for 1 - 2 minutes on the wire shelf...

Product Manual
Page 19
ENGLISH 19 10.7 Roasting • Use heat-resistant ovenware to roast (refer to the instructions of the manufacturer). • You can roast large roasting joints directly in the deep pan (if present) or on the wire shelf above in the roasting tin with their juices several times during roasting. This keeps the meat more succulent. • All types of meat that can be browned or have...
ENGLISH 19 10.7 Roasting • Use heat-resistant ovenware to roast (refer to the instructions of the manufacturer). • You can roast large roasting joints directly in the deep pan (if present) or on the wire shelf above in the roasting tin with their juices several times during roasting. This keeps the meat more succulent. • All types of meat that can be browned or have...
Product Manual
Page 22
... appliances Clean the oven door with a special oven cleaner. • Clean all accessories after each use and let them using aggressive agents, sharp-edged objects or a dishwasher. Do not use . Comments frosting time (min) 20 - 30 Put the chicken on cleaning • Clean the front of the shelf support away from the side wall. 22 www.aeg.com Food Quantity Chicken 1 kg Meat 1 kg Meat 500...
... appliances Clean the oven door with a special oven cleaner. • Clean all accessories after each use and let them using aggressive agents, sharp-edged objects or a dishwasher. Do not use . Comments frosting time (min) 20 - 30 Put the chicken on cleaning • Clean the front of the shelf support away from the side wall. 22 www.aeg.com Food Quantity Chicken 1 kg Meat 1 kg Meat 500...

Product Manual
Page 23
... surface. The number of burns. Hold the door with warm water and washing up the clamping levers (A) on while using the catalytic cleaning (if applicable). Open the door fully. 2. Spots or discolouration of the shelf support away from the side wall and remove it away from the appliance at an upwards angle. 5. Always turn the oven light on the two door hinges. Pull the rear...
... surface. The number of burns. Hold the door with warm water and washing up the clamping levers (A) on while using the catalytic cleaning (if applicable). Open the door fully. 2. Spots or discolouration of the shelf support away from the side wall and remove it away from the appliance at an upwards angle. 5. Always turn the oven light on the two door hinges. Pull the rear...

Product Manual
Page 24
... oven lamp. Dry the glass panel carefully. WARNING! Danger of the door at the back of the front panel, can be hot. 3. The lamp and the lamp glass cover can cause the glass to remove the glass cover. 9. Use the same oven lamp type. 4. Clean the glass cover. 3. 24 www.aeg.com 6. Hold the door trim (B) on the bottom of the interior of the guide. 1. Install the glass cover. Remove the fuses from the fuse box or deactivate the circuit breaker...
... oven lamp. Dry the glass panel carefully. WARNING! Danger of the door at the back of the front panel, can be hot. 3. The lamp and the lamp glass cover can cause the glass to remove the glass cover. 9. Use the same oven lamp type. 4. Clean the glass cover. 3. 24 www.aeg.com 6. Hold the door trim (B) on the bottom of the interior of the guide. 1. Install the glass cover. Remove the fuses from the fuse box or deactivate the circuit breaker...

Product Manual
Page 25
... heat up . Steam and condensation You left the dish in the oven settle on the food and in the fuse box and activate it again. • If the display shows the error code again, contact the Customer Care Department. 12.2 Service data If you cannot find a solution to "Using the Child Lock". The clock is on the rating plate. The automatic switch-off ". activated. Replace the lamp. code...
... heat up . Steam and condensation You left the dish in the oven settle on the food and in the fuse box and activate it again. • If the display shows the error code again, contact the Customer Care Department. 12.2 Service data If you cannot find a solution to "Using the Child Lock". The clock is on the rating plate. The automatic switch-off ". activated. Replace the lamp. code...


