Product Manual
Page 2
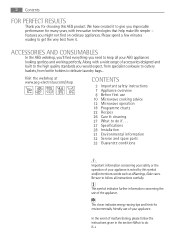
... instructions 7 Appliance overview 8 Before first use 10 Microwave cooking advice 12 Microwave operation 18 Programme charts 22 Recipes 26 Care & cleaning 27 What to follow the instructions given in the section «What to the high quality standards you for many years, with a wide range of accessories designed and built to do if . . . 27 Specifications 28 Installation 31 Environmental information 32 Service and spare parts...
... instructions 7 Appliance overview 8 Before first use 10 Microwave cooking advice 12 Microwave operation 18 Programme charts 22 Recipes 26 Care & cleaning 27 What to follow the instructions given in the section «What to the high quality standards you for many years, with a wide range of accessories designed and built to do if . . . 27 Specifications 28 Installation 31 Environmental information 32 Service and spare parts...
Product Manual
Page 3
... be left unattended during operation. Power levels that are too high or cooking times that they are not broken or loose. The temperature cannot be dry and free from food and food packages. See the corresponding hints in this operation manual. b) The hinges and door safety latches; Clean the waveguide cover, the oven cavity, the turntable and turntable support after you start the oven to ensure the oven is damaged or malfunctioning...
... be left unattended during operation. Power levels that are too high or cooking times that they are not broken or loose. The temperature cannot be dry and free from food and food packages. See the corresponding hints in this operation manual. b) The hinges and door safety latches; Clean the waveguide cover, the oven cavity, the turntable and turntable support after you start the oven to ensure the oven is damaged or malfunctioning...
Product Manual
Page 4
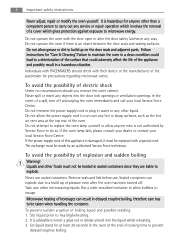
... that could lead to insert a glass rod or similar utensil into the door lock openings or ventilation openings. Individuals with a special cord. Do not attempt to replace the oven lamp yourself or allow bubbles to a build up on the door seals and adjacent parts. Liquids and other foods must be taken when handling the container. Take care when microwaving liquids. To prevent sudden eruption of...
... that could lead to insert a glass rod or similar utensil into the door lock openings or ventilation openings. Individuals with a special cord. Do not attempt to replace the oven lamp yourself or allow bubbles to a build up on the door seals and adjacent parts. Liquids and other foods must be taken when handling the container. Take care when microwaving liquids. To prevent sudden eruption of...

Product Manual
Page 5
... of food coverings; Important safety instructions 5 Do not cook eggs in their safety. Always stand back from the oven door when opening to avoid burns from the oven to use of such foods as they may be extra hot. Keep children away from the face and hands to the temperature of the food or drink; This appliance is for use of pot holders, careful removal...
... of food coverings; Important safety instructions 5 Do not cook eggs in their safety. Always stand back from the oven door when opening to avoid burns from the oven to use of such foods as they may be extra hot. Keep children away from the face and hands to the temperature of the food or drink; This appliance is for use of pot holders, careful removal...
Product Manual
Page 6
... such as a porcelain plate under it is not an indication of your oven, please consult an authorised, qualified electrician. Do not operate the oven without the turntable. b) Do not put cans in the dish's instructions must not be exceeded. Do not put hot foods or hot utensils on the outer cabinet during operation. 6 Important safety instructions To promote trouble-free use of microwave leakage or a malfunction...
... such as a porcelain plate under it is not an indication of your oven, please consult an authorised, qualified electrician. Do not operate the oven without the turntable. b) Do not put cans in the dish's instructions must not be exceeded. Do not put hot foods or hot utensils on the outer cabinet during operation. 6 Important safety instructions To promote trouble-free use of microwave leakage or a malfunction...
Product Manual
Page 7
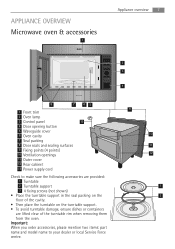
... the turntable support. • To avoid turntable damage, ensure dishes or containers are lifted clear of the turntable rim when removing them from the oven. APPLIANCE OVERVIEW Microwave oven & accessories 1 Appliance overview 7 2 3 4 8 7 65 9 1 Front trim 2 Oven lamp 3 Control panel 13 4 Door opening button 5 Waveguide cover 6 Oven cavity 7 Seal packing 8 Door seals and sealing surfaces 9 Fixing points (4 points) 10 Ventilation openings 11 Outer cover 12 Rear cabinet 13 Power supply cord Check to your dealer or local Service...
... the turntable support. • To avoid turntable damage, ensure dishes or containers are lifted clear of the turntable rim when removing them from the oven. APPLIANCE OVERVIEW Microwave oven & accessories 1 Appliance overview 7 2 3 4 8 7 65 9 1 Front trim 2 Oven lamp 3 Control panel 13 4 Door opening button 5 Waveguide cover 6 Oven cavity 7 Seal packing 8 Door seals and sealing surfaces 9 Fixing points (4 points) 10 Ventilation openings 11 Outer cover 12 Rear cabinet 13 Power supply cord Check to your dealer or local Service...
Product Manual
Page 8
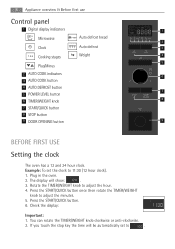
...If you touch the stop key the time will show: . 3. Check the display: Important: 1. Example: To set to adjust the hour. 4. 8 Appliance overview & Before first use Control panel 1 Digital display indicators 1 Microwave Auto defrost bread 2 Clock Auto defrost 3 Cooking stages Weight 4 5 Plus/Minus 2 AUTO COOK indicators 6 3 AUTO COOK button 4 AUTO DEFROST button 7 5 POWER LEVEL button 6 TIMER/WEIGHT knob 8 7 START/QUICK button 8 STOP button 9 DOOR OPENING button 9 BEFORE FIRST USE Setting the clock AUTO + AUTO The oven has a 12 and 24 hour clock. Plug in...
...If you touch the stop key the time will show: . 3. Check the display: Important: 1. Example: To set to adjust the hour. 4. 8 Appliance overview & Before first use Control panel 1 Digital display indicators 1 Microwave Auto defrost bread 2 Clock Auto defrost 3 Cooking stages Weight 4 5 Plus/Minus 2 AUTO COOK indicators 6 3 AUTO COOK button 4 AUTO DEFROST button 7 5 POWER LEVEL button 6 TIMER/WEIGHT knob 8 7 START/QUICK button 8 STOP button 9 DOOR OPENING button 9 BEFORE FIRST USE Setting the clock AUTO + AUTO The oven has a 12 and 24 hour clock. Plug in...

Product Manual
Page 9
... the START/QUICK button for 5 seconds. Press the START/QUICK button once then rotate the TIMER/WEIGHT knob to : 1. Open the door. 2. Press and hold the START/QUICK button for 5 seconds. Using the STOP button Use the STOP button to adjust the hour. Erase a mistake during cooking, touch twice. Rotate the TIMER/WEIGHT knob to adjust the minutes. 4. Open the door. The display will show : . 3. If you touch the stop key the time will beep. The oven will be automatically set the clock...
... the START/QUICK button for 5 seconds. Press the START/QUICK button once then rotate the TIMER/WEIGHT knob to : 1. Open the door. 2. Press and hold the START/QUICK button for 5 seconds. Using the STOP button Use the STOP button to adjust the hour. Erase a mistake during cooking, touch twice. Rotate the TIMER/WEIGHT knob to adjust the minutes. 4. Open the door. The display will show : . 3. If you touch the stop key the time will beep. The oven will be automatically set the clock...

Product Manual
Page 10
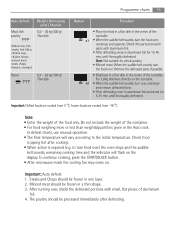
... less heating time. Example: To set , no part of food take longer to ensure even heating. The oven will beep twice and 'LOC' will be displayed: Note: • To cancel the child safety lock, press and hold the stop button for 5 seconds. Standing time is not set if the clock is necessary after cooking as it is important to turn, rearrange or stir food to cook than large ones, as microwaves...
... less heating time. Example: To set , no part of food take longer to ensure even heating. The oven will beep twice and 'LOC' will be displayed: Note: • To cancel the child safety lock, press and hold the stop button for 5 seconds. Standing time is not set if the clock is necessary after cooking as it is important to turn, rearrange or stir food to cook than large ones, as microwaves...

Product Manual
Page 11
... break or crack if heated suddenly. Browning dishes Always follow instructions carefully. Plastic / polystyrene e.g. Stand Standing time is essential to let the steam escape. China and ceramics / $ Porcelain, pottery, glazed earthenware and bone china are not recommended unless specified by the manufacturer, e.g. Microwave cooking advice 11 Cooking techniques Arrange Cover Place the thickest parts of food towards the centre. Foil...
... break or crack if heated suddenly. Browning dishes Always follow instructions carefully. Plastic / polystyrene e.g. Stand Standing time is essential to let the steam escape. China and ceramics / $ Porcelain, pottery, glazed earthenware and bone china are not recommended unless specified by the manufacturer, e.g. Microwave cooking advice 11 Cooking techniques Arrange Cover Place the thickest parts of food towards the centre. Foil...
Product Manual
Page 12
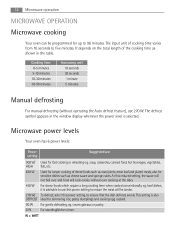
.... cream gateaux or pastry. 0 W For standing/kitchen timer. Microwave power levels Your oven has 6 power levels: Power setting Suggested use 270 W. The input unit of dense foods such as roast joints, meat loaf and plated meals, also for sensitive dishes such as shown in the window display whenever the power level is also DEFROST ideal for longer cooking of cooking time varies from 10 seconds to five minutes. It depends...
.... cream gateaux or pastry. 0 W For standing/kitchen timer. Microwave power levels Your oven has 6 power levels: Power setting Suggested use 270 W. The input unit of dense foods such as roast joints, meat loaf and plated meals, also for sensitive dishes such as shown in the window display whenever the power level is also DEFROST ideal for longer cooking of cooking time varies from 10 seconds to five minutes. It depends...
Product Manual
Page 13
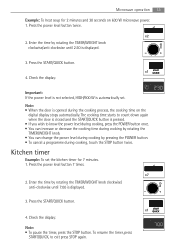
... timer, press START/QUICK, to know the power level during cooking, press the POWER button once. • You can increase or decrease the cooking time during cooking by rotating the TIMER/WEIGHT knob. • You can change the power level during the cooking process, the cooking time on 630 W microwave power. 1. Enter the time by rotating the TIMER/WEIGHT knob clockwise/ anti-clockwise until 2:30 is displayed. 3. Kitchen timer Example: To set . x7 2. Press the START/QUICK button. Microwave operation 13 Example: To heat...
... timer, press START/QUICK, to know the power level during cooking, press the POWER button once. • You can increase or decrease the cooking time during cooking by rotating the TIMER/WEIGHT knob. • You can change the power level during the cooking process, the cooking time on 630 W microwave power. 1. Enter the time by rotating the TIMER/WEIGHT knob clockwise/ anti-clockwise until 2:30 is displayed. 3. Kitchen timer Example: To set . x7 2. Press the START/QUICK button. Microwave operation 13 Example: To heat...

Product Manual
Page 14
... prefer boiled potatoes softer, use MINUS . Turn the TIMER/WEIGHT knob until 0.3 kg is in operation. Press the power button once to decrease or increase the cooking time when using the automatic programmes. Check the display: 14 Microwave operation Add 30 seconds The START/QUICK button allows you to operate the two following functions: 1.Direct Start You can extend the cooking time for 30 seconds by pressing the AUTO COOK button twice. x1 Note...
... prefer boiled potatoes softer, use MINUS . Turn the TIMER/WEIGHT knob until 0.3 kg is in operation. Press the power button once to decrease or increase the cooking time when using the automatic programmes. Check the display: 14 Microwave operation Add 30 seconds The START/QUICK button allows you to operate the two following functions: 1.Direct Start You can extend the cooking time for 30 seconds by pressing the AUTO COOK button twice. x1 Note...

Product Manual
Page 16
... with Sauce Symbol Example: To cook 0.3 kg of the Auto cook time, the programme will be displayed. After 1 minute and a reminder beep, the time of day will automatically stop. Check the display: When action is displayed. 3. To continue cooking, press the START/QUICK button. x2 2. At the end of boiled potatoes. 1. 16 Microwave operation Auto cook & auto defrost operation AUTO COOK and AUTO DEFROST automatically work out the correct cooking mode and cooking time. Turn the TIMER/WEIGHT knob until 0.3 kg is required...
... with Sauce Symbol Example: To cook 0.3 kg of the Auto cook time, the programme will be displayed. After 1 minute and a reminder beep, the time of day will automatically stop. Check the display: When action is displayed. 3. To continue cooking, press the START/QUICK button. x2 2. At the end of boiled potatoes. 1. 16 Microwave operation Auto cook & auto defrost operation AUTO COOK and AUTO DEFROST automatically work out the correct cooking mode and cooking time. Turn the TIMER/WEIGHT knob until 0.3 kg is required...

Product Manual
Page 17
... the display. x1 4. to turn food over) the oven stops and the audible bell sounds, remaining cooking time and the indicator will flash. x2 2. Check the display: When action is displayed. 3. To continue cooking, press the START/QUICK button. After 1 minute and a reminder beep, the time of bread. 1. Turn the TIMER/WEIGHT knob until 0.2 is required (e.g. Select the menu required by pressing the AUTO DEFROST button twice. At the end of the Auto defrost time...
... the display. x1 4. to turn food over) the oven stops and the audible bell sounds, remaining cooking time and the indicator will flash. x2 2. Check the display: When action is displayed. 3. To continue cooking, press the START/QUICK button. After 1 minute and a reminder beep, the time of bread. 1. Turn the TIMER/WEIGHT knob until 0.2 is required (e.g. Select the menu required by pressing the AUTO DEFROST button twice. At the end of the Auto defrost time...
Product Manual
Page 19
... poultry. • Minced meat: When the audible bell sounds, turn the food over , rearrange and remove defrosted slices. • After defrosting cover in aluminium foil and stand for 15-45 min, until thoroughly defrosted. For 1,0 kg distribute directly on . To continue cooking, press the START/QUICK button. • After microwave mode the cooling fan may come on the turntable. Steaks and Chops should be frozen in a thin...
... poultry. • Minced meat: When the audible bell sounds, turn the food over , rearrange and remove defrosted slices. • After defrosting cover in aluminium foil and stand for 15-45 min, until thoroughly defrosted. For 1,0 kg distribute directly on . To continue cooking, press the START/QUICK button. • After microwave mode the cooling fan may come on the turntable. Steaks and Chops should be frozen in a thin...

Product Manual
Page 26
... cloth. Care should not be taken when cleaning the control panel. Make sure that could lead to de-activate the control panel. Turntable & turntable support Remove the turntable and turntable support from the oven. Make sure the soap is still warm. Important: A steam cleaner should be used. Cooking mode Microwave 900 W Standard time 20 minutes Reduced power level Microwave - 630 W Oven exterior The outside of water. For cleaning, wipe any sort of the glass. Door To remove all...
... cloth. Care should not be taken when cleaning the control panel. Make sure that could lead to de-activate the control panel. Turntable & turntable support Remove the turntable and turntable support from the oven. Make sure the soap is still warm. Important: A steam cleaner should be used. Cooking mode Microwave 900 W Standard time 20 minutes Reduced power level Microwave - 630 W Oven exterior The outside of water. For cleaning, wipe any sort of the glass. Door To remove all...
Product Manual
Page 27
... turning ? The microwave will not switch off ? The interior light bulb can be used in the fuse box are working properly ? Group 2 means that the equipment is classified as group 2 class B equipment. Actual capacity for the heat treatment of food. Check if . . . • The fuses in domestic establishments. ** Internal capacity is calculated by trained Service Force Technicians. • Set a longer cooking time (double quantity = nearly double time...
... turning ? The microwave will not switch off ? The interior light bulb can be used in the fuse box are working properly ? Group 2 means that the equipment is classified as group 2 class B equipment. Actual capacity for the heat treatment of food. Check if . . . • The fuses in domestic establishments. ** Internal capacity is calculated by trained Service Force Technicians. • Set a longer cooking time (double quantity = nearly double time...

Product Manual
Page 29
... be found on the inside face of the control panel. • The power supply cord may only be replaced by incorporating a switch in the fixed wiring in accordance with the specification of your power supply. Electrical connections WARNING! THIS APPLIANCE MUST BE EARTHED The manufacturer declines any other liquid. Installation 29 Connecting the appliance to the power supply • The electrical outlet should be...
... be found on the inside face of the control panel. • The power supply cord may only be replaced by incorporating a switch in the fixed wiring in accordance with the specification of your power supply. Electrical connections WARNING! THIS APPLIANCE MUST BE EARTHED The manufacturer declines any other liquid. Installation 29 Connecting the appliance to the power supply • The electrical outlet should be...
Product Manual
Page 33
... neglect, the replacement of any light bulbs or removable parts of glass or plastic. • Costs incurred for calls to put right an appliance which case a premium will , at our discretion repair or replace the same FREE OF CHARGE for labour, materials or carriage on condition that: • The appliance has been correctly installed and used only on the electricity or gas...
... neglect, the replacement of any light bulbs or removable parts of glass or plastic. • Costs incurred for calls to put right an appliance which case a premium will , at our discretion repair or replace the same FREE OF CHARGE for labour, materials or carriage on condition that: • The appliance has been correctly installed and used only on the electricity or gas...

