Product Manual
Page 2
... information concerning the use of your appliance. 2 Contents FOR PERFECT RESULTS Thank you need to keep all instructions carefully. Be sure to follow the instructions given in the section «What to do if . . . 27 Specifications 28 Installation 31 Environmental information 32 Service & spare parts 33 Guarantee conditions Important information concerning your appliance is noted by this AEG product. Visit...
... information concerning the use of your appliance. 2 Contents FOR PERFECT RESULTS Thank you need to keep all instructions carefully. Be sure to follow the instructions given in the section «What to do if . . . 27 Specifications 28 Installation 31 Environmental information 32 Service & spare parts 33 Guarantee conditions Important information concerning your appliance is noted by this AEG product. Visit...
Product Manual
Page 3
If food being heated begins to make sure the door closes properly and ensure it is operating as desired. Built-up grease may catch fire. Remove all metallic seals, wire twists, etc., from grease. To make sure there are too long may cause a fire. Only use : a) The door; Clean the waveguide cover, the oven cavity, the turntable and turntable support after you start the oven to ensure the oven is damaged or...
If food being heated begins to make sure the door closes properly and ensure it is operating as desired. Built-up grease may catch fire. Remove all metallic seals, wire twists, etc., from grease. To make sure there are too long may cause a fire. Only use : a) The door; Clean the waveguide cover, the oven cavity, the turntable and turntable support after you start the oven to ensure the oven is damaged or...

Product Manual
Page 4
... liquid whilst reheating. 3. 4 Important safety instructions Never adjust, repair or modify the oven yourself. Do not allow grease or dirt to replace the oven lamp yourself or allow the power supply cord to insert a glass rod or similar utensil into the door lock openings or ventilation openings. Never spill or insert any hot or sharp surfaces, such as the hot air vent area at the end of...
... liquid whilst reheating. 3. 4 Important safety instructions Never adjust, repair or modify the oven yourself. Do not allow grease or dirt to replace the oven lamp yourself or allow the power supply cord to insert a glass rod or similar utensil into the door lock openings or ventilation openings. Never spill or insert any hot or sharp surfaces, such as the hot air vent area at the end of...

Product Manual
Page 5
... hot. Temperature of the food or drink; Slice stuffed baked foods after microwave cooking has ended. Shell and slice hard boiled eggs before reheating them burning themselves. Always stand back from the oven door when opening to avoid burns from the face and hands to prevent burns. Children should be heated in microwave ovens since they have been given supervision or instruction...
... hot. Temperature of the food or drink; Slice stuffed baked foods after microwave cooking has ended. Shell and slice hard boiled eggs before reheating them burning themselves. Always stand back from the oven door when opening to avoid burns from the face and hands to prevent burns. Children should be heated in microwave ovens since they have been given supervision or instruction...
Product Manual
Page 6
... form on the outer cabinet during operation. Neither the manufacturer nor the dealer can accept any liability for this oven. This is a normal occurrence and is empty. Do not operate the oven without the turntable. Do not place anything on the oven walls or around the door seals and sealing surfaces. 6 Important safety instructions To promote trouble-free use of microwave leakage or a malfunction...
... form on the outer cabinet during operation. Neither the manufacturer nor the dealer can accept any liability for this oven. This is a normal occurrence and is empty. Do not operate the oven without the turntable. Do not place anything on the oven walls or around the door seals and sealing surfaces. 6 Important safety instructions To promote trouble-free use of microwave leakage or a malfunction...
Product Manual
Page 7
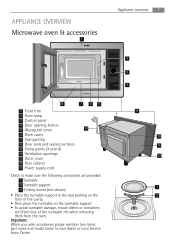
APPLIANCE OVERVIEW Microwave oven & accessories 1 Appliance overview 7 2 3 4 8 7 65 1 Front trim 2 Oven lamp 3 Control panel 4 Door opening button 5 Waveguide cover 13 6 Oven cavity 7 Seal packing 8 Door seals and sealing surfaces 9 Fixing points (4 points) 10 Ventilation openings 11 Outer cover 12 Rear cabinet 13 Power supply cord Check to your dealer or local Service Force Centre. 9 10 11 12 1 2 Important: When you order accessories, please mention two items: part name and model name to make sure...
APPLIANCE OVERVIEW Microwave oven & accessories 1 Appliance overview 7 2 3 4 8 7 65 1 Front trim 2 Oven lamp 3 Control panel 4 Door opening button 5 Waveguide cover 13 6 Oven cavity 7 Seal packing 8 Door seals and sealing surfaces 9 Fixing points (4 points) 10 Ventilation openings 11 Outer cover 12 Rear cabinet 13 Power supply cord Check to your dealer or local Service Force Centre. 9 10 11 12 1 2 Important: When you order accessories, please mention two items: part name and model name to make sure...
Product Manual
Page 8
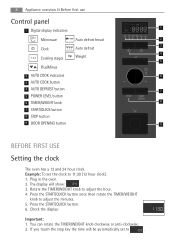
... clock to . Check the display: Important: 1. Plug in the oven. 2. 8 Appliance overview & Before first use Control panel 1 1 Digital display indicators Microwave Auto defrost bread 2 3 Clock Auto defrost 4 Cooking stages Weight 5 Plus/Minus 2 AUTO COOK indicators 6 3 AUTO COOK button 4 AUTO DEFROST button 7 5 POWER LEVEL button 6 TIMER/WEIGHT knob 8 7 START/QUICK button 8 STOP button 9 DOOR OPENING button 9 BEFORE FIRST USE Setting the clock AUTO + AUTO The oven has a 12 and 24 hour clock. Press the START/QUICK button. 6. If you touch the stop key the time...
... clock to . Check the display: Important: 1. Plug in the oven. 2. 8 Appliance overview & Before first use Control panel 1 1 Digital display indicators Microwave Auto defrost bread 2 3 Clock Auto defrost 4 Cooking stages Weight 5 Plus/Minus 2 AUTO COOK indicators 6 3 AUTO COOK button 4 AUTO DEFROST button 7 5 POWER LEVEL button 6 TIMER/WEIGHT knob 8 7 START/QUICK button 8 STOP button 9 DOOR OPENING button 9 BEFORE FIRST USE Setting the clock AUTO + AUTO The oven has a 12 and 24 hour clock. Press the START/QUICK button. 6. If you touch the stop key the time...

Product Manual
Page 9
... TIMER/WEIGHT knob to 23:45 (24 hour clock). 1. Press the START/QUICK button once. 5. Press the START/QUICK button once. 5. Erase a mistake during cooking, touch twice. Cancel a programme during programming. 2. Rotate the TIMER/WEIGHT knob to adjust the minutes. 6. Stop the oven temporarily during cooking, press once. 3. Press the START/QUICK button. 7. Press the START/QUICK button once then rotate the TIMER/WEIGHT knob to adjust the hour. 3. Open the door. 2. AUTO AUTO + AUTO Before first use 9 Example: To set the clock...
... TIMER/WEIGHT knob to 23:45 (24 hour clock). 1. Press the START/QUICK button once. 5. Press the START/QUICK button once. 5. Erase a mistake during cooking, touch twice. Cancel a programme during programming. 2. Rotate the TIMER/WEIGHT knob to adjust the minutes. 6. Stop the oven temporarily during cooking, press once. 3. Press the START/QUICK button. 7. Press the START/QUICK button once then rotate the TIMER/WEIGHT knob to adjust the hour. 3. Open the door. 2. AUTO AUTO + AUTO Before first use 9 Example: To set the clock...

Product Manual
Page 10
... (e.g. The oven will beep twice and 'LOC' will be displayed: Note: • To cancel the child safety lock, press and hold the stop button for 5 seconds. Quantity The cooking time must be taken as the amount of cooking time needed . For even cooking make all sides to the centre. Chilled foods will operate until the lock feature has been cancelled. Example: To set , no part of the microwave will...
... (e.g. The oven will beep twice and 'LOC' will be displayed: Note: • To cancel the child safety lock, press and hold the stop button for 5 seconds. Quantity The cooking time must be taken as the amount of cooking time needed . For even cooking make all sides to the centre. Chilled foods will operate until the lock feature has been cancelled. Example: To set , no part of the microwave will...

Product Manual
Page 11
... 2 cm from the oven walls, as they may occur. Foil containers are suitable for microwave use plastic or metal ties, as overheating may explode, even after cooking to enable the heat to shield food from the outside towards the outside of the dish. Should not touch the food and must be pierced to let steam escape. Paper - Care must be taken as...
... 2 cm from the oven walls, as they may occur. Foil containers are suitable for microwave use plastic or metal ties, as overheating may explode, even after cooking to enable the heat to shield food from the outside towards the outside of the dish. Should not touch the food and must be pierced to let steam escape. Paper - Care must be taken as...
Product Manual
Page 12
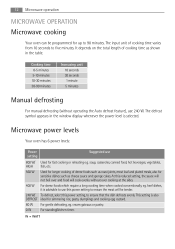
... will be programmed for up to 90 minutes. Microwave power levels Your oven has 6 power levels: Power setting Suggested use 800 W/ Used for simmering rice, pasta, dumplings and cooking egg custard. 80 W For gentle defrosting, eg. This setting is selected. The defrost symbol appears in the table. cream gateaux or pastry. 0 W For standing/kitchen timer. The input unit of dense foods such as roast joints, meat loaf and plated meals...
... will be programmed for up to 90 minutes. Microwave power levels Your oven has 6 power levels: Power setting Suggested use 800 W/ Used for simmering rice, pasta, dumplings and cooking egg custard. 80 W For gentle defrosting, eg. This setting is selected. The defrost symbol appears in the table. cream gateaux or pastry. 0 W For standing/kitchen timer. The input unit of dense foods such as roast joints, meat loaf and plated meals...

Product Manual
Page 13
... cooking process, the cooking time on 560 W microwave power. 1. Press the power level button 7 times. x1 4. Press the START/QUICK button. To resume the timer press START/QUICK, to know the power level during cooking, press the power button once. • You can increase or decrease the cooking time during cooking by rotating the TIMER/WEIGHT knob. • You can change the power level during cooking by rotating the TIMER/WEIGHT knob clockwise/ anti-clockwise until 2:30 is displayed. 3. Microwave operation 13 Example: To heat...
... cooking process, the cooking time on 560 W microwave power. 1. Press the power level button 7 times. x1 4. Press the START/QUICK button. To resume the timer press START/QUICK, to know the power level during cooking, press the power button once. • You can increase or decrease the cooking time during cooking by rotating the TIMER/WEIGHT knob. • You can change the power level during cooking by rotating the TIMER/WEIGHT knob clockwise/ anti-clockwise until 2:30 is displayed. 3. Microwave operation 13 Example: To heat...

Product Manual
Page 16
... cooking, press the START/QUICK button. to turn food over) the oven stops and the audible bell sounds, remaining cooking time and the indicator will automatically stop. At the end of the Auto cook time, the programme will flash on the display. After 1 minute and a reminder beep, the time of boiled potatoes. 1. 16 Microwave operation Auto cook & auto defrost operation AUTO COOK and AUTO DEFROST automatically work out the correct cooking mode and cooking time. The audible bell sounds and the cooking symbol will be displayed. Turn the TIMER/WEIGHT...
... cooking, press the START/QUICK button. to turn food over) the oven stops and the audible bell sounds, remaining cooking time and the indicator will automatically stop. At the end of the Auto cook time, the programme will flash on the display. After 1 minute and a reminder beep, the time of boiled potatoes. 1. 16 Microwave operation Auto cook & auto defrost operation AUTO COOK and AUTO DEFROST automatically work out the correct cooking mode and cooking time. The audible bell sounds and the cooking symbol will be displayed. Turn the TIMER/WEIGHT...

Product Manual
Page 17
... 2. Press the START/QUICK button. Check the display: When action is displayed. 3. After 1 minute and a reminder beep, the time of the Auto defrost time, the programme will be displayed. Select the menu required by pressing the AUTO DEFROST button twice. The audible bell sounds and the cooking symbol will flash on the display. Auto Defrost Food Meat/Fish/Poultry Bread Symbol Microwave operation 17 Example: To defrost 0.2 kg of bread. 1. Turn the TIMER/WEIGHT knob until...
... 2. Press the START/QUICK button. Check the display: When action is displayed. 3. After 1 minute and a reminder beep, the time of the Auto defrost time, the programme will be displayed. Select the menu required by pressing the AUTO DEFROST button twice. The audible bell sounds and the cooking symbol will flash on the display. Auto Defrost Food Meat/Fish/Poultry Bread Symbol Microwave operation 17 Example: To defrost 0.2 kg of bread. 1. Turn the TIMER/WEIGHT knob until...
Product Manual
Page 19
... audible bell sounds, turn the food over , rearrange and remove defrosted slices. • After defrosting cover in one layer. 2. Note: • Enter the weight of the food only. To continue cooking, press the START/QUICK button. • After microwave mode the cooling fan may come on the turntable. Note: Not suitable for 15-45 min, until thoroughly defrosted. to turn the food over ) the oven stops and the audible bell sounds, remaining cooking time and...
... audible bell sounds, turn the food over , rearrange and remove defrosted slices. • After defrosting cover in one layer. 2. Note: • Enter the weight of the food only. To continue cooking, press the START/QUICK button. • After microwave mode the cooling fan may come on the turntable. Note: Not suitable for 15-45 min, until thoroughly defrosted. to turn the food over ) the oven stops and the audible bell sounds, remaining cooking time and...

Product Manual
Page 26
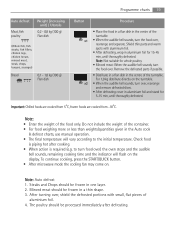
... glass. Make sure the soap is still warm. Control panel Open the door before cleaning to 560 W.) After pausing for 90 seconds, 800 W can be reduced to de-activate the control panel. For heavier spills, use a mild soap and wipe several times with mild soap and water. Do not remove the waveguide cover. 2. Cooking mode Microwave 800 W Standard time 20 minutes Reduced power level Microwave - 560 W Both the turntable and the turntable support...
... glass. Make sure the soap is still warm. Control panel Open the door before cleaning to 560 W.) After pausing for 90 seconds, 800 W can be reduced to de-activate the control panel. For heavier spills, use a mild soap and wipe several times with mild soap and water. Do not remove the waveguide cover. 2. Cooking mode Microwave 800 W Standard time 20 minutes Reduced power level Microwave - 560 W Both the turntable and the turntable support...
Product Manual
Page 27
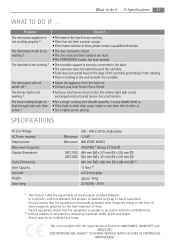
... door seals and their surfaces are clean. • The START/QUICK-button has been pressed. • The turntable support is correctly connected to the drive. • The ovenware does not extend beyond the turntable. • Food does not extend beyond the edge of food. SPECIFICATIONS AC Line Voltage AC Power required: Output power: Microwave Frequency Outside Dimensions: Cavity Dimensions Oven Capacity Turntable Weight Oven lamp 230 - 240 V, 50 Hz, single phase Microwave 1.2 kW Microwave...
... door seals and their surfaces are clean. • The START/QUICK-button has been pressed. • The turntable support is correctly connected to the drive. • The ovenware does not extend beyond the turntable. • Food does not extend beyond the edge of food. SPECIFICATIONS AC Line Voltage AC Power required: Output power: Microwave Frequency Outside Dimensions: Cavity Dimensions Oven Capacity Turntable Weight Oven lamp 230 - 240 V, 50 Hz, single phase Microwave 1.2 kW Microwave...

Product Manual
Page 28
...:Unscrew and remove the 4 feet from the bottom of damage. 2. Replace the 3 tall feet with those provided in position with this oven. Ensure the appliance is kept between the cupboard door above and the top of the oven. The fixing points are 3 tall feet and 1 short foot. 28 Installation INSTALLATION The microwave can be fitted in position A, B, C or D: Position Niche size W D H Position...
...:Unscrew and remove the 4 feet from the bottom of damage. 2. Replace the 3 tall feet with those provided in position with this oven. Ensure the appliance is kept between the cupboard door above and the top of the oven. The fixing points are 3 tall feet and 1 short foot. 28 Installation INSTALLATION The microwave can be fitted in position A, B, C or D: Position Niche size W D H Position...

Product Manual
Page 29
... on the inside face of the control panel. • The power supply cord may only be replaced by incorporating (A) a switch in the fixed wiring in an emergency. The rating plate can be unplugged easily in accordance with the specification of string to the power supply cord to facilitate connection to the microwave oven while the hob is on. Installation 29 Safe use near domestic gas, electric and...
... on the inside face of the control panel. • The power supply cord may only be replaced by incorporating (A) a switch in the fixed wiring in an emergency. The rating plate can be unplugged easily in accordance with the specification of string to the power supply cord to facilitate connection to the microwave oven while the hob is on. Installation 29 Safe use near domestic gas, electric and...
Product Manual
Page 33
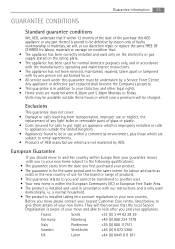
...; The product is installed and used in accordance with by any person not authorised by us. • All service work under this AEG appliance or any light bulbs or removable parts of glass or plastic. • Costs incurred for normal domestic purposes only, and in accordance with the manufacturer's operating and maintenance instructions. • The appliance has not been serviced, maintained, repaired, taken apart...
...; The product is installed and used in accordance with by any person not authorised by us. • All service work under this AEG appliance or any light bulbs or removable parts of glass or plastic. • Costs incurred for normal domestic purposes only, and in accordance with the manufacturer's operating and maintenance instructions. • The appliance has not been serviced, maintained, repaired, taken apart...

