Specification Sheet
Page 1
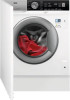
...; touch display • LED display • 8 kg wash capacity • 1400 spin speed RPM • Programmes include: • Wool plus you can finish your wash cycle with a gentle steam so clothes need . AEG's built-in 8000 washing machine fits seamlessly with other appliances, makes less noise and provides unrivalled care for a comfortable home The quiet washing machine ensures low noise levels when running a cycle. The short, gentle programme safely removes odours and...
...; touch display • LED display • 8 kg wash capacity • 1400 spin speed RPM • Programmes include: • Wool plus you can finish your wash cycle with a gentle steam so clothes need . AEG's built-in 8000 washing machine fits seamlessly with other appliances, makes less noise and provides unrivalled care for a comfortable home The quiet washing machine ensures low noise levels when running a cycle. The short, gentle programme safely removes odours and...
Specification Sheet
Page 2
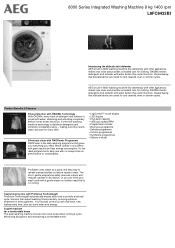
... Generation Energy Class Spin drying efficiency (2010/30/EC) Energy consumption (annual) Annual water consumption, l Energy cons. Cotton 60°C (kWh) Time of wash / cotton 60°C Water cotton 60 Load Capacity kg (Wash) Drum volume Max spin speed (rpm) Residual Humidity Motor System Washing noise, dB(A) Spinning noise, dB(A) Dimensions (mm) (HxWxD) Depth max, mm Wheels/feet Cord Length Inlet hose length (mm) Outlet hose length (mm) Connected Load Voltage Required Fuse Frequency Porthole Type 8000 Series Integrated Washing Machine...
... Generation Energy Class Spin drying efficiency (2010/30/EC) Energy consumption (annual) Annual water consumption, l Energy cons. Cotton 60°C (kWh) Time of wash / cotton 60°C Water cotton 60 Load Capacity kg (Wash) Drum volume Max spin speed (rpm) Residual Humidity Motor System Washing noise, dB(A) Spinning noise, dB(A) Dimensions (mm) (HxWxD) Depth max, mm Wheels/feet Cord Length Inlet hose length (mm) Outlet hose length (mm) Connected Load Voltage Required Fuse Frequency Porthole Type 8000 Series Integrated Washing Machine...
User Manual
Page 2
... 8. SETTINGS...25 9. BEFORE FIRST USE 26 10. PRODUCT INFORMATION SHEET IN REFERENCE TO E.U. REGULATION 1369/2017...43 FOR PERFECT RESULTS Thank you might not find on the rating plate. SAFETY INFORMATION 3 2. INSTALLATION...6 4. DIAL AND BUTTONS 19 7. TROUBLESHOOTING 37 14. When contacting our Authorised Service Centre, ensure that help make life simpler features you for your appliance: www.aeg.com/shop CUSTOMER CARE...
... 8. SETTINGS...25 9. BEFORE FIRST USE 26 10. PRODUCT INFORMATION SHEET IN REFERENCE TO E.U. REGULATION 1369/2017...43 FOR PERFECT RESULTS Thank you might not find on the rating plate. SAFETY INFORMATION 3 2. INSTALLATION...6 4. DIAL AND BUTTONS 19 7. TROUBLESHOOTING 37 14. When contacting our Authorised Service Centre, ensure that help make life simpler features you for your appliance: www.aeg.com/shop CUSTOMER CARE...

User Manual
Page 3
...instruction concerning the use of this appliance. • This appliance is open. • If the appliance has a child safety device, it should be activated. • Children shall not carry out cleaning and user maintenance of the appliance without supervision. 1.2 General Safety • Do not change the specification of the appliance, carefully read the supplied instructions. SAFETY INFORMATION Before the installation and use...detergents away from children. • Keep children and pets away from the appliance when the door is intended to be used in shops, offices and other working environments...
...instruction concerning the use of this appliance. • This appliance is open. • If the appliance has a child safety device, it should be activated. • Children shall not carry out cleaning and user maintenance of the appliance without supervision. 1.2 General Safety • Do not change the specification of the appliance, carefully read the supplied instructions. SAFETY INFORMATION Before the installation and use...detergents away from children. • Keep children and pets away from the appliance when the door is intended to be used in shops, offices and other working environments...
User Manual
Page 4
...; Remove all the packaging and the transit bolts including rubber bush with plastic spacer. • Keep the transit bolts in the future they must be connected to clean the appliance. • Clean the appliance with the appliance. • Do not install or use abrasive products, abrasive cleaning pads, solvents or metal objects. 2. 4 www.aeg.com - Do not use the appliance where the temperature...
...; Remove all the packaging and the transit bolts including rubber bush with plastic spacer. • Keep the transit bolts in the future they must be connected to clean the appliance. • Clean the appliance with the appliance. • Do not install or use abrasive products, abrasive cleaning pads, solvents or metal objects. 2. 4 www.aeg.com - Do not use the appliance where the temperature...

User Manual
Page 5
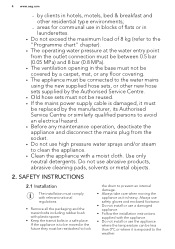
... removed from the drain hose. If it to be replaced, this must be carried out by hand before loading them into the washing machine. • Do not touch the glass door while a programme is fitted with wet hands. • Do not pull the mains cable to the mains plug after the first use of the appliance. • Do not use a correctly installed...
... removed from the drain hose. If it to be replaced, this must be carried out by hand before loading them into the washing machine. • Do not touch the glass door while a programme is fitted with wet hands. • Do not pull the mains cable to the mains plug after the first use of the appliance. • Do not use a correctly installed...
User Manual
Page 16
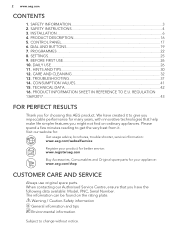
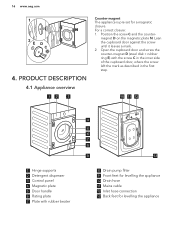
... as described in the first step. 10 11 12 1 Hinge supports 2 Detergent dispenser 3 Control panel 4 Magnetic plate 5 Door handle 6 Rating plate 7 Plate with rubber beater 4 5 6 7 8 9 13 8 Drain pump filter 9 Front feet for levelling the appliance 10 Drain hose 11 Mains cable 12 Inlet hose connection 13 Back feet for a magnetic closure. magnet D on the magnetic plate N. Lean the cupboard door against the screw until it leaves a mark. 2. 16 www...
... as described in the first step. 10 11 12 1 Hinge supports 2 Detergent dispenser 3 Control panel 4 Magnetic plate 5 Door handle 6 Rating plate 7 Plate with rubber beater 4 5 6 7 8 9 13 8 Drain pump filter 9 Front feet for levelling the appliance 10 Drain hose 11 Mains cable 12 Inlet hose connection 13 Back feet for a magnetic closure. magnet D on the magnetic plate N. Lean the cupboard door against the screw until it leaves a mark. 2. 16 www...

User Manual
Page 18
... " paragraph). Rinse Hold indicator. Child safety lock indicator. Oko-Mix indicator. The spin area: Spin speed indicator No Spin indicator. Spin phase is off. Delay start indicator. g. ). • Cycle end ( ). • Warning code (e.g. ). • Error indicator ( ). Anti-crease phase indicator. Silent indicator. Door locked indicator. It flashes when the laundry load exceeds the maximum declared load of the washing phase, when it is a recommendation to perform the drum cleaning.
... " paragraph). Rinse Hold indicator. Child safety lock indicator. Oko-Mix indicator. The spin area: Spin speed indicator No Spin indicator. Spin phase is off. Delay start indicator. g. ). • Cycle end ( ). • Warning code (e.g. ). • Error indicator ( ). Anti-crease phase indicator. Silent indicator. Door locked indicator. It flashes when the laundry load exceeds the maximum declared load of the washing phase, when it is a recommendation to perform the drum cleaning.

User Manual
Page 19
... all spin phases. The drum turns regularly to 'Programmes' chapter for more details. You must drain the water to prevent the fabrics from creasing. Refer to reduce creasing. When you touch the Start/Pause button, the appliance performs the spinning phase and drains the water. The final spin is a "Reset" function, which stops and resets the running programme. The indicator remains displayed. The door stays locked and the drum turns regularly...
... all spin phases. The drum turns regularly to 'Programmes' chapter for more details. You must drain the water to prevent the fabrics from creasing. Refer to reduce creasing. When you touch the Start/Pause button, the appliance performs the spinning phase and drains the water. The final spin is a "Reset" function, which stops and resets the running programme. The indicator remains displayed. The door stays locked and the drum turns regularly...

User Manual
Page 22
... Steam programme can be used for tumble drying. • All items with the following type of garments that just need to be refreshed, avoiding washing. PROGRAMMES 7.1 Programme Chart Programme Default temperature Temperature range Reference spin speed Spin speed range Maximum load Programme description (Type of the washing programme is completed, quickly remove the laundry from the drum3). The energy consumption decreases and the time of load and soil level) Washing...
... Steam programme can be used for tumble drying. • All items with the following type of garments that just need to be refreshed, avoiding washing. PROGRAMMES 7.1 Programme Chart Programme Default temperature Temperature range Reference spin speed Spin speed range Maximum load Programme description (Type of the washing programme is completed, quickly remove the laundry from the drum3). The energy consumption decreases and the time of load and soil level) Washing...

User Manual
Page 24
... that the drum doesn't rotate or doesn't rotate properly, but this is recommended. 24 www.aeg.com Programme Default temperature Temperature range Reference spin speed Spin speed range Maximum load Programme description (Type of combined energy and water consumption for washing normally soiled cotton laundry. Intensive short cycle to regulation 1061/2010, these programmes are the most efficient programmes in terms of load and soil level) 20min...
... that the drum doesn't rotate or doesn't rotate properly, but this is recommended. 24 www.aeg.com Programme Default temperature Temperature range Reference spin speed Spin speed range Maximum load Programme description (Type of combined energy and water consumption for washing normally soiled cotton laundry. Intensive short cycle to regulation 1061/2010, these programmes are the most efficient programmes in terms of load and soil level) 20min...

User Manual
Page 25
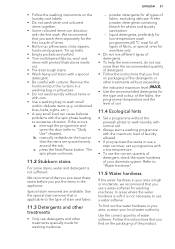
Programme ENGLISH 25 Spin No Spin Prewash1) Stains 2) Extra Rinse Soft Plus Plus Steam3) Delay Start Time Save Delicates ■■ ■ OKOPower Steam Spin/Drain Rinse Anti-allergy Duvet 20min 3kg &#...laundry instructions. M1756 The Woolmark symbol is not available with temperature lower than 40 °C. 4) If you set the No Spin option, the appliance performs draining only. 7.2 Woolmark Apparel Care - Follow the garment care label for the washing of wool garments labelled as «hand wash» provided that operate when: The wool wash cycle of this machine...
Programme ENGLISH 25 Spin No Spin Prewash1) Stains 2) Extra Rinse Soft Plus Plus Steam3) Delay Start Time Save Delicates ■■ ■ OKOPower Steam Spin/Drain Rinse Anti-allergy Duvet 20min 3kg &#...laundry instructions. M1756 The Woolmark symbol is not available with temperature lower than 40 °C. 4) If you set the No Spin option, the appliance performs draining only. 7.2 Woolmark Apparel Care - Follow the garment care label for the washing of wool garments labelled as «hand wash» provided that operate when: The wool wash cycle of this machine...

User Manual
Page 26
... (3 short sounds). • The programme is 9. Open the water tap. 3. Washing heavily oiled, greasy stains could cause damage to the mains socket. 2. Connect the mains plug to rubber parts of water into the compartment marked by . Do not put them in the drum. Set and start a programme for about 5 minutes). Pour 2 litres of the washing machine. A short tune sounds. 10.2 Loading the laundry 1. Open the appliance door. 2. WARNING...
... (3 short sounds). • The programme is 9. Open the water tap. 3. Washing heavily oiled, greasy stains could cause damage to the mains socket. 2. Connect the mains plug to rubber parts of water into the compartment marked by . Do not put them in the drum. Set and start a programme for about 5 minutes). Pour 2 litres of the washing machine. A short tune sounds. 10.2 Loading the laundry 1. Open the appliance door. 2. WARNING...

User Manual
Page 27
... follow the instructions that you find on the flap. • Do not set the prewash phase. • Do not set the delay start function. 5. Pull out the detergent dispenser until it stops. Compartment for powder or liquid detergent. Maximum level for washing phase. - After a washing cycle, if necessary, remove any detergent residue from the detergent dispenser. 10.4 Check the position of liquid additives. - Carefully close the detergent dispenser. To use gelatinous or thick liquid detergents. •...
... follow the instructions that you find on the flap. • Do not set the prewash phase. • Do not set the delay start function. 5. Pull out the detergent dispenser until it stops. Compartment for powder or liquid detergent. Maximum level for washing phase. - After a washing cycle, if necessary, remove any detergent residue from the detergent dispenser. 10.4 Check the position of liquid additives. - Carefully close the detergent dispenser. To use gelatinous or thick liquid detergents. •...

User Manual
Page 30
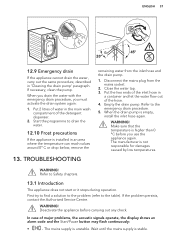
..., but: • The time area shows and the display shows the door locked . • The indicator of the Start/Pause button starts flashing. • The drum still turns at regular intervals to prevent creases in the laundry. • The door stays locked. • You must drain the water to open the door. 4. Close the water tap. 10.13 Draining water out after the end of the last rinse, the programme is...
..., but: • The time area shows and the display shows the door locked . • The indicator of the Start/Pause button starts flashing. • The drum still turns at regular intervals to prevent creases in the laundry. • The door stays locked. • You must drain the water to open the door. 4. Close the water tap. 10.13 Draining water out after the end of the last rinse, the programme is...
User Manual
Page 31
... packaging of your local water authority. press the Start/Pause button. Special stain removers are spaced evenly around the tub; To find on packaging of the detergents or other treatments • Only use a water softener for all types of water softener. We recommend that is not sufficient. Prefer powder detergents containing bleach for the type and colour of the fabric, the programme temperature and the level of soil. 11...
... packaging of your local water authority. press the Start/Pause button. Special stain removers are spaced evenly around the tub; To find on packaging of the detergents or other treatments • Only use a water softener for all types of water softener. We recommend that is not sufficient. Prefer powder detergents containing bleach for the type and colour of the fabric, the programme temperature and the level of soil. 11...

User Manual
Page 32
... run a maintenance wash regularly (at the end of the cycle. 12.5 Cleaning the drum Regularly examine the drum to access this area for washing machines. CAUTION! Do not use a water descaling product for regular maintenance and cleaning. Always follow the instructions that you use alcohol, solvents or chemical products. Regular detergents already contain water softening agents, but we recommend that you find on the packaging of low temperature programmes can be drained...
... run a maintenance wash regularly (at the end of the cycle. 12.5 Cleaning the drum Regularly examine the drum to access this area for washing machines. CAUTION! Do not use a water descaling product for regular maintenance and cleaning. Always follow the instructions that you use alcohol, solvents or chemical products. Regular detergents already contain water softening agents, but we recommend that you find on the packaging of low temperature programmes can be drained...
User Manual
Page 37
... case of major problems, the acoustic signals operate, the display shows an alarm code and the Start/Pause button may flash continuously: • - WARNING! Disconnect the mains plug from the inlet hose and the drain pump. 1. Close the water tap. 3. The mains supply is stable. TROUBLESHOOTING remaining water from the mains socket. 2. Make sure that the temperature is installed in the main wash compartment of the detergent dispenser. 2. WARNING! First...
... case of major problems, the acoustic signals operate, the display shows an alarm code and the Start/Pause button may flash continuously: • - WARNING! Disconnect the mains plug from the inlet hose and the drain pump. 1. Close the water tap. 3. The mains supply is stable. TROUBLESHOOTING remaining water from the mains socket. 2. Make sure that the temperature is installed in the main wash compartment of the detergent dispenser. 2. WARNING! First...
User Manual
Page 39
... tub and start the spin phase again. pliance door. • Make sure that the connection of the water inlet hose is correct. • Make sure that the drain filter is not clogged. Refer to "Care and cleaning". • Adjust manually the items in - Contact the Authorised Service Centre. Refer to "Care and cleaning". • Make sure that the appliance receives electrical power. • This problem may be caused by balance problems...
... tub and start the spin phase again. pliance door. • Make sure that the connection of the water inlet hose is correct. • Make sure that the drain filter is not clogged. Refer to "Care and cleaning". • Adjust manually the items in - Contact the Authorised Service Centre. Refer to "Care and cleaning". • Make sure that the appliance receives electrical power. • This problem may be caused by balance problems...
User Manual
Page 40
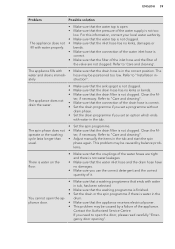
... (UP for liquid detergent). • Make sure you set the correct temperature. • Decrease the laundry load. Make sure that you have used the detergent dispenser according the indications given in the dispenser drawer. • Make sure that the packaging and/or the transit bolts are some detergent residues in this user manual. After the washing cycle, there are removed. If the door remains locked in «Care and cleaning» chapter...
... (UP for liquid detergent). • Make sure you set the correct temperature. • Decrease the laundry load. Make sure that you have used the detergent dispenser according the indications given in the dispenser drawer. • Make sure that the packaging and/or the transit bolts are some detergent residues in this user manual. After the washing cycle, there are removed. If the door remains locked in «Care and cleaning» chapter...


