Product Manual
Page 2
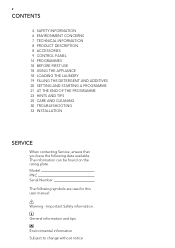
... information. Model PNC Serial Number The following data available. 2 CONTENTS 4 SAFETY INFORMATION 6 ENVIRONMENT CONCERNS 7 TECHNICAL INFORMATION 8 PRODUCT DESCRIPTION 8 ACCESSORIES 9 CONTROL PANEL 14 PROGRAMMES 18 BEFORE FIRST USE 18 USING THE APPLIANCE 18 LOADING THE LAUNDRY 19 FILLING THE DETERGENT AND ADDITIVES 20 SETTING AND STARTING A PROGRAMME 21 AT THE END OF THE PROGRAMME 23 HINTS AND TIPS 25 CARE AND CLEANING 30 TROUBLESHOOTING 33 INSTALLATION SERVICE When contacting Service, ensure...
... information. Model PNC Serial Number The following data available. 2 CONTENTS 4 SAFETY INFORMATION 6 ENVIRONMENT CONCERNS 7 TECHNICAL INFORMATION 8 PRODUCT DESCRIPTION 8 ACCESSORIES 9 CONTROL PANEL 14 PROGRAMMES 18 BEFORE FIRST USE 18 USING THE APPLIANCE 18 LOADING THE LAUNDRY 19 FILLING THE DETERGENT AND ADDITIVES 20 SETTING AND STARTING A PROGRAMME 21 AT THE END OF THE PROGRAMME 23 HINTS AND TIPS 25 CARE AND CLEANING 30 TROUBLESHOOTING 33 INSTALLATION SERVICE When contacting Service, ensure...
Product Manual
Page 4
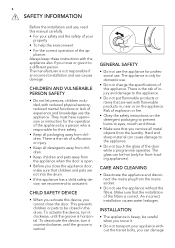
... and the safety of injury and damage to be careful when you move or give it counterclockwise, until the groove is correct. CARE AND CLEANING • Deactivate the appliance and disconnect the mains plug from the appliance when the door is the risk of your appliance without the filters. Always keep these instructions with flammable products in the drum.
... and the safety of injury and damage to be careful when you move or give it counterclockwise, until the groove is correct. CARE AND CLEANING • Deactivate the appliance and disconnect the mains plug from the appliance when the door is the risk of your appliance without the filters. Always keep these instructions with flammable products in the drum.

Product Manual
Page 5
... damage to the mains plug and cable. • Connect the mains plug to new pipes or pipes not used . If it is necessary to remove all packaging and transport bolts. • Make sure that the water hoses and the couplings do the electrical installation, the plumbing and the installation of fire. • Do not replace or change the fuse in the appliance. internal...
... damage to the mains plug and cable. • Connect the mains plug to new pipes or pipes not used . If it is necessary to remove all packaging and transport bolts. • Make sure that the water hoses and the couplings do the electrical installation, the plumbing and the installation of fire. • Do not replace or change the fuse in the appliance. internal...
Product Manual
Page 6
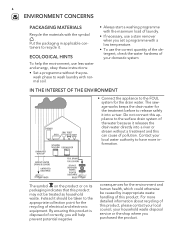
... wash laundry with normal soil. • Always start a washing programme with the maximum load of laundry. • If necessary, use a stain remover when you set a programme with the symbol . For more information. Do not connect this appliance to the appropriate collection point for the drain water. 6 ENVIRONMENT CONCERNS PACKAGING MATERIALS Recycle the materials with a low temperature. • To use the correct quantity of the detergent, check...
... wash laundry with normal soil. • Always start a washing programme with the maximum load of laundry. • If necessary, use a stain remover when you set a programme with the symbol . For more information. Do not connect this appliance to the appropriate collection point for the drain water. 6 ENVIRONMENT CONCERNS PACKAGING MATERIALS Recycle the materials with a low temperature. • To use the correct quantity of the detergent, check...

Product Manual
Page 10
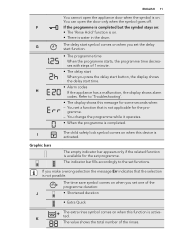
... DISPLAY 3 A B C D E FG H L K J I The display shows: The temperature of the set programme A Cold water The spin speed of the set , all the symbols of the phases related to the programme come on. • When the programme starts, only the symbol of the phase in operation flashes. • When the programme is completed, the symbol of the cycle when the appliance detects too much detergent. D The steam...
... DISPLAY 3 A B C D E FG H L K J I The display shows: The temperature of the set programme A Cold water The spin speed of the set , all the symbols of the phases related to the programme come on. • When the programme starts, only the symbol of the phase in operation flashes. • When the programme is completed, the symbol of the cycle when the appliance detects too much detergent. D The steam...
Product Manual
Page 11
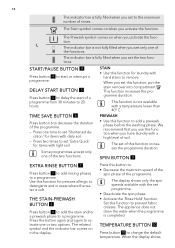
...; The programme time When the programme starts, the programme time decreases with steps of the rinses. I Graphic bars The child safety lock symbol comes on . The indicator bar fills accordingly to 'Troubleshooting'. • The display shows this function is water in the drum. You can open the appliance door when the symbol is completed. Refer to the set the delay start When you make...
...; The programme time When the programme starts, the programme time decreases with steps of the rinses. I Graphic bars The child safety lock symbol comes on . The indicator bar fills accordingly to 'Troubleshooting'. • The display shows this function is water in the drum. You can open the appliance door when the symbol is completed. Refer to the set the delay start When you make...
Product Manual
Page 12
... to add a prewash phase before the washing phase. The display shows only the spin speeds available with a high level of rinses. TEMPERATURE BUTTON 10 Press button 10 to : • Decrease the maximum speed of the spin phase of the two functions. Set this button to change the default temperature. tion. PREWASH • Use this function when you use this function to prevent fabric creases. The Prewash symbol comes on...
... to add a prewash phase before the washing phase. The display shows only the spin speeds available with a high level of rinses. TEMPERATURE BUTTON 10 Press button 10 to : • Decrease the maximum speed of the spin phase of the two functions. Set this button to change the default temperature. tion. PREWASH • Use this function when you use this function to prevent fabric creases. The Prewash symbol comes on...
Product Manual
Page 15
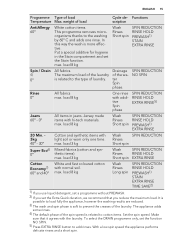
... function NO SPIN. 5) Press EXTRA RINSE button to the washing by 60° C and adds one time. max. load 8 kg Wash Rinses Long spin SPIN REDUCTION RINSE HOLD PREWASH1) STAIN EXTRA RINSE TIME SAVE2) 1) If you use liquid detergent, set the Extra Quick duration, we recommend that it agrees with light soil or worn only one rinse. load 8 kg Wash Rinses Short spin SPIN REDUCTION RINSE HOLD PREWASH1) STAIN EXTRA RINSE Spin / Drain 4) 0° All fabrics. Jersey made items with normal soil. max...
... function NO SPIN. 5) Press EXTRA RINSE button to the washing by 60° C and adds one time. max. load 8 kg Wash Rinses Long spin SPIN REDUCTION RINSE HOLD PREWASH1) STAIN EXTRA RINSE TIME SAVE2) 1) If you use liquid detergent, set the Extra Quick duration, we recommend that it agrees with light soil or worn only one rinse. load 8 kg Wash Rinses Short spin SPIN REDUCTION RINSE HOLD PREWASH1) STAIN EXTRA RINSE Spin / Drain 4) 0° All fabrics. Jersey made items with normal soil. max...
Product Manual
Page 16
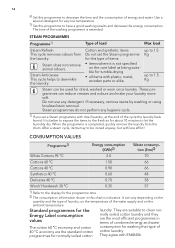
... most efficient programmes in this programme to have a good washing results and decrease the energy consumption. up to 1.5 Kg up to 1.5 Kg Steam can vary depending on the quantity and the type of laundry, on the temperature of the water supply and on the care label as being suitable for this type of load Max load Steam Refresh This cycle removes odours from the drum. CONSUMPTION...
... most efficient programmes in this programme to have a good washing results and decrease the energy consumption. up to 1.5 Kg up to 1.5 Kg Steam can vary depending on the quantity and the type of laundry, on the temperature of the water supply and on the care label as being suitable for this type of load Max load Steam Refresh This cycle removes odours from the drum. CONSUMPTION...
Product Manual
Page 18
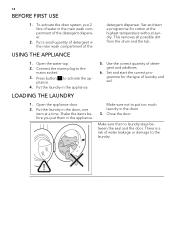
... main wash compartment of water leakage or damage to the mains socket. 3. This removes all possible dirt from the drum and the tub. Close the door. Press button 1 to put them in the main wash compartment of detergent in the appliance. Put a small quantity of the detergent dispenser. Set and start the correct programme for cotton at a time. Set and start a programme for the type of detergent and...
... main wash compartment of water leakage or damage to the mains socket. 3. This removes all possible dirt from the drum and the tub. Close the door. Press button 1 to put them in the main wash compartment of detergent in the appliance. Put a small quantity of the detergent dispenser. Set and start the correct programme for cotton at a time. Set and start a programme for the type of detergent and...
Product Manual
Page 20
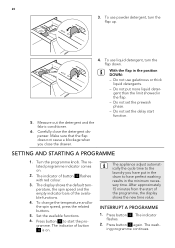
... programme indicator comes on . The washing programme continues. To use powder detergent, turn the flap down. To use gelatinous or thick liquid detergents. - Carefully close the drawer. SETTING AND STARTING A PROGRAMME 1. The display shows the default temperature, the spin speed and the empty indicator bars of button 4 flashes with red colour. 3. Set the available functions. 6. Press button 4 to have perfect washing results in the drum to start of button 4 is on . 2. Do not use liquid detergent, turn the...
... programme indicator comes on . The washing programme continues. To use powder detergent, turn the flap down. To use gelatinous or thick liquid detergents. - Carefully close the drawer. SETTING AND STARTING A PROGRAMME 1. The display shows the default temperature, the spin speed and the empty indicator bars of button 4 flashes with red colour. 3. Set the available functions. 6. Press button 4 to have perfect washing results in the drum to start of button 4 is on . 2. Do not use liquid detergent, turn the...
Product Manual
Page 21
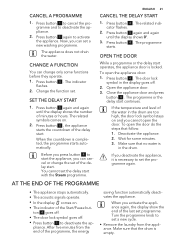
... can set the delay start operates, the appliance door is locked. Close the appliance door and press button 4 . Press button 4 . You cannot set a new washing programme. Wait for some functions before they operate. 1. After five minutes from the appliance. Change the function set a new cycle. • Remove the laundry from the end of the delay start. Press button 4 . Open the appliance door. 3. Make sure that the drum is in the display goes...
... can set the delay start operates, the appliance door is locked. Close the appliance door and press button 4 . Press button 4 . You cannot set a new washing programme. Wait for some functions before they operate. 1. After five minutes from the appliance. Change the function set a new cycle. • Remove the laundry from the end of the delay start. Press button 4 . Open the appliance door. 3. Make sure that the drum is in the display goes...
Product Manual
Page 23
... small load can discolour with the first wash. If this occurs, adjust manually the items in your area, contact your local water authority. We recommend that you remove these products. • Use the correct products for the type and colour of the fabric, the programme temperature and the level of soil. • If you use liquid detergents, do not use a water softener for washing machines. Use the special stain remover that is...
... small load can discolour with the first wash. If this occurs, adjust manually the items in your area, contact your local water authority. We recommend that you remove these products. • Use the correct products for the type and colour of the fabric, the programme temperature and the level of soil. • If you use liquid detergents, do not use a water softener for washing machines. Use the special stain remover that is...
Product Manual
Page 25
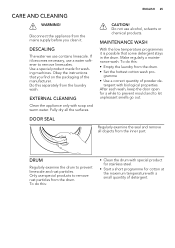
... for washing machines. MAINTENANCE WASH With the low temperature programmes it . Use a special product made for cotton at the maximum temperature with a small quantity of detergent. gramme • Use a correct quantity of the manufacturer. tergent with soap and warm water. Only use a water softener to let unpleasant smells go out. EXTERNAL CLEANING Clean the appliance only with biological properties. CAUTION! DOOR SEAL Regularly examine the seal and remove all the surfaces. DRUM...
... for washing machines. MAINTENANCE WASH With the low temperature programmes it . Use a special product made for cotton at the maximum temperature with a small quantity of detergent. gramme • Use a correct quantity of the manufacturer. tergent with soap and warm water. Only use a water softener to let unpleasant smells go out. EXTERNAL CLEANING Clean the appliance only with biological properties. CAUTION! DOOR SEAL Regularly examine the seal and remove all the surfaces. DRUM...

Product Manual
Page 28
... plug from the water tap. 3. Put the drainage duct back and close the drain pump door. ter. • The appliance fills with a stiff brush. 4. Install again the inlet hose. To clean the water inlet filters: • The indicator of button 4 flashes and the display shows the related alarm. Clean the filter in the inlet hose with the water for a long time. If necessary, clean the pump. Make sure that you tighten correctly the filter to clean...
... plug from the water tap. 3. Put the drainage duct back and close the drain pump door. ter. • The appliance fills with a stiff brush. 4. Install again the inlet hose. To clean the water inlet filters: • The indicator of button 4 flashes and the display shows the related alarm. Clean the filter in the inlet hose with the water for a long time. If necessary, clean the pump. Make sure that you tighten correctly the filter to clean...

Product Manual
Page 29
... inlet hose in a container and let the water flow out of the detergent dispenser. 2. ENGLISH 29 2. Empty the drain pump. Refer to drain the water. The manufacturer is empty, install the inlet hose again. When you drain the water with the emergency drain procedure, you use the appliance again. Disconnect the mains plug from the inlet hose and the drain pump. 1. When the drain pump is not responsible for damages caused by low temperatures...
... inlet hose in a container and let the water flow out of the detergent dispenser. 2. ENGLISH 29 2. Empty the drain pump. Refer to drain the water. The manufacturer is empty, install the inlet hose again. When you drain the water with the emergency drain procedure, you use the appliance again. Disconnect the mains plug from the inlet hose and the drain pump. 1. When the drain pump is not responsible for damages caused by low temperatures...

Product Manual
Page 30
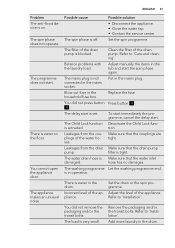
... stops during operation. The function Rinse & Hold is set. Set the drain programme. 30 TROUBLESHOOTING The start of the drain pump is blocked. The appliance does not drain the water. • - The water tap is furred with water. or is closed correctly. Clean the filter of the water inlet hose is open or not closed correctly. • - A washing programme without the drain phase is on . The appliance door is not correct. With some problems...
... stops during operation. The function Rinse & Hold is set. Set the drain programme. 30 TROUBLESHOOTING The start of the drain pump is blocked. The appliance does not drain the water. • - The water tap is furred with water. or is closed correctly. Clean the filter of the water inlet hose is open or not closed correctly. • - A washing programme without the drain phase is on . The appliance door is not correct. With some problems...
Product Manual
Page 31
... appliance. Set the drain or the spin programme. You did not press button Press button 4 . 4 . The appliance makes an unusual noise. Replace the fuse. The Child Lock function Deactivate the Child Lock func- Make sure that the water inlet damaged. Adjust the level of the appliance. The filter of the drain pump is water in the drum. Balance problems with the laundry load. Clean the filter of the water hoses. Refer to 'Care and cleaning'. Refer to 'Installation'. Leakages...
... appliance. Set the drain or the spin programme. You did not press button Press button 4 . 4 . The appliance makes an unusual noise. Replace the fuse. The Child Lock function Deactivate the Child Lock func- Make sure that the water inlet damaged. Adjust the level of the appliance. The filter of the drain pump is water in the drum. Balance problems with the laundry load. Clean the filter of the water hoses. Refer to 'Care and cleaning'. Refer to 'Installation'. Leakages...
Product Manual
Page 32
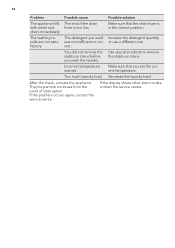
... alarm codes, contact the service centre. or use a different one. Incorrect temperature was not sufficient or cor- Make sure that you set . The detergent you wash the laundry. rect. Make sure that the drain hose is too low. Too much laundry load. was set the correct temperature. you used Increase the detergent quantity sults are not satis- Decrease the laundry load. You did not remove the Use special products to remove stubborn...
... alarm codes, contact the service centre. or use a different one. Incorrect temperature was not sufficient or cor- Make sure that you set . The detergent you wash the laundry. rect. Make sure that the drain hose is too low. Too much laundry load. was set the correct temperature. you used Increase the detergent quantity sults are not satis- Decrease the laundry load. You did not remove the Use special products to remove stubborn...

Product Manual
Page 35
... transit bolts for possible repairs by a qualified person. You can find these caps in operation. We recommend that the appliance does not touch the wall or other units • Loosen or tighten the feet to adjust the level. A correct adjustment of the appliance level prevents the vibration, noise and the movement of the appliance when in the user manual bag...
... transit bolts for possible repairs by a qualified person. You can find these caps in operation. We recommend that the appliance does not touch the wall or other units • Loosen or tighten the feet to adjust the level. A correct adjustment of the appliance level prevents the vibration, noise and the movement of the appliance when in the user manual bag...


