Product Manual
Page 2
PRODUCT DESCRIPTION 5 4. CONTROL PANEL...6 5. HINTS AND TIPS...18 12. CARE AND CLEANING 19 13. TECHNICAL DATA...26 FOR PERFECT RESULTS Thank you for your product for better service: www.registeraeg.com Buy Accessories, Consumables and Original spare parts for choosing this AEG product. 2 www.aeg.com CONTENTS 1. We have the following data available: Model, PNC, Serial Number. SETTINGS...13 8. Visit our website for: Get usage advice, brochures, trouble shooter, service information...
PRODUCT DESCRIPTION 5 4. CONTROL PANEL...6 5. HINTS AND TIPS...18 12. CARE AND CLEANING 19 13. TECHNICAL DATA...26 FOR PERFECT RESULTS Thank you for your product for better service: www.registeraeg.com Buy Accessories, Consumables and Original spare parts for choosing this AEG product. 2 www.aeg.com CONTENTS 1. We have the following data available: Model, PNC, Serial Number. SETTINGS...13 8. Visit our website for: Get usage advice, brochures, trouble shooter, service information...
Product Manual
Page 4
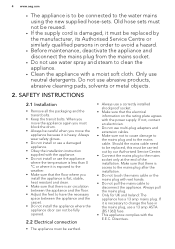
... a moist soft cloth. Old hose sets must not be reused. • If the supply cord is damaged, it must be replaced by our Authorised Service Centre. • Connect the mains plug to clean the appliance. • Clean the appliance with the power supply. When you move the appliance again you must block the drum. • Always be careful when you install the appliance...
... a moist soft cloth. Old hose sets must not be reused. • If the supply cord is damaged, it must be replaced by our Authorised Service Centre. • Connect the mains plug to clean the appliance. • Clean the appliance with the power supply. When you move the appliance again you must block the drum. • Always be careful when you install the appliance...

Product Manual
Page 5
... 2 Detergent dispenser 3 Control panel 4 Door handle 4 5 Rating plate 6 Drain pump filter 7 Feet for a long time, let the water flow until it is clean. • The first time you connect the appliance to new pipes or pipes not used . • Do not touch the glass of injury, electrical shock, fire, burns or damage to the appliance. • Use this appliance in a household only. • Obey the safety instructions on the detergent...
... 2 Detergent dispenser 3 Control panel 4 Door handle 4 5 Rating plate 6 Drain pump filter 7 Feet for a long time, let the water flow until it is clean. • The first time you connect the appliance to new pipes or pipes not used . • Do not touch the glass of injury, electrical shock, fire, burns or damage to the appliance. • Use this appliance in a household only. • Obey the safety instructions on the detergent...

Product Manual
Page 6
... Duvet 10 9 8 7 6 5 4 1 On/Off button On/Off 2 Programme knob 3 Display 4 Start Pause button (Start/Pause) 5 Delay start button (Delay Start) 6 Time save button (Time Save) 7 Extra rinse button (Extra Rinse) 8 Stain button (Stains) 9 Spin reduction button (Spin) Read carefully the instructions supplied with screws, the wood panel must extend beyond the front feet. You cannot close the door, turn the device anticlockwise until the groove is more stable. 3.4 Fixing plate kit (4055171146) Available from your authorized...
... Duvet 10 9 8 7 6 5 4 1 On/Off button On/Off 2 Programme knob 3 Display 4 Start Pause button (Start/Pause) 5 Delay start button (Delay Start) 6 Time save button (Time Save) 7 Extra rinse button (Extra Rinse) 8 Stain button (Stains) 9 Spin reduction button (Spin) Read carefully the instructions supplied with screws, the wood panel must extend beyond the front feet. You cannot close the door, turn the device anticlockwise until the groove is more stable. 3.4 Fixing plate kit (4055171146) Available from your authorized...

Product Manual
Page 7
Delay start Spin area: Spin speed indicator B No Spin indicator1) Rinse Hold indicator 1) Only available for Spin/Drain programme. You can open the appliance door when the symbol is on. 10 Temperature button (Temperature) 4.2 Display A B C ENGLISH 7 D Temperature area: A Temperature indicator Cold water indicator. Display indicators: Washing phase Rinses phase Spin phase C Child safety lock Door locked You cannot open the door only when the symbol goes off.
Delay start Spin area: Spin speed indicator B No Spin indicator1) Rinse Hold indicator 1) Only available for Spin/Drain programme. You can open the appliance door when the symbol is on. 10 Temperature button (Temperature) 4.2 Display A B C ENGLISH 7 D Temperature area: A Temperature indicator Cold water indicator. Display indicators: Washing phase Rinses phase Spin phase C Child safety lock Door locked You cannot open the door only when the symbol goes off.

Product Manual
Page 8
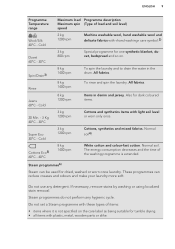
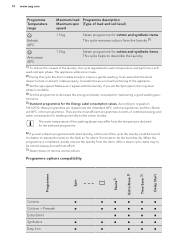
... to be gentle washed. Easy Iron 60°C - Cold 4 kg 1200 rpm Delicate fabrics as acrylics, viscose, polyester items. Normal soil. Cottons + Prewash 95°C - Cold 4 kg 1200 rpm Synthetic items or mixed fabric items. Normal soil. The cycle stops with water in the tub. PROGRAMMES 5.1 Programme Chart Programme Temperature range Maximum load Programme description Maximum spin (Type of error Programme is completed 5. Cold 8 kg 1400 rpm...
... to be gentle washed. Easy Iron 60°C - Cold 4 kg 1200 rpm Delicate fabrics as acrylics, viscose, polyester items. Normal soil. Cottons + Prewash 95°C - Cold 4 kg 1200 rpm Synthetic items or mixed fabric items. Normal soil. The cycle stops with water in the tub. PROGRAMMES 5.1 Programme Chart Programme Temperature range Maximum load Programme description Maximum spin (Type of error Programme is completed 5. Cold 8 kg 1400 rpm...
Product Manual
Page 9
...;C - Normal soil4). Spin/Drain3) 8 kg 1400 rpm To spin the laundry and to drain the water in denim and jersey. Rinse 8 kg 1400 rpm To rinse and spin the laundry. Cold 8 kg 1200 rpm Items in the drum. The energy consumption decreases and the time of the washing programme is not specified on . Do not use any hygienic cycle. ENGLISH 9 Programme Temperature range Maximum load Programme description Maximum spin (Type of...
...;C - Normal soil4). Spin/Drain3) 8 kg 1400 rpm To spin the laundry and to drain the water in denim and jersey. Rinse 8 kg 1400 rpm To rinse and spin the laundry. Cold 8 kg 1200 rpm Items in the drum. The energy consumption decreases and the time of the washing programme is not specified on . Do not use any hygienic cycle. ENGLISH 9 Programme Temperature range Maximum load Programme description Maximum spin (Type of...
Product Manual
Page 10
... are the most efficient programmes in terms of the cycle the laundry could be ironed anyway, but with the laundry. The water temperature of the washing phase may to be humid. It can seem that the drum doesn't rotate or doesn't rotate properly. If you set No Spin option the only drain phase is completed, quickly remove the laundry from the drum. They are respectively...
... are the most efficient programmes in terms of the cycle the laundry could be ironed anyway, but with the laundry. The water temperature of the washing phase may to be humid. It can seem that the drum doesn't rotate or doesn't rotate properly. If you set No Spin option the only drain phase is completed, quickly remove the laundry from the drum. They are respectively...
Product Manual
Page 11
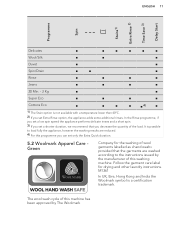
... machine has been approved by the manufacturer of wool garments labelled as «hand wash» provided that you decrease the quantity of the load. In the Rinse programme, if you set a low spin speed the appliance performs delicate rinses and a short spin. 3) If you can set only the Extra Quick duration. 5.2 Woolmark Apparel Care Green Company for drying and other laundry instructions...
... machine has been approved by the manufacturer of wool garments labelled as «hand wash» provided that you decrease the quantity of the load. In the Rinse programme, if you set a low spin speed the appliance performs delicate rinses and a short spin. 3) If you can set only the Extra Quick duration. 5.2 Woolmark Apparel Care Green Company for drying and other laundry instructions...

Product Manual
Page 13
... this option for laundry with almost no soil. The related indicator comes on. 8.6 Stains Set this button two times to a programme. This option is not available with the control panel. 8. OPTIONS 8.1 Programme knob Turn this option for persons allergic to 20 hours. and Spin at the same time until the indicator Extra Rinse comes on / goes off . Use this knob to remove. When you...
... this option for laundry with almost no soil. The related indicator comes on. 8.6 Stains Set this button two times to a programme. This option is not available with the control panel. 8. OPTIONS 8.1 Programme knob Turn this option for persons allergic to 20 hours. and Spin at the same time until the indicator Extra Rinse comes on / goes off . Use this knob to remove. When you...
Product Manual
Page 14
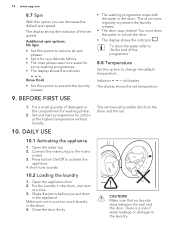
... = cold water. Make sure that no laundry stays between the seal and the door. A short tune sounds. 10.2 Loading the laundry 1. You must drain the water to prevent the laundry creases. • The door stays locked. The display shows the set speed. This removes all spin phases. • Set it for very delicate fabrics. • The rinse phase uses more water for some washing programmes. • The display shows the indicator . The drum turns regularly to unlock...
... = cold water. Make sure that no laundry stays between the seal and the door. A short tune sounds. 10.2 Loading the laundry 1. You must drain the water to prevent the laundry creases. • The door stays locked. The display shows the set speed. This removes all spin phases. • Set it for very delicate fabrics. • The rinse phase uses more water for some washing programmes. • The display shows the indicator . The drum turns regularly to unlock...

Product Manual
Page 15
... for washing phase. B Always obey the instructions that the flap does not cause a blockage when you find on the packaging of the detergent products. 10.4 Check the position of liquid additives. Carefully close the drawer. 10.5 Setting a programme 1. To use gelatinous or thick liquid detergents. • Do not put more liquid detergent than the limit showed in the position DOWN: • Do not use powder detergent, turn the...
... for washing phase. B Always obey the instructions that the flap does not cause a blockage when you find on the packaging of the detergent products. 10.4 Check the position of liquid additives. Carefully close the drawer. 10.5 Setting a programme 1. To use gelatinous or thick liquid detergents. • Do not put more liquid detergent than the limit showed in the position DOWN: • Do not use powder detergent, turn the...
Product Manual
Page 16
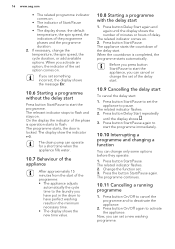
... or change the temperature, the spin speed, the cycle duration, or add available options. The display show the indicator . Press button Delay Start again and again until the display shows . 3. Before you have put in the drum to have perfect washing results in the minimum necessary time. • The display shows the new time value. 10.8 Starting a programme with the delay start the programme. Change the function set...
... or change the temperature, the spin speed, the cycle duration, or add available options. The display show the indicator . Press button Delay Start again and again until the display shows . 3. Before you have put in the drum to have perfect washing results in the minimum necessary time. • The display shows the new time value. 10.8 Starting a programme with the delay start the programme. Change the function set...

Product Manual
Page 17
..., make sure that the drum is locked. 1. In the display the related door lock indicator goes off . The appliance drains the water and spins. 3. After five minutes from the end of the water in the laundry. If necessary, decrease the spin speed. 2. Press On/Off some seconds to set a new cycle. Turn the programme knob to deactivate the appliance. Press button On/Off to prevent...
..., make sure that the drum is locked. 1. In the display the related door lock indicator goes off . The appliance drains the water and spins. 3. After five minutes from the end of the water in the laundry. If necessary, decrease the spin speed. 2. Press On/Off some seconds to set a new cycle. Turn the programme knob to deactivate the appliance. Press button On/Off to prevent...
Product Manual
Page 18
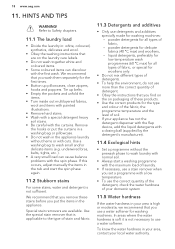
... for the first times. • Button up belts. • Empty the pockets and unfold the items. • Turn inside out multilayered fabrics, wool and items with painted illustrations. • Remove hard stains. • Wash with a special detergent heavy soil stains. • Be careful with the spin phase. powder detergents for washing machines. liquid detergents, preferably for low temperature wash programmes (60 °C max) for all types of soil...
... for the first times. • Button up belts. • Empty the pockets and unfold the items. • Turn inside out multilayered fabrics, wool and items with painted illustrations. • Remove hard stains. • Wash with a special detergent heavy soil stains. • Be careful with the spin phase. powder detergents for washing machines. liquid detergents, preferably for low temperature wash programmes (60 °C max) for all types of soil...
Product Manual
Page 19
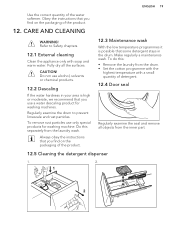
... seal and remove all the surfaces. To do this separately from the inner part. 12.5 Cleaning the detergent dispenser 1. 2. 1 2 CARE AND CLEANING WARNING! Do not use only special products for washing machines. To remove rust particles use alcohol, solvents or chemical products. 12.2 Descaling If the water hardness in the drum. Do this : • Remove the laundry from the drum. • Set the cotton programme with the highest temperature with soap and warm water...
... seal and remove all the surfaces. To do this separately from the inner part. 12.5 Cleaning the detergent dispenser 1. 2. 1 2 CARE AND CLEANING WARNING! Do not use only special products for washing machines. To remove rust particles use alcohol, solvents or chemical products. 12.2 Descaling If the water hardness in the drum. Do this : • Remove the laundry from the drum. • Set the cotton programme with the highest temperature with soap and warm water...

Product Manual
Page 22
... the main wash compartment of the detergent dispenser. 2. Empty the drain pump. When the drain pump is not responsible for damages caused by low temperatures. Start the programme to the emergency drain procedure. 5. Disconnect the mains plug from the inlet hose and the drain pump. 1. Close the water tap. 3. Refer to drain the water 12.9 Frost precautions If the appliance is more than 0° C, remove the remaining water from the...
... the main wash compartment of the detergent dispenser. 2. Empty the drain pump. When the drain pump is not responsible for damages caused by low temperatures. Start the programme to the emergency drain procedure. 5. Disconnect the mains plug from the inlet hose and the drain pump. 1. Close the water tap. 3. Refer to drain the water 12.9 Frost precautions If the appliance is more than 0° C, remove the remaining water from the...
Product Manual
Page 23
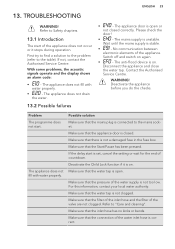
... the filter of the inlet hose and the filter of the water inlet hose is on. With some problems, the acoustic signals operate and the display shows an alarm code: • - Switch off and switch on . Make sure that the connection of the valve are not clogged. Make sure that the water tap is unstable. Contact the Authorised Service Centre. Problem The programme does not start is not a damaged fuse...
... the filter of the inlet hose and the filter of the water inlet hose is on. With some problems, the acoustic signals operate and the display shows an alarm code: • - Switch off and switch on . Make sure that the connection of the valve are not clogged. Make sure that the water tap is unstable. Contact the Authorised Service Centre. Problem The programme does not start is not a damaged fuse...
Product Manual
Page 24
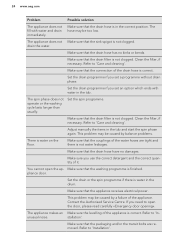
... Authorised Service Centre. unusual noise. Refer to 'Care and cleaning'. Make sure that the couplings of the water hoses are removed. Refer to 'In- The spin phase does not operate or the washing cycle lasts longer than usually. Make sure that the drain filter is finished. This problem may be too low. Refer to 'Care and cleaning'. drain the water. Set the spin programme. Adjust manually the items in the drum. Make...
... Authorised Service Centre. unusual noise. Refer to 'Care and cleaning'. Make sure that the couplings of the water hoses are removed. Refer to 'In- The spin phase does not operate or the washing cycle lasts longer than usually. Make sure that the drain filter is finished. This problem may be too low. Refer to 'Care and cleaning'. drain the water. Set the spin programme. Adjust manually the items in the drum. Make...
Product Manual
Page 25
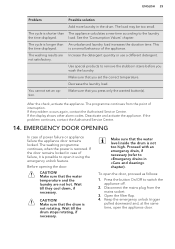
... solution Add more laundry in «Care and cleaning» chapter). The cycle is longer than the time displayed. Wait till they cool down, if necessary. Disconnect the mains plug from the point of power failure or appliance failure the appliance door remains locked. EMERGENCY DOOR OPENING In case of interruption. Make sure that the water level inside the drum is restored. ENGLISH 25 Problem The cycle is...
... solution Add more laundry in «Care and cleaning» chapter). The cycle is longer than the time displayed. Wait till they cool down, if necessary. Disconnect the mains plug from the point of power failure or appliance failure the appliance door remains locked. EMERGENCY DOOR OPENING In case of interruption. Make sure that the water level inside the drum is restored. ENGLISH 25 Problem The cycle is...


