Product Manual
Page 2
... appliances. Model, PNC, Serial Number. PROGRAMMES 10 7. DAILY USE 14 10. TROUBLESHOOTING 23 13. We have the following data available. TECHNICAL INFORMATION 5 4. BEFORE FIRST USE 14 9. CARE AND CLEANING 19 12. PRODUCT DESCRIPTION 6 5. CONTROL PANEL 7 6. HINTS AND TIPS 18 11. features you impeccable performance for many years, with innovative technologies that you for your appliance: www.aeg.com/shop CUSTOMER CARE AND SERVICE We recommend the use of...
... appliances. Model, PNC, Serial Number. PROGRAMMES 10 7. DAILY USE 14 10. TROUBLESHOOTING 23 13. We have the following data available. TECHNICAL INFORMATION 5 4. BEFORE FIRST USE 14 9. CARE AND CLEANING 19 12. PRODUCT DESCRIPTION 6 5. CONTROL PANEL 7 6. HINTS AND TIPS 18 11. features you impeccable performance for many years, with innovative technologies that you for your appliance: www.aeg.com/shop CUSTOMER CARE AND SERVICE We recommend the use of...

Product Manual
Page 3
... packaging away from children. • Keep all detergents away from children. • Keep children and pets away from the appliance door when it . • Cleaning and user maintenance shall not be used by children without supervision. 1.2 General Safety • Before maintenance, deactivate the appliance and disconnect the mains plug from 8 years and above and persons with the appliance for...
... packaging away from children. • Keep all detergents away from children. • Keep children and pets away from the appliance door when it . • Cleaning and user maintenance shall not be used by children without supervision. 1.2 General Safety • Before maintenance, deactivate the appliance and disconnect the mains plug from 8 years and above and persons with the appliance for...
Product Manual
Page 4
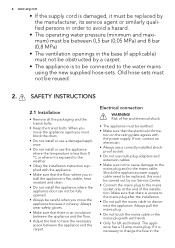
... mains plug. Risk of the installation. Should the appliance power supply cable need to be replaced, this must be carried out by a carpet. • The appliance is necessary to change the fuse in the base (if applicable) must not be obstructed by our Service Centre. • Connect the mains plug to the water mains using the new supplied hose-sets. SAFETY INSTRUCTIONS 2.1 Installation • Remove all...
... mains plug. Risk of the installation. Should the appliance power supply cable need to be replaced, this must be carried out by a carpet. • The appliance is necessary to change the fuse in the base (if applicable) must not be obstructed by our Service Centre. • Connect the mains plug to the water mains using the new supplied hose-sets. SAFETY INSTRUCTIONS 2.1 Installation • Remove all...

Product Manual
Page 5
... the safety instructions on the appliance. Old hose sets must not be hot. • Make sure that there is to be connected to the water mains using the new supplied hose-sets. Directives. Do not use neutral detergents. Only use abrasive products, abrasive cleaning pads, solvents or metal objects. 2.4 Disposal WARNING! mains plug, use water spray and steam to clean the appliance. • Clean the appliance with flammable products in, near...
... the safety instructions on the appliance. Old hose sets must not be hot. • Make sure that there is to be connected to the water mains using the new supplied hose-sets. Directives. Do not use neutral detergents. Only use abrasive products, abrasive cleaning pads, solvents or metal objects. 2.4 Disposal WARNING! mains plug, use water spray and steam to clean the appliance. • Clean the appliance with flammable products in, near...

Product Manual
Page 6
IPX4 0,5 bar (0,05 MPa) 8 bar (0,8 MPa) Cold water 7 kg 1400 rpm 4. PRODUCT DESCRIPTION 1 2 3 8 9 1 Worktop 2 Detergent dispenser 3 Control panel 4 Door handle 5 Rating plate 6 Drain pump 10 4 5 11 6 7 12 7 Feet for the appliance level 8 Water drain hose 9 Water inlet valve 10 Mains cable 11 Transit bolts 12 Feet for the appliance level 6 www.aeg.com Level of protection against ingress of solid particles and moisture ensured by the protective cover, except where the low voltage equipment has...
IPX4 0,5 bar (0,05 MPa) 8 bar (0,8 MPa) Cold water 7 kg 1400 rpm 4. PRODUCT DESCRIPTION 1 2 3 8 9 1 Worktop 2 Detergent dispenser 3 Control panel 4 Door handle 5 Rating plate 6 Drain pump 10 4 5 11 6 7 12 7 Feet for the appliance level 8 Water drain hose 9 Water inlet valve 10 Mains cable 11 Transit bolts 12 Feet for the appliance level 6 www.aeg.com Level of protection against ingress of solid particles and moisture ensured by the protective cover, except where the low voltage equipment has...

Product Manual
Page 7
.... CONTROL PANEL 1 2 3 Super Eco 20 Min. - 3 kg Quick Intensive Jeans Curtains Rinse Spin/Drain On/Off Cottons + Prewash Extra Silent Synthetics + Prewash Easy Iron Delicates Wool/Silk Extra Time Delay Temp. A tune sounds when the appliance is activated. Spin Stains Rinse Save Start Start/Pause 1 On/Off button (On/Off) 2 Programme knob 3 Display 4 Start Pause button 5 Delay start button 6 Time save button 7 Extra rinse button 8 Stain button 9 Spin reduction button 10 Temperature button 10 9 8 7 6 5 4 5.1 On Off button 1 Press...
.... CONTROL PANEL 1 2 3 Super Eco 20 Min. - 3 kg Quick Intensive Jeans Curtains Rinse Spin/Drain On/Off Cottons + Prewash Extra Silent Synthetics + Prewash Easy Iron Delicates Wool/Silk Extra Time Delay Temp. A tune sounds when the appliance is activated. Spin Stains Rinse Save Start Start/Pause 1 On/Off button (On/Off) 2 Programme knob 3 Display 4 Start Pause button 5 Delay start button 6 Time save button 7 Extra rinse button 8 Stain button 9 Spin reduction button 10 Temperature button 10 9 8 7 6 5 4 5.1 On Off button 1 Press...

Product Manual
Page 9
... delay start button, the display shows the delay start time. • Alarm codes If the appliance has a malfunction, the display shows alarm codes. Use this function for persons allergic to detergents and in areas where the water is not applicable for items with almost no soil. This function is not available with a temperature lower than 40° C. 5.9 Spin button 9 Press this function to set 'Extra Quick...
... delay start button, the display shows the delay start time. • Alarm codes If the appliance has a malfunction, the display shows alarm codes. Use this function for persons allergic to detergents and in areas where the water is not applicable for items with almost no soil. This function is not available with a temperature lower than 40° C. 5.9 Spin button 9 Press this function to set 'Extra Quick...
Product Manual
Page 10
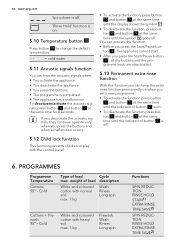
.... 7 kg Prewash Wash Rinses Long spin Functions SPIN REDUCTION RINSE HOLD STAIN1) EXTRA RINSE TIME SAVE2) SPIN REDUCTION RINSE HOLD EXTRA RINSE TIME SAVE2) Cold Type of button 7 is off. 5.12 Child lock function This function prevents children to change the default temperature. - - = cold water 5.11 Acoustic signals function You can keep the extra rinse function permanently on . 5.10 Temperature button 10 Press button 10 to play with the control panel. 6. 10 www.aeg.com Spin phase is...
.... 7 kg Prewash Wash Rinses Long spin Functions SPIN REDUCTION RINSE HOLD STAIN1) EXTRA RINSE TIME SAVE2) SPIN REDUCTION RINSE HOLD EXTRA RINSE TIME SAVE2) Cold Type of button 7 is off. 5.12 Child lock function This function prevents children to change the default temperature. - - = cold water 5.11 Acoustic signals function You can keep the extra rinse function permanently on . 5.10 Temperature button 10 Press button 10 to play with the control panel. 6. 10 www.aeg.com Spin phase is...

Product Manual
Page 11
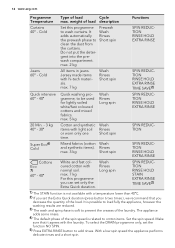
.... Cold Spin/Drain4) Rinse ENGLISH 11 Type of soil. max. 7 kg Wash STAIN1) Rinses EXTRA RINSE Stop with water in the drum TIME SAVE2) Synthetic or mixed fabric items with normal soil. Cold Delicates 40° - SPIN REDUCTION NO SPIN All fabrics. Cold Wool/Silk 40° - Cold Synthetics 60° - weight of load description Functions White and coloured cotton with normal level of load Cycle max. max. 3.5 kg Prewash Wash Rinses Short spin SPIN REDUCTION RINSE HOLD EXTRA RINSE TIME...
.... Cold Spin/Drain4) Rinse ENGLISH 11 Type of soil. max. 7 kg Wash STAIN1) Rinses EXTRA RINSE Stop with water in the drum TIME SAVE2) Synthetic or mixed fabric items with normal soil. Cold Delicates 40° - SPIN REDUCTION NO SPIN All fabrics. Cold Wool/Silk 40° - Cold Synthetics 60° - weight of load description Functions White and coloured cotton with normal level of load Cycle max. max. 3.5 kg Prewash Wash Rinses Short spin SPIN REDUCTION RINSE HOLD EXTRA RINSE TIME...
Product Manual
Page 12
.... Wash Rinses Long spin SPIN REDUCTION RINSE HOLD STAIN EXTRA RINSE TIME SAVE2) 1) The STAIN function is not available with normal soil. Make sure that you can set the Extra Quick duration (press button 6 two times ), we recommend that it agrees with the laundry. max. 2 kg SPIN REDUCTION RINSE HOLD EXTRA RINSE Jeans 60° - 12 www.aeg.com Programme Type of load description Functions Curtains 40° - weight of load Cycle Temperature...
.... Wash Rinses Long spin SPIN REDUCTION RINSE HOLD STAIN EXTRA RINSE TIME SAVE2) 1) The STAIN function is not available with normal soil. Make sure that you can set the Extra Quick duration (press button 6 two times ), we recommend that it agrees with the laundry. max. 2 kg SPIN REDUCTION RINSE HOLD EXTRA RINSE Jeans 60° - 12 www.aeg.com Programme Type of load description Functions Curtains 40° - weight of load Cycle Temperature...
Product Manual
Page 14
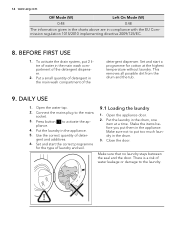
... USE 1. Set and start the correct programme for cotton at a time. Open the water tap. 2. This removes all possible dirt from the drum and the tub. 9. Make sure that no laundry stays between the seal and the door. Put the laundry in compliance with the EU Commission regulation 1015/2010 implementing directive 2009/125/EC. 8. Put the laundry in the drum, one item at the highest temperature...
... USE 1. Set and start the correct programme for cotton at a time. Open the water tap. 2. This removes all possible dirt from the drum and the tub. 9. Make sure that no laundry stays between the seal and the door. Put the laundry in compliance with the EU Commission regulation 1015/2010 implementing directive 2009/125/EC. 8. Put the laundry in the drum, one item at the highest temperature...
Product Manual
Page 16
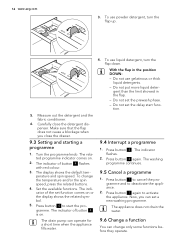
... change the temperature and/or the spin speed, press the related buttons. 4. To change only some functions before they operate. The indicator flashes. 2. Set the available functions. Press button 1 to cancel the programme and to activate the appliance. Do not set a new washing programme. Press button 4 to start function. 5. Press button 4 again. To use powder detergent, turn the flap down. The drain pump can operate for a short time when the appliance fills water...
... change the temperature and/or the spin speed, press the related buttons. 4. To change only some functions before they operate. The indicator flashes. 2. Set the available functions. Press button 1 to cancel the programme and to activate the appliance. Do not set a new washing programme. Press button 4 to start function. 5. Press button 4 again. To use powder detergent, turn the flap down. The drain pump can operate for a short time when the appliance fills water...
Product Manual
Page 17
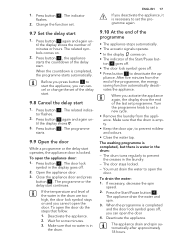
... or change the set a new cycle. • Remove the laundry from the end of the water in the drum: - Press button 4 . The programme or the delay start . Make sure that no water is completed and the door lock symbol goes off, you can open the door do the steps that the drum is locked. After five minutes from the appliance. The drum turns regularly to start operates, the appliance door is...
... or change the set a new cycle. • Remove the laundry from the end of the water in the drum: - Press button 4 . The programme or the delay start . Make sure that no water is completed and the door lock symbol goes off, you can open the door do the steps that the drum is locked. After five minutes from the appliance. The drum turns regularly to start operates, the appliance door is...
Product Manual
Page 18
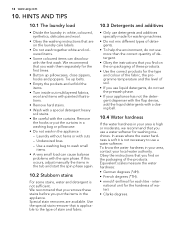
... remove these products. • Use the correct products for the type and colour of the fabric, the programme temperature and the level of soil. • If you use liquid detergents, do not use more than the correct quantity of detergent. • Obey the instructions that you find on the laundry care labels. • Do not wash together white and coloured items. • Some coloured items can cause balance problems...
... remove these products. • Use the correct products for the type and colour of the fabric, the programme temperature and the level of soil. • If you use liquid detergents, do not use more than the correct quantity of detergent. • Obey the instructions that you find on the laundry care labels. • Do not wash together white and coloured items. • Some coloured items can cause balance problems...
Product Manual
Page 19
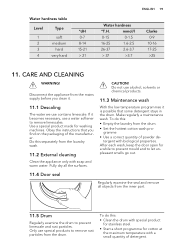
...; Start a short programme for cotton at the maximum temperature with soap and warm water. CARE AND CLEANING WARNING! If it . 11.1 Descaling The water we use contains limescale. Obey the instructions that some detergent stays in the drum. Make regularly a maintenance wash. gramme • Use a correct quantity of detergent. Only use a water softener to remove rust particles from the laundry wash. 11.2 External cleaning Clean the appliance only with a small quantity of powder de- Use...
...; Start a short programme for cotton at the maximum temperature with soap and warm water. CARE AND CLEANING WARNING! If it . 11.1 Descaling The water we use contains limescale. Obey the instructions that some detergent stays in the drum. Make regularly a maintenance wash. gramme • Use a correct quantity of detergent. Only use a water softener to remove rust particles from the laundry wash. 11.2 External cleaning Clean the appliance only with a small quantity of powder de- Use...
Product Manual
Page 20
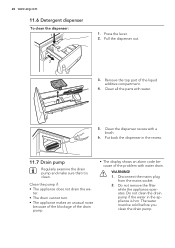
... the drain pump. • The display shows an alarm code because of the liquid additive compartment. 4. Put back the dispenser in the appliance is clean. Clean the dispenser recess with a brush. 6. Disconnect the mains plug from the mains socket. 2. Pull the dispenser out. 2 3. The water must be cold before you clean the drain pump. 20 www.aeg.com 11.6 Detergent dispenser To clean the dispenser: 1 1. Do not remove the filter while the appliance operates.
... the drain pump. • The display shows an alarm code because of the liquid additive compartment. 4. Put back the dispenser in the appliance is clean. Clean the dispenser recess with a brush. 6. Disconnect the mains plug from the mains socket. 2. Pull the dispenser out. 2 3. The water must be cold before you clean the drain pump. 20 www.aeg.com 11.6 Detergent dispenser To clean the dispenser: 1 1. Do not remove the filter while the appliance operates.

Product Manual
Page 22
... the drain pump door. 11.8 The inlet hose filter and the valve filter It could be necessary to 'Troubleshooting'. Make sure that the couplings are tight to prevent leakages. 11. Install again the inlet hose. Refer to clean the filters when: • The appliance does not fill with water. • The appliance fills with a stiff brush. 4. Clean the filter in the inlet hose with the water for a long time. Clean the filter under the water...
... the drain pump door. 11.8 The inlet hose filter and the valve filter It could be necessary to 'Troubleshooting'. Make sure that the couplings are tight to prevent leakages. 11. Install again the inlet hose. Refer to clean the filters when: • The appliance does not fill with water. • The appliance fills with a stiff brush. 4. Clean the filter in the inlet hose with the water for a long time. Clean the filter under the water...
Product Manual
Page 23
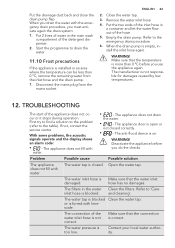
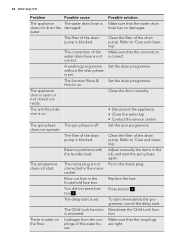
... signals operate and the display shows an alarm code: • - Problem Possible cause Possible solution The appliance does not fill with water. • - ENGLISH 23 2. Remove the water inlet hose 4. Refer to drain the water. 11.10 Frost precautions If the appliance is open or not closed . If not, contact the service centre. The water tap is empty, install the inlet hose again. The connection of the detergent dispenser. 2. Start...
... signals operate and the display shows an alarm code: • - Problem Possible cause Possible solution The appliance does not fill with water. • - ENGLISH 23 2. Remove the water inlet hose 4. Refer to drain the water. 11.10 Frost precautions If the appliance is open or not closed . If not, contact the service centre. The water tap is empty, install the inlet hose again. The connection of the detergent dispenser. 2. Start...
Product Manual
Page 24
... 'Care and cleaning'. Refer to 'Care and cleaning'. Press button 4 . To start immediately the programme, cancel the delay start the spin phase again. Make sure that the water drain hose has no damages. The spin phase is water on the floor. Leakages from the couplings of the drain pump. Clean the filter of the drain pump is set . water. The filter of the water drain hose is on . Balance problems with the laundry load. Blow out fuse in the mains plug...
... 'Care and cleaning'. Refer to 'Care and cleaning'. Press button 4 . To start immediately the programme, cancel the delay start the spin phase again. Make sure that the water drain hose has no damages. The spin phase is water on the floor. Leakages from the couplings of the drain pump. Clean the filter of the drain pump is set . water. The filter of the water drain hose is on . Balance problems with the laundry load. Blow out fuse in the mains plug...
Product Manual
Page 25
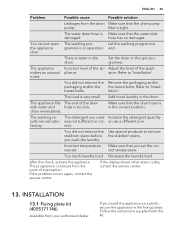
... water drain hose is Make sure that the drain pump pump. Set the drain or the spin programme. Adjust the level of the drain with the kit. ance. You did not remove the Use special products to remove stubborn stains before the stubborn stains. Refer to 'Installation'. The washing re- was set the cor- You did not remove the Remove the packaging and/or packaging and/or the the transit bolts. rect temperature. INSTALLATION...
... water drain hose is Make sure that the drain pump pump. Set the drain or the spin programme. Adjust the level of the drain with the kit. ance. You did not remove the Use special products to remove stubborn stains before the stubborn stains. Refer to 'Installation'. The washing re- was set the cor- You did not remove the Remove the packaging and/or packaging and/or the the transit bolts. rect temperature. INSTALLATION...


