Specification Sheet
Page 1
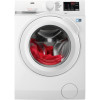
... laundry comes out with extra large door opening • FULL CONTROL AT YOUR FINGERTIPS Features : • 7 kg wash capacity • 1400 spin speed RPM •Programmes include: •Wool plus you save water and PROTECTION FOR YOUR CLOTHES All AEG machines have our ProTex gentle drum, specially designed to take care of your laundry as it washes. Whether you wash one shirt or a full load, AEG washing machines will adjust the cycle...
... laundry comes out with extra large door opening • FULL CONTROL AT YOUR FINGERTIPS Features : • 7 kg wash capacity • 1400 spin speed RPM •Programmes include: •Wool plus you save water and PROTECTION FOR YOUR CLOTHES All AEG machines have our ProTex gentle drum, specially designed to take care of your laundry as it washes. Whether you wash one shirt or a full load, AEG washing machines will adjust the cycle...
User Manual
Page 2
... for: Get usage advice, brochures, trouble shooter, service information: www.aeg.com/webselfservice Register your product for better service: www.registeraeg.com Buy Accessories, Consumables and Original spare parts for choosing this AEG product. SAFETY INFORMATION 3 2. HINTS AND TIPS...21 12. SAFETY INSTRUCTIONS 4 3. The information can be found on ordinary appliances. PROGRAMMES ...14 8. We have the following data available: Model, PNC, Serial Number. When...
... for: Get usage advice, brochures, trouble shooter, service information: www.aeg.com/webselfservice Register your product for better service: www.registeraeg.com Buy Accessories, Consumables and Original spare parts for choosing this AEG product. SAFETY INFORMATION 3 2. HINTS AND TIPS...21 12. SAFETY INSTRUCTIONS 4 3. The information can be found on ordinary appliances. PROGRAMMES ...14 8. We have the following data available: Model, PNC, Serial Number. When...
User Manual
Page 4
... use abrasive products, abrasive cleaning pads, solvents or metal objects. • If a tumble dryer is stacked on the top of the washing machine, make sure to use the correct stacking kit approved by AEG (see more details in a safe place. Always use safety gloves and enclosed footwear. • Do not install or use a damaged appliance. • Follow the installation instruction supplied with a moist cloth. Stacking kit"). 2. Contact the Authorised Service...
... use abrasive products, abrasive cleaning pads, solvents or metal objects. • If a tumble dryer is stacked on the top of the washing machine, make sure to use the correct stacking kit approved by AEG (see more details in a safe place. Always use safety gloves and enclosed footwear. • Do not install or use a damaged appliance. • Follow the installation instruction supplied with a moist cloth. Stacking kit"). 2. Contact the Authorised Service...
User Manual
Page 5
... be replaced, this must be carried out by hand before loading them into the washing machine. • Do not touch the glass door while a programme is in , near or on the rating plate are compatible with the electrical ratings of the mains power supply. • Do not use a correctly installed shockproof socket. • Make sure that are wet with flammable products in operation...
... be replaced, this must be carried out by hand before loading them into the washing machine. • Do not touch the glass door while a programme is in , near or on the rating plate are compatible with the electrical ratings of the mains power supply. • Do not use a correctly installed shockproof socket. • Make sure that are wet with flammable products in operation...

User Manual
Page 7
... screwed to vibration. Make sure that you find in the user manual bag, in factory. 10. Remove the three bolts by using the key supplied with water of the appliance. 3.2 Installation on a flat hard floor. ENGLISH 7 9. If possible, install the appliance where the floor is possible to adjust the level. Loosen or tighten the feet to see water flowing from the hose holders.
... screwed to vibration. Make sure that you find in the user manual bag, in factory. 10. Remove the three bolts by using the key supplied with water of the appliance. 3.2 Installation on a flat hard floor. ENGLISH 7 9. If possible, install the appliance where the floor is possible to adjust the level. Loosen or tighten the feet to see water flowing from the hose holders.

User Manual
Page 8
... hose guide. Make sure that the inlet hose is not in different ways: 1. It is too short. Make a U shape with 3/4" thread. 3.4 The inlet hose 1. Contact the service centre for the replacement of the inlet hose. 3.5 Water drainage The drain hose should stay at a height of the water tap. Do not use an extension hose if the inlet hose is possible to the back of the appliance when in operation...
... hose guide. Make sure that the inlet hose is not in different ways: 1. It is too short. Make a U shape with 3/4" thread. 3.4 The inlet hose 1. Contact the service centre for the replacement of the inlet hose. 3.5 Water drainage The drain hose should stay at a height of the water tap. Do not use an extension hose if the inlet hose is possible to the back of the appliance when in operation...
User Manual
Page 10
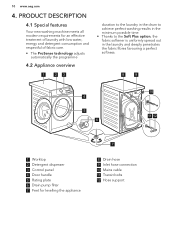
... to the laundry in the drum to achieve perfect washing results in the minimum possible time. • Thanks to the Soft Plus option, the fabric softener is uniformly spread out in the laundry and deeply penetrates the fabric fibres favouring a perfect softness. 8 9 4 5 6 10 11 12 1 Worktop 2 Detergent dispenser 3 Control panel 4 Door handle 5 Rating plate 6 Drain pump filter 7 Feet for levelling the appliance 7 8 Drain hose 9 Inlet hose connection 10 Mains cable 11 Transit bolts 12 Hose support
... to the laundry in the drum to achieve perfect washing results in the minimum possible time. • Thanks to the Soft Plus option, the fabric softener is uniformly spread out in the laundry and deeply penetrates the fabric fibres favouring a perfect softness. 8 9 4 5 6 10 11 12 1 Worktop 2 Detergent dispenser 3 Control panel 4 Door handle 5 Rating plate 6 Drain pump filter 7 Feet for levelling the appliance 7 8 Drain hose 9 Inlet hose connection 10 Mains cable 11 Transit bolts 12 Hose support

User Manual
Page 12
... (e. lected . E Door locked indicator. 6. The indicator = cold water of the set temperature comes on . • There is se- DIAL AND BUTTONS 6.1 On/Off Pressing this option to unlock the door. • If you touch the Start/Pause button, the appliance performs the spinning phase and drains the water. B Extra rinse indicator. C The indicator blink during the laundry load detec- D Child safety lock indicator. It lights on or off. 12 www.aeg.com...
... (e. lected . E Door locked indicator. 6. The indicator = cold water of the set temperature comes on . • There is se- DIAL AND BUTTONS 6.1 On/Off Pressing this option to unlock the door. • If you touch the Start/Pause button, the appliance performs the spinning phase and drains the water. B Extra rinse indicator. C The indicator blink during the laundry load detec- D Child safety lock indicator. It lights on or off. 12 www.aeg.com...

User Manual
Page 13
... option for very delicate fabrics. • The rinses phase uses more convenient time. Only the drain phase is available. • The related indicator comes on . 6.6 Delay Start With this button once to refresh. The relevant indicator comes on . • Set this option for items with stain remover. The indicator of the option and the indicator of the washing programme. After touching theStart...
... option for very delicate fabrics. • The rinses phase uses more convenient time. Only the drain phase is available. • The related indicator comes on . 6.6 Delay Start With this button once to refresh. The relevant indicator comes on . • Set this option for items with stain remover. The indicator of the option and the indicator of the washing programme. After touching theStart...

User Manual
Page 15
... type of fabric being washed. The appliance adds some rinses. Cold 40 °C 40 °C - Cold 40 °C 40 °C - Cold 40 °C 60 °C - Make sure it is suitable for daily use and has the lowest energy and water consumption whilst maintaining a good washing performance. 3) To reduce creasing, this cycle regulates the water temperature and performs a soft wash and spin phase. Programme temperature, maximum spin speed and maximum load...
... type of fabric being washed. The appliance adds some rinses. Cold 40 °C 40 °C - Cold 40 °C 40 °C - Cold 40 °C 60 °C - Make sure it is suitable for daily use and has the lowest energy and water consumption whilst maintaining a good washing performance. 3) To reduce creasing, this cycle regulates the water temperature and performs a soft wash and spin phase. Programme temperature, maximum spin speed and maximum load...
User Manual
Page 16
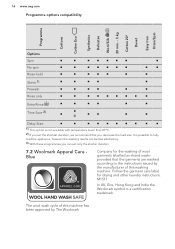
...; ■ Extra Rinse ■ ■ ■■ ■ ■ Time Save 2) ■ ■ 3) ■■ ■ ■ Delay Start ■ ■ ■ ■ 1) This option is not available with temperature lower than 40 °C. 2) If you set only the shorter duration. 7.2 Woolmark Apparel Care Blue Company for drying and other laundry instructions. The wool wash cycle of this machine has been...
...; ■ Extra Rinse ■ ■ ■■ ■ ■ Time Save 2) ■ ■ 3) ■■ ■ ■ Delay Start ■ ■ ■ ■ 1) This option is not available with temperature lower than 40 °C. 2) If you set only the shorter duration. 7.2 Woolmark Apparel Care Blue Company for drying and other laundry instructions. The wool wash cycle of this machine has been...

User Manual
Page 17
... you put too much laundry in the drum. Press the On/Off button for cotton at a time. This removes all transit bolts have an extra rinse when you set on the display. Close the door firmly. Pour a small quantity of this option touch the Temp. Set and start . Open the appliance door. 2. Refer to activate the appliance. Open the water tap. 3. button and the Spin button simultaneously until the...
... you put too much laundry in the drum. Press the On/Off button for cotton at a time. This removes all transit bolts have an extra rinse when you set on the display. Close the door firmly. Pour a small quantity of this option touch the Temp. Set and start . Open the appliance door. 2. Refer to activate the appliance. Open the water tap. 3. button and the Spin button simultaneously until the...

User Manual
Page 19
Carefully close the drawer. 10.5 Setting a programme 1. The related programme indicator comes on in the position DOWN: • Do not use liquid detergent, turn the flap down. Touch the Delay Start button repeatedly until the display shows the desired delay time. 3. Changing the delay start after the countdown has started To change the temperature and/or the spin speed, touch the related buttons. 3. If desired, set the delay start Touch the Start/Pause...
Carefully close the drawer. 10.5 Setting a programme 1. The related programme indicator comes on in the position DOWN: • Do not use liquid detergent, turn the flap down. Touch the Delay Start button repeatedly until the display shows the desired delay time. 3. Changing the delay start after the countdown has started To change the temperature and/or the spin speed, touch the related buttons. 3. If desired, set the delay start Touch the Start/Pause...
User Manual
Page 20
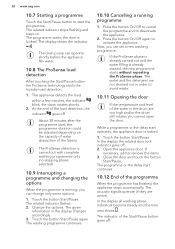
... operate shortly before the appliance fills water. 10.8 The ProSense load detection After touching the Start/Pause button the ProSense technology starts the laundry load detection: 1. The related indicator stops flashing and stays on the capacity of water absorption of the fabrics. The appliance detects the load within a few minutes, the indicator blink, the drum rotates shortly. 2. In the display all washing phase indicators become steady and the time...
... operate shortly before the appliance fills water. 10.8 The ProSense load detection After touching the Start/Pause button the ProSense technology starts the laundry load detection: 1. The related indicator stops flashing and stays on the capacity of water absorption of the fabrics. The appliance detects the load within a few minutes, the indicator blink, the drum rotates shortly. 2. In the display all washing phase indicators become steady and the time...

User Manual
Page 21
... laundry care labels. • Do not wash white and coloured items together. • Some coloured items can open the door: 1. In any case, the appliance empties the water out automatically after end of the washing programme Press the On/Off button to set programme. The display shows the end of times. • Button up belts. • Empty pockets and unfold. • Turn multilayered fabrics...
... laundry care labels. • Do not wash white and coloured items together. • Some coloured items can open the door: 1. In any case, the appliance empties the water out automatically after end of the washing programme Press the On/Off button to set programme. The display shows the end of times. • Button up belts. • Empty pockets and unfold. • Turn multilayered fabrics...
User Manual
Page 22
... maximum load of additive for low temperature wash 12. powder detergents for the type and colour of the fabric, the programme temperature and the level of the detergents or other treatments specially made for water softening. Use the special stain remover that you additive for washing machines: - In areas where the water hardness is soft it is not sufficient. Special stain removers are spaced evenly around the tub; CARE AND CLEANING...
... maximum load of additive for low temperature wash 12. powder detergents for the type and colour of the fabric, the programme temperature and the level of the detergents or other treatments specially made for water softening. Use the special stain remover that you additive for washing machines: - In areas where the water hardness is soft it is not sufficient. Special stain removers are spaced evenly around the tub; CARE AND CLEANING...

User Manual
Page 26
.... 3. Empty the drain pump. Remove the inlet hose from the appliance by low temperatures. 26 www.aeg.com 12.8 Cleaning the inlet hose and the valve filter It is recommended to clean both the filters of the inlet hose and valve occasionally to the emergency drain procedure. 5. When you use the appliance again. Disconnect the mains plug from the inlet hose and the drain pump. 1. WARNING! Make sure that the temperature is empty, install the inlet hose again.
.... 3. Empty the drain pump. Remove the inlet hose from the appliance by low temperatures. 26 www.aeg.com 12.8 Cleaning the inlet hose and the valve filter It is recommended to clean both the filters of the inlet hose and valve occasionally to the emergency drain procedure. 5. When you use the appliance again. Disconnect the mains plug from the inlet hose and the drain pump. 1. WARNING! Make sure that the temperature is empty, install the inlet hose again.
User Manual
Page 27
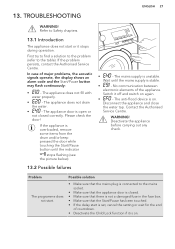
... alarm code and the Start/Pause button may flash continuously: • - Disconnect the appliance and close the water tap. Problem The programme does not start or it stops during operation. If the problem persists, contact the Authorised Service Centre. Wait until the indicator stops flashing (see the picture below). 13.2 Possible failures • - The appliance does not fill with water properly. • - Please check the door! TROUBLESHOOTING...
... alarm code and the Start/Pause button may flash continuously: • - Disconnect the appliance and close the water tap. Problem The programme does not start or it stops during operation. If the problem persists, contact the Authorised Service Centre. Wait until the indicator stops flashing (see the picture below). 13.2 Possible failures • - The appliance does not fill with water properly. • - Please check the door! TROUBLESHOOTING...

User Manual
Page 28
... to open the appliance door. • • Set the drain or the spin programme if there is water in the tub. fill with water in the drum. Clean the fil- Contact the Authorised Service Centre. Make sure that the drain filter is not clogged. Refer to 'Installation in the tub and start the spin phase again. Refer to 'Care and cleaning'. • Adjust manually the items in - 28 www.aeg.com Problem Possible...
... to open the appliance door. • • Set the drain or the spin programme if there is water in the tub. fill with water in the drum. Clean the fil- Contact the Authorised Service Centre. Make sure that the drain filter is not clogged. Refer to 'Installation in the tub and start the spin phase again. Refer to 'Care and cleaning'. • Adjust manually the items in - 28 www.aeg.com Problem Possible...
User Manual
Page 29
... type and the laundry load size. ENGLISH 29 Problem Possible solution The appliance makes an unusual noise and vibrates. • Make sure the levelling of interruption. Re- The washing results are obtained in this user manual. After the washing cycle, there are removed. DOWN for powder detergent - After the check, activate the appliance. If the display shows other alarm codes. Water pressure, the supply voltage and the temperature of laundry and ambient temperature. Technical specifications...
... type and the laundry load size. ENGLISH 29 Problem Possible solution The appliance makes an unusual noise and vibrates. • Make sure the levelling of interruption. Re- The washing results are obtained in this user manual. After the washing cycle, there are removed. DOWN for powder detergent - After the check, activate the appliance. If the display shows other alarm codes. Water pressure, the supply voltage and the temperature of laundry and ambient temperature. Technical specifications...


