
Specification Sheet
Page 1
... washing times precisely, ensuring optimum treatment for a thorough clean. dispenser compartments no : 3 •Program list : Cotton, Delicate, Wool Plus, Antiallergy, Quick 20 Min 3 Kg, New Outdoor, Duvets, Easy Iron, Spin / Drain, Synthetics •Product Partner Code : All Open Product Description : Quality clothes are made to be worn, but everyday pieces need care to maintain their condition. Whether you wash one shirt or a full load, AEG washing machines will adjust the cycle...
... washing times precisely, ensuring optimum treatment for a thorough clean. dispenser compartments no : 3 •Program list : Cotton, Delicate, Wool Plus, Antiallergy, Quick 20 Min 3 Kg, New Outdoor, Duvets, Easy Iron, Spin / Drain, Synthetics •Product Partner Code : All Open Product Description : Quality clothes are made to be worn, but everyday pieces need care to maintain their condition. Whether you wash one shirt or a full load, AEG washing machines will adjust the cycle...
User Manual
Page 2
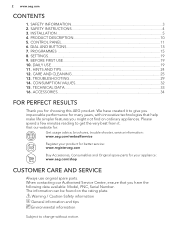
DIAL AND BUTTONS 13 7. SETTINGS...19 9. DAILY USE...19 11. TECHNICAL DATA 33 16. Visit our website for: Get usage advice, brochures, trouble shooter, service information: www.aeg.com/webselfservice Register your product for better service: www.registeraeg.com Buy Accessories, Consumables and Original spare parts for many years, with innovative technologies that you have created it . SAFETY INFORMATION 3 2. CARE AND CLEANING 25 13. ACCESSORIES...34...
DIAL AND BUTTONS 13 7. SETTINGS...19 9. DAILY USE...19 11. TECHNICAL DATA 33 16. Visit our website for: Get usage advice, brochures, trouble shooter, service information: www.aeg.com/webselfservice Register your product for better service: www.registeraeg.com Buy Accessories, Consumables and Original spare parts for many years, with innovative technologies that you have created it . SAFETY INFORMATION 3 2. CARE AND CLEANING 25 13. ACCESSORIES...34...

User Manual
Page 3
...location for future reference. 1.1 Children and vulnerable people safety • This appliance can be used by children aged from 8 years and above and persons with the appliance. • Children aged 3 years and under must be activated. • Children shall not carry out cleaning and user maintenance of the appliance without supervision. 1.2 General Safety • Do not change the specification... supervision or instruction concerning the use of incorrect installation or usage. SAFETY INFORMATION Before the installation and use of the appliance in operation at all times. •...
...location for future reference. 1.1 Children and vulnerable people safety • This appliance can be used by children aged from 8 years and above and persons with the appliance. • Children aged 3 years and under must be activated. • Children shall not carry out cleaning and user maintenance of the appliance without supervision. 1.2 General Safety • Do not change the specification... supervision or instruction concerning the use of incorrect installation or usage. SAFETY INFORMATION Before the installation and use of the appliance in operation at all times. •...
User Manual
Page 4
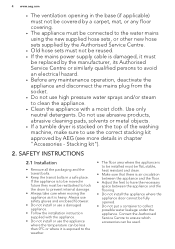
Do not use abrasive products, abrasive cleaning pads, solvents or metal objects. • If a tumble dryer is stacked on the top of the washing machine, make sure to collect possible water leakage under the appliance. SAFETY INSTRUCTIONS 2.1 Installation • Remove all the packaging and the transit bolts. • Keep the transit bolts in chapter "Accessories - Use only neutral detergents. Contact the Authorised Service Centre to ensure which...
Do not use abrasive products, abrasive cleaning pads, solvents or metal objects. • If a tumble dryer is stacked on the top of the washing machine, make sure to collect possible water leakage under the appliance. SAFETY INSTRUCTIONS 2.1 Installation • Remove all the packaging and the transit bolts. • Keep the transit bolts in chapter "Accessories - Use only neutral detergents. Contact the Authorised Service Centre to ensure which...

User Manual
Page 5
... the safety instructions on the detergent packaging. • Do not put flammable products or items that are wet with flammable products in, near or on the rating plate are no visible water leaks during and after the installation. • Do not touch the mains cable or the mains plug with the E.E.C. Should the mains cable need to be replaced, this must...
... the safety instructions on the detergent packaging. • Do not put flammable products or items that are wet with flammable products in, near or on the rating plate are no visible water leaks during and after the installation. • Do not touch the mains cable or the mains plug with the E.E.C. Should the mains cable need to be replaced, this must...

User Manual
Page 7
... identify the different sizes and the positions of water in vertical position. Make sure that you find in the user manual bag, in the holes. Remove the three bolts by using the key supplied with the appliance of the sound barriers. Make sure to bottom of the appliance 10. Remove the power supply cable and the drain hose from the sound barriers. 11...
... identify the different sizes and the positions of water in vertical position. Make sure that you find in the user manual bag, in the holes. Remove the three bolts by using the key supplied with the appliance of the sound barriers. Make sure to bottom of the appliance 10. Remove the power supply cable and the drain hose from the sound barriers. 11...

User Manual
Page 11
...Worktop 2 Detergent dispenser 3 Control panel 4 Door handle 5 Rating plate 6 Drain pump filter 7 Feet for levelling the appliance 5. CONTROL PANEL 5.1 Control panel description 1 8 Drain hose 9 Inlet hose connection 10 Mains cable 11 Transit bolts 12 Hose support 2 3 4 5 12 11 10 9 8 7 6 1 Programme dial 2 Display 3 Eco touch button 4 Time Save touch button 5 Rinse touch button • Extra rinse option • Skipping wash phase Rinse only 6 Start/Pause touch button 7 Stains/Prewash touch button • Stains option • Prewash option 8 Delay Start touch button 9 Soft...
...Worktop 2 Detergent dispenser 3 Control panel 4 Door handle 5 Rating plate 6 Drain pump filter 7 Feet for levelling the appliance 5. CONTROL PANEL 5.1 Control panel description 1 8 Drain hose 9 Inlet hose connection 10 Mains cable 11 Transit bolts 12 Hose support 2 3 4 5 12 11 10 9 8 7 6 1 Programme dial 2 Display 3 Eco touch button 4 Time Save touch button 5 Rinse touch button • Extra rinse option • Skipping wash phase Rinse only 6 Start/Pause touch button 7 Stains/Prewash touch button • Stains option • Prewash option 8 Delay Start touch button 9 Soft...

User Manual
Page 13
... the energy consumption in the drum. The washing programme ends with all washing programmes. You must drain the water to unlock the door. DIAL AND BUTTONS 6.1 On/Off Pressing this case the appliance doesn't allow you set programme. • Activate the Rinse Hold option. The door stays locked and the drum turns regularly to prevent the fabrics from creasing. You must drain the water to unlock the door. The display shows...
... the energy consumption in the drum. The washing programme ends with all washing programmes. You must drain the water to unlock the door. DIAL AND BUTTONS 6.1 On/Off Pressing this case the appliance doesn't allow you set programme. • Activate the Rinse Hold option. The door stays locked and the drum turns regularly to prevent the fabrics from creasing. You must drain the water to unlock the door. The display shows...
User Manual
Page 14
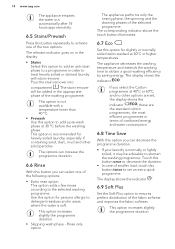
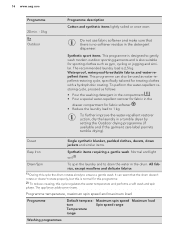
... the fabric softener and improves the fabric softness. The corresponding indicator above the touch button illuminates. 6.7 Eco Set this button twice to obtain a good washing efficiency by saving energy. The appliance decreases the washing temperature and extends the washing time to set , the display shows the indicator ; Touch this button once to decrease the duration. • In case of smaller load, touch this option for heavily soiled laundry...
... the fabric softener and improves the fabric softness. The corresponding indicator above the touch button illuminates. 6.7 Eco Set this button twice to obtain a good washing efficiency by saving energy. The appliance decreases the washing temperature and extends the washing time to set , the display shows the indicator ; Touch this button once to decrease the duration. • In case of smaller load, touch this option for heavily soiled laundry...
User Manual
Page 16
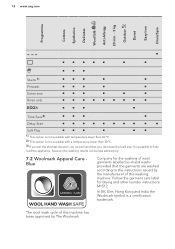
... is also suitable for fabric softener . • Reduce the laundry load to 1 kg. Maximum spin speed Maximum load ture Spin speed range Temperature range Washing programmes Do not use fabric softener and make sure that the drum doesn't rotate or doesn't rotate properly, but this cycle the drum rotates slowly to drain the water in the drawer compartment for sporting clothes such as water-repellent restoring cycle, specifically tailored for this programme...
... is also suitable for fabric softener . • Reduce the laundry load to 1 kg. Maximum spin speed Maximum load ture Spin speed range Temperature range Washing programmes Do not use fabric softener and make sure that the drum doesn't rotate or doesn't rotate properly, but this cycle the drum rotates slowly to drain the water in the drawer compartment for sporting clothes such as water-repellent restoring cycle, specifically tailored for this programme...
User Manual
Page 18
... Woolmark symbol is possible to fully load the appliance, however the washing results can be less satisfactory. 7.2 Woolmark Apparel Care Blue Company for drying and other laundry instructions. The wool wash cycle of this machine has been approved by the manufacturer of wool garments labelled as «hand wash» provided that you set the shortest duration, we recommend that...
... Woolmark symbol is possible to fully load the appliance, however the washing results can be less satisfactory. 7.2 Woolmark Apparel Care Blue Company for drying and other laundry instructions. The wool wash cycle of this machine has been approved by the manufacturer of wool garments labelled as «hand wash» provided that you set the shortest duration, we recommend that...

User Manual
Page 19
... 6 seconds. The display shows the maximum load, the default temperature, the maximum spin speed, the indicators of detergent into the compartment marked . 10. This removes all possible dirt from playing with the control panel. • To activate/deactivate this option: • After you touch the Start/Pause button: all transit bolts have an extra rinse when you set on the display. SETTINGS 8.1 Child Lock With this...
... 6 seconds. The display shows the maximum load, the default temperature, the maximum spin speed, the indicators of detergent into the compartment marked . 10. This removes all possible dirt from playing with the control panel. • To activate/deactivate this option: • After you touch the Start/Pause button: all transit bolts have an extra rinse when you set on the display. SETTINGS 8.1 Child Lock With this...

User Manual
Page 21
... Start button repeatedly until the display shows the desired delay time. Touch the Delay Start button repeatedly until the display shows . 3. Measure out the detergent and the fabric conditioner. 6. Turn the programme dial to start : 1. To change the temperature and/or the spin speed, touch the related buttons. 3. The indicator comes on the flap. • Do not set the prewash phase. • Do not set one or more liquid detergent...
... Start button repeatedly until the display shows the desired delay time. Touch the Delay Start button repeatedly until the display shows . 3. Measure out the detergent and the fabric conditioner. 6. Turn the programme dial to start : 1. To change the temperature and/or the spin speed, touch the related buttons. 3. The indicator comes on the flap. • Do not set the prewash phase. • Do not set one or more liquid detergent...

User Manual
Page 23
... prevent the creases in the drum are active). Turn the programme dial to prevent mildew and odours. 5. Keep the door and the detergent dispenser slightly ajar to set a new cycle. 2. In the display all washing phase indicators become steady and the time area shows . Touch the Start/Pause button: • If you have set , the appliance drains the water and spins. • If you activate the...
... prevent the creases in the drum are active). Turn the programme dial to prevent mildew and odours. 5. Keep the door and the detergent dispenser slightly ajar to set a new cycle. 2. In the display all washing phase indicators become steady and the time area shows . Touch the Start/Pause button: • If you have set , the appliance drains the water and spins. • If you activate the...

User Manual
Page 24
... balance problems with cuts. b. liquid detergents, preferably for low temperature wash programmes (60 °C max) for all types of the last set a new cycle. 11. The display shows the end of fabric, - Special stain removers are spaced evenly around the tub; manually redistribute the load so that is not sufficient. powder detergents for delicate fabrics (40 °C max) and woollens, - Use a washing bag to "Opening the door when a programme or the delay start operates...
... balance problems with cuts. b. liquid detergents, preferably for low temperature wash programmes (60 °C max) for all types of the last set a new cycle. 11. The display shows the end of fabric, - Special stain removers are spaced evenly around the tub; manually redistribute the load so that is not sufficient. powder detergents for delicate fabrics (40 °C max) and woollens, - Use a washing bag to "Opening the door when a programme or the delay start operates...

User Manual
Page 25
... the packaging of the product. Perform a maintenance wash regularly. To do this: • Remove all laundry from the inner part. 12.5 Cleaning the drum Regularly examine the drum to run a cycle with mild soap and warm water only. Refer to check any left residues. 12.4 Door seal Regularly examine the seal and remove all the surfaces. Use the correct quantity of the product. 12.3 Maintenance wash With the low temperature programmes it is...
... the packaging of the product. Perform a maintenance wash regularly. To do this: • Remove all laundry from the inner part. 12.5 Cleaning the drum Regularly examine the drum to run a cycle with mild soap and warm water only. Refer to check any left residues. 12.4 Door seal Regularly examine the seal and remove all the surfaces. Use the correct quantity of the product. 12.3 Maintenance wash With the low temperature programmes it is...
User Manual
Page 29
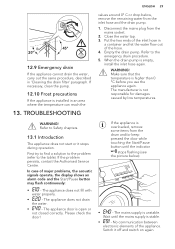
... you use the appliance again. Empty the drain pump. Wait until the indicator stops flashing (see the picture below , remove the remaining water from the mains socket. 2. Switch it stops during operation. In case of the appliance. The appliance door is unstable. WARNING! No communication between electronic elements of major problems, the acoustic signals operate, the display shows an alarm code and the Start/Pause button may flash...
... you use the appliance again. Empty the drain pump. Wait until the indicator stops flashing (see the picture below , remove the remaining water from the mains socket. 2. Switch it stops during operation. In case of the appliance. The appliance door is unstable. WARNING! No communication between electronic elements of major problems, the acoustic signals operate, the display shows an alarm code and the Start/Pause button may flash...
User Manual
Page 30
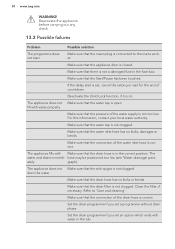
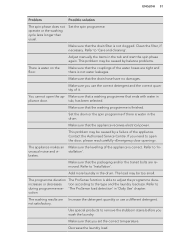
... clogged. Clean the filter, if necessary. The appliance does not Make sure that the drain filter is not clogged. Make sure that the water tap is correct. The water and drains immedi- Refer to the mains socket. If the delay start . Make sure that the connection of the water inlet hose is not a damaged fuse in the tub. Set the drain programme if you set a programme without drain phase. Set...
... clogged. Clean the filter, if necessary. The appliance does not Make sure that the drain filter is not clogged. Make sure that the water tap is correct. The water and drains immedi- Refer to the mains socket. If the delay start . Make sure that the connection of the water inlet hose is not a damaged fuse in the tub. Set the drain programme if you set a programme without drain phase. Set...
User Manual
Page 31
... balance problems. There is not water leakages. Make sure the levelling of the water hoses are Increase the detergent quantity or use the correct detergent and the correct quantity of the appliance. Refer to 'Care and cleaning'. Make sure that ends with water in 'Daily Use' chapter. Refer to 'Installation'. Clean the filter, if necessary. Contact the Authorised Service Centre. The appliance makes an unusual noise and vibrates. The load...
... balance problems. There is not water leakages. Make sure the levelling of the water hoses are Increase the detergent quantity or use the correct detergent and the correct quantity of the appliance. Refer to 'Care and cleaning'. Make sure that ends with water in 'Daily Use' chapter. Refer to 'Installation'. Clean the filter, if necessary. Contact the Authorised Service Centre. The appliance makes an unusual noise and vibrates. The load...

User Manual
Page 33
... 52 Off Mode (W) Left On Mode (W) 0.30 0.30 The information given in the chart above is not lower than 0.05 MPa (0.5 bar). TECHNICAL DATA Dimension Width/ Height/ Depth/ Total depth 600 mm/ 850 mm/ 630 mm/ 660 mm Electrical connection Voltage Overall power Fuse Frequency 230-240 V 2200 W 13 A 50 Hz Level of protection against ingress of spin phase...
... 52 Off Mode (W) Left On Mode (W) 0.30 0.30 The information given in the chart above is not lower than 0.05 MPa (0.5 bar). TECHNICAL DATA Dimension Width/ Height/ Depth/ Total depth 600 mm/ 850 mm/ 630 mm/ 660 mm Electrical connection Voltage Overall power Fuse Frequency 230-240 V 2200 W 13 A 50 Hz Level of protection against ingress of spin phase...


