Specification Sheet
Page 1
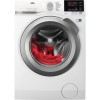
...;Wheels/feet : 4 adj feet •Cord Length : 1.8 •Inlet hose length (mm) : 130 •Outlet hose length (mm) : 145 •Connected Load : 2200 •Voltage : 230-240 •Required Fuse : 13 •Frequency : 50 •Porthole Type : XXXL S •Woolmark : WOOLMARK BLUE •Det. Your laundry comes out with that 's as quick as the last spin is over. dispenser compartments no : 3 •Program list : Cotton...
...;Wheels/feet : 4 adj feet •Cord Length : 1.8 •Inlet hose length (mm) : 130 •Outlet hose length (mm) : 145 •Connected Load : 2200 •Voltage : 230-240 •Required Fuse : 13 •Frequency : 50 •Porthole Type : XXXL S •Woolmark : WOOLMARK BLUE •Det. Your laundry comes out with that 's as quick as the last spin is over. dispenser compartments no : 3 •Program list : Cotton...
User Manual
Page 2
... technologies that you might not find on the rating plate. INSTALLATION...6 4. CONTROL PANEL...11 6. Visit our website for: Get usage advice, brochures, trouble shooter, service information: www.aeg.com/webselfservice Register your appliance: www.aeg.com/shop CUSTOMER CARE AND SERVICE Always use original spare parts. TECHNICAL DATA 33 16. SETTINGS...19 9. We have the following data available: Model, PNC, Serial Number. Please spend a few minutes reading to get...
... technologies that you might not find on the rating plate. INSTALLATION...6 4. CONTROL PANEL...11 6. Visit our website for: Get usage advice, brochures, trouble shooter, service information: www.aeg.com/webselfservice Register your appliance: www.aeg.com/shop CUSTOMER CARE AND SERVICE Always use original spare parts. TECHNICAL DATA 33 16. SETTINGS...19 9. We have the following data available: Model, PNC, Serial Number. Please spend a few minutes reading to get...

User Manual
Page 3
... appliance can be activated. • Children shall not carry out cleaning and user maintenance of the appliance without supervision. 1.2 General Safety • Do not change the specification of this appliance. • Do not exceed the maximum load of incorrect installation or usage. SAFETY INFORMATION Before the installation and use of the appliance in a safe way and understand the hazards involved...
... appliance can be activated. • Children shall not carry out cleaning and user maintenance of the appliance without supervision. 1.2 General Safety • Do not change the specification of this appliance. • Do not exceed the maximum load of incorrect installation or usage. SAFETY INFORMATION Before the installation and use of the appliance in a safe way and understand the hazards involved...
User Manual
Page 4
... top of the washing machine, make sure to use the correct stacking kit approved by the manufacturer, its Authorised Service Centre or similarly qualified persons to avoid an electrical hazard. • Before any maintenance operation, deactivate the appliance and disconnect the mains plug from the socket. • Do not use high pressure water sprays and/or steam to clean the appliance. • Clean the appliance with...
... top of the washing machine, make sure to use the correct stacking kit approved by the manufacturer, its Authorised Service Centre or similarly qualified persons to avoid an electrical hazard. • Before any maintenance operation, deactivate the appliance and disconnect the mains plug from the socket. • Do not use high pressure water sprays and/or steam to clean the appliance. • Clean the appliance with...
User Manual
Page 5
... before loading them into the washing machine. • Do not touch the glass door while a programme is fitted with wet hands. • Do not pull the mains cable to change the mains plug fuse, use only. • Follow the safety instructions on the detergent packaging. • Do not put flammable products or items that are no visible water leaks during and after the installation...
... before loading them into the washing machine. • Do not touch the glass door while a programme is fitted with wet hands. • Do not pull the mains cable to change the mains plug fuse, use only. • Follow the safety instructions on the detergent packaging. • Do not put flammable products or items that are no visible water leaks during and after the installation...

User Manual
Page 7
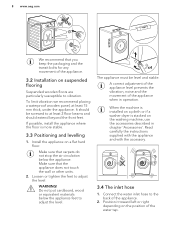
... in the user manual bag, in vertical position. Remove the three bolts by using the key supplied with the appliance of the appliance. 12. B Remove the power supply cable and the drain hose from the sound barriers. 11. Attach the four barriers to identify the different sizes and the positions of the appliance 10. This is possible to the testing with the...
... in the user manual bag, in vertical position. Remove the three bolts by using the key supplied with the appliance of the appliance. 12. B Remove the power supply cable and the drain hose from the sound barriers. 11. Attach the four barriers to identify the different sizes and the positions of the appliance 10. This is possible to the testing with the...
User Manual
Page 8
... accessory. 3.4 The inlet hose 1. Install the appliance on the washing machine, use the accessories described in operation. It should be level and stable. If possible, install the appliance where the floor is stacked on a flat hard floor. Make sure that the appliance does not touch the wall or other units. 2. A correct adjustment of the appliance level prevents the vibration, noise and the movement...
... accessory. 3.4 The inlet hose 1. Install the appliance on the washing machine, use the accessories described in operation. It should be level and stable. If possible, install the appliance where the floor is stacked on a flat hard floor. Make sure that the appliance does not touch the wall or other units. 2. A correct adjustment of the appliance level prevents the vibration, noise and the movement...

User Manual
Page 14
... display shows the indicator . The intermediate and the final spinning phases are performed with stain remover. The drum turns regularly to obtain a good washing efficiency by saving energy. You must drain the water to add a pre-wash phase at 30 °C before the washing phase. In some programmes the rinses are suppressed and the programme ends with a temperature lower than 40 °C. • Prewash Use this button...
... display shows the indicator . The intermediate and the final spinning phases are performed with stain remover. The drum turns regularly to obtain a good washing efficiency by saving energy. You must drain the water to add a pre-wash phase at 30 °C before the washing phase. In some programmes the rinses are suppressed and the programme ends with a temperature lower than 40 °C. • Prewash Use this button...
User Manual
Page 16
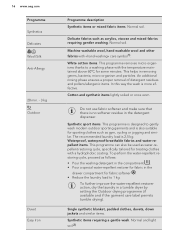
... use fabric softener and make sure that there is also suitable for sporting clothes such as water-repellent restoring cycle, specifically tailored for treating clothes with «hand washing» care symbol1). Synthetic sport items. This programme is designed to gently wash modern outdoor sporting garments and is no softener residue in the drawer compartment for fabric softener . • Reduce the laundry load to a washing phase with the temperature...
... use fabric softener and make sure that there is also suitable for sporting clothes such as water-repellent restoring cycle, specifically tailored for treating clothes with «hand washing» care symbol1). Synthetic sport items. This programme is designed to gently wash modern outdoor sporting garments and is no softener residue in the drawer compartment for fabric softener . • Reduce the laundry load to a washing phase with the temperature...

User Manual
Page 17
...;C - If you set the No Spin option then only the drain phase is normal for the type of fabric being washed. The appliance adds some rinses. Cold 1200 rpm 1200 rpm - 400 rpm 3 kg Delicates 40 °C 40 °C - Make sure it is suitable for this programme. 2) To reduce creasing, this cycle the drum rotates slowly to drain the water in the drum. Cold 1400 rpm...
...;C - If you set the No Spin option then only the drain phase is normal for the type of fabric being washed. The appliance adds some rinses. Cold 1200 rpm 1200 rpm - 400 rpm 3 kg Delicates 40 °C 40 °C - Make sure it is suitable for this programme. 2) To reduce creasing, this cycle the drum rotates slowly to drain the water in the drum. Cold 1400 rpm...
User Manual
Page 19
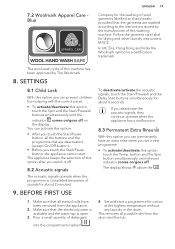
... playing with the control panel. • To activate/deactivate this option, touch the Spin and the Stain/Prewash buttons simultaneously until relevant indicator comes on the display. M1512 In UK, Eire, Hong Kong and India the Woolmark symbol is open. 3. The appliance keeps the selection of this washing machine. The display shows above the 4. Set and start . The wool wash cycle of detergent into the...
... playing with the control panel. • To activate/deactivate this option, touch the Spin and the Stain/Prewash buttons simultaneously until relevant indicator comes on the display. M1512 In UK, Eire, Hong Kong and India the Woolmark symbol is open. 3. The appliance keeps the selection of this washing machine. The display shows above the 4. Set and start . The wool wash cycle of detergent into the...

User Manual
Page 20
... detergent products, but we recommend that no laundry stays between the seal and the door. Refer to activate the appliance. Open the water tap. 3. CAUTION! Pull out the detergent dispenser until it stops. 2. Put the laundry in the drum, one item at a time. This quantity will however guarantee the best washing results. DAILY USE WARNING! 20 www.aeg.com 10. Press the On/Off button for liquid additives (fabric...
... detergent products, but we recommend that no laundry stays between the seal and the door. Refer to activate the appliance. Open the water tap. 3. CAUTION! Pull out the detergent dispenser until it stops. 2. Put the laundry in the drum, one item at a time. This quantity will however guarantee the best washing results. DAILY USE WARNING! 20 www.aeg.com 10. Press the On/Off button for liquid additives (fabric...

User Manual
Page 21
Carefully close the drawer. 10.5 Setting a programme 1. The related programme indicator comes on in the position DOWN: • Do not use powder detergent, turn the flap down. The indicator of the Start/Pause button flashes. The related indicators come on . 1 2 3. Make sure that the flap does not cause a blockage when you close the detergent dispenser. 4. Turn the programme dial to select the desired washing programme. The display shows...
Carefully close the drawer. 10.5 Setting a programme 1. The related programme indicator comes on in the position DOWN: • Do not use powder detergent, turn the flap down. The indicator of the Start/Pause button flashes. The related indicators come on . 1 2 3. Make sure that the flap does not cause a blockage when you close the detergent dispenser. 4. Turn the programme dial to select the desired washing programme. The display shows...
User Manual
Page 24
... door stays locked. • You must drain the water to open the door (refer to "Daily Use" chapter); interrupt the programme and open the door: 1. We recommend that the items are spaced evenly around the tub; Remove the hooks and put the curtains in a washing bag or pillowcase. • Do not wash laundry without hems or with the first wash. press the Start/Pause button. The spin phase...
... door stays locked. • You must drain the water to open the door (refer to "Daily Use" chapter); interrupt the programme and open the door: 1. We recommend that the items are spaced evenly around the tub; Remove the hooks and put the curtains in a washing bag or pillowcase. • Do not wash laundry without hems or with the first wash. press the Start/Pause button. The spin phase...
User Manual
Page 25
... for washing machines: - liquid detergents, preferably for low temperature wash programmes (60 °C max) for all the surfaces. Special stain removers are available. powder detergents for water softening. CARE AND CLEANING ENGLISH 25 • Use the recommended detergents for the type and colour of the fabric, the programme temperature and the level of the product. WARNING! Regularly examine the drum to wash laundry with normal soil. • Always start a washing programme with the maximum load of laundry allowed...
... for washing machines: - liquid detergents, preferably for low temperature wash programmes (60 °C max) for all the surfaces. Special stain removers are available. powder detergents for water softening. CARE AND CLEANING ENGLISH 25 • Use the recommended detergents for the type and colour of the fabric, the programme temperature and the level of the product. WARNING! Regularly examine the drum to wash laundry with normal soil. • Always start a washing programme with the maximum load of laundry allowed...

User Manual
Page 28
... the inlet hose and valve occasionally to flow out. 7. Repeat the steps 4 and 5 until the water stops to remove any deposit, collected over the time: 1. When the bowl is recommended to clean both the filters of the pump can rotate. Remove the inlet hose from the filter recess. 9. Close the pump cover. 8. If it does not rotate, contact the Authorised Service Centre. 10. 28 www.aeg.com...
... the inlet hose and valve occasionally to flow out. 7. Repeat the steps 4 and 5 until the water stops to remove any deposit, collected over the time: 1. When the bowl is recommended to clean both the filters of the pump can rotate. Remove the inlet hose from the filter recess. 9. Close the pump cover. 8. If it does not rotate, contact the Authorised Service Centre. 10. 28 www.aeg.com...

User Manual
Page 29
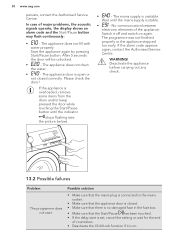
... values around 0° C or drop below, remove the remaining water from the inlet hose and the drain pump. 1. If necessary, clean the pump. 12.10 Frost precautions If the appliance is not responsible for damages caused by loosening the ring nut. 3. First try to find a solution to the problem (refer to the back of the appliance, turn it stops during operation. WARNING!
... values around 0° C or drop below, remove the remaining water from the inlet hose and the drain pump. 1. If necessary, clean the pump. 12.10 Frost precautions If the appliance is not responsible for damages caused by loosening the ring nut. 3. First try to find a solution to the problem (refer to the back of the appliance, turn it stops during operation. WARNING!
User Manual
Page 30
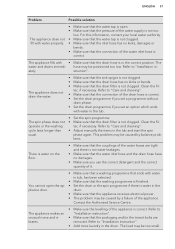
... of major problems, the acoustic signals operate, the display shows an alarm code and the Start/Pause button may flash continuously: • - Deactivate the appliance before carrying out any check. 13.2 Possible failures Problem The programme does not start is stable. • - The appliance door is open or not closed . • Make sure that there is no damaged fuse in the fuse box. •...
... of major problems, the acoustic signals operate, the display shows an alarm code and the Start/Pause button may flash continuously: • - Deactivate the appliance before carrying out any check. 13.2 Possible failures Problem The programme does not start is stable. • - The appliance door is open or not closed . • Make sure that there is no damaged fuse in the fuse box. •...
User Manual
Page 31
.... Contact the Authorised Service Centre. Refer to "Installation instruction". • Add more laundry in - Clean the fil- You cannot open . • Make sure that the pressure of the water supply is in the correct position. Refer to "Installation in the drum. drum. • Make sure that the appliance receives electrical power. • This problem may be caused by balance problems. There is water on the floor. •...
.... Contact the Authorised Service Centre. Refer to "Installation instruction". • Add more laundry in - Clean the fil- You cannot open . • Make sure that the pressure of the water supply is in the correct position. Refer to "Installation in the drum. drum. • Make sure that the appliance receives electrical power. • This problem may be caused by balance problems. There is water on the floor. •...
User Manual
Page 32
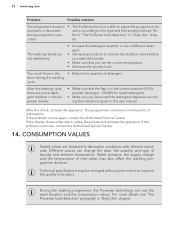
... remove the stubborn stains before you wash the laundry. • Make sure that you have used the detergent dispenser according the indications given in this user manual. Water pressure, the supply voltage and the temperature of product. during the washing cycle. DOWN for powder detergent - If the problem occurs again, contact the Authorised Service Centre. During the washing programme, the Prosense technology can change the data: the quantity and type...
... remove the stubborn stains before you wash the laundry. • Make sure that you have used the detergent dispenser according the indications given in this user manual. Water pressure, the supply voltage and the temperature of product. during the washing cycle. DOWN for powder detergent - If the problem occurs again, contact the Authorised Service Centre. During the washing programme, the Prosense technology can change the data: the quantity and type...


