
Product Manual
Page 2
2 www.aeg.com CONTENTS 1. CONTROL PANEL...6 5. CARE AND CLEANING 16 13. TECHNICAL DATA...22 FOR PERFECT RESULTS Thank you for your appliance: www.aeg.com/shop CUSTOMER CARE AND SERVICE Always use original spare parts. The information can be found on ordinary appliances. SAFETY INSTRUCTIONS 4 3. PRODUCT DESCRIPTION 5 4. SETTINGS...11 9. HINTS AND TIPS...15 12. Visit our website for: Get usage advice, brochures, trouble shooter, service information: www.aeg.com Register...
2 www.aeg.com CONTENTS 1. CONTROL PANEL...6 5. CARE AND CLEANING 16 13. TECHNICAL DATA...22 FOR PERFECT RESULTS Thank you for your appliance: www.aeg.com/shop CUSTOMER CARE AND SERVICE Always use original spare parts. The information can be found on ordinary appliances. SAFETY INSTRUCTIONS 4 3. PRODUCT DESCRIPTION 5 4. SETTINGS...11 9. HINTS AND TIPS...15 12. Visit our website for: Get usage advice, brochures, trouble shooter, service information: www.aeg.com Register...

Product Manual
Page 3
... is open. • Cleaning and user maintenance shall not be made by a carpet. • The appliance is not responsible if an incorrect installation and use causes injuries and damages. SAFETY INFORMATION Before the installation and use of the appliance, carefully read the supplied instructions. Old hose sets must not be obstructed by children without supervision. 1.2 General Safety • Do not change the specification of...
... is open. • Cleaning and user maintenance shall not be made by a carpet. • The appliance is not responsible if an incorrect installation and use causes injuries and damages. SAFETY INFORMATION Before the installation and use of the appliance, carefully read the supplied instructions. Old hose sets must not be obstructed by children without supervision. 1.2 General Safety • Do not change the specification of...
Product Manual
Page 4
... INSTRUCTIONS 2.1 Installation • Remove all the packaging and the transit bolts. • Keep the transit bolts. Make sure that there is no leakage. Do not use neutral detergents. If it is necessary to change the fuse in order to avoid a hazard. • Before maintenance, deactivate the appliance and disconnect the mains plug from the mains socket. • Do not use water spray and steam...
... INSTRUCTIONS 2.1 Installation • Remove all the packaging and the transit bolts. • Keep the transit bolts. Make sure that there is no leakage. Do not use neutral detergents. If it is necessary to change the fuse in order to avoid a hazard. • Before maintenance, deactivate the appliance and disconnect the mains plug from the mains socket. • Do not use water spray and steam...
Product Manual
Page 5
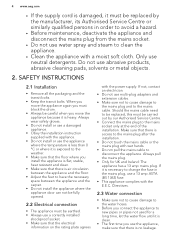
... appliance from the laundry. • Do not put flammable products or items that are particularly susceptible to get closed in the appliance. 1 23 1 Worktop 2 Detergent dispenser 3 Control panel 4 Door handle 5 Rating plate 4 6 Drain pump filter 7 Feet for the appliance level 5 6 7 3.2 Installation on the detergent packaging. • Do not put a container to ensure which accessories can be used. 3. To help prevent vibration we recommend you remove all metal objects...
... appliance from the laundry. • Do not put flammable products or items that are particularly susceptible to get closed in the appliance. 1 23 1 Worktop 2 Detergent dispenser 3 Control panel 4 Door handle 5 Rating plate 4 6 Drain pump filter 7 Feet for the appliance level 5 6 7 3.2 Installation on the detergent packaging. • Do not put a container to ensure which accessories can be used. 3. To help prevent vibration we recommend you remove all metal objects...
Product Manual
Page 6
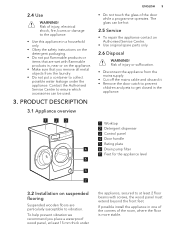
... Quick Super Quick Rinse Only Drain & Spin Finish In Option Start/Pause 1 23 4 5 6 78 9 1 On/Off button (On/Off) 2 Programme selection touchpad (Programmes) 3 Temperature selection touchpad (Temp.) 4 Spin selection touchpad (Spin) 4.2 Display Finish In AB D C 5 Options selection touchpad (Option) 6 Start/Pause touchpad (Start/Pause) 7 Finish In touchpad (Finish In) 8 Display 9 Door locked indicator ( ) A) The time area: • : the programme duration • : the "finish in" time • : the alarm codes...
... Quick Super Quick Rinse Only Drain & Spin Finish In Option Start/Pause 1 23 4 5 6 78 9 1 On/Off button (On/Off) 2 Programme selection touchpad (Programmes) 3 Temperature selection touchpad (Temp.) 4 Spin selection touchpad (Spin) 4.2 Display Finish In AB D C 5 Options selection touchpad (Option) 6 Start/Pause touchpad (Start/Pause) 7 Finish In touchpad (Finish In) 8 Display 9 Door locked indicator ( ) A) The time area: • : the programme duration • : the "finish in" time • : the alarm codes...
Product Manual
Page 7
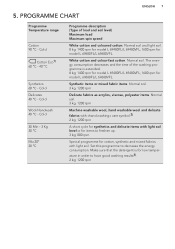
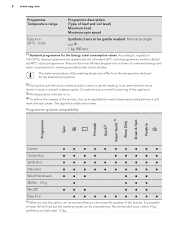
... and mixed fabrics with light soil. Cold 30 Min - 3 Kg 30 °C Mix 20° 20 °C Programme description (Type of the washing programme is for model L 69680FL/L 69680VFL White cotton and colour-fast cotton. The energy consumption decreases and the time of load and soil level) Maximum load Maximum spin speed White cotton and coloured cotton. PROGRAMME CHART ENGLISH 7 Programme Temperature range...
... and mixed fabrics with light soil. Cold 30 Min - 3 Kg 30 °C Mix 20° 20 °C Programme description (Type of the washing programme is for model L 69680FL/L 69680VFL White cotton and colour-fast cotton. The energy consumption decreases and the time of load and soil level) Maximum load Maximum spin speed White cotton and coloured cotton. PROGRAMME CHART ENGLISH 7 Programme Temperature range...
Product Manual
Page 8
..., these programmes are the most efficient programmes in terms of the laundry. The water temperature of the laundry, this cycle regulates the water temperature and performs a soft wash and spin phase. Consider this as a normal functioning of the appliance. 3) No temperature indicator is possible to keep the full load but the washing results can seem that you set this cycle the drum rotates slowly to be unsatisfactory...
..., these programmes are the most efficient programmes in terms of the laundry. The water temperature of the laundry, this cycle regulates the water temperature and performs a soft wash and spin phase. Consider this as a normal functioning of the appliance. 3) No temperature indicator is possible to keep the full load but the washing results can seem that you set this cycle the drum rotates slowly to be unsatisfactory...
Product Manual
Page 9
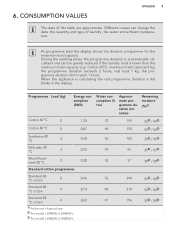
...; At programme start the display shows the duration programme for the maximum load capacity. Different causes can be greatly reduced if the laundry load is calculating the real programme duration a dot blinks in the display. real load 1 kg, the programme duration don't reach 1 hour). CONSUMPTION VALUES ENGLISH 9 The data of laundry, the water and ambient temperature. Programmes Load (kg) Energy consumption (kWh) Water consumption (litre...
...; At programme start the display shows the duration programme for the maximum load capacity. Different causes can be greatly reduced if the laundry load is calculating the real programme duration a dot blinks in the display. real load 1 kg, the programme duration don't reach 1 hour). CONSUMPTION VALUES ENGLISH 9 The data of laundry, the water and ambient temperature. Programmes Load (kg) Energy consumption (kWh) Water consumption (litre...

Product Manual
Page 10
... rinse of the set temperature comes on . 7.5 Super Quick With this option you set this option for items with daily soil. The spin phase is completed. • The drum turns regularly to prevent the laundry creases. • The door stays locked. Use this option the programme duration increases. If you can change the default spin speed. With this option to unlock the door. Additional spin options: • Set this...
... rinse of the set temperature comes on . 7.5 Super Quick With this option you set this option for items with daily soil. The spin phase is completed. • The drum turns regularly to prevent the laundry creases. • The door stays locked. Use this option the programme duration increases. If you can change the default spin speed. With this option to unlock the door. Additional spin options: • Set this...
Product Manual
Page 11
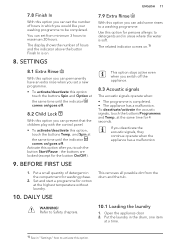
... this option after you can set from the drum and the tub. 10.1 Loading the laundry 1. You can add some rinses to be completed. The display shows the number of detergent in the compartment for 4 seconds. Activate this option you touch the button Start/Pause : the buttons are locked (except for the button On/Off ) . 9. BEFORE FIRST USE 1. DAILY USE WARNING! This removes all possible dirt from minimum...
... this option after you can set from the drum and the tub. 10.1 Loading the laundry 1. You can add some rinses to be completed. The display shows the number of detergent in the compartment for 4 seconds. Activate this option you touch the button Start/Pause : the buttons are locked (except for the button On/Off ) . 9. BEFORE FIRST USE 1. DAILY USE WARNING! This removes all possible dirt from minimum...

Product Manual
Page 12
... laundry. 10.2 Using detergent and additives 1. There is a risk of water leakage or damage to put the detergent for liquid additives (fabric conditioner, starch). Carefully close the detergent drawer 10.3 Detergent compartments Detergent compartment for powder or liquid detergent. CAUTION! Do not exceed the MAX level. Close the door firmly. When you use liquid detergent, put them in the drum. 4. Measure out the detergent and the fabric conditioner. 2. CAUTION! Compartment for prewash phase directly...
... laundry. 10.2 Using detergent and additives 1. There is a risk of water leakage or damage to put the detergent for liquid additives (fabric conditioner, starch). Carefully close the detergent drawer 10.3 Detergent compartments Detergent compartment for powder or liquid detergent. CAUTION! Do not exceed the MAX level. Close the door firmly. When you use liquid detergent, put them in the drum. 4. Measure out the detergent and the fabric conditioner. 2. CAUTION! Compartment for prewash phase directly...

Product Manual
Page 13
... animation quickly shows each washing programme and the default temperature and spin settings. When you use the liquid detergent: • Do not use gelatinous or thick liquid detergents. • Do not put more liquid then the maximum level. • Do not set the prewash option. • Do not set the delay start up animation. If necessary, change the temperature and the spin speed or add available options. Touch the programme button...
... animation quickly shows each washing programme and the default temperature and spin settings. When you use the liquid detergent: • Do not use gelatinous or thick liquid detergents. • Do not put more liquid then the maximum level. • Do not set the prewash option. • Do not set the delay start up animation. If necessary, change the temperature and the spin speed or add available options. Touch the programme button...
Product Manual
Page 14
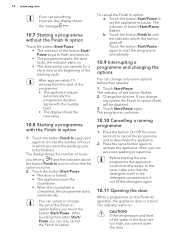
... option before they operate. 1. Touch the button Start/Pause to set ) will be finished. If you want the washing cycle to choose the number of the water in the drum are too high, you set a new washing programme. Now, you touch the button Start/Pause . If the temperature and level of hours in the detergent compartment, if not fill the detergent again. 10.11 Opening the door While a programme (or...
... option before they operate. 1. Touch the button Start/Pause to set ) will be finished. If you want the washing cycle to choose the number of the water in the drum are too high, you set a new washing programme. Now, you touch the button Start/Pause . If the temperature and level of hours in the detergent compartment, if not fill the detergent again. 10.11 Opening the door While a programme (or...
Product Manual
Page 15
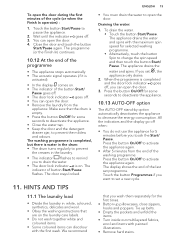
... change the spin speed and then touch the button Start/ Pause. The programme (or the Finish In) continues. 10.12 At the end of the button Start/ Pause goes off. • The door lock indicator goes off . 3. HINTS AND TIPS 11.1 The laundry load • Divide the laundry in the laundry. • The indicator flashes to remind you want to set a new cycle. To drain the water...
... change the spin speed and then touch the button Start/ Pause. The programme (or the Finish In) continues. 10.12 At the end of the button Start/ Pause goes off. • The door lock indicator goes off . 3. HINTS AND TIPS 11.1 The laundry load • Divide the laundry in the laundry. • The indicator flashes to remind you want to set a new cycle. To drain the water...
Product Manual
Page 16
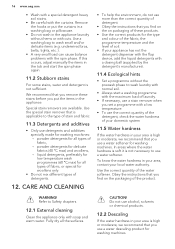
... use detergents and additives specially made for washing machines. Use a washing bag to the type of fabric, - WARNING! Use the correct quantity of soil. • If your area is high or moderate, we recommend that is not necessary to use a water softener for washing machines: - Special stain removers are available. underwired bras, belts, tights, etc. ). • A very small load can cause balance problems with the curtains. liquid detergents, preferably for low temperature wash...
... use detergents and additives specially made for washing machines. Use a washing bag to the type of fabric, - WARNING! Use the correct quantity of soil. • If your area is high or moderate, we recommend that is not necessary to use a water softener for washing machines: - Special stain removers are available. underwired bras, belts, tights, etc. ). • A very small load can cause balance problems with the curtains. liquid detergents, preferably for low temperature wash...
Product Manual
Page 17
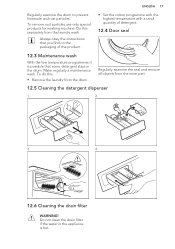
... the laundry wash. Always obey the instructions that you find on the packaging of the product. • Set the cotton programme with the highest temperature with a small quantity of detergent. 12.4 Door seal 12.3 Maintenance wash With the low temperature programmes it is possible that some detergent stays in the appliance is hot. Do this : • Remove the laundry from the inner part. 12.5 Cleaning the detergent dispenser 1. 2. 3. 4. 12.6 Cleaning the drain filter...
... the laundry wash. Always obey the instructions that you find on the packaging of the product. • Set the cotton programme with the highest temperature with a small quantity of detergent. 12.4 Door seal 12.3 Maintenance wash With the low temperature programmes it is possible that some detergent stays in the appliance is hot. Do this : • Remove the laundry from the inner part. 12.5 Cleaning the detergent dispenser 1. 2. 3. 4. 12.6 Cleaning the drain filter...

Product Manual
Page 19
....7 Cleaning the inlet hose and the valve filter 1. 2. 1 2 3 3. 4. 45° 20° 12.8 Emergency drain Because of 'Cleaning the drain filter'. If this occurs, do steps (1) through (9) of a malfunction, the appliance cannot drain the water. When you drain the water with the emergency drain procedure, you must activate again the drain system: 1. If necessary, clean the pump. Start the programme to drain the water When you drain the water with the emergency drain...
....7 Cleaning the inlet hose and the valve filter 1. 2. 1 2 3 3. 4. 45° 20° 12.8 Emergency drain Because of 'Cleaning the drain filter'. If this occurs, do steps (1) through (9) of a malfunction, the appliance cannot drain the water. When you drain the water with the emergency drain procedure, you must activate again the drain system: 1. If necessary, clean the pump. Start the programme to drain the water When you drain the water with the emergency drain...
Product Manual
Page 20
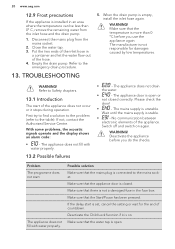
.... 3. Empty the drain pump. TROUBLESHOOTING 5. Make sure that there is not a damaged fuse in the fuse box. The manufacturer is more than 0° C, remove the remaining water from the mains socket. 2. WARNING! First try to find a solution to the problem (refer to the emergency drain procedure. 13. With some problems, the acoustic signals operate and the display shows an alarm code: • - WARNING...
.... 3. Empty the drain pump. TROUBLESHOOTING 5. Make sure that there is not a damaged fuse in the fuse box. The manufacturer is more than 0° C, remove the remaining water from the mains socket. 2. WARNING! First try to find a solution to the problem (refer to the emergency drain procedure. 13. With some problems, the acoustic signals operate and the display shows an alarm code: • - WARNING...
Product Manual
Page 21
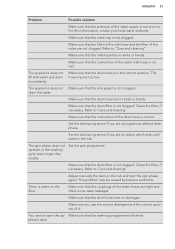
... you use the correct detergent and the correct quantity of the water hoses are not clogged. Adjust manually the items in the tub. Make sure that the drain hose has no damages. Clean the filter, if necessary. The spin phase does not operate or the washing cycle lasts longer than usually. Make sure you set an option which ends with water and drain immediately. Refer to 'Care and cleaning'. Clean the filter...
... you use the correct detergent and the correct quantity of the water hoses are not clogged. Adjust manually the items in the tub. Make sure that the drain hose has no damages. Clean the filter, if necessary. The spin phase does not operate or the washing cycle lasts longer than usually. Make sure you set an option which ends with water and drain immediately. Refer to 'Care and cleaning'. Clean the filter...
Product Manual
Page 22
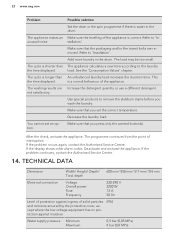
... noise. load. After the check, activate the appliance. Deactivate and activate the appliance. Refer to 'In- The washing results are removed. Decrease the laundry load. If the problem occurs again, contact the Authorised Service Centre. TECHNICAL DATA Dimension Width/ Height/ Depth/ Total depth 600 mm/ 850 mm/ 517 mm/ 576 mm Electrical connection Voltage Overall power Fuse Frequency 230-240 V 2200 W 13 A 50 Hz Level...
... noise. load. After the check, activate the appliance. Deactivate and activate the appliance. Refer to 'In- The washing results are removed. Decrease the laundry load. If the problem occurs again, contact the Authorised Service Centre. TECHNICAL DATA Dimension Width/ Height/ Depth/ Total depth 600 mm/ 850 mm/ 517 mm/ 576 mm Electrical connection Voltage Overall power Fuse Frequency 230-240 V 2200 W 13 A 50 Hz Level...


