Product Manual
Page 2
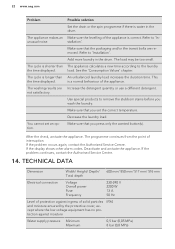
... available: Model, PNC, Serial Number. When contacting our Authorised Service Centre, ensure that help make life simpler features you impeccable performance for your appliance: www.aeg.com/shop CUSTOMER CARE AND SERVICE Always use original spare parts. CONTROL PANEL...6 5. CONSUMPTION VALUES 9 7. Please spend a few minutes reading to get the very best from it to change without notice. SETTINGS...11 9. DAILY USE...11 11. TECHNICAL DATA...22...
... available: Model, PNC, Serial Number. When contacting our Authorised Service Centre, ensure that help make life simpler features you impeccable performance for your appliance: www.aeg.com/shop CUSTOMER CARE AND SERVICE Always use original spare parts. CONTROL PANEL...6 5. CONSUMPTION VALUES 9 7. Please spend a few minutes reading to get the very best from it to change without notice. SETTINGS...11 9. DAILY USE...11 11. TECHNICAL DATA...22...

Product Manual
Page 3
... supplied hose-sets. Always keep the instructions with the appliance for future reference. 1.1 Children and vulnerable people safety • This appliance can be used by children without supervision. 1.2 General Safety • Do not change the specification of this appliance. • Obey the maximum load volume of the appliance, carefully read the supplied instructions. ENGLISH 3 1. The manufacturer is open. • Cleaning and user maintenance...
... supplied hose-sets. Always keep the instructions with the appliance for future reference. 1.1 Children and vulnerable people safety • This appliance can be used by children without supervision. 1.2 General Safety • Do not change the specification of this appliance. • Obey the maximum load volume of the appliance, carefully read the supplied instructions. ENGLISH 3 1. The manufacturer is open. • Cleaning and user maintenance...
Product Manual
Page 4
... the end of the installation. Only use abrasive products, abrasive cleaning pads, solvents or metal objects. 2. 4 www.aeg.com • If the supply cord is damaged, it is clean. • The first time you use the appliance, make sure that there is no leakage. SAFETY INSTRUCTIONS 2.1 Installation • Remove all the packaging and the transit bolts. • Keep the transit bolts. Directives. 2.3 Water connection • Make...
... the end of the installation. Only use abrasive products, abrasive cleaning pads, solvents or metal objects. 2. 4 www.aeg.com • If the supply cord is damaged, it is clean. • The first time you use the appliance, make sure that there is no leakage. SAFETY INSTRUCTIONS 2.1 Installation • Remove all the packaging and the transit bolts. • Keep the transit bolts. Directives. 2.3 Water connection • Make...

Product Manual
Page 5
.... • Remove the door catch to prevent children and pets to at least 2 floor beams with flammable products in, near or on suspended flooring Suspended wooden floors are wet with screws, the wood panel must extend beyond the front feet. If possible install the appliance in the appliance. 1 23 1 Worktop 2 Detergent dispenser 3 Control panel 4 Door handle 5 Rating plate 4 6 Drain pump filter 7 Feet for the appliance level 5 6 7 3.2 Installation on...
.... • Remove the door catch to prevent children and pets to at least 2 floor beams with flammable products in, near or on suspended flooring Suspended wooden floors are wet with screws, the wood panel must extend beyond the front feet. If possible install the appliance in the appliance. 1 23 1 Worktop 2 Detergent dispenser 3 Control panel 4 Door handle 5 Rating plate 4 6 Drain pump filter 7 Feet for the appliance level 5 6 7 3.2 Installation on...

Product Manual
Page 6
... Quick Super Quick Rinse Only Drain & Spin Finish In Option Start/Pause 1 23 4 5 6 78 9 1 On/Off button (On/Off) 2 Programme selection touchpad (Programmes) 3 Temperature selection touchpad (Temp.) 4 Spin selection touchpad (Spin) 4.2 Display Finish In AB D C 5 Options selection touchpad (Option) 6 Start/Pause touchpad (Start/Pause) 7 Finish In touchpad (Finish In) 8 Display 9 Door locked indicator ( ) A) The time area: • : the programme duration • : the "finish in" time • : the alarm codes...
... Quick Super Quick Rinse Only Drain & Spin Finish In Option Start/Pause 1 23 4 5 6 78 9 1 On/Off button (On/Off) 2 Programme selection touchpad (Programmes) 3 Temperature selection touchpad (Temp.) 4 Spin selection touchpad (Spin) 4.2 Display Finish In AB D C 5 Options selection touchpad (Option) 6 Start/Pause touchpad (Start/Pause) 7 Finish In touchpad (Finish In) 8 Display 9 Door locked indicator ( ) A) The time area: • : the programme duration • : the "finish in" time • : the alarm codes...
Product Manual
Page 7
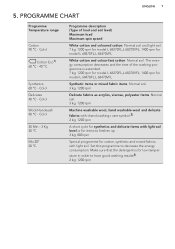
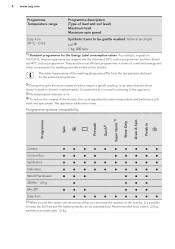
...;C - Normal soil and light soil. 7 kg; 1200 rpm for model L 68270FL,L 68270VFL; 1400 rpm for low temperature in order to have good washing results3). 2 kg; 1200 rpm Cold Cotton Eco1) 60 °C - 40 °C Synthetics 60 °C - Cold Delicates 40 °C - The energy consumption decreases and the time of load and soil level) Maximum load Maximum spin speed White cotton and coloured cotton. Set...
...;C - Normal soil and light soil. 7 kg; 1200 rpm for model L 68270FL,L 68270VFL; 1400 rpm for low temperature in order to have good washing results3). 2 kg; 1200 rpm Cold Cotton Eco1) 60 °C - 40 °C Synthetics 60 °C - Cold Delicates 40 °C - The energy consumption decreases and the time of load and soil level) Maximum load Maximum spin speed White cotton and coloured cotton. Set...
Product Manual
Page 8
... 1) Standard programmes for the selected programme. 2) During this cycle the drum rotates slowly to regulation 1061/2010, these programmes are the most efficient programmes in terms of combined energy and water consumption for washing normally soiled cotton laundry. According to ensure a gentle washing. Programme options compatibility Programme Spin Prewash Quick1) Super Quick 1) Rinse Only Drain & Spin Finish In Cotton ■ ■ ■ ■ ■...
... 1) Standard programmes for the selected programme. 2) During this cycle the drum rotates slowly to regulation 1061/2010, these programmes are the most efficient programmes in terms of combined energy and water consumption for washing normally soiled cotton laundry. According to ensure a gentle washing. Programme options compatibility Programme Spin Prewash Quick1) Super Quick 1) Rinse Only Drain & Spin Finish In Cotton ■ ■ ■ ■ ■...

Product Manual
Page 9
... and can change the data: the quantity and type of laundry, the water and ambient temperature. At programme start the display shows the duration programme for the maximum load capacity. CONSUMPTION VALUES ENGLISH 9 The data of spin phase. 2) For model L 68270FL,L 68270VFL. 3) For model L 68470FL,L 68470VFL. Different causes can be greatly reduced if the laundry load is lower than the maximum load capacity (e.g. During the washing phase...
... and can change the data: the quantity and type of laundry, the water and ambient temperature. At programme start the display shows the duration programme for the maximum load capacity. CONSUMPTION VALUES ENGLISH 9 The data of spin phase. 2) For model L 68270FL,L 68270VFL. 3) For model L 68470FL,L 68470VFL. Different causes can be greatly reduced if the laundry load is lower than the maximum load capacity (e.g. During the washing phase...
Product Manual
Page 10
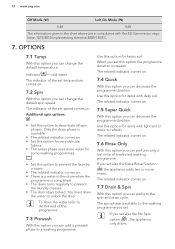
... directive 2009/125/EC. 7. The related indicator comes on. 7.5 Super Quick With this option for heavy soil. The indicator of a selected washing programme. Use this option you set also the Extra Rinse function ( ) the appliance adds two or more water for items with light soil or items to prevent the laundry creases. • The door stays locked. 10 www.aeg.com Off Mode (W) Left On Mode...
... directive 2009/125/EC. 7. The related indicator comes on. 7.5 Super Quick With this option for heavy soil. The indicator of a selected washing programme. Use this option you set also the Extra Rinse function ( ) the appliance adds two or more water for items with light soil or items to prevent the laundry creases. • The door stays locked. 10 www.aeg.com Off Mode (W) Left On Mode...

Product Manual
Page 11
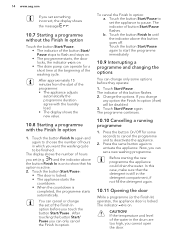
... children play with the control panel. • To activate/deactivate this option after you switch off . If you set from the drum and the tub. 10.1 Loading the laundry 1. BEFORE FIRST USE 1. The related indicator comes on.1) This option stays active even when you touch the button Start/Pause : the buttons are locked (except for the button On/Off ) . 9. Open the appliance door 2. 7.8 Finish In With this...
... children play with the control panel. • To activate/deactivate this option after you switch off . If you set from the drum and the tub. 10.1 Loading the laundry 1. BEFORE FIRST USE 1. The related indicator comes on.1) This option stays active even when you touch the button Start/Pause : the buttons are locked (except for the button On/Off ) . 9. Open the appliance door 2. 7.8 Finish In With this...

Product Manual
Page 12
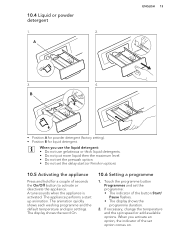
... of water leakage or damage to put the detergent for liquid additives (fabric conditioner, starch). Carefully close the detergent drawer 10.3 Detergent compartments Detergent compartment for powder or liquid detergent. Do not exceed the MAX level. Make sure not to the laundry. 10.2 Using detergent and additives 1. Close the door. CAUTION! CAUTION! Compartment for prewash phase directly into the drum. Shake the items before you start the programme. If you use liquid detergent...
... of water leakage or damage to put the detergent for liquid additives (fabric conditioner, starch). Carefully close the detergent drawer 10.3 Detergent compartments Detergent compartment for powder or liquid detergent. Do not exceed the MAX level. Make sure not to the laundry. 10.2 Using detergent and additives 1. Close the door. CAUTION! CAUTION! Compartment for prewash phase directly into the drum. Shake the items before you start the programme. If you use liquid detergent...
Product Manual
Page 13
... set option comes on. A 3. 4. The animation quickly shows each washing programme and the default temperature and spin settings. If necessary, change the temperature and the spin speed or add available options. B ENGLISH 13 • Position A for powder detergent (factory setting). • Position B for a couple of seconds the On/Off button to activate or deactivate the appliance. The display shows the word On. 10.6 Setting a programme 1. 10.4 Liquid or powder detergent...
... set option comes on. A 3. 4. The animation quickly shows each washing programme and the default temperature and spin settings. If necessary, change the temperature and the spin speed or add available options. B ENGLISH 13 • Position A for powder detergent (factory setting). • Position B for a couple of seconds the On/Off button to activate or deactivate the appliance. The display shows the word On. 10.6 Setting a programme 1. 10.4 Liquid or powder detergent...
Product Manual
Page 14
... or change only some seconds to cancel the programme and to choose the number of hours you touch the button Start/Pause . b. Touch Start/Pause again. Now, you cannot open the door. Touch the button Start/Pause to set of the washing cycle. If the temperature and level of the programme: • The appliance adjusts automatically the programme duration agree with the laundry load. • The display...
... or change only some seconds to cancel the programme and to choose the number of hours you touch the button Start/Pause . b. Touch Start/Pause again. Now, you cannot open the door. Touch the button Start/Pause to set of the washing cycle. If the temperature and level of the programme: • The appliance adjusts automatically the programme duration agree with the laundry load. • The display...
Product Manual
Page 15
...). • In the display comes on. • The indicator of the button Start/ Pause goes off. • The door lock indicator goes off , you to drain the water. • The door lock indicator is water in the drum: • The drum turns regularly to remind you can open the door. • Remove the laundry from the end of the cycle (or when the Finish In operates) : 1. The washing programme is completed...
...). • In the display comes on. • The indicator of the button Start/ Pause goes off. • The door lock indicator goes off , you to drain the water. • The door lock indicator is water in the drum: • The drum turns regularly to remind you can open the door. • Remove the laundry from the end of the cycle (or when the Finish In operates) : 1. The washing programme is completed...
Product Manual
Page 16
...; A very small load can cause balance problems with the curtains. WARNING! Use a washing bag to use detergents and additives specially made for all types of detergents. 12. 16 www.aeg.com • Wash with a special detergent heavy soil stains. • Be careful with the spin phase. Special stain removers are available. liquid detergents, preferably for low temperature wash programmes (60 °C max) for all the surfaces. CARE AND CLEANING • To...
...; A very small load can cause balance problems with the curtains. WARNING! Use a washing bag to use detergents and additives specially made for all types of detergents. 12. 16 www.aeg.com • Wash with a special detergent heavy soil stains. • Be careful with the spin phase. Special stain removers are available. liquid detergents, preferably for low temperature wash programmes (60 °C max) for all the surfaces. CARE AND CLEANING • To...
Product Manual
Page 17
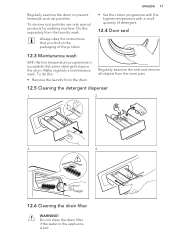
... the drum to prevent limescale and rust particles. To remove rust particles use only special products for washing machine. To do this separately from the laundry wash. Do not clean the drain filter if the water in the appliance is possible that you find on the packaging of the product. • Set the cotton programme with the highest temperature with a small quantity of detergent. 12.4 Door seal 12.3 Maintenance wash...
... the drum to prevent limescale and rust particles. To remove rust particles use only special products for washing machine. To do this separately from the laundry wash. Do not clean the drain filter if the water in the appliance is possible that you find on the packaging of the product. • Set the cotton programme with the highest temperature with a small quantity of detergent. 12.4 Door seal 12.3 Maintenance wash...

Product Manual
Page 19
... wash compartment of the detergent dispenser. 2. Start the programme to drain the water When you drain the water with the emergency drain procedure, you must activate again the drain system: 1. If necessary, clean the pump. If this occurs, do steps (1) through (9) of a malfunction, the appliance cannot drain the water. 9. 1 2 ENGLISH 19 12.7 Cleaning the inlet hose and the valve filter 1. 2. 1 2 3 3. 4. 45° 20° 12.8 Emergency drain Because of 'Cleaning the drain filter...
... wash compartment of the detergent dispenser. 2. Start the programme to drain the water When you drain the water with the emergency drain procedure, you must activate again the drain system: 1. If necessary, clean the pump. If this occurs, do steps (1) through (9) of a malfunction, the appliance cannot drain the water. 9. 1 2 ENGLISH 19 12.7 Cleaning the inlet hose and the valve filter 1. 2. 1 2 3 3. 4. 45° 20° 12.8 Emergency drain Because of 'Cleaning the drain filter...
Product Manual
Page 20
... Start/Pause has been pressed. With some problems, the acoustic signals operate and the display shows an alarm code: • - The appliance door is stable. • - Please check the door! • - WARNING! Make sure that the water tap is open or not closed . Deactivate the Child Lock function if it stops during operation. 20 www.aeg.com 12.9 Frost precautions If the appliance is installed...
... Start/Pause has been pressed. With some problems, the acoustic signals operate and the display shows an alarm code: • - The appliance door is stable. • - Please check the door! • - WARNING! Make sure that the water tap is open or not closed . Deactivate the Child Lock function if it stops during operation. 20 www.aeg.com 12.9 Frost precautions If the appliance is installed...
Product Manual
Page 21
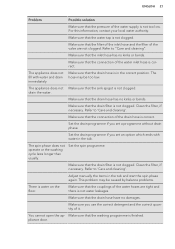
... the drain hose is correct. Clean the filter, if necessary. pliance door. Refer to 'Care and cleaning'. Set the drain programme if you set an option which ends with water and drain immediately. Make sure that the drain filter is not clogged. Adjust manually the items in the correct position. The appliance does not Make sure that the washing programme is not clogged. Make sure you use the correct detergent...
... the drain hose is correct. Clean the filter, if necessary. pliance door. Refer to 'Care and cleaning'. Set the drain programme if you set an option which ends with water and drain immediately. Make sure that the drain filter is not clogged. Adjust manually the items in the correct position. The appliance does not Make sure that the washing programme is not clogged. Make sure you use the correct detergent...
Product Manual
Page 22
... no protection against ingress of the appliance. load. Refer to 'Installation'. Deactivate and activate the appliance. The appliance makes an Make sure the levelling of interruption. 22 www.aeg.com Problem Possible solution Set the drain or the spin programme if there is shorter than An unbalanced laundry load increases the duration time. The cycle is water in the drum. Use special products to the laundry the time displayed.
... no protection against ingress of the appliance. load. Refer to 'Installation'. Deactivate and activate the appliance. The appliance makes an Make sure the levelling of interruption. 22 www.aeg.com Problem Possible solution Set the drain or the spin programme if there is shorter than An unbalanced laundry load increases the duration time. The cycle is water in the drum. Use special products to the laundry the time displayed.


