
Product Manual
Page 2
... inlet 31 Water-stop device 32 Water drainage 32 In the interest of our high-quality products. Contents Operating instructions 3 Safety information 3 General safety 3 Installation 4 Use 4 Child Safety 4 Product description 5 Detergent dispenser drawer 6 Control panel 6 Display 7 Indicator pilot lights (10) 8 Personalization 8 Acoustic signals 8 Child safety lock 8 Daily use 9 Load the laundry 9 Measure out the detergent and the fabric softener 9 Select the required programme by means of programme selector dial (1) 10 Select the desired TEMPERATURE...
... inlet 31 Water-stop device 32 Water drainage 32 In the interest of our high-quality products. Contents Operating instructions 3 Safety information 3 General safety 3 Installation 4 Use 4 Child Safety 4 Product description 5 Detergent dispenser drawer 6 Control panel 6 Display 7 Indicator pilot lights (10) 8 Personalization 8 Acoustic signals 8 Child safety lock 8 Daily use 9 Load the laundry 9 Measure out the detergent and the fabric softener 9 Select the required programme by means of programme selector dial (1) 10 Select the desired TEMPERATURE...
Product Manual
Page 3
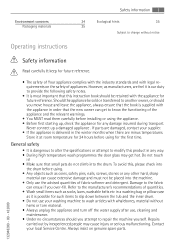
... repair the machine yourself. To avoid this, please check into the drum before using. • Any objects such as manufacturers, we feel it at room temperature for 24 hours before installing or using for such items to slip down between the tub and the inner drum. • Do not use your washing machine to wash articles with whalebones, material without notice Operating instructions Safety information Read carefully...
... repair the machine yourself. To avoid this, please check into the drum before using. • Any objects such as manufacturers, we feel it at room temperature for 24 hours before installing or using for such items to slip down between the tub and the inner drum. • Do not use your washing machine to wash articles with whalebones, material without notice Operating instructions Safety information Read carefully...
Product Manual
Page 4
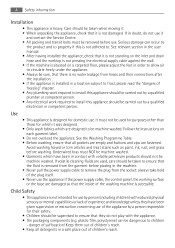
... they do not use it was designed. • Only wash fabrics which have been given supervision or instruction concerning use of the plug itself. • Never use . Underwired bras must not be used , care should be taken to ensure that all detergents in the machine. • Never pull the power supply cable to remove the plug from hoses and their connections after the installation. • If...
... they do not use it was designed. • Only wash fabrics which have been given supervision or instruction concerning use of the plug itself. • Never use . Underwired bras must not be used , care should be taken to ensure that all detergents in the machine. • Never pull the power supply cable to remove the plug from hoses and their connections after the installation. • If...

Product Manual
Page 6
... is added at the beginning of the wash programme. Control panel Henceforth the programme selector dial, the buttons and the display will be indicated with STAIN-option . 6 Control panel 5 Drain pump 6 Adjustable feet Detergent dispenser drawer Compartment for detergent used for main wash with the numbers given in this table. 1 1 Programme selector dial 2 TEMPERATURE button 3 SPIN button 4 STAIN button 5 SENSITIVE button 6 TIME button 7 Display 2 3 4 5 6 7 8 9 10 Compartment for powder or liquid detergent used for liquid additives (fabric softener, starch). Compartment for main...
... is added at the beginning of the wash programme. Control panel Henceforth the programme selector dial, the buttons and the display will be indicated with STAIN-option . 6 Control panel 5 Drain pump 6 Adjustable feet Detergent dispenser drawer Compartment for detergent used for main wash with the numbers given in this table. 1 1 Programme selector dial 2 TEMPERATURE button 3 SPIN button 4 STAIN button 5 SENSITIVE button 6 TIME button 7 Display 2 3 4 5 6 7 8 9 10 Compartment for powder or liquid detergent used for liquid additives (fabric softener, starch). Compartment for main...

Product Manual
Page 7
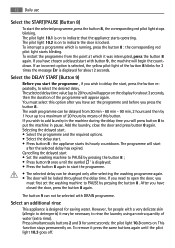
... lights Symbols on the control panel : = Handwash = Cold = Rinse Hold = Child Lock Display Display 7 7.2 7.3 7.1 Duration of selected programme (7.1) : Duration of button 8 light starts blinking. After the programme has started, the time remaining is calculated automatically on the display. The door can be opened. Incorrect option selection If an option which is not compatible with the set by one unit every hour. Delay Start (7.2) The selected delay (20 hours max) set wash...
... lights Symbols on the control panel : = Handwash = Cold = Rinse Hold = Child Lock Display Display 7 7.2 7.3 7.1 Duration of selected programme (7.1) : Duration of button 8 light starts blinking. After the programme has started, the time remaining is calculated automatically on the display. The door can be opened. Incorrect option selection If an option which is not compatible with the set by one unit every hour. Delay Start (7.2) The selected delay (20 hours max) set wash...
Product Manual
Page 8
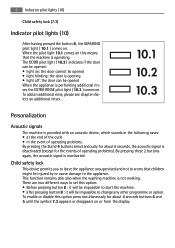
... add an additional rinse, please see chapter «Select an additional rinse». 8 Indicator pilot lights (10) Child safety lock (7.3) Indicator pilot lights (10) After having pressed the button 8 , the WASHING pilot light ( 10.1 ) comes on this means that children might be opened • light blinking: the door is opening • light off: the door can be injured by or cause damage to worry that the machine is operating. The DOOR...
... add an additional rinse, please see chapter «Select an additional rinse». 8 Indicator pilot lights (10) Child safety lock (7.3) Indicator pilot lights (10) After having pressed the button 8 , the WASHING pilot light ( 10.1 ) comes on this means that children might be opened • light blinking: the door is opening • light off: the door can be injured by or cause damage to worry that the machine is operating. The DOOR...

Product Manual
Page 9
... stops. Daily use 9 Measure out the detergent and the fabric softener Your new appliance was designed to carry out the prewash phase, pour the detergent into the compartment marked with blue arrow . Place the laundry in the drum, one item at a time, shaking them out as much as possible. 2. Daily use Load the laundry 1. Pull out the dispenser drawer until it into the main wash...
... stops. Daily use 9 Measure out the detergent and the fabric softener Your new appliance was designed to carry out the prewash phase, pour the detergent into the compartment marked with blue arrow . Place the laundry in the drum, one item at a time, shaking them out as much as possible. 2. Daily use Load the laundry 1. Pull out the dispenser drawer until it into the main wash...
Product Manual
Page 12
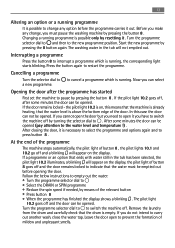
...) will appear on the display for saving water. The selected delay time value (up to PAUSE by means of 20 hours by pressing the button 8 . If you have set the washing machine to a maximum of this button. If you wish to add laundry in the machine during the delay time you have chosen a delayed start , press the button repeatedly, to open the door, you must select this...
...) will appear on the display for saving water. The selected delay time value (up to PAUSE by means of 20 hours by pressing the button 8 . If you have set the washing machine to a maximum of this button. If you wish to add laundry in the machine during the delay time you have chosen a delayed start , press the button repeatedly, to open the door, you must select this...
Product Manual
Page 13
... spin speed if needed, by pressing the 8 button again. If you do not intend to switch the machine off and a blinking will not emptied out. Turn the programme selector dial to to carry out another wash, close the water tap. Leave the door open it is necessary to select the programme and options again and to press button 8 . Remove the laundry from the drum and carefully check...
... spin speed if needed, by pressing the 8 button again. If you do not intend to switch the machine off and a blinking will not emptied out. Turn the programme selector dial to to carry out another wash, close the water tap. Leave the door open it is necessary to select the programme and options again and to press button 8 . Remove the laundry from the drum and carefully check...

Product Manual
Page 14
..., delicates, woollens. Button up in hot water or a rust removing product used cold. It is reduced. Dried grease stains: moisten with turpentine, lay the garment on a soft surface and dab the stain with a special detergent then rub in the soap and water. Lipstick: moisten with methylated spirits. treat any residual marks with bleach and then rinse thoroughly. Whites may run in water with the...
..., delicates, woollens. Button up in hot water or a rust removing product used cold. It is reduced. Dried grease stains: moisten with turpentine, lay the garment on a soft surface and dab the stain with a special detergent then rub in the soap and water. Lipstick: moisten with methylated spirits. treat any residual marks with bleach and then rinse thoroughly. Whites may run in water with the...
Product Manual
Page 15
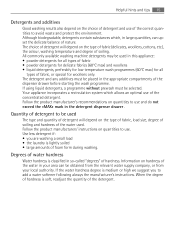
If using liquid detergents, a programme without prewash must be used . Your appliance incorporates a recirculation system which , in so-called "degrees" of the dispenser drawer before starting the wash programme. Follow the product manufacturers' instructions on the choice of detergent and use of the water used in your local authority. Follow the product manufacturer's recommendations on the type of fabric, load size, degree of soiling and hardness of the correct quantities...
If using liquid detergents, a programme without prewash must be used . Your appliance incorporates a recirculation system which , in so-called "degrees" of the dispenser drawer before starting the wash programme. Follow the product manufacturers' instructions on the choice of detergent and use of the water used in your local authority. Follow the product manufacturer's recommendations on the type of fabric, load size, degree of soiling and hardness of the correct quantities...
Product Manual
Page 17
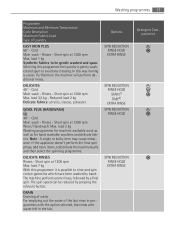
... the water of Laundry EASY IRON PLUS 60° - Furthermore the machine will perform additional rinses. Short spin at 1200 rpm Max. Short spin at 1200 rpm Max. Short spin at 1200 rpm Wool / Handwash: Max. WOOL PLUS (HANDWASH) 40° - Note : A single or bulky item may cause imbalance. Washing programmes 17 Programme Maximum and Minimum Temperature Cycle Description Maximum Fabrics Load Type...
... the water of Laundry EASY IRON PLUS 60° - Furthermore the machine will perform additional rinses. Short spin at 1200 rpm Max. Short spin at 1200 rpm Max. Short spin at 1200 rpm Wool / Handwash: Max. WOOL PLUS (HANDWASH) 40° - Note : A single or bulky item may cause imbalance. Washing programmes 17 Programme Maximum and Minimum Temperature Cycle Description Maximum Fabrics Load Type...

Product Manual
Page 18
... energy, water and time. Options SPIN REDUCTION SPIN REDUCTION SPIN REDUCTION RINSE HOLD EXTRA RINSE SPIN REDUCTION RINSE HOLD STAIN SENSITIVE EXTRA RINSE /OFF For cancelling the programme which is running or to switch the machine off . 1) STAIN option can choose the spin speed by detergent's manufacturer). 18 Washing programmes Programme Maximum and Minimum Temperature Cycle Description Maximum Fabrics Load Type of Laundry SPIN Drain and long spin at the temperature of the detergent recommended by pressing the relevant button...
... energy, water and time. Options SPIN REDUCTION SPIN REDUCTION SPIN REDUCTION RINSE HOLD EXTRA RINSE SPIN REDUCTION RINSE HOLD STAIN SENSITIVE EXTRA RINSE /OFF For cancelling the programme which is running or to switch the machine off . 1) STAIN option can choose the spin speed by detergent's manufacturer). 18 Washing programmes Programme Maximum and Minimum Temperature Cycle Description Maximum Fabrics Load Type of Laundry SPIN Drain and long spin at the temperature of the detergent recommended by pressing the relevant button...

Product Manual
Page 19
... the maximum load as indicated. This helps to prevent mould and stagnant smells forming inside the drum. Maintenance wash With the use methylated spirits, solvents or similar products to preserve the door seal. Do not use of low temperature washes it firmly. Remove the detergent dispenser drawer by pressing button 6 , we use a water softening powder in the machine. After each wash Leave the door open after a wash will help to clean the cabinet. Detergent dispenser drawer The detergent dispenser drawer should be...
... the maximum load as indicated. This helps to prevent mould and stagnant smells forming inside the drum. Maintenance wash With the use methylated spirits, solvents or similar products to preserve the door seal. Do not use of low temperature washes it firmly. Remove the detergent dispenser drawer by pressing button 6 , we use a water softening powder in the machine. After each wash Leave the door open after a wash will help to clean the cabinet. Detergent dispenser drawer The detergent dispenser drawer should be...

Product Manual
Page 22
... be hot water in . 10. When replacing the cover, ensure it . Screw the pump fully in the pump. Never remove the pump cover during a wash cycle, always wait until the appliance has finished the cycle, and is securely retightened so as to stop leaks and young children being able to do if..." To clean the water inlet filters: 1. Turn off the water tap. 2. 22 Care and cleaning 8. Unscrew the hose from...
... be hot water in . 10. When replacing the cover, ensure it . Screw the pump fully in the pump. Never remove the pump cover during a wash cycle, always wait until the appliance has finished the cycle, and is securely retightened so as to stop leaks and young children being able to do if..." To clean the water inlet filters: 1. Turn off the water tap. 2. 22 Care and cleaning 8. Unscrew the hose from...

Product Manual
Page 23
..., wait until water stops flowing out; 6. open the pump door; 5. close the water tap and unscrew the water inlet hose from the machine. Emergency emptying out If the water is tight. 8. Remove its seat after having plugged it; 8. Frost precautions If the machine is full, put the cap back on the floor and place the end of cloth. pull out the plug from the power socket; 2. place...
..., wait until water stops flowing out; 6. open the pump door; 5. close the water tap and unscrew the water inlet hose from the machine. Emergency emptying out If the water is tight. 8. Remove its seat after having plugged it; 8. Frost precautions If the machine is full, put the cap back on the floor and place the end of cloth. pull out the plug from the power socket; 2. place...
Product Manual
Page 24
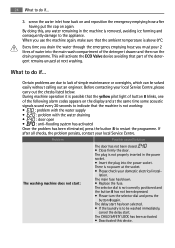
Every time you drain the water through the emergency emptying hose you use the machine again, make sure that the yellow pilot light of button 8 blinks, one of the detergent drawer and then run the drain programme. During machine operation it is not working: • : problem with the water supply • : problem with the water draining • : door open • : anti-flooding system has activated Once the problem has been eliminated, press the button 8 to restart...
Every time you drain the water through the emergency emptying hose you use the machine again, make sure that the yellow pilot light of button 8 blinks, one of the detergent drawer and then run the drain programme. During machine operation it is not working: • : problem with the water supply • : problem with the water draining • : door open • : anti-flooding system has activated Once the problem has been eliminated, press the button 8 to restart...
Product Manual
Page 26
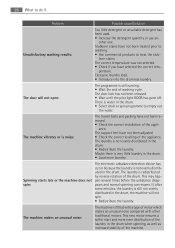
... door lock has not been released. • Wait until the pilot light DOOR has gone off. The machine vibrates or is still not evenly distributed in the drum when spinning, as well as increased stability of the appliance. The support feet have not been removed. • Check the correct installation of washing cycle. Stubborn stains have selected the correct tem- Excessive laundry load. • Introduce into the drum...
... door lock has not been released. • Wait until the pilot light DOOR has gone off. The machine vibrates or is still not evenly distributed in the drum when spinning, as well as increased stability of the appliance. The support feet have not been removed. • Check the correct installation of washing cycle. Stubborn stains have selected the correct tem- Excessive laundry load. • Introduce into the drum...

Product Manual
Page 27
...; 1) Cottons 40° Energy consumption (KWh) 2.1 1.4 1.19 0.77 Water consumption (litres) 65 60 49 60 Programme duration (Minutes) For the duration of the appliance door. trol panel. Technical data 27 Problem Possible cause/Solution No water is given on the rating Voltage - Before telephoning, make a note of the model, serial number and purchase date of your machine: the Service Centre will require this...
...; 1) Cottons 40° Energy consumption (KWh) 2.1 1.4 1.19 0.77 Water consumption (litres) 65 60 49 60 Programme duration (Minutes) For the duration of the appliance door. trol panel. Technical data 27 Problem Possible cause/Solution No water is given on the rating Voltage - Before telephoning, make a note of the model, serial number and purchase date of your machine: the Service Centre will require this...

Product Manual
Page 31
... cardboard, wood or similar materials under the machine to purchase a new, longer hose specially designed for safe operation of a breakdown. Set the hose correctly by screwing the adjustable feet in the chapter "Technical Data". Installation 31 Please ensure that when the appliance is installed, it is supplied and can be found inside the machine drum. Carefully level by loosening the ring nut. This...
... cardboard, wood or similar materials under the machine to purchase a new, longer hose specially designed for safe operation of a breakdown. Set the hose correctly by screwing the adjustable feet in the chapter "Technical Data". Installation 31 Please ensure that when the appliance is installed, it is supplied and can be found inside the machine drum. Carefully level by loosening the ring nut. This...


