Product Manual
Page 2
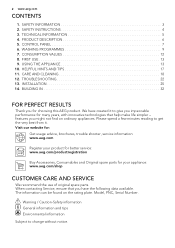
.... The information can be found on ordinary appliances. SAFETY INSTRUCTIONS 4 3. INSTALLATION 25 14. Visit our website for: Get usage advice, brochures, trouble shooter, service information: www.aeg.com Register your product for better service: www.aeg.com/productregistration Buy Accessories, Consumables and Original spare parts for choosing this AEG product. 2 www.aeg.com CONTENTS 1. SAFETY INFORMATION 3 2. CONTROL PANEL 7 6. CONSUMPTION VALUES 12 8. FIRST USE 13 9. CARE AND CLEANING 18 12.
.... The information can be found on ordinary appliances. SAFETY INSTRUCTIONS 4 3. INSTALLATION 25 14. Visit our website for: Get usage advice, brochures, trouble shooter, service information: www.aeg.com Register your product for better service: www.aeg.com/productregistration Buy Accessories, Consumables and Original spare parts for choosing this AEG product. 2 www.aeg.com CONTENTS 1. SAFETY INFORMATION 3 2. CONTROL PANEL 7 6. CONSUMPTION VALUES 12 8. FIRST USE 13 9. CARE AND CLEANING 18 12.

Product Manual
Page 4
... mains plug and to the mains cable. Old hose sets must not be carried out by a carpet. • The appliance is to be earthed. • Make sure that the electrical information on the rating plate agrees with the power supply. 4 www.aeg.com • If the supply cord is damaged, it must be replaced by the manufacturer, its service agent...
... mains plug and to the mains cable. Old hose sets must not be carried out by a carpet. • The appliance is to be earthed. • Make sure that the electrical information on the rating plate agrees with the power supply. 4 www.aeg.com • If the supply cord is damaged, it must be replaced by the manufacturer, its service agent...
Product Manual
Page 5
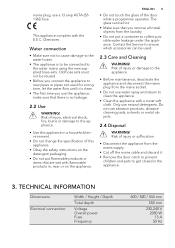
...! TECHNICAL INFORMATION Dimensions Electrical connection: Width / Height / Depth Total depth Voltage Overall power Fuse Frequency 600 / 820 / 544 mm 550 mm 230-240 V 2050 W 13 A 50 Hz Contact the Service to collect possible water leakage under the appliance. Directives. Old hose sets must not be used for a long time, let the water flow until it . • Remove the door catch to prevent children and pets to clean...
...! TECHNICAL INFORMATION Dimensions Electrical connection: Width / Height / Depth Total depth Voltage Overall power Fuse Frequency 600 / 820 / 544 mm 550 mm 230-240 V 2050 W 13 A 50 Hz Contact the Service to collect possible water leakage under the appliance. Directives. Old hose sets must not be used for a long time, let the water flow until it . • Remove the door catch to prevent children and pets to clean...

Product Manual
Page 7
... bolts. 2 Plastic caps To close the holes on the rear side of the cabinet after the removal of the transit bolts. 3 Anti-flood inlet hose To prevent possible leakage 4 Plastic hose guide To connect the drain hose on the edge of a sink. 5. Extra Rinse CONTROL PANEL 1 2 3 4 5 678 9 10 A B C 1 Programme selector dial 2 TEMPERATURE button 3 SPIN button • Rinse hold position 4 STAIN button 5 EXTRA RINSE button 6 TIME SAVE button 7 Display 8 START/PAUSE button 9 DELAY START button 10 Indicator pilot lights...
... bolts. 2 Plastic caps To close the holes on the rear side of the cabinet after the removal of the transit bolts. 3 Anti-flood inlet hose To prevent possible leakage 4 Plastic hose guide To connect the drain hose on the edge of a sink. 5. Extra Rinse CONTROL PANEL 1 2 3 4 5 678 9 10 A B C 1 Programme selector dial 2 TEMPERATURE button 3 SPIN button • Rinse hold position 4 STAIN button 5 EXTRA RINSE button 6 TIME SAVE button 7 Display 8 START/PAUSE button 9 DELAY START button 10 Indicator pilot lights...
Product Manual
Page 8
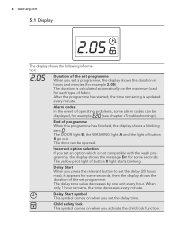
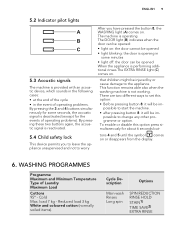
... DOOR light B, the WASHING light A and the light of operating problems, some alarm codes can be displayed, for example (see chapter «Troubleshooting»). Incorrect option selection If you set a programme, the display shows the duration in hours and minutes (for each type of button 8 light starts blinking. Child safety lock This symbol comes on when you set an option which is not compatible with the wash programme, the display shows the message...
... DOOR light B, the WASHING light A and the light of operating problems, some alarm codes can be displayed, for example (see chapter «Troubleshooting»). Incorrect option selection If you set a programme, the display shows the duration in hours and minutes (for each type of button 8 light starts blinking. Child safety lock This symbol comes on when you set an option which is not compatible with the wash programme, the display shows the message...
Product Manual
Page 9
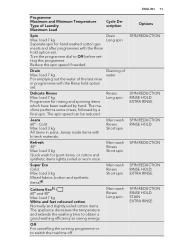
... wash Rinses Long spin SPIN REDUCTION RINSE HOLD STAIN1) TIME SAVE2) EXTRA RINSE By pressing these two buttons again, the acoustic signal is reactivated. 5.4 Child safety lock This device permits you have pressed the button 8, the WASHING light (A) comes on. WASHING PROGRAMMES Programme Maximum and Minimum Temperature Type of operating problems). There are two different ways to set this option press simultaneously for the events of Laundry Maximum Load Cottons 95° - Cold...
... wash Rinses Long spin SPIN REDUCTION RINSE HOLD STAIN1) TIME SAVE2) EXTRA RINSE By pressing these two buttons again, the acoustic signal is reactivated. 5.4 Child safety lock This device permits you have pressed the button 8, the WASHING light (A) comes on. WASHING PROGRAMMES Programme Maximum and Minimum Temperature Type of operating problems). There are two different ways to set this option press simultaneously for the events of Laundry Maximum Load Cottons 95° - Cold...
Product Manual
Page 11
... the Rinse hold option set . Normally and slightly soiled cotton items. The appliance decreases the temperature and extends the washing time to switch the machine off . ENGLISH 11 Programme Maximum and Minimum Temperature Type of water Delicate Rinses Max. Drain Long spin Drain Max. Main wash Rinses Short spin Refresh 30° Max. Main wash Rinses Long spin Off For cancelling the running programme or to obtain a good washing efficiency so saving energy. load 3 kg Quick wash for hand washed cotton...
... the Rinse hold option set . Normally and slightly soiled cotton items. The appliance decreases the temperature and extends the washing time to switch the machine off . ENGLISH 11 Programme Maximum and Minimum Temperature Type of water Delicate Rinses Max. Drain Long spin Drain Max. Main wash Rinses Short spin Refresh 30° Max. Main wash Rinses Long spin Off For cancelling the running programme or to obtain a good washing efficiency so saving energy. load 3 kg Quick wash for hand washed cotton...
Product Manual
Page 14
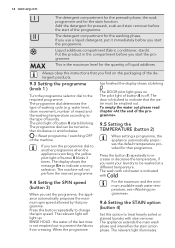
... soiled or stained laundry with . 9.4 Setting the SPIN speed (button 3) When you turn the programme dial to the type of button 8 starts blinking. The pilot light of laundry. The wash with cold water is working, the yellow pilot light of the programme. Press this option to change the spin speed. water level, drum movement, number of rinses) and the washing temperature according to another programme when the appliance is indicated with stain remover The appliance extends...
... soiled or stained laundry with . 9.4 Setting the SPIN speed (button 3) When you turn the programme dial to the type of button 8 starts blinking. The pilot light of laundry. The wash with cold water is working, the yellow pilot light of the programme. Press this option to change the spin speed. water level, drum movement, number of rinses) and the washing temperature according to another programme when the appliance is indicated with stain remover The appliance extends...
Product Manual
Page 15
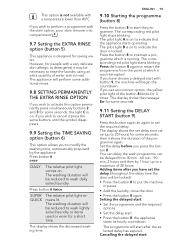
... light of water (extra rinse). Setting the delayed start: • Set the programme and the required options. • Set the delay start : The washing duration will be delayed from the point at which is designed for a short time. The corresponding red pilot light stops blinking. The display shows the message Err for people with a temperature lower than 40°C. However, for some seconds. 9.11 Setting the DELAY START (button...
... light of water (extra rinse). Setting the delayed start: • Set the programme and the required options. • Set the delay start : The washing duration will be delayed from the point at which is designed for a short time. The corresponding red pilot light stops blinking. The display shows the message Err for people with a temperature lower than 40°C. However, for some seconds. 9.11 Setting the DELAY START (button...
Product Manual
Page 16
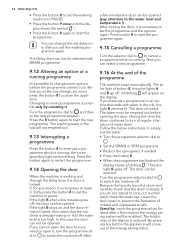
... the energy saving status. Changing a running , the corresponding light starts blinking. Press the 8 button again to PAUSE; • Press the button 9 once until water drain. Press the button again to switch the machine off. If the light B stays on the display. In this time the drum continues to turn the programme dial to to restart the programme. 9.14 Opening the door When the machine is working and through the delay time, the door is locked...
... the energy saving status. Changing a running , the corresponding light starts blinking. Press the 8 button again to PAUSE; • Press the button 9 once until water drain. Press the button again to switch the machine off. If the light B stays on the display. In this time the drum continues to turn the programme dial to to restart the programme. 9.14 Opening the door When the machine is working and through the delay time, the door is locked...
Product Manual
Page 17
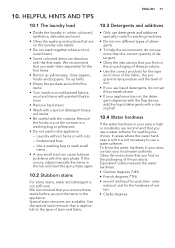
... appliance has not the detergent dispenser with the flap device, add the liquid detergents with the spin phase. Obey the instructions that you remove these products. • Use the correct products for washing machines. We recommend that you wash them separately for the hardness of stain and fabric. 10.3 Detergents and additives • Only use a water softener. Underwired bras. - international unit for the first times. • Button up belts. • Empty...
... appliance has not the detergent dispenser with the flap device, add the liquid detergents with the spin phase. Obey the instructions that you remove these products. • Use the correct products for washing machines. We recommend that you wash them separately for the hardness of stain and fabric. 10.3 Detergents and additives • Only use a water softener. Underwired bras. - international unit for the first times. • Button up belts. • Empty...
Product Manual
Page 18
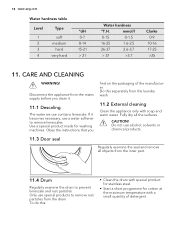
...; Start a short programme for washing machines. Do not use contains limescale. Fully dry all objects from the drum. CAUTION! If it . 11.1 Descaling The water we use alcohol, solvents or chemical products. 11.3 Door seal Regularly examine the seal and remove all the surfaces. Disconnect the appliance from the laundry wash. 11.2 External cleaning Clean the appliance only with a small quantity of the manufacturer. Obey the instructions...
...; Start a short programme for washing machines. Do not use contains limescale. Fully dry all objects from the drum. CAUTION! If it . 11.1 Descaling The water we use alcohol, solvents or chemical products. 11.3 Door seal Regularly examine the seal and remove all the surfaces. Disconnect the appliance from the laundry wash. 11.2 External cleaning Clean the appliance only with a small quantity of the manufacturer. Obey the instructions...
Product Manual
Page 19
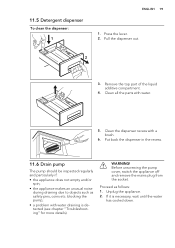
... the pump cover, switch the appliance off and remove the mains plug from the socket. Pull the dispenser out. Remove the top part of the liquid additive compartment. 4. Unplug the appliance. 2. 11.5 Detergent dispenser To clean the dispenser: 1 ENGLISH 19 1. Clean the dispenser recess with water. WARNING! If it is detected (see chapter "Troubleshooting" for more details). Clean all the parts with a brush. 6. blocking the pump; • a problem with water draining is...
... the pump cover, switch the appliance off and remove the mains plug from the socket. Pull the dispenser out. Remove the top part of the liquid additive compartment. 4. Unplug the appliance. 2. 11.5 Detergent dispenser To clean the dispenser: 1 ENGLISH 19 1. Clean the dispenser recess with water. WARNING! If it is detected (see chapter "Troubleshooting" for more details). Clean all the parts with a brush. 6. blocking the pump; • a problem with water draining is...

Product Manual
Page 20
.... 7. Check carefully whether the pump impeller rotates (it doesn't rotate, please contact your Service Centre. Release the emergency emptying hose (B), place it anti-clockwise and remove the filter. When no more water comes out, unscrew the pump cover (A) by turning it in the container and remove its cap cover. 5. 20 www.aeg.com 3. Place a container close to the pump to remove any traces of fluff. 6. Clean...
.... 7. Check carefully whether the pump impeller rotates (it doesn't rotate, please contact your Service Centre. Release the emergency emptying hose (B), place it anti-clockwise and remove the filter. When no more water comes out, unscrew the pump cover (A) by turning it in the container and remove its cap cover. 5. 20 www.aeg.com 3. Place a container close to the pump to remove any traces of fluff. 6. Clean...

Product Manual
Page 21
.... Remove the inlet hose behind the appliance. 5. Clean the filter in the pump. Disconnect the mains plug from the water tap. 3. Replace the filter into the pump by turning it correctly into the special guides. Refer to remove it is empty. Remove the water inlet hose from the mains socket. 11.7 The inlet hose filter and the valve filter It could be hot water in the valve with the water for a long time. • The indicator of button 8 flashes and the display...
.... Remove the inlet hose behind the appliance. 5. Clean the filter in the pump. Disconnect the mains plug from the water tap. 3. Replace the filter into the pump by turning it correctly into the special guides. Refer to remove it is empty. Remove the water inlet hose from the mains socket. 11.7 The inlet hose filter and the valve filter It could be hot water in the valve with the water for a long time. • The indicator of button 8 flashes and the display...
Product Manual
Page 22
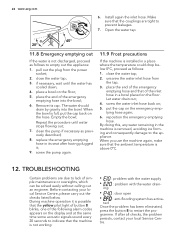
... machine is installed in its cap. screw the water inlet hose back on the floor; 5. reposition the emergency emptying hose. 22 www.aeg.com 6. if necessary, wait until water stops flowing out; 7. The water should drain by gravity into the bowl; 6. clean the pump if necessary as follows: 1. unscrew the water inlet hose from the power socket; 2. TROUBLESHOOTING Certain problems are tight to indicate that the yellow pilot light of button 8 blinks...
... machine is installed in its cap. screw the water inlet hose back on the floor; 5. reposition the emergency emptying hose. 22 www.aeg.com 6. if necessary, wait until water stops flowing out; 7. The water should drain by gravity into the bowl; 6. clean the pump if necessary as follows: 1. unscrew the water inlet hose from the power socket; 2. TROUBLESHOOTING Certain problems are tight to indicate that the yellow pilot light of button 8 blinks...
Product Manual
Page 23
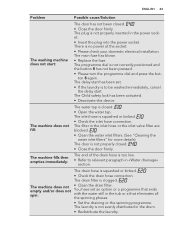
... with the water still in the drum. • Redistribute the laundry. The laundry is to relevant paragraph in the power socket. • Insert the plug into the power socket. The filter in the inlet hose or the inlet valve filter are blocked. • Clean the water inlet filters. (See "Cleaning the water inlet filters" for more details) The door is not correctly positioned and the button 8 has not been pressed. • Please turn the...
... with the water still in the drum. • Redistribute the laundry. The laundry is to relevant paragraph in the power socket. • Insert the plug into the power socket. The filter in the inlet hose or the inlet valve filter are blocked. • Clean the water inlet filters. (See "Cleaning the water inlet filters" for more details) The door is not correctly positioned and the button 8 has not been pressed. • Please turn the...
Product Manual
Page 24
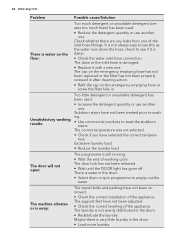
... prior to washing. • Use commercial products to empty out the water. The machine vibrates or is water in the drum. • Select drain or spin programme to treat the stubborn stains. The laundry is damaged. • Replace it is still running. • Wait the end of the inlet hose fittings. Stubborn stains have not been removed. • Check the correct installation of the appliance. The door lock has not...
... prior to washing. • Use commercial products to empty out the water. The machine vibrates or is water in the drum. • Select drain or spin programme to treat the stubborn stains. The laundry is damaged. • Replace it is still running. • Wait the end of the inlet hose fittings. Stubborn stains have not been removed. • Check the correct installation of the appliance. The door lock has not...
Product Manual
Page 25
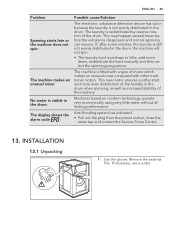
... the Service Force Centre. 13. If, after some minutes, the laundry is still not evenly distributed in the drum, the machine will not spin. • The laundry load is not evenly distributed in the drum. INSTALLATION 13.1 Unpacking 1. ENGLISH 25 Problem Spinning starts late or the machine does not spin: The machine makes an unusual noise: No water is visible in the drum: The display shows the alarm code : Possible...
... the Service Force Centre. 13. If, after some minutes, the laundry is still not evenly distributed in the drum, the machine will not spin. • The laundry load is not evenly distributed in the drum. INSTALLATION 13.1 Unpacking 1. ENGLISH 25 Problem Spinning starts late or the machine does not spin: The machine makes an unusual noise: No water is visible in the drum: The display shows the alarm code : Possible...

Product Manual
Page 28
... the appliance, secured to a gas cooker or coalburning stove, an insulating panel covered with screws, the wood panel must be level and stable. Before placing it is more stable The water inlet hose and the drain hose must not be installed in one of the corners of...aeg.com WARNING! Remove all the packaging and the transit bolts before you place a waterproof wood panel, at least 2 floor beams with aluminium foil on a flat hard floor. • Make sure that air circulation around the machine is not impeded by carpets, rugs etc. • Carefully level by screwing the adjustable feet...
... the appliance, secured to a gas cooker or coalburning stove, an insulating panel covered with screws, the wood panel must be level and stable. Before placing it is more stable The water inlet hose and the drain hose must not be installed in one of the corners of...aeg.com WARNING! Remove all the packaging and the transit bolts before you place a waterproof wood panel, at least 2 floor beams with aluminium foil on a flat hard floor. • Make sure that air circulation around the machine is not impeded by carpets, rugs etc. • Carefully level by screwing the adjustable feet...


