
Product Manual
Page 2
SAFETY INFORMATION 3 2. SAFETY INSTRUCTIONS 4 3. DAILY USE...11 11. TROUBLESHOOTING 19 14. CONTROL PANEL...6 5. SETTINGS...11 9. CARE AND CLEANING 16 13. We have the following data available: Model, PNC, Serial Number. When contacting our Authorised Service Centre, ensure that help make life simpler features you might not find on the rating plate. PROGRAMMES ...7 6. Warning / Caution-Safety information General information and tips Environmental information Subject to...
SAFETY INFORMATION 3 2. SAFETY INSTRUCTIONS 4 3. DAILY USE...11 11. TROUBLESHOOTING 19 14. CONTROL PANEL...6 5. SETTINGS...11 9. CARE AND CLEANING 16 13. We have the following data available: Model, PNC, Serial Number. When contacting our Authorised Service Centre, ensure that help make life simpler features you might not find on the rating plate. PROGRAMMES ...7 6. Warning / Caution-Safety information General information and tips Environmental information Subject to...

Product Manual
Page 3
... all detergents away from children. • Keep children and pets away from the appliance door when it is open. • Cleaning and user maintenance shall not be made by a carpet. • The appliance is to the water mains using the new supplied hose-sets. Old hose sets must not be obstructed by children without supervision. 1.2 General Safety • Do not change the specification of...
... all detergents away from children. • Keep children and pets away from the appliance door when it is open. • Cleaning and user maintenance shall not be made by a carpet. • The appliance is to the water mains using the new supplied hose-sets. Old hose sets must not be obstructed by children without supervision. 1.2 General Safety • Do not change the specification of...
Product Manual
Page 4
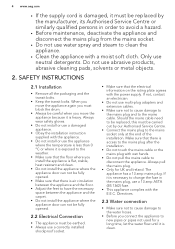
... the mains plug, use a 13 amp ASTA (BS 1362) fuse. • This appliance complies with the E.E.C. 4 www.aeg.com • If the supply cord is damaged, it must be replaced by our Authorised Service Centre. • Connect the mains plug to disconnect the appliance. SAFETY INSTRUCTIONS 2.1 Installation • Remove all the packaging and the transit bolts. • Keep the transit bolts. Directives. 2.3 Water connection •...
... the mains plug, use a 13 amp ASTA (BS 1362) fuse. • This appliance complies with the E.E.C. 4 www.aeg.com • If the supply cord is damaged, it must be replaced by our Authorised Service Centre. • Connect the mains plug to disconnect the appliance. SAFETY INSTRUCTIONS 2.1 Installation • Remove all the packaging and the transit bolts. • Keep the transit bolts. Directives. 2.3 Water connection •...

Product Manual
Page 5
.... 1 Worktop 2 Detergent dispenser 3 Control panel 4 Door handle 5 Rating plate 6 Drain pump filter 7 Feet for the appliance level 6 7 3.2 Installation on suspended flooring Suspended wooden floors are wet with screws, the wood panel must extend beyond the front feet. Risk of the room, where the floor is no leakage. 2.4 Use WARNING! To help prevent vibration we recommend you place a waterproof wood panel, at least 2 floor beams with flammable products in...
.... 1 Worktop 2 Detergent dispenser 3 Control panel 4 Door handle 5 Rating plate 6 Drain pump filter 7 Feet for the appliance level 6 7 3.2 Installation on suspended flooring Suspended wooden floors are wet with screws, the wood panel must extend beyond the front feet. Risk of the room, where the floor is no leakage. 2.4 Use WARNING! To help prevent vibration we recommend you place a waterproof wood panel, at least 2 floor beams with flammable products in...

Product Manual
Page 6
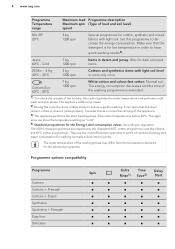
6 www.aeg.com If you install the appliance on a plinth, secure the appliance in the fixing plates. 4. CONTROL PANEL 4.1 Control panel description 1 2 Read carefully the instructions supplied with the kit. 3 98 765 4 1 On/Off button (On/Off) 2 Programme knob 3 Display 4 Start/Pause button (Start/Pause) 5 Delay start button (Delay Start) A 6 Time saving button (Time Save) 7 Extra rinse button (Extra Rinse) 8 Spin button (Spin) 9 Temperature button (Temperature) 4.2 Display BC Time area: A Programme duration Delay start Alarm codes Message of error Programme is completed.
6 www.aeg.com If you install the appliance on a plinth, secure the appliance in the fixing plates. 4. CONTROL PANEL 4.1 Control panel description 1 2 Read carefully the instructions supplied with the kit. 3 98 765 4 1 On/Off button (On/Off) 2 Programme knob 3 Display 4 Start/Pause button (Start/Pause) 5 Delay start button (Delay Start) A 6 Time saving button (Time Save) 7 Extra rinse button (Extra Rinse) 8 Spin button (Spin) 9 Temperature button (Temperature) 4.2 Display BC Time area: A Programme duration Delay start Alarm codes Message of error Programme is completed.
Product Manual
Page 7
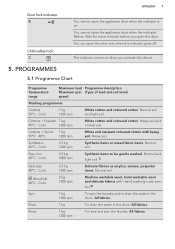
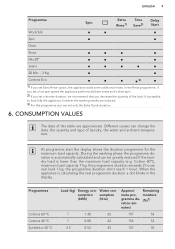
... To rinse and spin the laundry. Door lock indicator: B Child safety lock: C ENGLISH 7 You cannot open the door. PROGRAMMES 5.1 Programme Chart Programme Temperature range Maximum load Programme description Maximum spin (Type of load and soil level) speed Washing programmes Cottons 95°C - Easy Iron 60°C - Cold 3.5 kg 1200 rpm Delicate fabrics as acrylics, viscose, polyester items. Normal soil. All fabrics. Drain 7 kg To drain the water in the 1200 rpm drum. Cold 7 kg...
... To rinse and spin the laundry. Door lock indicator: B Child safety lock: C ENGLISH 7 You cannot open the door. PROGRAMMES 5.1 Programme Chart Programme Temperature range Maximum load Programme description Maximum spin (Type of load and soil level) speed Washing programmes Cottons 95°C - Easy Iron 60°C - Cold 3.5 kg 1200 rpm Delicate fabrics as acrylics, viscose, polyester items. Normal soil. All fabrics. Drain 7 kg To drain the water in the 1200 rpm drum. Cold 7 kg...
Product Manual
Page 8
... cotton and colour-fast cotton. Set this cycle the drum rotates slowly to decrease the energy consumption. The water temperature of combined energy and water consumption for washing normally soiled cotton laundry. It can show the temperature setting as a normal functioning of the laundry, this as "cold". 4) Standard programmes for low temperature in denim and jersey. The energy consumption decreases and the time of the washing programme is extended. 1) To...
... cotton and colour-fast cotton. Set this cycle the drum rotates slowly to decrease the energy consumption. The water temperature of combined energy and water consumption for washing normally soiled cotton laundry. It can show the temperature setting as a normal functioning of the laundry, this as "cold". 4) Standard programmes for low temperature in denim and jersey. The energy consumption decreases and the time of the washing programme is extended. 1) To...
Product Manual
Page 9
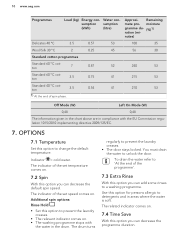
... this programme you can change the data: the quantity and type of the load. At programme start the display shows the duration programme for the maximum load capacity. real load 1 kg, the programme duration don't reach 1 hour). When the appliance is lower than the maximum load capacity (e.g. Different causes can set Extra Rinse option, the appliance adds some additional rinses. moisture gramme duration (mi...
... this programme you can change the data: the quantity and type of the load. At programme start the display shows the duration programme for the maximum load capacity. real load 1 kg, the programme duration don't reach 1 hour). When the appliance is lower than the maximum load capacity (e.g. Different causes can set Extra Rinse option, the appliance adds some additional rinses. moisture gramme duration (mi...
Product Manual
Page 10
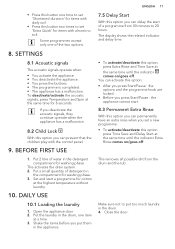
... to detergents and in compliance with the water in the drum. Indicator = cold water. The drum turns regularly to change the default temperature. Additional spin options: Rinse Hold • Set this option to prevent the laundry creases. • The door stays locked. The related indicator comes on . • The washing programme stops with the EU Commission regulation 1015/2010 implementing directive 2009/125/EC. 7. 10 www.aeg.com Programmes Load (kg) Energy...
... to detergents and in compliance with the water in the drum. Indicator = cold water. The drum turns regularly to change the default temperature. Additional spin options: Rinse Hold • Set this option to prevent the laundry creases. • The door stays locked. The related indicator comes on . • The washing programme stops with the EU Commission regulation 1015/2010 implementing directive 2009/125/EC. 7. 10 www.aeg.com Programmes Load (kg) Energy...
Product Manual
Page 11
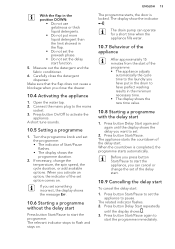
... drum and the tub. Open the appliance door 2. Put the laundry in the compartment for cotton at the same time for washing phase. Close the door. The display shows the related indicator and delay time. • To activate/deactivate this option, press Extra Rinse and Time Save at a time. 3. DAILY USE 10.1 Loading the laundry 1. Shake the items before you set 'Extra Quick' for items with the control panel. 9. Set and start...
... drum and the tub. Open the appliance door 2. Put the laundry in the compartment for cotton at the same time for washing phase. Close the door. The display shows the related indicator and delay time. • To activate/deactivate this option, press Extra Rinse and Time Save at a time. 3. DAILY USE 10.1 Loading the laundry 1. Shake the items before you set 'Extra Quick' for items with the control panel. 9. Set and start...

Product Manual
Page 12
... instructions that no laundry stays between the seal and the door. To use liquid detergent, turn the flap up. Compartment for prewash phase, soak programme or stain remover. Press the lever down . To use powder detergent, turn the flap down to the laundry. 10.2 Filling the detergent and additives 3. Pull out the detergent dispenser until it stops. 2. 12 www.aeg.com 10.3 Check the position of the detergent products. A Compartment for liquid additives (fabric...
... instructions that no laundry stays between the seal and the door. To use liquid detergent, turn the flap up. Compartment for prewash phase, soak programme or stain remover. Press the lever down . To use powder detergent, turn the flap down to the laundry. 10.2 Filling the detergent and additives 3. Pull out the detergent dispenser until it stops. 2. 12 www.aeg.com 10.3 Check the position of the detergent products. A Compartment for liquid additives (fabric...
Product Manual
Page 13
... The programme starts, the door is completed, the programme starts automatically. The drain pump can cancel or change the temperature, the spin speed, the cycle duration, or add available options. When you have put more liquid detergent than the limit showed in the minimum necessary time. • The display shows the new time value. 10.8 Starting a programme with the delay start the programme. Press button Delay Start again and...
... The programme starts, the door is completed, the programme starts automatically. The drain pump can cancel or change the temperature, the spin speed, the cycle duration, or add available options. When you have put more liquid detergent than the limit showed in the minimum necessary time. • The display shows the new time value. 10.8 Starting a programme with the delay start the programme. Press button Delay Start again and...

Product Manual
Page 14
... temperature and level of the last set the available functions. In the display the door lock indicator goes off . 1. Turn the programme knob to deactivate the appliance. 2. Remove the laundry from the end of cycle The washing programme is completed, but there is on and the door locked indicator goes off. Press the button Start/Pause again. Wait for some minutes and then open carefully the appliance door...
... temperature and level of the last set the available functions. In the display the door lock indicator goes off . 1. Turn the programme knob to deactivate the appliance. 2. Remove the laundry from the end of cycle The washing programme is completed, but there is on and the door locked indicator goes off. Press the button Start/Pause again. Wait for some minutes and then open carefully the appliance door...
Product Manual
Page 15
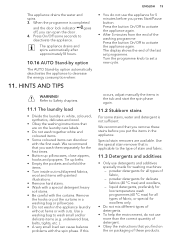
... cause balance problems with the first wash. Use the special stain remover that are available. If this ENGLISH 15 • You do not use more than the correct quantity of the last set a new cycle. The display shows the end of detergent. • Obey the instructions that you can open the door . 4. The appliance drains the water and spins. 3. Press On/Off some stains, water and detergent is...
... cause balance problems with the first wash. Use the special stain remover that are available. If this ENGLISH 15 • You do not use more than the correct quantity of the last set a new cycle. The display shows the end of detergent. • Obey the instructions that you can open the door . 4. The appliance drains the water and spins. 3. Press On/Off some stains, water and detergent is...
Product Manual
Page 16
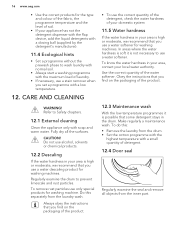
... drum. To remove rust particles use only special products for washing machine. Do this : • Remove the laundry from the drum. • Set the cotton programme with the highest temperature with soap and warm water. Obey the instructions that you use a water softener for washing machines. Make regularly a maintenance wash. To do this separately from the inner part. Refer to Safety chapters. 12.1 External cleaning Clean the appliance only with a small quantity of detergent. 12.4 Door seal...
... drum. To remove rust particles use only special products for washing machine. Do this : • Remove the laundry from the drum. • Set the cotton programme with the highest temperature with soap and warm water. Obey the instructions that you use a water softener for washing machines. Make regularly a maintenance wash. To do this separately from the inner part. Refer to Safety chapters. 12.1 External cleaning Clean the appliance only with a small quantity of detergent. 12.4 Door seal...

Product Manual
Page 17
Do not clean the drain filter if the water in the appliance is hot. 1. 2. 1 1 2 ENGLISH 17 12.6 Cleaning the drain filter WARNING! 12.5 Cleaning the detergent dispenser 1. 2. 1 2 3. 4.
Do not clean the drain filter if the water in the appliance is hot. 1. 2. 1 1 2 ENGLISH 17 12.6 Cleaning the drain filter WARNING! 12.5 Cleaning the detergent dispenser 1. 2. 1 2 3. 4.
Product Manual
Page 19
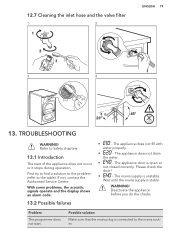
....7 Cleaning the inlet hose and the valve filter 1. 2. 1 2 3 3. 4. ENGLISH 19 45° 20° 13. TROUBLESHOOTING WARNING! If not, contact the Authorised Service Centre. Deactivate the appliance before you do the checks. The appliance does not drain the water. • - Refer to Safety chapters. 13.1 Introduction The start . Problem The programme does not start of the appliance does not occur or it stops during operation...
....7 Cleaning the inlet hose and the valve filter 1. 2. 1 2 3 3. 4. ENGLISH 19 45° 20° 13. TROUBLESHOOTING WARNING! If not, contact the Authorised Service Centre. Deactivate the appliance before you do the checks. The appliance does not drain the water. • - Refer to Safety chapters. 13.1 Introduction The start . Problem The programme does not start of the appliance does not occur or it stops during operation...
Product Manual
Page 20
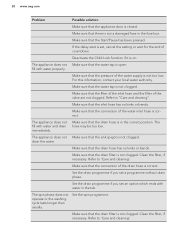
... the drain filter is not clogged. Make sure that the sink spigot is in the fuse box. The spin phase does not operate or the washing cycle lasts longer than usually. Make sure that the drain hose is not clogged. Make sure that the Start/Pause has been pressed. Make sure that there is set a programme without drain phase. Refer to 'Care and cleaning'. Clean the filter, if...
... the drain filter is not clogged. Make sure that the sink spigot is in the fuse box. The spin phase does not operate or the washing cycle lasts longer than usually. Make sure that the drain hose is not clogged. Make sure that the Start/Pause has been pressed. Make sure that there is set a programme without drain phase. Refer to 'Care and cleaning'. Clean the filter, if...
Product Manual
Page 21
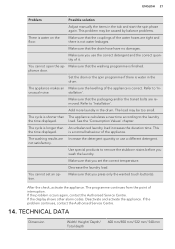
... time displayed. Make sure that you press only the wanted touch button(s). The cycle is not water leakages. load. See the 'Consumption Values' chapter. not satisfactory. Use special products to 'Installation'. ENGLISH 21 Problem Possible solution Adjust manually the items in the drum. Make sure you wash the laundry. You cannot open the ap- The appliance makes an Make sure the levelling of the appliance. unusual noise...
... time displayed. Make sure that you press only the wanted touch button(s). The cycle is not water leakages. load. See the 'Consumption Values' chapter. not satisfactory. Use special products to 'Installation'. ENGLISH 21 Problem Possible solution Adjust manually the items in the drum. Make sure you wash the laundry. You cannot open the ap- The appliance makes an Make sure the levelling of the appliance. unusual noise...

Product Manual
Page 22
... Overall power Fuse Frequency 230-240 V 2200 W 13 A 50 Hz Level of protection against moisture IPX4 Water supply pressure Minimum 1) Maximum 0,5 bar (0,05 MPa) 8 bar (0,8 MPa) Water supply 2) Cold water Maximum Load Cotton 7 kg Energy Efficiency Class A+++ Spin Speed Maximum 1200 rpm 1) The appliance works correctly if the water pressure is not less than a distance of 5.02 m (16.5 ft) between the appliance inlet hose and...
... Overall power Fuse Frequency 230-240 V 2200 W 13 A 50 Hz Level of protection against moisture IPX4 Water supply pressure Minimum 1) Maximum 0,5 bar (0,05 MPa) 8 bar (0,8 MPa) Water supply 2) Cold water Maximum Load Cotton 7 kg Energy Efficiency Class A+++ Spin Speed Maximum 1200 rpm 1) The appliance works correctly if the water pressure is not less than a distance of 5.02 m (16.5 ft) between the appliance inlet hose and...


