
Specification Sheet
Page 1
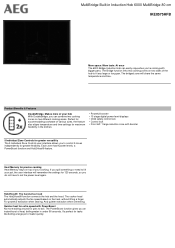
... pan. The Bridge function links two cooking zones on two different cooking areas. Hob2Hood®: The hands-free hood The Hob2Hood® function connects the hob and the hood. The cooker hood automatically adjusts the fan speed based on top of heat, boiling water in the kitchen. • Powerful booster • 15 stage digital power level displays • Child safety control lock • Control lock • Front left: 1 large induction...
... pan. The Bridge function links two cooking zones on two different cooking areas. Hob2Hood®: The hands-free hood The Hob2Hood® function connects the hob and the hood. The cooker hood automatically adjusts the fan speed based on top of heat, boiling water in the kitchen. • Powerful booster • 15 stage digital power level displays • Child safety control lock • Control lock • Front left: 1 large induction...
Specification Sheet
Page 2
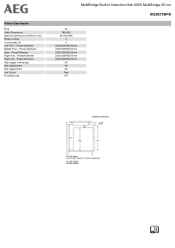
Power/Diameter Middle Front - Power/Diameter Rear - Power/Diameter Gas supply: natural gas Gas replacement Gas replacement Led Colour ProdPartCode MultiBridge Built-in mm Radius cutting Cord Length (m) Left Front - Product Specification Plug Hobs Dimensions Aperture dimensions HxWxD in Induction Hob 6000 MultiBridge 80 cm IKE8575HFB No 780x520 44x750x490 5 0 2300/3200W/210mm 2300/3200W/210mm 2300/3200W/210mm 2300/3200W/210mm 2300/3200W/210mm No No No Red KR Power/Diameter Right front - Power/Diameter Right rear -
Power/Diameter Middle Front - Power/Diameter Rear - Power/Diameter Gas supply: natural gas Gas replacement Gas replacement Led Colour ProdPartCode MultiBridge Built-in mm Radius cutting Cord Length (m) Left Front - Product Specification Plug Hobs Dimensions Aperture dimensions HxWxD in Induction Hob 6000 MultiBridge 80 cm IKE8575HFB No 780x520 44x750x490 5 0 2300/3200W/210mm 2300/3200W/210mm 2300/3200W/210mm 2300/3200W/210mm 2300/3200W/210mm No No No Red KR Power/Diameter Right front - Power/Diameter Right rear -
User Manual
Page 2
... 9. Visit our website to change without notice. Warning / Caution-Safety information General information and tips Environmental information Subject to : Get usage advice, brochures, trouble shooter, service and repair information: www.aeg.com/support Register your product for better service: www.registeraeg.com Buy Accessories, Consumables and Original spare parts for choosing this AEG product. We have the following data available: Model, PNC, Serial Number.
... 9. Visit our website to change without notice. Warning / Caution-Safety information General information and tips Environmental information Subject to : Get usage advice, brochures, trouble shooter, service and repair information: www.aeg.com/support Register your product for better service: www.registeraeg.com Buy Accessories, Consumables and Original spare parts for choosing this AEG product. We have the following data available: Model, PNC, Serial Number.

User Manual
Page 3
... accessible parts become hot during use of it appropriately. • WARNING: Keep children and pets away from the appliance when it operates or when it should be activated. • Children shall not carry out cleaning and user maintenance of the appliance without supervision. 1.2 General Safety ... ensure that they have been given supervision or instruction concerning the use . Always keep the instructions in a safe and accessible location for single household domestic use in a safe way and understand the hazards involved. ENGLISH 3 installation or usage. Children of less than 8 years...
... accessible parts become hot during use of it appropriately. • WARNING: Keep children and pets away from the appliance when it operates or when it should be activated. • Children shall not carry out cleaning and user maintenance of the appliance without supervision. 1.2 General Safety ... ensure that they have been given supervision or instruction concerning the use . Always keep the instructions in a safe and accessible location for single household domestic use in a safe way and understand the hazards involved. ENGLISH 3 installation or usage. Children of less than 8 years...
User Manual
Page 4
... hob element by its control and do not rely on the pan detector. • If the glass ceramic surface / glass surface is damaged, it must be supervised continuously. • WARNING: Danger of fire: Do not store items on the cooking surfaces. • Metallic objects such as a timer, or connected to a circuit that is connected to the mains directly using junction box, remove the fuse to extinguish the cooking fire. Switch...
... hob element by its control and do not rely on the pan detector. • If the glass ceramic surface / glass surface is damaged, it must be supervised continuously. • WARNING: Danger of fire: Do not store items on the cooking surfaces. • Metallic objects such as a timer, or connected to a circuit that is connected to the mains directly using junction box, remove the fuse to extinguish the cooking fire. Switch...

User Manual
Page 5
... the mains plug. • Use only correct isolation devices: line protecting cut surfaces with the appliance. • Keep the minimum distance from other appliances and units. • Always take care when moving the appliance as they can make sure that the appliance is heavy. Always use safety gloves and enclosed footwear. • Seal the cut -outs, fuses (screw type fuses removed from the power supply...
... the mains plug. • Use only correct isolation devices: line protecting cut surfaces with the appliance. • Keep the minimum distance from other appliances and units. • Always take care when moving the appliance as they can make sure that the appliance is heavy. Always use safety gloves and enclosed footwear. • Seal the cut -outs, fuses (screw type fuses removed from the power supply...
User Manual
Page 6
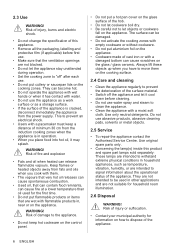
... not put a hot pan cover on the glass surface of the appliance is in , near or on the control panel. • Do not put flammable products or items that can contain food remnants, can release flammable vapours. The surface can cause scratches on the cooking zones. 2.3 Use WARNING! Risk of injury, burns and electric shock. • Do not change the specification of the...
... not put a hot pan cover on the glass surface of the appliance is in , near or on the control panel. • Do not put flammable products or items that can contain food remnants, can release flammable vapours. The surface can cause scratches on the cooking zones. 2.3 Use WARNING! Risk of injury, burns and electric shock. • Do not change the specification of the...
User Manual
Page 7
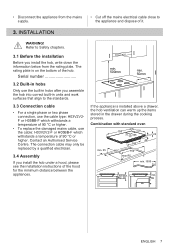
... rating plate is installed above a drawer, the hob ventilation can warm up the items stored in units and work surfaces that align to the standards. 3.3 Connection cable • For a single phase or two phase connection, use the cable type: H03V2V2F or H05BB-F which withstands a temperature of 90 °C or higher. • To replace the damaged mains cable, use the built-in...
... rating plate is installed above a drawer, the hob ventilation can warm up the items stored in units and work surfaces that align to the standards. 3.3 Connection cable • For a single phase or two phase connection, use the cable type: H03V2V2F or H05BB-F which withstands a temperature of 90 °C or higher. • To replace the damaged mains cable, use the built-in...
User Manual
Page 8
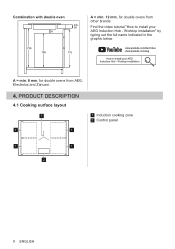
Find the video tutorial "How to install your AEG Induction Hob - www.youtube.com/electrolux www.youtube.com/aeg How to install your AEG Induction Hob - Worktop installation A = min. 6 mm, for double ovens from AEG, Electrolux and Zanussi. 4. Combination with double oven A = min. 12 mm, for double ovens from other brands. PRODUCT DESCRIPTION 4.1 Cooking surface layout 1 1 1 1 Induction cooking zone 2 Control panel 1 1 2 8 ENGLISH Worktop installation" by typing out the full name indicated in the graphic below.
Find the video tutorial "How to install your AEG Induction Hob - www.youtube.com/electrolux www.youtube.com/aeg How to install your AEG Induction Hob - Worktop installation A = min. 6 mm, for double ovens from AEG, Electrolux and Zanussi. 4. Combination with double oven A = min. 12 mm, for double ovens from other brands. PRODUCT DESCRIPTION 4.1 Cooking surface layout 1 1 1 1 Induction cooking zone 2 Control panel 1 1 2 8 ENGLISH Worktop installation" by typing out the full name indicated in the graphic below.
User Manual
Page 10
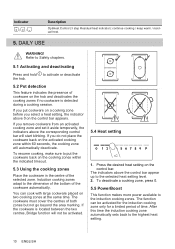
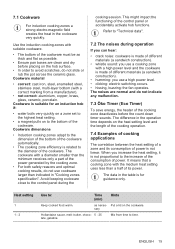
... 0. 5.5 PowerBoost This function makes more power available to the highest heat setting. 10 ENGLISH After this time the induction cooking zone automatically sets back to the induction cooking zones. Indicator / / Description OptiHeat Control (3 step Residual heat indicator): continue cooking / keep warm / resid‐ ual heat. 5. If you put the cookware back on the activated cooking zone within the indicated timeout. 5.3 Using the cooking zones Place the cookware in the...
... 0. 5.5 PowerBoost This function makes more power available to the highest heat setting. 10 ENGLISH After this time the induction cooking zone automatically sets back to the induction cooking zones. Indicator / / Description OptiHeat Control (3 step Residual heat indicator): continue cooking / keep warm / resid‐ ual heat. 5. If you put the cookware back on the activated cooking zone within the indicated timeout. 5.3 Using the cooking zones Place the cookware in the...
User Manual
Page 11
... phase has a maximum electricity loading. To activate the function for the selected cooking zone and then set the function. Press to the location and number of the cookware. To change the heat setting. 5.6 OptiHeat Control (3 step Residual heat indicator) WARNING! / / As long as the indicator is activated but the cooking zone is heated by the heat of maximum available power within ENGLISH 11 The cooking zone deactivates. Press...
... phase has a maximum electricity loading. To activate the function for the selected cooking zone and then set the function. Press to the location and number of the cookware. To change the heat setting. 5.6 OptiHeat Control (3 step Residual heat indicator) WARNING! / / As long as the indicator is activated but the cooking zone is heated by the heat of maximum available power within ENGLISH 11 The cooking zone deactivates. Press...
User Manual
Page 12
... shows the basic menu structure. The remaining power will be automatically reduced. • The heat setting of the cooking zone selected first is always prioritised. Change the heat settings of the setting symbol and a value. To enter user settings: press and hold . Navigating the menu: the menu consists of the cooking zones manually, if necessary. User settings Sym‐ Setting bol Possible options b Sound On / Off...
... shows the basic menu structure. The remaining power will be automatically reduced. • The heat setting of the cooking zone selected first is always prioritised. Change the heat settings of the setting symbol and a value. To enter user settings: press and hold . Navigating the menu: the menu consists of the cooking zones manually, if necessary. User settings Sym‐ Setting bol Possible options b Sound On / Off...
User Manual
Page 13
... indicator above is defined automatically on the correct placement of the left / right cooking zones: touch / . Speed of the fan is on . 6.3 Lock You can also operate the fan from the hob manually. It prevents an accidental change of the hottest cookware on the control panels are locked. The function stays active when you do not deactivate a cooking zone or change the heat setting...
... indicator above is defined automatically on the correct placement of the left / right cooking zones: touch / . Speed of the fan is on . 6.3 Lock You can also operate the fan from the hob manually. It prevents an accidental change of the hottest cookware on the control panels are locked. The function stays active when you do not deactivate a cooking zone or change the heat setting...
User Manual
Page 14
.... 7. To do so set fan speed to select an automatic mode. To do that time the system deactivates the fan automatically and prevents you from accidental activation of the function, deactivate the hob and activate it before you use the function. Activate it again. Refer to hood user manual. To operate the hood directly on the hood panel deactivate the automatic...
.... 7. To do so set fan speed to select an automatic mode. To do that time the system deactivates the fan automatically and prevents you from accidental activation of the function, deactivate the hob and activate it before you use the function. Activate it again. Refer to hood user manual. To operate the hood directly on the hood panel deactivate the automatic...
User Manual
Page 15
... a diameter smaller than the minimum receives only a part of the cookware. The noises are clean and dry before the count down timer sounds. as possible. • Ensure pan bases are normal and do not slide or rub the pot across the ceramic glass. 7.1 Cookware For induction cooking zones a strong electro-magnetic field creates the heat in "Cooking zones specification". The difference in the...
... a diameter smaller than the minimum receives only a part of the cookware. The noises are clean and dry before the count down timer sounds. as possible. • Ensure pan bases are normal and do not slide or rub the pot across the ceramic glass. 7.1 Cookware For induction cooking zones a strong electro-magnetic field creates the heat in "Cooking zones specification". The difference in the...

User Manual
Page 16
... hood panel from direct sunlight. • Do not spot halogen light on the hood panel. • Do not cover the hob control panel. • Do not interrupt the signal between the hob and the hood (e.g. See the picture. The hood pictured below is on . The AEG cooker hoods that work...Use max. ¼ l of water for illustration purpose only. Simmer rice and milkbased dishes, heat up ready-cooked meals. 25 - 50 Add at least twice as much liquid as neces‐ Turn halfway through . Cooker hoods with the Hob²Hood function To find the full range of cooker hoods which work...
... hood panel from direct sunlight. • Do not spot halogen light on the hood panel. • Do not cover the hob control panel. • Do not interrupt the signal between the hob and the hood (e.g. See the picture. The hood pictured below is on . The AEG cooker hoods that work...Use max. ¼ l of water for illustration purpose only. Simmer rice and milkbased dishes, heat up ready-cooked meals. 25 - 50 Add at least twice as much liquid as neces‐ Turn halfway through . Cooker hoods with the Hob²Hood function To find the full range of cooker hoods which work...
User Manual
Page 17
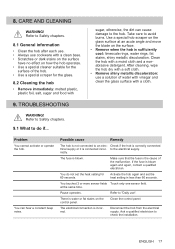
.... 8.1 General information • Clean the hob after each use. • Always use cookware with a clean base. • Scratches or dark stains on the surface have no effect on the surface. • Remove when the hob is the cause of the hob. • Use a special scraper for the surface of the malfunction. If the fuse is connected incor‐ to do not set the heat setting in...
.... 8.1 General information • Clean the hob after each use. • Always use cookware with a clean base. • Scratches or dark stains on the surface have no effect on the surface. • Remove when the hob is the cause of the hob. • Use a special scraper for the surface of the malfunction. If the fuse is connected incor‐ to do not set the heat setting in...
User Manual
Page 18
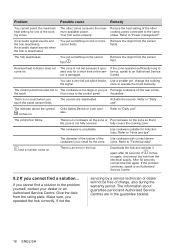
... same Your hob works properly. Residual heat indicator does not come on . You use a very tall pot which blocks Use a smaller pot, change the cooking the signal. Child Safety Device or Lock oper‐ ates. If not the servicing by a service technician or dealer will not be hot, speak to the control panel. cooking zones connected to "Power management". Remove the object from the electrical supply. Centre. If...
... same Your hob works properly. Residual heat indicator does not come on . You use a very tall pot which blocks Use a smaller pot, change the cooking the signal. Child Safety Device or Lock oper‐ ates. If not the servicing by a service technician or dealer will not be hot, speak to the control panel. cooking zones connected to "Power management". Remove the object from the electrical supply. Centre. If...
User Manual
Page 19
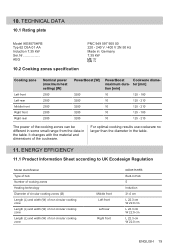
... 11.1 Product Information Sheet according to UK Ecodesign Regulation Model identification Type of hob Number of cooking zones Heating technology Diameter of circular cooking zones (Ø) Length (L) and width (W) of non circular cooking zone Length (L) and width (W) of non circular cooking zone Length (L) and width (W) of the cookware. 10. It changes with the material and dimensions of non circular cooking zone Middle front...
... 11.1 Product Information Sheet according to UK Ecodesign Regulation Model identification Type of hob Number of cooking zones Heating technology Diameter of circular cooking zones (Ø) Length (L) and width (W) of non circular cooking zone Length (L) and width (W) of non circular cooking zone Length (L) and width (W) of the cookware. 10. It changes with the material and dimensions of non circular cooking zone Middle front...
Product information sheet
Page 1
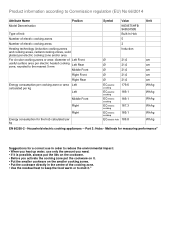
... 60350-2 - Product information according to Commission regulation (EU) No 66/2014 Attribute Name Model Denomination Position Type of hob Number of electric cooking zones Number of electric cooking areas Heating technology (induction cooking zones and cooking areas, radiant cooking zones, solid plates) per electric cooking zone and/or area For circular cooking zones or area: diameter of the cooking zone. • Use the residual heat to keep the food warm or...
... 60350-2 - Product information according to Commission regulation (EU) No 66/2014 Attribute Name Model Denomination Position Type of hob Number of electric cooking zones Number of electric cooking areas Heating technology (induction cooking zones and cooking areas, radiant cooking zones, solid plates) per electric cooking zone and/or area For circular cooking zones or area: diameter of the cooking zone. • Use the residual heat to keep the food warm or...


