
Product Manual
Page 30
... keep all your AEG appliances looking spotless and working perfectly. Visit the webshop at: www.aeg.com/shop 30 FOR PERFECT RESULTS Thank you would expect, from specialist cookware to cutlery baskets, from it to give you impeccable performance for many years, with a wide range of accessories designed and built to the high quality standards you...
... keep all your AEG appliances looking spotless and working perfectly. Visit the webshop at: www.aeg.com/shop 30 FOR PERFECT RESULTS Thank you would expect, from specialist cookware to cutlery baskets, from it to give you impeccable performance for many years, with a wide range of accessories designed and built to the high quality standards you...
Product Manual
Page 31
General information and tips Environmental information Subject to avoid damaging the appliance. CONTENTS Contents 31 32 Safety information 33 Installation instructions 35 Product description 36 Operating instructions 40 Helpful hints and tips 41 Care and cleaning 41 What to do if... 42 Environment concerns 43 Warranty The following symbols are used in this user manual: Important information concerning your personal safety and information on how to change without notice
General information and tips Environmental information Subject to avoid damaging the appliance. CONTENTS Contents 31 32 Safety information 33 Installation instructions 35 Product description 36 Operating instructions 40 Helpful hints and tips 41 Care and cleaning 41 What to do if... 42 Environment concerns 43 Warranty The following symbols are used in this user manual: Important information concerning your personal safety and information on how to change without notice
Product Manual
Page 32
... the glass ceramic. WARNING! WARNING! The users must have supervision or instruction for the operation of the appliance by a person who is only for their safety. • Keep all packaging, stickers and layers from children. Correct operation • Always monitor the appliance during and after each use the appliance as they can occur with ignition very quickly.
... the glass ceramic. WARNING! WARNING! The users must have supervision or instruction for the operation of the appliance by a person who is only for their safety. • Keep all packaging, stickers and layers from children. Correct operation • Always monitor the appliance during and after each use the appliance as they can occur with ignition very quickly.
Product Manual
Page 33
... from electrical current. Use only original spare parts. • Only use the appliance (safety regulations, recycling regulations, electrical safety rules etc.)! • Keep the minimum distances to other appliances and units! • Install shock protection, for electrical connections. • The electrical mains terminal is on its lower casing. rectly below windows! Installation instructions 33 • Do not put the aluminium foil on the surface, disconnect power...
... from electrical current. Use only original spare parts. • Only use the appliance (safety regulations, recycling regulations, electrical safety rules etc.)! • Keep the minimum distances to other appliances and units! • Install shock protection, for electrical connections. • The electrical mains terminal is on its lower casing. rectly below windows! Installation instructions 33 • Do not put the aluminium foil on the surface, disconnect power...
Product Manual
Page 34
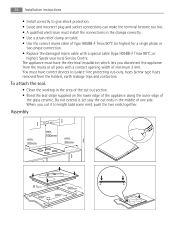
... install the connections in the clamps correctly. • Use a strain relief clamp on the lower edge of the appliance along the outer edge of the glass ceramic. or higher). Assembly min. 50mm min. 500mm min. 50mm R 5mm 600mm = 490+1mm 880+1mm = To attach the seal. • Clean the worktop in the area of the cut -outs, fuses (screw type fuses removed...
... install the connections in the clamps correctly. • Use a strain relief clamp on the lower edge of the appliance along the outer edge of the glass ceramic. or higher). Assembly min. 50mm min. 500mm min. 50mm R 5mm 600mm = 490+1mm 880+1mm = To attach the seal. • Clean the worktop in the area of the cut -outs, fuses (screw type fuses removed...
Product Manual
Page 35
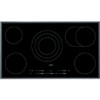
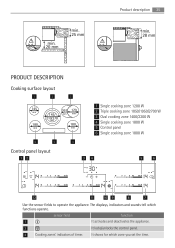
.... 2 It locks/unlocks the control panel. 3 Cooking zones' indicators of timer. The displays, indicators and sounds tell which zone you set the time. min. 20 mm min. 25 mm Product description 35 min. 28 mm PRODUCT DESCRIPTION Cooking surface layout 1 2... 3 145 mm 265 170 145/ mm mm 210/270 mm 180 180 mm mm 1 Single cooking zone 1200 W 2 Triple cooking zone 1050/1950/2700 W 3 Oval cooking zone 1400/2200 W 4 Single cooking zone 1800 W 5 Control panel 6 Single cooking zone 1800 W 6 5 4 Control panel layout 12 34 5 6 12 11 10 9 8 7 Use...
.... 2 It locks/unlocks the control panel. 3 Cooking zones' indicators of timer. The displays, indicators and sounds tell which zone you set the time. min. 20 mm min. 25 mm Product description 35 min. 28 mm PRODUCT DESCRIPTION Cooking surface layout 1 2... 3 145 mm 265 170 145/ mm mm 210/270 mm 180 180 mm mm 1 Single cooking zone 1200 W 2 Triple cooking zone 1050/1950/2700 W 3 Oval cooking zone 1400/2200 W 4 Single cooking zone 1800 W 5 Control panel 6 Single cooking zone 1800 W 6 5 4 Control panel layout 12 34 5 6 12 11 10 9 8 7 Use...
Product Manual
Page 36
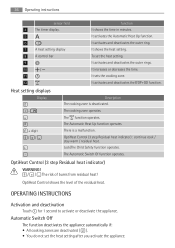
It shows the heat setting. The cooking zone operates. OptiHeat Control (3 step Residual heat indicator) : continue cook / stay warm / residual heat. The function operates. Lock/The Child Safety function operates. OptiHeat Control shows the level of burns from residual heat! Automatic Switch Off The function deactivates the appliance automatically if: • All cooking zones are deactivated ( ). • You do not set the heat setting. Heat setting displays Display - + digit / / Description...
It shows the heat setting. The cooking zone operates. OptiHeat Control (3 step Residual heat indicator) : continue cook / stay warm / residual heat. The function operates. Lock/The Child Safety function operates. OptiHeat Control shows the level of burns from residual heat! Automatic Switch Off The function deactivates the appliance automatically if: • All cooking zones are deactivated ( ). • You do not set the heat setting. Heat setting displays Display - + digit / / Description...
Product Manual
Page 37
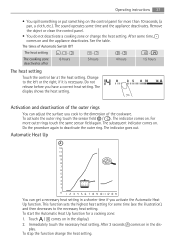
... highest heat setting for a cooking zone: 1. Operating instructions 37 • You spill something or put something on and the appliance deactivates. Do not release before you have a correct heat setting. Do the procedure again to the dimension of Automatic Switch Off The heat setting , - - - - Immediately touch the necessary heat setting. Remove the object or clean the control panel. • You do not deactivate a cooking zone or change the heat setting.
... highest heat setting for a cooking zone: 1. Operating instructions 37 • You spill something or put something on and the appliance deactivates. Do not release before you have a correct heat setting. Do the procedure again to the dimension of Automatic Switch Off The heat setting , - - - - Immediately touch the necessary heat setting. Remove the object or clean the control panel. • You do not deactivate a cooking zone or change the heat setting.
Product Manual
Page 38
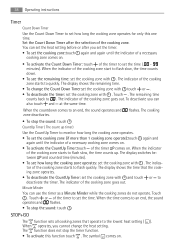
... to quickly. 38 Operating instructions Timer Count Down Timer Use the Count Down Timer to monitor how long the cooking zone operates. • To set the cooking zone (if more than 1 cooking zone operate):touch again and again until the indicator of a necessary cooking zone comes on. • To activate the Count Down Timer: touch of the timer to flash...
... to quickly. 38 Operating instructions Timer Count Down Timer Use the Count Down Timer to monitor how long the cooking zone operates. • To set the cooking zone (if more than 1 cooking zone operate):touch again and again until the indicator of a necessary cooking zone comes on. • To activate the Count Down Timer: touch of the timer to flash...
Product Manual
Page 39
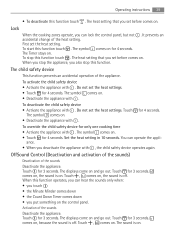
...prevents an accidental change of the appliance. comes on . • Deactivate the appliance with , the child safety device operates again. The child safety device This function prevents an accidental operation of the heat setting. ance. • When you set the heat settings. •...Timer stays on the control panel. for only one cooking time • Activate the appliance with . Operating instructions 39 • To deactivate this function touch . The symbol comes on . The heat setting that you put something on . Lock When the cooking zones operate, you ...
...prevents an accidental change of the appliance. comes on . • Deactivate the appliance with , the child safety device operates again. The child safety device This function prevents an accidental operation of the heat setting. ance. • When you set the heat settings. •...Timer stays on the control panel. for only one cooking time • Activate the appliance with . Operating instructions 39 • To deactivate this function touch . The symbol comes on . The heat setting that you put something on . Lock When the cooking zones operate, you ...
Product Manual
Page 40
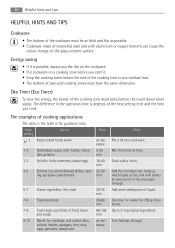
... bottoms can cause the colour change on the glass-ceramic surface. Turn halfway through . The difference in the table is depends of food, stews 60-150 and soups min 9-12 Gentle fry: escalope, veal cordon bleu, as possible. • Cookware made of the cooking zone deactivates before you cook. Heat Use to: Time setting 1 Keep cooked foods warm as necessary 1-3 Hollandaise...
... bottoms can cause the colour change on the glass-ceramic surface. Turn halfway through . The difference in the table is depends of food, stews 60-150 and soups min 9-12 Gentle fry: escalope, veal cordon bleu, as possible. • Cookware made of the cooking zone deactivates before you cook. Heat Use to: Time setting 1 Keep cooked foods warm as necessary 1-3 Hollandaise...
Product Manual
Page 41
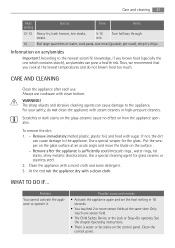
... cook at the lowest temperatures and do not clean the appliance with steam cleaners or high-pressure cleaners. Use a special scraper for glass ceramic or stainless steel. 2. WHAT TO DO IF... Problem You cannot activate the appliance or operate it. For your safety, do not brown food too much. Put the scraper on the glass surface at the same time. Care and cleaning 41 Heat setting Use...
... cook at the lowest temperatures and do not clean the appliance with steam cleaners or high-pressure cleaners. Use a special scraper for glass ceramic or stainless steel. 2. WHAT TO DO IF... Problem You cannot activate the appliance or operate it. For your safety, do not brown food too much. Put the scraper on the glass surface at the same time. Care and cleaning 41 Heat setting Use...
Product Manual
Page 42
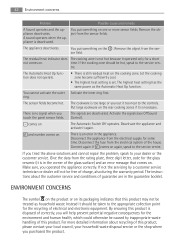
Let the cooking zone become hot. There is set. Control). and number comes on The Automatic Switch Off operates. Connect again. Make sure, you purchased the product. The instructions about recycling of this product may not be free of charge, also during the warranty period. For more sensor fields. 42 Environment concerns Problem Possible cause and remedy A Sound operates and the appliance...
Let the cooking zone become hot. There is set. Control). and number comes on The Automatic Switch Off operates. Connect again. Make sure, you purchased the product. The instructions about recycling of this product may not be free of charge, also during the warranty period. For more sensor fields. 42 Environment concerns Problem Possible cause and remedy A Sound operates and the appliance...
Product Manual
Page 43
The plastic components are friendly to the environment and can be recycled. Warranty 43 Packaging material The packaging materials are identified by marking: >PEPS
The plastic components are friendly to the environment and can be recycled. Warranty 43 Packaging material The packaging materials are identified by marking: >PEPS

Product Manual
Page 44
...properly maintain or service iii) normal wear and tear iv) power surges, electrical storm damage or incorrect power supply v) incomplete or improper installation vi) incorrect, improper or inappropriate operation vii) insect or vermin infestation. - or - The Appliance's serial number or warranty seal has been removed or defaced.... the replacement or repair of the Appliances or the supply of equivalent products or the payment of the cost of replacing the Appliances or having the services re-supplied; Where the Appliance was purchased in writing. - Upon being replaced, parts and ...
...properly maintain or service iii) normal wear and tear iv) power surges, electrical storm damage or incorrect power supply v) incomplete or improper installation vi) incorrect, improper or inappropriate operation vii) insect or vermin infestation. - or - The Appliance's serial number or warranty seal has been removed or defaced.... the replacement or repair of the Appliances or the supply of equivalent products or the payment of the cost of replacing the Appliances or having the services re-supplied; Where the Appliance was purchased in writing. - Upon being replaced, parts and ...
Product Manual
Page 45
... a Service Technician please check carefully the operating instructions, service booklet and the warranty terms and conditions. 45 and in the case of a local call (Australia only) FOR SERVICE OR TO FIND THE ADDRESS OF YOUR NEAREST AUTHORISED SERVICE CENTRE IN NEW ZEALAND Free call 0800 10 66 10 (New Zealand only) SERVICE NEW ZEALAND ELECTROLUX HOME PRODUCTS FOR SPARE PARTS...
... a Service Technician please check carefully the operating instructions, service booklet and the warranty terms and conditions. 45 and in the case of a local call (Australia only) FOR SERVICE OR TO FIND THE ADDRESS OF YOUR NEAREST AUTHORISED SERVICE CENTRE IN NEW ZEALAND Free call 0800 10 66 10 (New Zealand only) SERVICE NEW ZEALAND ELECTROLUX HOME PRODUCTS FOR SPARE PARTS...


