
Product Manual
Page 17
... Thank you need to keep all your AEG appliances looking spotless and working perfectly. ACCESSORIES AND CONSUMABLES In the AEG webshop, you'll find on ordinary appliances. features you would expect, from specialist cookware to cutlery baskets, from it. Visit the webshop at: www.aeg-electrolux.com/shop...this AEG product. Along with innovative technologies that help make life simpler - We have created it to get the very best from bottle holders to the high quality standards you might not find everything you for many years, with a wide range of accessories designed and built to...
... Thank you need to keep all your AEG appliances looking spotless and working perfectly. ACCESSORIES AND CONSUMABLES In the AEG webshop, you'll find on ordinary appliances. features you would expect, from specialist cookware to cutlery baskets, from it. Visit the webshop at: www.aeg-electrolux.com/shop...this AEG product. Along with innovative technologies that help make life simpler - We have created it to get the very best from bottle holders to the high quality standards you might not find everything you for many years, with a wide range of accessories designed and built to...
Product Manual
Page 18
18 Contents CONTENTS 19 Safety information 20 Installation instructions 22 Product description 23 Operating instructions 27 Helpful hints and tips 28 Care and cleaning 29 What to do if... 30 Environment concerns The following symbols are used in this user manual: Important information concerning your personal safety and information on how to change without notice General information and tips Environmental information Subject to avoid damaging the appliance.
18 Contents CONTENTS 19 Safety information 20 Installation instructions 22 Product description 23 Operating instructions 27 Helpful hints and tips 28 Care and cleaning 29 What to do if... 30 Environment concerns The following symbols are used in this user manual: Important information concerning your personal safety and information on how to change without notice General information and tips Environmental information Subject to avoid damaging the appliance.
Product Manual
Page 19
... lack of the appliance, read this manual carefully before the first use. • Set the cooking zones to the near sockets. Safety during operation • Remove all packaging away from the appliance during operation. • The appliance is the risk of the glass ceramic. Do not let the electricity bonds touch the appliance or hot cookware. Always keep very flammable...
... lack of the appliance, read this manual carefully before the first use. • Set the cooking zones to the near sockets. Safety during operation • Remove all packaging away from the appliance during operation. • The appliance is the risk of the glass ceramic. Do not let the electricity bonds touch the appliance or hot cookware. Always keep very flammable...
Product Manual
Page 20
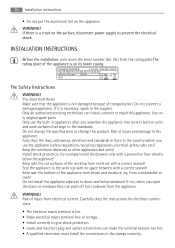
... use the appliance (safety regulations, recycling regulations, electrical safety rules etc.)! HK764070FB 949 595 123 00 58 HDD 70 AO 220-240 V 50-60-Hz 7,5 kW AEG The Safety Instructions WARNING! Keep safe the cut surfaces of voltage. • Install correctly to the supplier. Carefully obey the instructions for example install the drawers only with a correct sealant! Nr.) from moisture with a protective floor directly...
... use the appliance (safety regulations, recycling regulations, electrical safety rules etc.)! HK764070FB 949 595 123 00 58 HDD 70 AO 220-240 V 50-60-Hz 7,5 kW AEG The Safety Instructions WARNING! Keep safe the cut surfaces of voltage. • Install correctly to the supplier. Carefully obey the instructions for example install the drawers only with a correct sealant! Nr.) from moisture with a protective floor directly...
Product Manual
Page 21
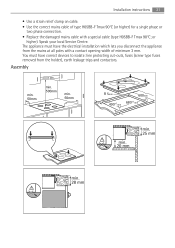
... have correct devices to isolate: line protecting cut-outs, fuses (screw type fuses removed from the mains at all poles with a contact opening width of type H05BB-F Tmax 90°C (or higher) for a single phase or two phase connection. • Replace the damaged mains cable with a special cable (type H05BB-F Tmax 90°C; Installation instructions 21 • Use a strain relief clamp on cable...
... have correct devices to isolate: line protecting cut-outs, fuses (screw type fuses removed from the mains at all poles with a contact opening width of type H05BB-F Tmax 90°C (or higher) for a single phase or two phase connection. • Replace the damaged mains cable with a special cable (type H05BB-F Tmax 90°C; Installation instructions 21 • Use a strain relief clamp on cable...

Product Manual
Page 22
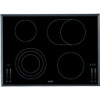
... 120/175/210 180 mm mm 1 Cooking zone 1200 W 2 Oval zone 1400/2200 W 3 Control panel 4 Cooking zone 1800 W 5 Triple cooking zone 800/1600/2300 W 6 Control panel 6 5 4 3 Control panel layout 10 11 12 9 8 1 7 2 3 6 5 4 Use the sensor fields to operate the appliance. The displays, indicators and sounds tell which functions operate. 22 Product description If you use a protection box (the additional accessory), the protective floor...
... 120/175/210 180 mm mm 1 Cooking zone 1200 W 2 Oval zone 1400/2200 W 3 Control panel 4 Cooking zone 1800 W 5 Triple cooking zone 800/1600/2300 W 6 Control panel 6 5 4 3 Control panel layout 10 11 12 9 8 1 7 2 3 6 5 4 Use the sensor fields to operate the appliance. The displays, indicators and sounds tell which functions operate. 22 Product description If you use a protection box (the additional accessory), the protective floor...
Product Manual
Page 23
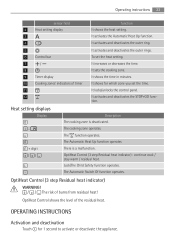
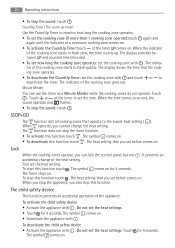
.... The Automatic Switch Of function operates. It shows for 1 second to activate or deactivate the appliance. The cooking zone operates. The function operates. Lock/The Child Safety function operates. It sets the cooking zone. It shows the time in minutes. It locks/unlocks the control panel. Operating instructions 23 sensor field 2 Heat setting display 3 4 5 6 Control bar 7 / 8 9 Timer display 10 Cooking zones' indicators of timer 11...
.... The Automatic Switch Of function operates. It shows for 1 second to activate or deactivate the appliance. The cooking zone operates. The function operates. Lock/The Child Safety function operates. It sets the cooking zone. It shows the time in minutes. It locks/unlocks the control panel. Operating instructions 23 sensor field 2 Heat setting display 3 4 5 6 Control bar 7 / 8 9 Timer display 10 Cooking zones' indicators of timer 11...
Product Manual
Page 24
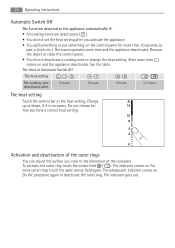
... seconds, (a pan, a cloth, etc.). The cooking zone deactivates after you have a correct heat setting. The sound operates some time, comes on the control panel for more outer rings touch the same sensor field again. The times of the outer rings You can adjust the surface you cook to deactivate the outer ring. The indicator comes on . 24 Operating instructions Automatic Switch Off...
... seconds, (a pan, a cloth, etc.). The cooking zone deactivates after you have a correct heat setting. The sound operates some time, comes on the control panel for more outer rings touch the same sensor field again. The times of the outer rings You can adjust the surface you cook to deactivate the outer ring. The indicator comes on . 24 Operating instructions Automatic Switch Off...
Product Manual
Page 25
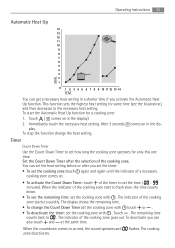
...set the heat setting before or after the selection of the cooking zone starts to 00 . The indicator of the cooking zone. The remaining time counts back to quickly. When the countdown comes to the necessary heat setting. To start to flash...To stop the function change the Count Down Timer:set the cooking zone with . You can also touch and at the same time. Touch . The cooking zone deactivates. This function sets the highest heat setting for a cooking zone: 1. Immediately touch the necessary heat setting. Operating instructions 25 Automatic Heat Up 14 13 12...
...set the heat setting before or after the selection of the cooking zone starts to 00 . The indicator of the cooking zone. The remaining time counts back to quickly. When the countdown comes to the necessary heat setting. To start to flash...To stop the function change the Count Down Timer:set the cooking zone with . You can also touch and at the same time. Touch . The cooking zone deactivates. This function sets the highest heat setting for a cooking zone: 1. Immediately touch the necessary heat setting. Operating instructions 25 Automatic Heat Up 14 13 12...
Product Manual
Page 26
... CountUp Timer:touch of the timer to flash quickly. Lock When the cooking zones operate, you set before comes on . Do not set the heat settings. • Touch for 4 seconds. Touch for 4 seconds. The symbol comes on . • To deactivate this function touch . The symbol comes on for 4 seconds. 26 Operating instructions • To stop the sound: touch STOP...
... CountUp Timer:touch of the timer to flash quickly. Lock When the cooking zones operate, you set before comes on . Do not set the heat settings. • Touch for 4 seconds. Touch for 4 seconds. The symbol comes on . • To deactivate this function touch . The symbol comes on for 4 seconds. 26 Operating instructions • To stop the sound: touch STOP...
Product Manual
Page 27
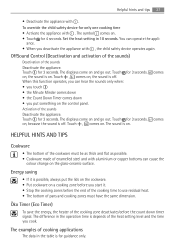
...or copper bottoms can cause the colour change on the glass-ceramic surface. You can hear the sounds only when... one cooking time • Activate the appliance with , the child safety device operates again. The difference in 10 seconds. Set the heat setting in...dimension. Öko Timer (Eco Timer) To save the energy, the heater of the sounds Deactivate the appliance. Activation of the cooking zone deactivates before you cook. Energy saving • If it . • Stop the cooking zones before the end of the cooking time to use residual heat. • The bottom of pans and cooking...
...or copper bottoms can cause the colour change on the glass-ceramic surface. You can hear the sounds only when... one cooking time • Activate the appliance with , the child safety device operates again. The difference in 10 seconds. Set the heat setting in...dimension. Öko Timer (Eco Timer) To save the energy, the heater of the sounds Deactivate the appliance. Activation of the cooking zone deactivates before you cook. Energy saving • If it . • Stop the cooking zones before the end of the cooking time to use residual heat. • The bottom of pans and cooking...
Product Manual
Page 28
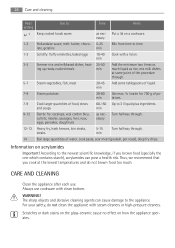
.... 7-9 Cook larger quantities of liquid. CARE AND CLEANING Clean the appliance after each use cookware with steam cleaners or high-pressure cleaners. cutlets, rissoles, sausages, liver, roux, essary eggs, pancakes, doughnuts 12-13 Heavy fry, hash browns, loin steaks, steaks 5-15 Turn halfway through...soups min 9-12 Gentle fry: escalope, veal cordon bleu, as ing up ready-cooked meals min much . Scratches or dark stains on the glass-ceramic cause no effect on . 28 Care and cleaning Heat setting Use to 3 l liquid plus ingredients. Put a lid on acrylamides Important! essary ...
.... 7-9 Cook larger quantities of liquid. CARE AND CLEANING Clean the appliance after each use cookware with steam cleaners or high-pressure cleaners. cutlets, rissoles, sausages, liver, roux, essary eggs, pancakes, doughnuts 12-13 Heavy fry, hash browns, loin steaks, steaks 5-15 Turn halfway through...soups min 9-12 Gentle fry: escalope, veal cordon bleu, as ing up ready-cooked meals min much . Scratches or dark stains on the glass-ceramic cause no effect on . 28 Care and cleaning Heat setting Use to 3 l liquid plus ingredients. Put a lid on acrylamides Important! essary ...
Product Manual
Page 29
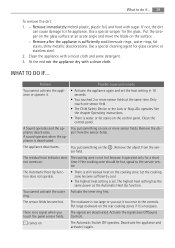
.... tre. Put large cookware on the control panel. The sensor fields become sufficiently cool. • The highest heat setting is no signal when you out it . • Activate the appliance again and set . Use a special scraper for glass ceramic or stainless steel. 2. Put the scraper on The Automatic Switch Off operates. ring. Use a special cleaning agent for the glass . At the end rub the...
.... tre. Put large cookware on the control panel. The sensor fields become sufficiently cool. • The highest heat setting is no signal when you out it . • Activate the appliance again and set . Use a special scraper for glass ceramic or stainless steel. 2. Put the scraper on The Automatic Switch Off operates. ring. Use a special cleaning agent for the glass . At the end rub the...
Product Manual
Page 30
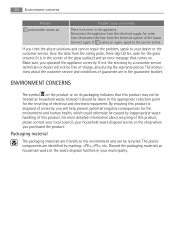
... consequences for the glass ceramic (it should be taken to the environment and can be free of the house. Disconnect the appliance from the electrical system of charge, also during the warranty period. 30 Environment concerns Problem Possible cause and remedy and number comes on . Give the data from the rating plate, three digit letter, code for the environment...
... consequences for the glass ceramic (it should be taken to the environment and can be free of the house. Disconnect the appliance from the electrical system of charge, also during the warranty period. 30 Environment concerns Problem Possible cause and remedy and number comes on . Give the data from the rating plate, three digit letter, code for the environment...

Product Manual
Page 64
www.aeg-electrolux.com/shop 892934493-A-452010
www.aeg-electrolux.com/shop 892934493-A-452010


