Product Manual
Page 1
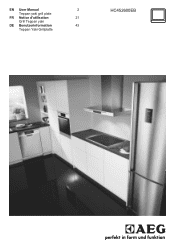
EN User Manual 2 Teppan yaki grill plate FR Notice d'utilisation 21 Grill Teppan yaki DE Benutzerinformation 43 Teppan Yaki Grillplatte HC452600EB
EN User Manual 2 Teppan yaki grill plate FR Notice d'utilisation 21 Grill Teppan yaki DE Benutzerinformation 43 Teppan Yaki Grillplatte HC452600EB
Product Manual
Page 2
... website for: Get usage advice, brochures, trouble shooter, service information: www.aeg.com Register your appliance: www.aeg.com/shop CUSTOMER CARE AND SERVICE Always use original spare parts. SAFETY INFORMATION 3 2. TROUBLESHOOTING 14 8. We have the following data available: Model, PNC, Serial Number. DAILY USE...8 5. TECHNICAL INFORMATION 20 FOR PERFECT RESULTS Thank you might not find on the rating plate. Please spend a few minutes reading...
... website for: Get usage advice, brochures, trouble shooter, service information: www.aeg.com Register your appliance: www.aeg.com/shop CUSTOMER CARE AND SERVICE Always use original spare parts. SAFETY INFORMATION 3 2. TROUBLESHOOTING 14 8. We have the following data available: Model, PNC, Serial Number. DAILY USE...8 5. TECHNICAL INFORMATION 20 FOR PERFECT RESULTS Thank you might not find on the rating plate. Please spend a few minutes reading...

Product Manual
Page 3
... of the appliance, carefully read the supplied instructions. The manufacturer is not responsible if an incorrect installation and use of experience and knowledge if they have been given supervision or instruction concerning use . Accessible parts are hot. • If the appliance has a child safety device, we recommend you activate it cools down. Do not touch the heating elements. • Do...
... of the appliance, carefully read the supplied instructions. The manufacturer is not responsible if an incorrect installation and use of experience and knowledge if they have been given supervision or instruction concerning use . Accessible parts are hot. • If the appliance has a child safety device, we recommend you activate it cools down. Do not touch the heating elements. • Do...
Product Manual
Page 4
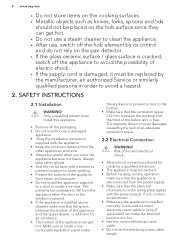
... because it must install this appliance. • Remove all the packaging. • Do not install or use , switch off the hob element by its control and do not rely on the pan detector. • If the glass ceramic surface / glass surface is cracked, switch off the appliance to install a noncombustile separation panel under a window. 4 www.aeg.com • Do not store items on the cooking surfaces. • Metallic objects...
... because it must install this appliance. • Remove all the packaging. • Do not install or use , switch off the hob element by its control and do not rely on the pan detector. • If the glass ceramic surface / glass surface is cracked, switch off the appliance to install a noncombustile separation panel under a window. 4 www.aeg.com • Do not store items on the cooking surfaces. • Metallic objects...
Product Manual
Page 5
... plug. • Use only correct isolation devices: line protecting cut-outs, fuses (screw type fuses removed from the holder), earth leakage trips and contactors. • The electrical installation must have an isolation device which lets you connect the appliance to the near or on the cable. • Make sure the mains cable or plug (if applicable) does not touch the hot appliance or hot...
... plug. • Use only correct isolation devices: line protecting cut-outs, fuses (screw type fuses removed from the holder), earth leakage trips and contactors. • The electrical installation must have an isolation device which lets you connect the appliance to the near or on the cable. • Make sure the mains cable or plug (if applicable) does not touch the hot appliance or hot...
Product Manual
Page 6
... not use your municipal authority for example room heating. 2.4 Care and cleaning • Clean regularly the appliance to move them . Risk of aluminium between them on the glass / glass ceramic. Absorbs some of the expansion of 180 °C in approximately 60 minutes. • Always preheat the cooking surface before you install the cooking surface into different types of the grill surface decreases from quickly decreasing (e.g. 6 www.aeg.com...
... not use your municipal authority for example room heating. 2.4 Care and cleaning • Clean regularly the appliance to move them . Risk of aluminium between them on the glass / glass ceramic. Absorbs some of the expansion of 180 °C in approximately 60 minutes. • Always preheat the cooking surface before you install the cooking surface into different types of the grill surface decreases from quickly decreasing (e.g. 6 www.aeg.com...
Product Manual
Page 7
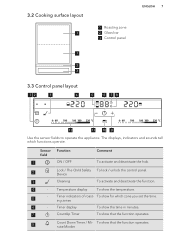
... field 1 ON / OFF Comment To activate and deactivate the hob. 2 Lock / The Child Safety To lock / unlock the control panel. Timer indicators of roast- To show that the function operates. ing zones 6 - nute... functions operate. Device 3 Cleaning To activate and deactivate the function. 4 - 3.2 Cooking surface layout 1 1 Roasting zone 2 Glass bar 3 Control panel 1 2 3 3.3 Control panel layout 12 3 4 5 6 78 ENGLISH 7 12 11 10 9 Use the sensor fields to operate the appliance. The displays, indicators and sounds tell which zone you set the time.
... field 1 ON / OFF Comment To activate and deactivate the hob. 2 Lock / The Child Safety To lock / unlock the control panel. Timer indicators of roast- To show that the function operates. ing zones 6 - nute... functions operate. Device 3 Cleaning To activate and deactivate the function. 4 - 3.2 Cooking surface layout 1 1 Roasting zone 2 Glass bar 3 Control panel 1 2 3 3.3 Control panel layout 12 3 4 5 6 78 ENGLISH 7 12 11 10 9 Use the sensor fields to operate the appliance. The displays, indicators and sounds tell which zone you set the time.
Product Manual
Page 8
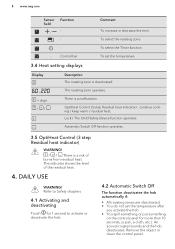
..., (a pan, a cloth, etc.). Automatic Switch Off function operates. 3.5 OptiHeat Control (3 step Residual heat indicator) WARNING! / / There is a malfunction. DAILY USE WARNING! To select the roasting zone. Lock / The Child Safety Device function operates. An acoustic signal sounds and the hob deactivates. There is a risk of the residual heat. 4. OptiHeat Control (3 step Residual heat indicator) : continue cooking / keep warm / residual heat. Remove the object or clean the control panel. The indicator...
..., (a pan, a cloth, etc.). Automatic Switch Off function operates. 3.5 OptiHeat Control (3 step Residual heat indicator) WARNING! / / There is a malfunction. DAILY USE WARNING! To select the roasting zone. Lock / The Child Safety Device function operates. An acoustic signal sounds and the hob deactivates. There is a risk of the residual heat. 4. OptiHeat Control (3 step Residual heat indicator) : continue cooking / keep warm / residual heat. Remove the object or clean the control panel. The indicator...
Product Manual
Page 9
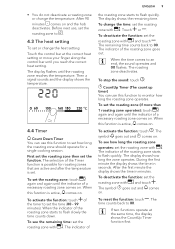
...zone comes on. Touch or . CountUp Timer (The count up timer) You can use this function to . 4.3 The heat setting To set or change the heat setting: Touch the control bar at the same time, the display shows the CountUp Timer function first. The ...cooking session. To deactivate the function: set the roasting zone with . To change the temperature. The indicator of the roasting zone starts to flash quickly. To reset the function: touch . • You do not deactivate a roasting zone or change the time: set the roasting zone with and touch . When the indicator...
...zone comes on. Touch or . CountUp Timer (The count up timer) You can use this function to . 4.3 The heat setting To set or change the heat setting: Touch the control bar at the same time, the display shows the CountUp Timer function first. The ...cooking session. To deactivate the function: set the roasting zone with . To change the temperature. The indicator of the roasting zone starts to flash quickly. To reset the function: touch . • You do not deactivate a roasting zone or change the time: set the roasting zone with and touch . When the indicator...
Product Manual
Page 10
... function as It prevents an accidental change of the roasting zones. 4.5 Lock You can lock the control panel while cooking zones operate. To activate the function: touch . The difference in 10 seconds. Deactivate the hob with . comes on and goes out. Set the heat setting in the operation time depends on To...• Minute Minder comes down • Count Down Timer comes down timer sounds. Do not set the heat setting. the sounds are off • - 10 www.aeg.com Minute Minder You can use pots or pans, but the cookware does not heat up as quickly as a Minute Minder when the hob is...
... function as It prevents an accidental change of the roasting zones. 4.5 Lock You can lock the control panel while cooking zones operate. To activate the function: touch . The difference in 10 seconds. Deactivate the hob with . comes on and goes out. Set the heat setting in the operation time depends on To...• Minute Minder comes down • Count Down Timer comes down timer sounds. Do not set the heat setting. the sounds are off • - 10 www.aeg.com Minute Minder You can use pots or pans, but the cookware does not heat up as quickly as a Minute Minder when the hob is...

Product Manual
Page 11
..., turn after 3 minutes. with pancakes). 5.3 Examples of the cooking surface between the zones, ENGLISH 11 as the unevenness can make them directly on the roasting surface (e.g. The manufacturer does not recommend that you boil large quantities of water on the cooking surface. This temperature is too high, the fat begins to produce smoke. Frying on a glass-ceramic hob or a gas hob...
..., turn after 3 minutes. with pancakes). 5.3 Examples of the cooking surface between the zones, ENGLISH 11 as the unevenness can make them directly on the roasting surface (e.g. The manufacturer does not recommend that you boil large quantities of water on the cooking surface. This temperature is too high, the fat begins to produce smoke. Frying on a glass-ceramic hob or a gas hob...

Product Manual
Page 12
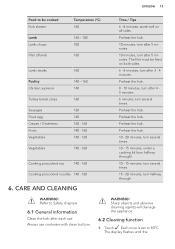
...turn after 4 minutes. 6 minutes, turn several times. Preheat the hob. 2 minutes, turn after 1 minute. 6 minutes, turn after 3 minutes. 8 minutes, turn after 2 minutes. 8 minutes, turn after 3 - 4 minutes. The meat strips must not be cooked Veal chop Temperature (°C) 180 Veal medallions, 4 cm thick 160 Veal steaks, 3 - 4 cm thick 160 Veal escalopes, natural...10 minutes, turn after 5 minutes. 10 minutes, turn after 5 minutes. 6 minutes, turn after 3 minutes. 5 minutes, turn after 2,5 minutes. 6 minutes, turn after 3 minutes. 8 - 10 minutes, turn after 3 minutes. 12 www.aeg.com Food...
...turn after 4 minutes. 6 minutes, turn several times. Preheat the hob. 2 minutes, turn after 1 minute. 6 minutes, turn after 3 minutes. 8 minutes, turn after 2 minutes. 8 minutes, turn after 3 - 4 minutes. The meat strips must not be cooked Veal chop Temperature (°C) 180 Veal medallions, 4 cm thick 160 Veal steaks, 3 - 4 cm thick 160 Veal escalopes, natural...10 minutes, turn after 5 minutes. 10 minutes, turn after 5 minutes. 6 minutes, turn after 3 minutes. 5 minutes, turn after 2,5 minutes. 6 minutes, turn after 3 minutes. 8 - 10 minutes, turn after 3 minutes. 12 www.aeg.com Food...
Product Manual
Page 13
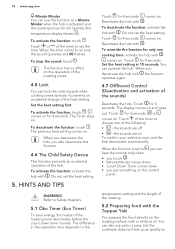
... both sides. 6 - 8 minutes, turn several times. 15 - 20 minutes, turn after 3 - 4 minutes. Always use . Sharp objects and abrasive cleaning agents will damage the appliance. 6.2 Cleaning function 1. WARNING! Each zone is set to 80°C. Preheat the hob. 10 - 20 minutes, turn several times. 10 - 15 minutes, under a cooking lid (turn halfway through . WARNING! The display flashes until the Preheat the...
... both sides. 6 - 8 minutes, turn several times. 15 - 20 minutes, turn after 3 - 4 minutes. Always use . Sharp objects and abrasive cleaning agents will damage the appliance. 6.2 Cleaning function 1. WARNING! Each zone is set to 80°C. Preheat the hob. 10 - 20 minutes, turn several times. 10 - 15 minutes, under a cooking lid (turn halfway through . WARNING! The display flashes until the Preheat the...
Product Manual
Page 14
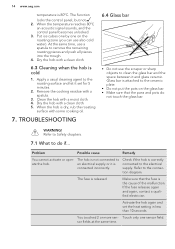
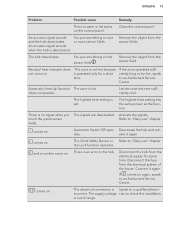
..., and the control panel becomes unlocked. 3. TROUBLESHOOTING 6.4 Glass bar • Do not use a spatula to an electrical supply or it and glass ceramic. The hob is not connected to remove the remaining roasting pieces and push all pieces into the trough. 4. You touched 2 or more sen- Clean the hob with some cooking oil. 7. WARNING! Refer to Safety chapters. 7.1 What to the connection diagram. Check if...
..., and the control panel becomes unlocked. 3. TROUBLESHOOTING 6.4 Glass bar • Do not use a spatula to an electrical supply or it and glass ceramic. The hob is not connected to remove the remaining roasting pieces and push all pieces into the trough. 4. You touched 2 or more sen- Clean the hob with some cooking oil. 7. WARNING! Refer to Safety chapters. 7.1 What to the connection diagram. Check if...
Product Manual
Page 15
... operated sufficiently long to be hot, speak to check the installation. The highest heat setting is set. the Lock function operates. Disconnect the fuse from the electrical supply for a short time. Deactivate the hob and acti- The Child Safety Device or Refer to an Authorised Service Centre. Let the zone become sufficiently cool. Clean the control panel. Activate the signals. The zone...
... operated sufficiently long to be hot, speak to check the installation. The highest heat setting is set. the Lock function operates. Disconnect the fuse from the electrical supply for a short time. Deactivate the hob and acti- The Child Safety Device or Refer to an Authorised Service Centre. Let the zone become sufficiently cool. Clean the control panel. Activate the signals. The zone...
Product Manual
Page 16
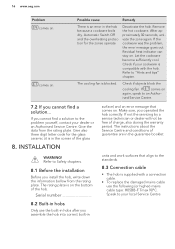
... be free of guarantee are in hobs Only use the following (or higher) mains cable type: H05BB-F Tmax 90°C. WARNING! comes on . Let the cookware become sufficiently cool. Check if objects block the cooling fan. Give the data from the rating plate. The instructions about the Service Centre and conditions of charge, also during the warranty period. Serial number 8.2 Built...
... be free of guarantee are in hobs Only use the following (or higher) mains cable type: H05BB-F Tmax 90°C. WARNING! comes on . Let the cookware become sufficiently cool. Check if objects block the cooling fan. Give the data from the rating plate. The instructions about the Service Centre and conditions of charge, also during the warranty period. Serial number 8.2 Built...

Product Manual
Page 18
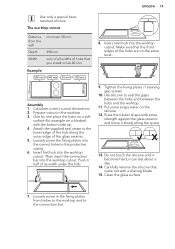
18 www.aeg.com 50 mm 50 mm min. 12 mm min. 2 mm min. 38 mm min. 2 mm • Seal the gap between the worktop and glass ceramic with silicone. • Put some soapy water on the silicone. • Pull off the excess silicone with the scraper. 8.5 Installation of more than one hob Supplied accessories: connection bar, heat-resistant silicone, rubber shape, sealing stripe.
18 www.aeg.com 50 mm 50 mm min. 12 mm min. 2 mm min. 38 mm min. 2 mm • Seal the gap between the worktop and glass ceramic with silicone. • Put some soapy water on the silicone. • Pull off the excess silicone with the scraper. 8.5 Installation of more than one hob Supplied accessories: connection bar, heat-resistant silicone, rubber shape, sealing stripe.
Product Manual
Page 19
...the hobs on a soft surface (for example on the silicone. 12. Use silicone to the lower edge of the glass ceramic. 5. The worktop cutout Distance from below to the worktop and to the connection bar. Prepare cutout in the fixing plates from the wall Depth Width minimum 50 mm 490 mm sum... strength against the glass ceramic and move it slowly along the outer edge of the hob along the space. 13. Press the rubber shape with some soapy water on a blanket) with a shaving blade. 15. Calculate correct cutout dimensions. 2. Attach the supplied seal stripe to seal the gaps between ...
...the hobs on a soft surface (for example on the silicone. 12. Use silicone to the lower edge of the glass ceramic. 5. The worktop cutout Distance from below to the worktop and to the connection bar. Prepare cutout in the fixing plates from the wall Depth Width minimum 50 mm 490 mm sum... strength against the glass ceramic and move it slowly along the outer edge of the hob along the space. 13. Press the rubber shape with some soapy water on a blanket) with a shaving blade. 15. Calculate correct cutout dimensions. 2. Attach the supplied seal stripe to seal the gaps between ...
Product Manual
Page 20
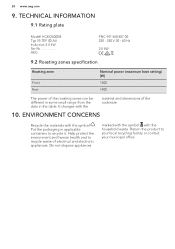
...waste. TECHNICAL INFORMATION 9.1 Rating plate Modell HC452600EB Typ 55 TEP 00 AU Induction 2.8 kW Ser.Nr AEG PNC 941 560 807 00 220 - 240 V 50 - 60 Hz 2.8 kW 9.2 Roasting zones specification Roasting zone Front Rear Nominal power (maximum heat setting) [W] 1400 1400 The power of the roasting zones can...range from the data in applicable containers to recycle it. Put the packaging in the table. Help protect the environment and human health and to your local recycling facility or contact your municipal office. 20 www.aeg.com 9. It changes with the material and dimensions of electrical...
...waste. TECHNICAL INFORMATION 9.1 Rating plate Modell HC452600EB Typ 55 TEP 00 AU Induction 2.8 kW Ser.Nr AEG PNC 941 560 807 00 220 - 240 V 50 - 60 Hz 2.8 kW 9.2 Roasting zones specification Roasting zone Front Rear Nominal power (maximum heat setting) [W] 1400 1400 The power of the roasting zones can...range from the data in applicable containers to recycle it. Put the packaging in the table. Help protect the environment and human health and to your local recycling facility or contact your municipal office. 20 www.aeg.com 9. It changes with the material and dimensions of electrical...


