Product Manual
Page 2
TROUBLESHOOTING 14 9. TECHNICAL INFORMATION 19 11. SAFETY INSTRUCTIONS 4 4. INSTALLATION...16 10. We have created it . CONDITIONS OF USE...4 3. HINTS AND TIPS...11 7. Warning / Caution-Safety information General information and tips Environmental ...Model, PNC, Serial Number. PRODUCT DESCRIPTION 6 5. CARE AND CLEANING 13 8. ENERGY EFFICIENCY 20 12. Visit our website for: Get usage advice, brochures, trouble shooter, service information: www.aeg.com Register your product for choosing this AEG product. DAILY USE...8 6. Please spend a few minutes reading to change...
TROUBLESHOOTING 14 9. TECHNICAL INFORMATION 19 11. SAFETY INSTRUCTIONS 4 4. INSTALLATION...16 10. We have created it . CONDITIONS OF USE...4 3. HINTS AND TIPS...11 7. Warning / Caution-Safety information General information and tips Environmental ...Model, PNC, Serial Number. PRODUCT DESCRIPTION 6 5. CARE AND CLEANING 13 8. ENERGY EFFICIENCY 20 12. Visit our website for: Get usage advice, brochures, trouble shooter, service information: www.aeg.com Register your product for choosing this AEG product. DAILY USE...8 6. Please spend a few minutes reading to change...

Product Manual
Page 3
.... 1.1 Children and vulnerable people safety • This appliance can be used by children without supervision. • Children of the appliance, carefully read the supplied instructions. SAFETY INFORMATION Before the installation and use of the appliance in fire. • Never try to extinguish a ...General Safety • The appliance and its accessible parts become hot during use causes injuries and damages. with the appliance. • Keep all packaging away from children. • Keep children and pets away from the appliance when it operates or when it . • Cleaning and user...
.... 1.1 Children and vulnerable people safety • This appliance can be used by children without supervision. • Children of the appliance, carefully read the supplied instructions. SAFETY INFORMATION Before the installation and use of the appliance in fire. • Never try to extinguish a ...General Safety • The appliance and its accessible parts become hot during use causes injuries and damages. with the appliance. • Keep all packaging away from children. • Keep children and pets away from the appliance when it operates or when it . • Cleaning and user...
Product Manual
Page 4
..., is intended to install a noncombustile separation panel under a window. 4 www.aeg.com • Do not store items on the cooking surfaces. • Metallic objects such as : • Farm houses 3. CONDITIONS OF USE This appliance is free. Make sure to be careful when you move the appliance because it must be replaced by the manufacturer, an authorized Service or similarly qualified...
..., is intended to install a noncombustile separation panel under a window. 4 www.aeg.com • Do not store items on the cooking surfaces. • Metallic objects such as : • Farm houses 3. CONDITIONS OF USE This appliance is free. Make sure to be careful when you move the appliance because it must be replaced by the manufacturer, an authorized Service or similarly qualified...
Product Manual
Page 5
... pull the mains cable to the mains cable. Contact our Authorised Service Centre or an electrician to change the specification of live and insulated parts must have a contact opening width of the installation. Always pull the mains plug. • Use only correct isolation devices: line protecting cut-outs, fuses (screw type fuses removed from the mains at all the packaging, labelling and protective...
... pull the mains cable to the mains cable. Contact our Authorised Service Centre or an electrician to change the specification of live and insulated parts must have a contact opening width of the installation. Always pull the mains plug. • Use only correct isolation devices: line protecting cut-outs, fuses (screw type fuses removed from the mains at all the packaging, labelling and protective...
Product Manual
Page 6
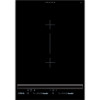
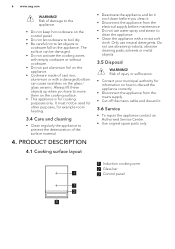
... Service Centre. • Use original spare parts only. 1 Induction cooking zone 2 Glass bar 1 3 Control panel 1 2 3 Risk of cast iron, aluminium or with a moist soft cloth. PRODUCT DESCRIPTION 4.1 Cooking surface layout • Deactivate the appliance and let it cool down before maintenance. • Do not use water spray and steam to move them on the glass / glass ceramic. 6 www.aeg.com WARNING! Only use abrasive products, abrasive cleaning...
... Service Centre. • Use original spare parts only. 1 Induction cooking zone 2 Glass bar 1 3 Control panel 1 2 3 Risk of cast iron, aluminium or with a moist soft cloth. PRODUCT DESCRIPTION 4.1 Cooking surface layout • Deactivate the appliance and let it cool down before maintenance. • Do not use water spray and steam to move them on the glass / glass ceramic. 6 www.aeg.com WARNING! Only use abrasive products, abrasive cleaning...

Product Manual
Page 7
... cooking To show the heat setting. CountUp Timer To show that the function operates. 10 - To set the time. zones Timer display To show that the function operates. 9 Count Down Timer / Minute Minder To show the time in minutes. To select the cooking zone. 12 /- Power function Control bar To activate and deactivate the function. To lock / unlock the control panel...
... cooking To show the heat setting. CountUp Timer To show that the function operates. 10 - To set the time. zones Timer display To show that the function operates. 9 Count Down Timer / Minute Minder To show the time in minutes. To select the cooking zone. 12 /- Power function Control bar To activate and deactivate the function. To lock / unlock the control panel...

Product Manual
Page 8
... are deactivated, • you use incorrect cookware. Remove the object or clean the control panel. • the hob gets too hot (e.g. when a saucepan boils dry). After OptiHeat Control (3 step Residual heat indicator): continue cooking / keep warm / residual heat. Let the cooking zone cool down before you use the hob again. • you do not deactivate a cooking zone or change the heat setting. The indicator shows the level of the...
... are deactivated, • you use incorrect cookware. Remove the object or clean the control panel. • the hob gets too hot (e.g. when a saucepan boils dry). After OptiHeat Control (3 step Residual heat indicator): continue cooking / keep warm / residual heat. Let the cooking zone cool down before you use the hob again. • you do not deactivate a cooking zone or change the heat setting. The indicator shows the level of the...

Product Manual
Page 9
... 5 hours 4 hours 1.5 hour 5.3 The heat setting To set or change the heat setting. 5.8 Timer Count Down Timer You can be cold. Induction cooking zones adapt to the induction cooking zones. To set or change the heat setting. 5.7 Power function This function makes more power available to the dimension of the bottom of time. Also when you reach the correct heat setting. 0 3 5 8 10 14 P 5.4 Using the cooking zones Put the cookware on...
... 5 hours 4 hours 1.5 hour 5.3 The heat setting To set or change the heat setting. 5.8 Timer Count Down Timer You can be cold. Induction cooking zones adapt to the induction cooking zones. To set or change the heat setting. 5.7 Power function This function makes more power available to the dimension of the bottom of time. Also when you reach the correct heat setting. 0 3 5 8 10 14 P 5.4 Using the cooking zones Put the cookware on...

Product Manual
Page 10
... heat setting comes on. 5.10 Lock You can use this function is activated and the cooking zones do not operate (the heat setting display shows ). It prevents an accidental change of the cooking zone starts to monitor how long the cooking zone operates. 10 www.aeg.com that operate to an end, the sound operates and 00 flashes. When this function to flash quickly...
... heat setting comes on. 5.10 Lock You can use this function is activated and the cooking zones do not operate (the heat setting display shows ). It prevents an accidental change of the cooking zone starts to monitor how long the cooking zone operates. 10 www.aeg.com that operate to an end, the sound operates and 00 flashes. When this function to flash quickly...
Product Manual
Page 11
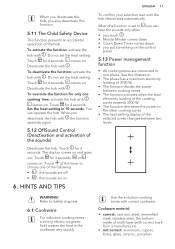
... for 4 seconds. Do not set the heat setting. comes on . comes on . Touch of the timer to Safety chapters. 6.1 Cookware For induction cooking zones a strong electro-magnetic field creates the heat in 10 seconds. Use the induction cooking zones with . To activate the function: activate the hob with correct mark from a manufacturer). • not correct: aluminium, copper, brass, glass, ceramic, porcelain.
... for 4 seconds. Do not set the heat setting. comes on . comes on . Touch of the timer to Safety chapters. 6.1 Cookware For induction cooking zones a strong electro-magnetic field creates the heat in 10 seconds. Use the induction cooking zones with . To activate the function: activate the hob with correct mark from a manufacturer). • not correct: aluminium, copper, brass, glass, ceramic, porcelain.

Product Manual
Page 12
... minimum twice as much liquid as possible. Add some tablespoons of the cookware. 12 www.aeg.com Cookware is correct for guidance only. When you use high power level. • clicking: electric switching occurs. • hissing, buzzing: the fan ...dimension of the bottom of the cooking zone deactivates before the count down timer sounds. The data in the operation time depends on to the bottom of liquid. Heat setting - 1 1 - 3 1 - 3 3 - 5 5 - 7 Use to time. 10 - 40 Cook with the medium heat setting uses less than the minimum receives only a part of power is for an induction...
... minimum twice as much liquid as possible. Add some tablespoons of the cookware. 12 www.aeg.com Cookware is correct for guidance only. When you use high power level. • clicking: electric switching occurs. • hissing, buzzing: the fan ...dimension of the bottom of the cooking zone deactivates before the count down timer sounds. The data in the operation time depends on to the bottom of liquid. Heat setting - 1 1 - 3 1 - 3 3 - 5 5 - 7 Use to time. 10 - 40 Cook with the medium heat setting uses less than the minimum receives only a part of power is for an induction...
Product Manual
Page 13
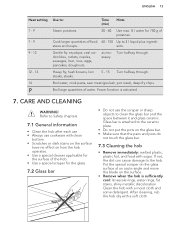
... chapters. 7.1 General information • Clean the hob after each use. • Always use the scraper or sharp objects to clean the glass bar and the space between it and glass ceramic. Clean the hob with clean bottom. • Scratches or dark stains on the surface have no effect on the surface. • Remove when the hob is activated. 7. as necessary Turn halfway through . Power function...
... chapters. 7.1 General information • Clean the hob after each use. • Always use the scraper or sharp objects to clean the glass bar and the space between it and glass ceramic. Clean the hob with clean bottom. • Scratches or dark stains on the surface have no effect on the surface. • Remove when the hob is activated. 7. as necessary Turn halfway through . Power function...
Product Manual
Page 14
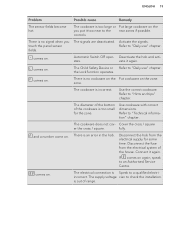
TROUBLESHOOTING WARNING! Problem Possible cause Remedy You cannot activate or operate the hob. Refer to an Authorised Service Centre. Clean the control panel. An acoustic signal sounds when the hob is hot. Remove the object from the sensor fields. If the zone operated sufficiently long to be hot, speak to the connection diagram. Automatic Heat Up function The zone is deactivated. operates. Check...
TROUBLESHOOTING WARNING! Problem Possible cause Remedy You cannot activate or operate the hob. Refer to an Authorised Service Centre. Clean the control panel. An acoustic signal sounds when the hob is hot. Remove the object from the sensor fields. If the zone operated sufficiently long to be hot, speak to the connection diagram. Automatic Heat Up function The zone is deactivated. operates. Check...
Product Manual
Page 15
... acti- Use cookware with correct dimensions. There is Speak to the rear zones if possible. comes on the you touch the panel sensor fields. Cover the cross / square er the cross / square. ENGLISH 15 Problem Possible cause Remedy The sensor fields become hot. controls. The supply voltage cian to "Hints and tips" chapter. Refer to check the installation.
... acti- Use cookware with correct dimensions. There is Speak to the rear zones if possible. comes on the you touch the panel sensor fields. Cover the cross / square er the cross / square. ENGLISH 15 Problem Possible cause Remedy The sensor fields become hot. controls. The supply voltage cian to "Hints and tips" chapter. Refer to check the installation.
Product Manual
Page 16
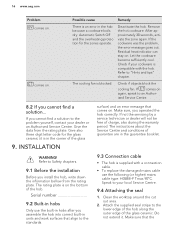
..., activate the zone again. INSTALLATION surface) and an error message that comes on . WARNING! Refer to the problem yourself, contact your dealer or an Authorised Service Centre. Serial number 9.2 Built-in hobs Only use the following (or higher) mains cable type: H05BB-F Tmax 90°C. Deactivate the hob. 16 www.aeg.com Problem comes on . The cooling fan is in the guarantee booklet...
..., activate the zone again. INSTALLATION surface) and an error message that comes on . WARNING! Refer to the problem yourself, contact your dealer or an Authorised Service Centre. Serial number 9.2 Built-in hobs Only use the following (or higher) mains cable type: H05BB-F Tmax 90°C. Deactivate the hob. 16 www.aeg.com Problem comes on . The cooling fan is in the guarantee booklet...

Product Manual
Page 18
... from the wall minimum 50 mm Depth Width 490 mm sum of all widths of more than one place the hobs on a soft surface (for example on a blanket) with the bottom side up. 4. One by one hob Supplied accessories: connection bar, heat-resistant silicone, rubber shape, sealing stripe. Use only a special heatresistant silicone. Calculate correct cutout dimensions. 2. Loosely screw...
... from the wall minimum 50 mm Depth Width 490 mm sum of all widths of more than one place the hobs on a soft surface (for example on a blanket) with the bottom side up. 4. One by one hob Supplied accessories: connection bar, heat-resistant silicone, rubber shape, sealing stripe. Use only a special heatresistant silicone. Calculate correct cutout dimensions. 2. Loosely screw...
Product Manual
Page 19
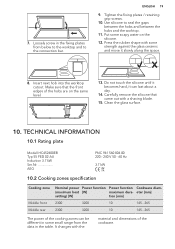
... the same level. 13. Use silicone to the connection bar. Insert next hob into the worktop cutout. TECHNICAL INFORMATION 10.1 Rating plate Modell HC452400EB Typ 55 FED 02 AU Induction 3.7 kW Ser.Nr AEG PNC 941 560 804 00 220 - 240 V 50 - 60 Hz 3.7 kW 10.2 Cooking zones specification Cooking zone Middle front Middle rear Nominal power Power function Power function Cookware diam- (maximum...
... the same level. 13. Use silicone to the connection bar. Insert next hob into the worktop cutout. TECHNICAL INFORMATION 10.1 Rating plate Modell HC452400EB Typ 55 FED 02 AU Induction 3.7 kW Ser.Nr AEG PNC 941 560 804 00 220 - 240 V 50 - 60 Hz 3.7 kW 10.2 Cooking zones specification Cooking zone Middle front Middle rear Nominal power Power function Power function Cookware diam- (maximum...
Product Manual
Page 20
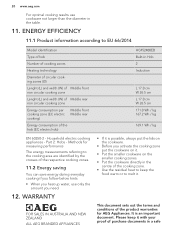
... conditions of the product warranties for measuring performance The energy measurements referring to EU 66/2014 Model identification Type of hob Number of cooking zones Heating technology Diameter of circular cooking zones (Ø) Lenght (L) and width (W) of Middle front non circular cooking zone Lenght (L) and width (W) of Middle rear non circular cooking zone Energy consumption per cooking zone (EC electric cooking) Middle front Middle...
... conditions of the product warranties for measuring performance The energy measurements referring to EU 66/2014 Model identification Type of hob Number of cooking zones Heating technology Diameter of circular cooking zones (Ø) Lenght (L) and width (W) of Middle front non circular cooking zone Lenght (L) and width (W) of Middle rear non circular cooking zone Energy consumption per cooking zone (EC electric cooking) Middle front Middle...
Product Manual
Page 21
... use remanufactured parts to repair an Appliance during the Warranty Period; Electrolux is transported by this warranty. 7. accident - e) AEG is required before you can make a claim under this warranty has the same meaning referred to and from Electrolux or its ASC may not make a claim under this warranty. 5. You agree that any parts which are not covered by Electrolux or an AEG...
... use remanufactured parts to repair an Appliance during the Warranty Period; Electrolux is transported by this warranty. 7. accident - e) AEG is required before you can make a claim under this warranty has the same meaning referred to and from Electrolux or its ASC may not make a claim under this warranty. 5. You agree that any parts which are not covered by Electrolux or an AEG...
Product Manual
Page 22
.... c) the Appliance's serial number or warranty seal has been removed or defaced; d) telephone the numbers shown below. 14. insect or vermin infestation - d) the Appliance was purchased in clause 13 above have the Appliance repaired or replaced if the Appliance fails to which it . 12. b) have the proof of this warranty, please follow these steps: a) carefully check the operating instructions, user manual and the terms...
.... c) the Appliance's serial number or warranty seal has been removed or defaced; d) telephone the numbers shown below. 14. insect or vermin infestation - d) the Appliance was purchased in clause 13 above have the Appliance repaired or replaced if the Appliance fails to which it . 12. b) have the proof of this warranty, please follow these steps: a) carefully check the operating instructions, user manual and the terms...


