Product Manual
Page 2
SAFETY INSTRUCTIONS 4 3. PRODUCT DESCRIPTION 7 4. CARE AND CLEANING 9 7. GREAT BRITAIN & IRELAND - Visit our website for: Get usage advice, brochures, trouble shooter, service information: www.aeg.com Register your product for better service: www.aeg.com/productregistration Buy Accessories, Consumables and Original spare parts for choosing this AEG product. INSTALLATION 10 9. GUARANTEE/CUSTOMER SERVICE 15 11. Please spend a few minutes reading to change without notice. Model, PNC, Serial Number. Warning / Caution...
SAFETY INSTRUCTIONS 4 3. PRODUCT DESCRIPTION 7 4. CARE AND CLEANING 9 7. GREAT BRITAIN & IRELAND - Visit our website for: Get usage advice, brochures, trouble shooter, service information: www.aeg.com Register your product for better service: www.aeg.com/productregistration Buy Accessories, Consumables and Original spare parts for choosing this AEG product. INSTALLATION 10 9. GUARANTEE/CUSTOMER SERVICE 15 11. Please spend a few minutes reading to change without notice. Model, PNC, Serial Number. Warning / Caution...

Product Manual
Page 3
Always keep the instructions with fat or oil can be made by children without supervision. 1.2 General Safety • The appliance and its accessible parts become hot during use. SAFETY INFORMATION ENGLISH 3 Before the installation and use causes injuries and damages. 1. Do not touch the heating elements. • Do not operate the appliance by an adult or a person who is not...
Always keep the instructions with fat or oil can be made by children without supervision. 1.2 General Safety • The appliance and its accessible parts become hot during use. SAFETY INFORMATION ENGLISH 3 Before the installation and use causes injuries and damages. 1. Do not touch the heating elements. • Do not operate the appliance by an adult or a person who is not...
Product Manual
Page 4
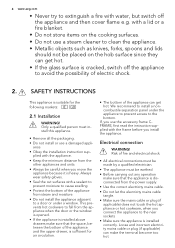
... appliance can get hot. • If the glass surface is cracked, switch off the appliance and then cover flame e.g. Risk of fire and electrical shock. • All electrical connections must be made by a qualified electrician. • The appliance must install this appliance. • Remove all the packaging. • Do not install or use the accessory frame CFRAME, first read the instruction supplied with a sealant...
... appliance can get hot. • If the glass surface is cracked, switch off the appliance and then cover flame e.g. Risk of fire and electrical shock. • All electrical connections must be made by a qualified electrician. • The appliance must install this appliance. • Remove all the packaging. • Do not install or use the accessory frame CFRAME, first read the instruction supplied with a sealant...
Product Manual
Page 5
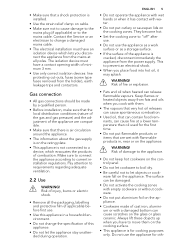
... conditions (nature of the gas and gas pressure) and the adjustment of the appliance are wet with flammable products in a household environment. • Do not change a damaged mains cable. • The electrical installation must have a contact opening width of minimum 3 mm. • Use only correct isolation devices: line protecting cut-outs, fuses (screw type fuses removed from fats and oils when you place food into hot oil...
... conditions (nature of the gas and gas pressure) and the adjustment of the appliance are wet with flammable products in a household environment. • Do not change a damaged mains cable. • The electrical installation must have a contact opening width of minimum 3 mm. • Use only correct isolation devices: line protecting cut-outs, fuses (screw type fuses removed from fats and oils when you place food into hot oil...
Product Manual
Page 6
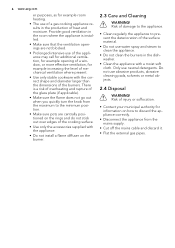
... install a flame diffuser on the burner. 2.3 Care and Cleaning WARNING! There is installed. • Make sure that the ventilation openings are centrally positioned on the rings and do not stick out over edges of the cooking surface. • Use only the accessories supplied with the correct shape and diameter larger than the dimensions of the burners. Do not use neutral detergents. 6 www.aeg...
... install a flame diffuser on the burner. 2.3 Care and Cleaning WARNING! There is installed. • Make sure that the ventilation openings are centrally positioned on the rings and do not stick out over edges of the cooking surface. • Use only the accessories supplied with the correct shape and diameter larger than the dimensions of the burners. Do not use neutral detergents. 6 www.aeg...

Product Manual
Page 7
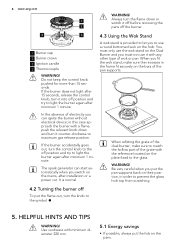
PRODUCT DESCRIPTION 3.1 Built-in correct positions. Adjust the flame after some tries the burner does not light, check if the crown and its cap are in Gas Hob Class 3 General overview ENGLISH 7 1 1 Burner (minimum pot size = 220 mm) 2 Glass bar 3 Control knob 2 3 3.2 Control knob Symbol Description no gas supply / off position ignition position / maximum gas supply Symbol Description minimum gas supply 4. 3. To light the burner: 1. Keep the control knob pushed for approximately 5 seconds; If after it...
PRODUCT DESCRIPTION 3.1 Built-in correct positions. Adjust the flame after some tries the burner does not light, check if the crown and its cap are in Gas Hob Class 3 General overview ENGLISH 7 1 1 Burner (minimum pot size = 220 mm) 2 Glass bar 3 Control knob 2 3 3.2 Control knob Symbol Description no gas supply / off position ignition position / maximum gas supply Symbol Description minimum gas supply 4. 3. To light the burner: 1. Keep the control knob pushed for approximately 5 seconds; If after it...
Product Manual
Page 8
... approach the burner with any other type of the grate with minimum diameter 220 mm. 5.1 Energy savings • If possible, always put the flame out, turn the control knob to the off position and try to light the burner again after minimum 1 minute. You must not use a round bottomed wok on the mains, after installation or a power cut. Be very careful when you put the pan supports back on...
... approach the burner with any other type of the grate with minimum diameter 220 mm. 5.1 Energy savings • If possible, always put the flame out, turn the control knob to the off position and try to light the burner again after minimum 1 minute. You must not use a round bottomed wok on the mains, after installation or a power cut. Be very careful when you put the pan supports back on...
Product Manual
Page 9
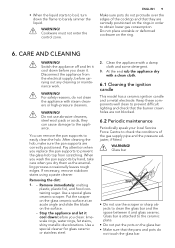
... appliance with steam cleaners or high-pressure cleaners. WARNING! WARNING! When you wash the pan supports by hand, take care when you clean it cool down before you replace the pan supports to barely simmer the liquid. Use a special glass ceramic scraper. Clean the appliance with a clean cloth. 6.1 Cleaning the ignition candle This model has a ceramic ignition candle and a metal electrode. Glass bar is attached to easily clean the hob. Disconnect the...
... appliance with steam cleaners or high-pressure cleaners. WARNING! WARNING! When you wash the pan supports by hand, take care when you clean it cool down before you replace the pan supports to barely simmer the liquid. Use a special glass ceramic scraper. Clean the appliance with a clean cloth. 6.1 Cleaning the ignition candle This model has a ceramic ignition candle and a metal electrode. Glass bar is attached to easily clean the hob. Disconnect the...
Product Manual
Page 10
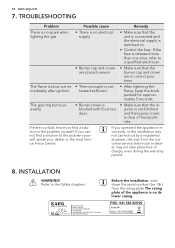
.... INSTALLATION WARNING! cles. TROUBLESHOOTING Problem Possible cause Remedy There is no spark when lighting the gas • There is released more than one time, refer to the problem yourself, speak your dealer or the local Service Force Centre. jector is not blocked dues and the burner crown is not mediately after ignition heated sufficient • After lightning the flame, keep the knob pushed...
.... INSTALLATION WARNING! cles. TROUBLESHOOTING Problem Possible cause Remedy There is no spark when lighting the gas • There is released more than one time, refer to the problem yourself, speak your dealer or the local Service Force Centre. jector is not blocked dues and the burner crown is not mediately after ignition heated sufficient • After lightning the flame, keep the knob pushed...
Product Manual
Page 11
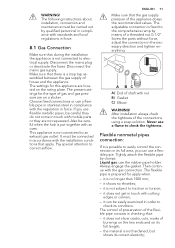
.... Also be careful they are located on its full area, you use a flexible pipe in stainless steel in compliance with the regulation in touch with mobile parts or they do not come in force. 8.1 Gas Connection Make sure that apply. The adjustable connection is no throttles; - Never use the rubber pipe holder. Liquid gas: use a flame to easily control the connection in the necessary direction and tighten everything...
.... Also be careful they are located on its full area, you use a flexible pipe in stainless steel in compliance with the regulation in touch with mobile parts or they do not come in force. 8.1 Gas Connection Make sure that apply. The adjustable connection is no throttles; - Never use the rubber pipe holder. Liquid gas: use a flame to easily control the connection in the necessary direction and tighten everything...
Product Manual
Page 12
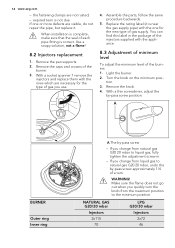
... this label in . - Remove the knob. 4. Turn the knob on the minimum posi- 12 www.aeg.com - Remove the pan supports. 2. Make sure the flame does not go out when you change from the maximum position to natural gas G20 20 mbar, undo the by -pass screw position. If one for the type of the burner. 3. With a socket spanner 7 remove the injectors and replace them with the...
... this label in . - Remove the knob. 4. Turn the knob on the minimum posi- 12 www.aeg.com - Remove the pan supports. 2. Make sure the flame does not go out when you change from the maximum position to natural gas G20 20 mbar, undo the by -pass screw position. If one for the type of the burner. 3. With a socket spanner 7 remove the injectors and replace them with the...
Product Manual
Page 13
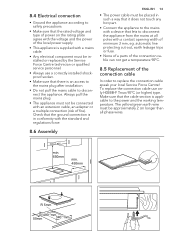
automatic line protecting cut-out, earth leakage trips or fuse. • None of a parts of the connection cable can not get a temperature 90°C. 8.5 Replacement of the connection cable In order to the power and the working temperature. 8.4 Electrical connection • Ground the appliance according to safety precautions. • Make sure that the rated voltage and type of power on the rating plate agree with the...
automatic line protecting cut-out, earth leakage trips or fuse. • None of a parts of the connection cable can not get a temperature 90°C. 8.5 Replacement of the connection cable In order to the power and the working temperature. 8.4 Electrical connection • Ground the appliance according to safety precautions. • Make sure that the rated voltage and type of power on the rating plate agree with the...
Product Manual
Page 14
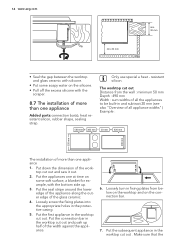
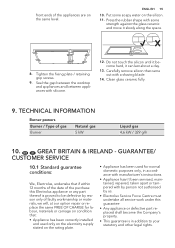
... casing. 5. Put the seal stripe around the lower edge of the appliance along the outer edge of the worktop cut out . Make sure that the Loosely turn in the worktop cut out and push up . 3. resistant silicon. Put down the dimension of the glass ceramic. 4. Put the first appliance in fixing plates from the wall : minimum 50 mm Depth...
... casing. 5. Put the seal stripe around the lower edge of the appliance along the outer edge of the worktop cut out . Make sure that the Loosely turn in the worktop cut out and push up . 3. resistant silicon. Put down the dimension of the glass ceramic. 4. Put the first appliance in fixing plates from the wall : minimum 50 mm Depth...
Product Manual
Page 15
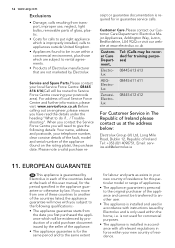
... 10. GUARANTEE/ CUSTOMER SERVICE 10.1 Standard guarantee conditions: We, Electrolux, undertake that came out with silicone. 12. Carefully remove silicon that if within 12 months of the date of the purchase this guarantee • Any appliance or defective part replaced shall become hard, it slowly along the space. 8. Clean glass ceramic fully. 9. front ends of gas Burner Natural gas 5 kW Liquid gas 4,6 kW / 329...
... 10. GUARANTEE/ CUSTOMER SERVICE 10.1 Standard guarantee conditions: We, Electrolux, undertake that came out with silicone. 12. Carefully remove silicon that if within 12 months of the date of the purchase this guarantee • Any appliance or defective part replaced shall become hard, it slowly along the space. 8. Clean glass ceramic fully. 9. front ends of gas Burner Natural gas 5 kW Liquid gas 4,6 kW / 329...
Product Manual
Page 16
... or guarantee documentation is required for commercial purposes. • The appliance is installed in accordance with instructions issued by Electrolux Service and Spare Parts.Please contact your local Service Force Centre: 08445 616 616(Call will need to give the following qualifications:- • The appliance guarantee starts from transport, improper use, neglect, light bulbs, removable parts of glass, plastic. • Costs for...
... or guarantee documentation is required for commercial purposes. • The appliance is installed in accordance with instructions issued by Electrolux Service and Spare Parts.Please contact your local Service Force Centre: 08445 616 616(Call will need to give the following qualifications:- • The appliance guarantee starts from transport, improper use, neglect, light bulbs, removable parts of glass, plastic. • Costs for...
Product Manual
Page 18
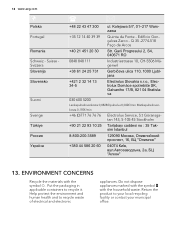
... 030 600 5200 Lankapuhelinverkosta 0,0828€/puhelu+0,032€/min Matkapuhelinverkosta 0,192€/min +46 (0)771 76 76 76 Electrolux Service, S:t Göransgatan 143, S-105 45 Stockholm +90 21 22 93 10 25 Tarlabaşı caddesi no : 35... 8-800-200-3589 129090 16 +380 44 586 20 60 04074 2 13. Return the product to recycle waste of electrical and electronic appliances. Kolejowa 5/7, 01-217 Wars‐ zawa +35 12 14 40 39 39 Quinta da Fonte - ... - Put the packaging in applicable containers to recycle it. 18 www.aeg.com Polska Portugal Romania Schweiz -
... 030 600 5200 Lankapuhelinverkosta 0,0828€/puhelu+0,032€/min Matkapuhelinverkosta 0,192€/min +46 (0)771 76 76 76 Electrolux Service, S:t Göransgatan 143, S-105 45 Stockholm +90 21 22 93 10 25 Tarlabaşı caddesi no : 35... 8-800-200-3589 129090 16 +380 44 586 20 60 04074 2 13. Return the product to recycle waste of electrical and electronic appliances. Kolejowa 5/7, 01-217 Wars‐ zawa +35 12 14 40 39 39 Quinta da Fonte - ... - Put the packaging in applicable containers to recycle it. 18 www.aeg.com Polska Portugal Romania Schweiz -


