
Product Manual
Page 2
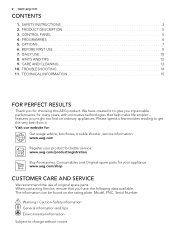
... appliance: www.aeg.com/shop CUSTOMER CARE AND SERVICE We recommend the use of original spare parts. We have the following data available. When contacting Service, ensure that help make life simpler - 2 www.aeg.com CONTENTS 1. HINTS AND TIPS 12 9. TROUBLESHOOTING 14 11. Model, PNC, Serial Number. BEFORE FIRST USE 8 7. SAFETY INSTRUCTIONS 3 2. PRODUCT DESCRIPTION 5 3. CARE AND CLEANING 13 10. features you have created it . OPTIONS 7 6. CONTROL PANEL 5 4. The information...
... appliance: www.aeg.com/shop CUSTOMER CARE AND SERVICE We recommend the use of original spare parts. We have the following data available. When contacting Service, ensure that help make life simpler - 2 www.aeg.com CONTENTS 1. HINTS AND TIPS 12 9. TROUBLESHOOTING 14 11. Model, PNC, Serial Number. BEFORE FIRST USE 8 7. SAFETY INSTRUCTIONS 3 2. PRODUCT DESCRIPTION 5 3. CARE AND CLEANING 13 10. features you have created it . OPTIONS 7 6. CONTROL PANEL 5 4. The information...
Product Manual
Page 3
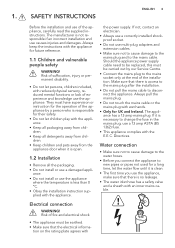
... power supply. Directives. Water connection • Make sure not to cause damage to the water hoses. • Before you connect the appliance to new pipes or pipes not used for a long time, let the water flow until it is responsible for the operation of the installation. Risk of fire and electrical shock. • The appliance must be carried out by a person who is open. 1.2 Installation • Remove all detergents away...
... power supply. Directives. Water connection • Make sure not to cause damage to the water hoses. • Before you connect the appliance to new pipes or pipes not used for a long time, let the water flow until it is responsible for the operation of the installation. Risk of fire and electrical shock. • The appliance must be carried out by a person who is open. 1.2 Installation • Remove all detergents away...

Product Manual
Page 4
... to be detergent on the dishes. • The appliance can be used in the appliance. • Do not remove the dishes from the mains socket. Risk of this appliance. • Put knives and cutlery with sharp points in the cutlery basket with the water in household and similar applications such as: - Contact the Service to replace the water inlet hose. 1.3 Use • This...
... to be detergent on the dishes. • The appliance can be used in the appliance. • Do not remove the dishes from the mains socket. Risk of this appliance. • Put knives and cutlery with sharp points in the cutlery basket with the water in household and similar applications such as: - Contact the Service to replace the water inlet hose. 1.3 Use • This...

Product Manual
Page 6
... Rinses Dry Prewash Wash 50 °C Rinses Dry Wash 60 °C Rinse Options ExtraHygiene Multitab Multitab Multitab ExtraHygiene Multitab Rinsing phase indicator. It comes on when the appliance door is open or is always off while the programme operates. 4. It is not correctly closed. It is always off button 2 Program button 3 Programme indicators 4 Display Indicators Description Multitab indicator. 5 Delay button 6 Start button 7 Indicators 8 Option button ExtraHygiene indicator. 6 www.aeg.com 1 On/off while the programme operates. Washing phase indicator. Delay indicator...
... Rinses Dry Prewash Wash 50 °C Rinses Dry Wash 60 °C Rinse Options ExtraHygiene Multitab Multitab Multitab ExtraHygiene Multitab Rinsing phase indicator. It comes on when the appliance door is open or is always off while the programme operates. 4. It is not correctly closed. It is always off button 2 Program button 3 Programme indicators 4 Display Indicators Description Multitab indicator. 5 Delay button 6 Start button 7 Indicators 8 Option button ExtraHygiene indicator. 6 www.aeg.com 1 On/off while the programme operates. Washing phase indicator. Delay indicator...
Product Manual
Page 7
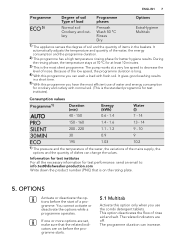
... a programme operates. The programme duration can increase. It gives good washing results in the baskets. send an email to decrease the level of rinse aid and salt. It automatically adjusts the temperature and quantity of a programme. During the rinsing phase, the temperature stays at a very low speed to : info.test@dishwasher-production.com Write down the product number (PNC) that the related indicators are...
... a programme operates. The programme duration can increase. It gives good washing results in the baskets. send an email to decrease the level of rinse aid and salt. It automatically adjusts the temperature and quantity of a programme. During the rinsing phase, the temperature stays at a very low speed to : info.test@dishwasher-production.com Write down the product number (PNC) that the related indicators are...

Product Manual
Page 8
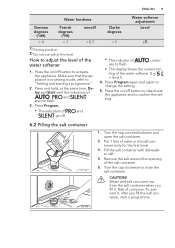
... related indicator does not come on . Make sure that the set level of the programme duration. • If the option is not applicable to the highest level. 2. Do not use the combi detergent tablets, before you start to activate the ExtraHygiene option 1. If not, adjust the water softener. In the display you have better hygiene results. Fill the rinse aid dispenser. 4. Open the water tap...
... related indicator does not come on . Make sure that the set level of the programme duration. • If the option is not applicable to the highest level. 2. Do not use the combi detergent tablets, before you start to activate the ExtraHygiene option 1. If not, adjust the water softener. In the display you have better hygiene results. Fill the rinse aid dispenser. 4. Open the water tap...
Product Manual
Page 9
... again and again to adjust the level of ues to flash. 3. CAUTION! How to change the setting. 5. Press the on /off . • The indicator of the water softener 1. ting of and go off button to deactivate the appliance and to "Setting and starting a programme". 2. Fill the salt container with dishwasher salt. 4. Press and hold, at this level. Turn the cap clockwise to activate the...
... again and again to adjust the level of ues to flash. 3. CAUTION! How to change the setting. 5. Press the on /off . • The indicator of the water softener 1. ting of and go off button to deactivate the appliance and to "Setting and starting a programme". 2. Fill the salt container with dishwasher salt. 4. Press and hold, at this level. Turn the cap clockwise to activate the...
Product Manual
Page 10
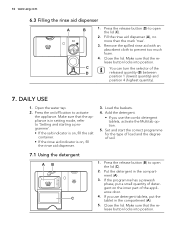
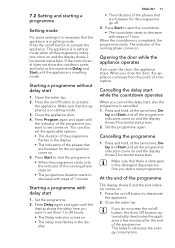
...). 4 4 1 1 7. C 1. DAILY USE 1. Open the water tap. 2. Make sure that the appliance is on, fill the rinse aid dispenser. 3. 10 www.aeg.com 6.3 Filling the rinse aid dispenser A B M AX 32 + - Close the lid. You can turn the selector of soil. 7.1 Using the detergent AB 30 MAX 32 20 + - Put the detergent in setting mode, refer to prevent too much foam. 4. Make sure that the release button locks into position...
...). 4 4 1 1 7. C 1. DAILY USE 1. Open the water tap. 2. Make sure that the appliance is on, fill the rinse aid dispenser. 3. 10 www.aeg.com 6.3 Filling the rinse aid dispenser A B M AX 32 + - Close the lid. You can turn the selector of soil. 7.1 Using the detergent AB 30 MAX 32 20 + - Put the detergent in setting mode, refer to prevent too much foam. 4. Make sure that the release button locks into position...
Product Manual
Page 11
... is in setting mode when all the programme indicators come on . • The delay time flashes in the dis- If you want to 24 hours). • The Delay indicator comes on and the display shows 2 horizontal status bars. The appliance is detergent in the detergent dispenser before you start a new programme. Starting a programme without delay start while the countdown operates When you open the door, the appliance stops. Press Program...
... is in setting mode when all the programme indicators come on . • The delay time flashes in the dis- If you want to 24 hours). • The Delay indicator comes on and the display shows 2 horizontal status bars. The appliance is detergent in the detergent dispenser before you start a new programme. Starting a programme without delay start while the countdown operates When you open the door, the appliance stops. Press Program...
Product Manual
Page 12
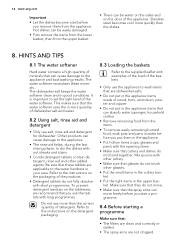
... the instructions on the door of detergent. Refer to the appliance and bad washing results. 12 www.aeg.com Important • Let the dishes become cold before you remove them in the upper basket. Mix spoons with other cutlery. • Make sure that glasses do not bond together. Make sure that they do not fully dissolve with long programmes. Stainless steel becomes...
... the instructions on the door of detergent. Refer to the appliance and bad washing results. 12 www.aeg.com Important • Let the dishes become cold before you remove them in the upper basket. Mix spoons with other cutlery. • Make sure that glasses do not bond together. Make sure that they do not fully dissolve with long programmes. Stainless steel becomes...
Product Manual
Page 13
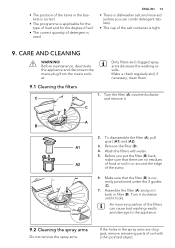
... filters can cause bad washing results and damage to the appliance. 9.2 Cleaning the spray arms Do not remove the spray arms. If the holes in the spray arms are no residues A2 of food or soil in or around the edge of the sump. 6. ENGLISH 13 • There is dishwasher salt and rinse aid (unless you put it . Turn it clockwise until it locks. CARE AND CLEANING...
... filters can cause bad washing results and damage to the appliance. 9.2 Cleaning the spray arms Do not remove the spray arms. If the holes in the spray arms are no residues A2 of food or soil in or around the edge of the sump. 6. ENGLISH 13 • There is dishwasher salt and rinse aid (unless you put it . Turn it clockwise until it locks. CARE AND CLEANING...
Product Manual
Page 14
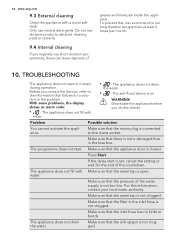
... filter in the fuse box. The appliance does not drain the water. TROUBLESHOOTING The appliance does not start . Make sure that the water tap is not clogged. Do not use neutral detergents. With some problems, the display shows an alarm code: • - The anti-flood device is set, cancel the setting or wait for a solution to the information that the inlet hose has no kinks or bends. Problem...
... filter in the fuse box. The appliance does not drain the water. TROUBLESHOOTING The appliance does not start . Make sure that the water tap is not clogged. Do not use neutral detergents. With some problems, the display shows an alarm code: • - The anti-flood device is set, cancel the setting or wait for a solution to the information that the inlet hose has no kinks or bends. Problem...
Product Manual
Page 15
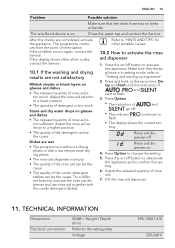
... the rinse aid dispenser 1. TECHNICAL INFORMATION Dimensions Electrical connection Width / Height / Depth (mm) Refer to the rating plate. Press the on . Rinse aid dispenser off . • The indicator flash. Fill the rinse aid dispenser. 11. Refer to 'HINTS AND TIPS' for other alarm codes, contact the Service. 10.1 If the washing and drying results are completed, activate the appliance. Voltage 596 / 850 / 610 220-240 V Make sure that the drain hose...
... the rinse aid dispenser 1. TECHNICAL INFORMATION Dimensions Electrical connection Width / Height / Depth (mm) Refer to the rating plate. Press the on . Rinse aid dispenser off . • The indicator flash. Fill the rinse aid dispenser. 11. Refer to 'HINTS AND TIPS' for other alarm codes, contact the Service. 10.1 If the washing and drying results are completed, activate the appliance. Voltage 596 / 850 / 610 220-240 V Make sure that the drain hose...

Product Manual
Page 16
... energy, (e.g. 16 www.aeg.com Frequency 50 Hz Water supply pressure Min. / max. (bar / MPa) (0.5 / 0.05 ) / (8 / 0.8 ) Water supply 1) Cold water or hot water2) max. 60 °C Capacity Place settings 12 Power consumption Left-on mode 0.10 W Off-mode 0.10 W 1) Connect the water inlet hose to a water tap with the symbol . Do not dispose appliances marked with the symbol with the household waste. solar panels, aeolian energy), use the hot water supply...
... energy, (e.g. 16 www.aeg.com Frequency 50 Hz Water supply pressure Min. / max. (bar / MPa) (0.5 / 0.05 ) / (8 / 0.8 ) Water supply 1) Cold water or hot water2) max. 60 °C Capacity Place settings 12 Power consumption Left-on mode 0.10 W Off-mode 0.10 W 1) Connect the water inlet hose to a water tap with the symbol . Do not dispose appliances marked with the symbol with the household waste. solar panels, aeolian energy), use the hot water supply...


