
Specification Sheet
Page 1
... will get clean dishes when you want them, without switching the dishwasher on straight away. Product Benefits & Features Powerful cleaning of the dirtiest loads The Pro Intensiv program is specially designed to dry items naturally. Thanks to dry items naturally. Circulating air inside the machine to clean extremely dirty loads with AirDry Technology FFB41600ZW The door to 24 hours • Time remaining indicator • Height adjustable upper basket Ready when...
... will get clean dishes when you want them, without switching the dishwasher on straight away. Product Benefits & Features Powerful cleaning of the dirtiest loads The Pro Intensiv program is specially designed to dry items naturally. Thanks to dry items naturally. Circulating air inside the machine to clean extremely dirty loads with AirDry Technology FFB41600ZW The door to 24 hours • Time remaining indicator • Height adjustable upper basket Ready when...
Specification Sheet
Page 2
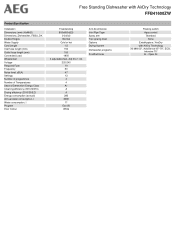
Free Standing Dishwasher with AirDry Technology FFB41600ZW Product Specification Installation Dimensions (mm) (HxWxD) Dimensions_Dishwasher_FSBU_DK Double Hinges Water Supply Cord Length Inlet hose length (mm) Outlet hose length (mm) Connected Load Wheels/feet Voltage Required Fuse Frequency Noise level, dB(A) Settings Number of programmes Number of Temperatures Second Generation Energy Class Cleaning efficiency (2010/30/EC) Drying efficiency (2010/30/EC) Energy consumption (annual) Annual water consumption, l Water consumption, l Program Door Colour Freestanding 850x600x625 0-0x0x0 Normal ...
Free Standing Dishwasher with AirDry Technology FFB41600ZW Product Specification Installation Dimensions (mm) (HxWxD) Dimensions_Dishwasher_FSBU_DK Double Hinges Water Supply Cord Length Inlet hose length (mm) Outlet hose length (mm) Connected Load Wheels/feet Voltage Required Fuse Frequency Noise level, dB(A) Settings Number of programmes Number of Temperatures Second Generation Energy Class Cleaning efficiency (2010/30/EC) Drying efficiency (2010/30/EC) Energy consumption (annual) Annual water consumption, l Water consumption, l Program Door Colour Freestanding 850x600x625 0-0x0x0 Normal ...
User Manual
Page 2
... help make life simpler features you for your product for better service: www.registeraeg.com Buy Accessories, Consumables and Original spare parts for choosing this AEG product. SAFETY INSTRUCTIONS 4 3. CONTROL PANEL...6 5. TROUBLESHOOTING 17 13. TECHNICAL INFORMATION 21 FOR PERFECT RESULTS Thank you might not find on the rating plate. We have the following data available: Model, PNC, Serial Number. SAFETY INFORMATION 2 2. PROGRAMMES...7 6. The...
... help make life simpler features you for your product for better service: www.registeraeg.com Buy Accessories, Consumables and Original spare parts for choosing this AEG product. SAFETY INSTRUCTIONS 4 3. CONTROL PANEL...6 5. TROUBLESHOOTING 17 13. TECHNICAL INFORMATION 21 FOR PERFECT RESULTS Thank you might not find on the rating plate. We have the following data available: Model, PNC, Serial Number. SAFETY INFORMATION 2 2. PROGRAMMES...7 6. The...

User Manual
Page 3
... installation or usage. by clients in hotels, motels, bed & breakfast and other working environments; - Always keep the instructions in a safe and accessible location for any injuries or damages that are the result of 13 place settings. • If the supply cord is intended to avoid a hazard. • Put the cutlery in the cutlery basket with the appliance. • Keep detergents...
... installation or usage. by clients in hotels, motels, bed & breakfast and other working environments; - Always keep the instructions in a safe and accessible location for any injuries or damages that are the result of 13 place settings. • If the supply cord is intended to avoid a hazard. • Put the cutlery in the cutlery basket with the appliance. • Keep detergents...
User Manual
Page 4
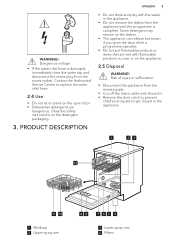
... water sprays and/or steam to clean the appliance. • If the appliance has ventilation openings in the mains plug, use fuse: 13 amp ASTA (BS 1362). 2.3 Water connection • Do not cause damage to the water hoses. • Before connection to new pipes, pipes not used for UK and Ireland. Old hose sets must be covered e.g. SAFETY INSTRUCTIONS 2.1 Installation • Remove all the packaging. • Do not install or use...
... water sprays and/or steam to clean the appliance. • If the appliance has ventilation openings in the mains plug, use fuse: 13 amp ASTA (BS 1362). 2.3 Water connection • Do not cause damage to the water hoses. • Before connection to new pipes, pipes not used for UK and Ireland. Old hose sets must be covered e.g. SAFETY INSTRUCTIONS 2.1 Installation • Remove all the packaging. • Do not install or use...
User Manual
Page 5
... 2 Upper spray arm 9 8 765 4 3 Lower spray arm 4 Filters Contact the Authorised Service Centre to get closed in the appliance. • Do not remove the dishes from the appliance until the programme is damaged, immediately close the water tap and disconnect the mains plug from the mains supply. • Cut off the mains cable and discard it. • Remove the door catch to prevent children and pets to replace the water inlet hose. 2.4 Use...
... 2 Upper spray arm 9 8 765 4 3 Lower spray arm 4 Filters Contact the Authorised Service Centre to get closed in the appliance. • Do not remove the dishes from the appliance until the programme is damaged, immediately close the water tap and disconnect the mains plug from the mains supply. • Cut off the mains cable and discard it. • Remove the door catch to prevent children and pets to replace the water inlet hose. 2.4 Use...

User Manual
Page 6
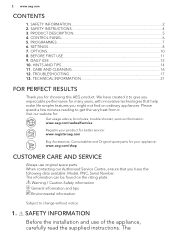
It comes on when the drying phase operates. It comes on when the rinsing phase operates. Drying phase. End indicator. It comes on when the washing phase operates. Rinsing phase. CONTROL PANEL 1 10 Cutlery basket 11 Lower basket 12 Upper basket 2 3 45 8 7 6 1 On/off button 2 Program button 3 Programme indicators 4 Display 5 Delay button 6 Option button 7 Indicators 8 Start button 4.1 Indicators Indicator Description Washing phase. 6 www.aeg.com 5 Rating plate 6 Salt container 7 Air vent 8 Rinse aid dispenser 9 Detergent dispenser 4.
It comes on when the drying phase operates. It comes on when the rinsing phase operates. Drying phase. End indicator. It comes on when the washing phase operates. Rinsing phase. CONTROL PANEL 1 10 Cutlery basket 11 Lower basket 12 Upper basket 2 3 45 8 7 6 1 On/off button 2 Program button 3 Programme indicators 4 Display 5 Delay button 6 Option button 7 Indicators 8 Start button 4.1 Indicators Indicator Description Washing phase. 6 www.aeg.com 5 Rating plate 6 Salt container 7 Air vent 8 Rinse aid dispenser 9 Detergent dispenser 4.
User Manual
Page 8
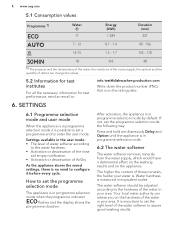
... the programme indicator flashes and the display shows the programme duration. Your local water authority can change the values. 5.2 Information for test institutes For all the necessary information for test performance, send an email to assure good washing results. Settings available in the user mode: • The level of water softener according to the water hardness. • Activation or deactivation of the rinse aid empty...
... the programme indicator flashes and the display shows the programme duration. Your local water authority can change the values. 5.2 Information for test institutes For all the necessary information for test performance, send an email to assure good washing results. Settings available in the user mode: • The level of water softener according to the water hardness. • Activation or deactivation of the rinse aid empty...

User Manual
Page 9
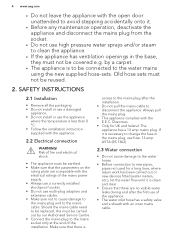
Water softener lev- grees el 47 - 50 84 - 90 8.4 - 9.0 58 - 63 10 43 - 46 76 - 83 7.6 - 8.3 53 - 57 9 37 - 42 65 - 75 6.5 - 7.5 46 - 52 8 29 - 36 51 - 64 5.1 - 6.4 36 - 45 7 23 - 28 40 - 50 4.0 - 5.0 28 - 35 6 19 - 22 33 - 39 3.3 - 3.9 23 - 27 5 1) 15 - 18 26 - 32 2.6 - 3.2 18 - 22 4 11 - 14 19 - 25 1.9 - 2.5 13 - 17 3 4 - 10 7 - 18 0.7 - 1.8 5 - 12 2 French degrees grees (°dH) (°fH) mmol/l Clarke de- ENGLISH 9 Water hardness German de-
Water softener lev- grees el 47 - 50 84 - 90 8.4 - 9.0 58 - 63 10 43 - 46 76 - 83 7.6 - 8.3 53 - 57 9 37 - 42 65 - 75 6.5 - 7.5 46 - 52 8 29 - 36 51 - 64 5.1 - 6.4 36 - 45 7 23 - 28 40 - 50 4.0 - 5.0 28 - 35 6 19 - 22 33 - 39 3.3 - 3.9 23 - 27 5 1) 15 - 18 26 - 32 2.6 - 3.2 18 - 22 4 11 - 14 19 - 25 1.9 - 2.5 13 - 17 3 4 - 10 7 - 18 0.7 - 1.8 5 - 12 2 French degrees grees (°dH) (°fH) mmol/l Clarke de- ENGLISH 9 Water hardness German de-
User Manual
Page 10
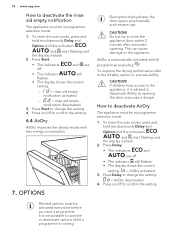
... indicators , and start flashing and the display is running. CAUTION! How to deactivate AirDry The appliance must be in programme selection mode. 1. Press Delay to deactivate AirDry as opening . It is not possible to activate or deactivate options while a programme is blank. 2. 10 www.aeg.com How to deactivate the rinse aid empty notification The appliance must be activated every time...
... indicators , and start flashing and the display is running. CAUTION! How to deactivate AirDry The appliance must be in programme selection mode. 1. Press Delay to deactivate AirDry as opening . It is not possible to activate or deactivate options while a programme is blank. 2. 10 www.aeg.com How to deactivate the rinse aid empty notification The appliance must be activated every time...

User Manual
Page 11
... needs to activate XtraDry Press Option until the indicator comes on or it flashes quickly for the first time). 3. Make sure that the current level of the water softener agrees with dishwasher salt. Open the water tap. 5. The washing phase starts only after this option to fill the salt container 1. The procedure is completed. ENGLISH 11 How to be chosen manually. 8. Only the indicators...
... needs to activate XtraDry Press Option until the indicator comes on or it flashes quickly for the first time). 3. Make sure that the current level of the water softener agrees with dishwasher salt. Open the water tap. 5. The washing phase starts only after this option to fill the salt container 1. The procedure is completed. ENGLISH 11 How to be chosen manually. 8. Only the indicators...
User Manual
Page 12
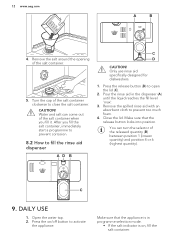
... quantity). Only use rinse aid specifically designed for dishwashers. 1. Make sure that the appliance is in the dispenser (A) until the liquid reaches the fill level 'max'. 3. C 9. DAILY USE 1. Press the release button (D) to prevent too much foam. 4. Remove the spilled rinse aid with an absorbent cloth to open the lid (C). 2. Press the on , fill the salt container. Water and salt can turn the selector of...
... quantity). Only use rinse aid specifically designed for dishwashers. 1. Make sure that the appliance is in the dispenser (A) until the liquid reaches the fill level 'max'. 3. C 9. DAILY USE 1. Press the release button (D) to prevent too much foam. 4. Remove the spilled rinse aid with an absorbent cloth to open the lid (C). 2. Press the on , fill the salt container. Water and salt can turn the selector of...

User Manual
Page 13
... button locks into operation: • 5 minutes after the completion of the running phase comes on , fill the rinse aid dispenser. 3. • If the rinse aid indicator is on . Set and start 1. Press the release button (B) to decrease with delay start the correct programme for dishwashers. 1. Put the detergent, in powder or tablets, in the compartment (D). 4. Press the on . • The programme duration starts to open the lid (C). 2. Press Start to start...
... button locks into operation: • 5 minutes after the completion of the running phase comes on , fill the rinse aid dispenser. 3. • If the rinse aid indicator is on . Set and start 1. Press the release button (B) to decrease with delay start the correct programme for dishwashers. 1. Put the detergent, in powder or tablets, in the compartment (D). 4. Press the on . • The programme duration starts to open the lid (C). 2. Press Start to start...
User Manual
Page 14
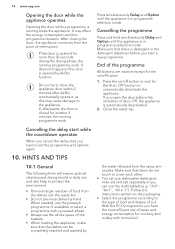
... to the appliance. After closing the door, the appliance continues from the spray arm nozzles. When needed, use dishwasher detergent, rinse aid and salt separately or you open the door before you start you have the most efficient use the whole space of interruption. Make sure that the dishes can be completely reached and washed by AirDry function. Cancelling the delay start while the countdown operates When you have to...
... to the appliance. After closing the door, the appliance continues from the spray arm nozzles. When needed, use dishwasher detergent, rinse aid and salt separately or you open the door before you start you have the most efficient use the whole space of interruption. Make sure that the dishes can be completely reached and washed by AirDry function. Cancelling the delay start while the countdown operates When you have to...

User Manual
Page 15
... salt and rinse aid containers are not clogged. • There is dishwasher salt and rinse aid (unless you remove it from the upper basket. Make sure that the items do not touch other cutlery. • Make sure that : • The filters are clean and correctly installed. • The cap of detergent. Refer to the water hardness in the upper basket. First remove items from the lower basket, then from...
... salt and rinse aid containers are not clogged. • There is dishwasher salt and rinse aid (unless you remove it from the upper basket. Make sure that the items do not touch other cutlery. • Make sure that : • The filters are clean and correctly installed. • The cap of detergent. Refer to the water hardness in the upper basket. First remove items from the lower basket, then from...

User Manual
Page 16
... edge of the sump. 6. Make a check regularly and, if necessary, clean them. 11.1 Cleaning the filters The filter system is correctly positioned under the 2 guides. 7. Reassemble the filters (B) and (C). 8. CARE AND CLEANING WARNING! Put back in the flat filter (A). Remove the filter (C) out of 3 parts. 4. Remove the flat filter (A). C B A 1. Put back the filter (B) in place the flat filter (A). 16 www.aeg.com 11. Turn the filter (B) counterclockwise and remove it locks. 2.
... edge of the sump. 6. Make a check regularly and, if necessary, clean them. 11.1 Cleaning the filters The filter system is correctly positioned under the 2 guides. 7. Reassemble the filters (B) and (C). 8. CARE AND CLEANING WARNING! Put back in the flat filter (A). Remove the filter (C) out of 3 parts. 4. Remove the flat filter (A). C B A 1. Put back the filter (B) in place the flat filter (A). 16 www.aeg.com 11. Turn the filter (B) counterclockwise and remove it locks. 2.
User Manual
Page 17
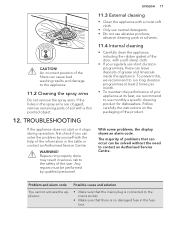
... problem by qualified personnel. TROUBLESHOOTING If the appliance does not start or it stops during operation, first check if you regularly use monthly a specific cleaning product for dishwashers. To prevent this, we recommend to run long duration programmes at its best, we recommend to contact an Authorised Service Centre. Any repairs must be solved without the need to use short duration programmes, these can cause bad washing...
... problem by qualified personnel. TROUBLESHOOTING If the appliance does not start or it stops during operation, first check if you regularly use monthly a specific cleaning product for dishwashers. To prevent this, we recommend to run long duration programmes at its best, we recommend to contact an Authorised Service Centre. Any repairs must be solved without the need to use short duration programmes, these can cause bad washing...
User Manual
Page 18
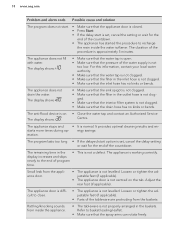
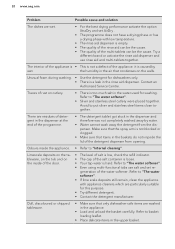
... www.aeg.com Problem and alarm code Possible cause and solution The program does not start. • Make sure that the appliance door is closed. • Press Start. • If the delay start option is on the tub. ged. • Make sure that the spray arms can rotate freely. The remaining time in the outlet hose is working correctly. Refer to the end of the water supply...
... www.aeg.com Problem and alarm code Possible cause and solution The program does not start. • Make sure that the appliance door is closed. • Press Start. • If the delay start option is on the tub. ged. • Make sure that the spray arms can rotate freely. The remaining time in the outlet hose is working correctly. Refer to the end of the water supply...
User Manual
Page 19
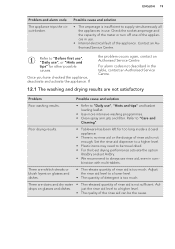
... the problem occurs again, contact an Authorised Service Centre. Refer to "Before first use", "Daily use ", "Hints and tips" and basket loading leaflet. • Use more intensive washing programmes. • Clean spray arm jets and filter. bination with multi-tablets. drops on glasses and dishes. • The release quantity of rinse aid is too much . Refer to "Care and Cleaning". Set the rinse aid dispenser to a higher level. • Plastic items may need...
... the problem occurs again, contact an Authorised Service Centre. Refer to "Before first use", "Daily use ", "Hints and tips" and basket loading leaflet. • Use more intensive washing programmes. • Clean spray arm jets and filter. bination with multi-tablets. drops on glasses and dishes. • The release quantity of rinse aid is too much . Refer to "Care and Cleaning". Set the rinse aid dispenser to a higher level. • Plastic items may need...
User Manual
Page 20
... still remain, clean the appliance with low temperature. • The rinse aid dispenser is a leak in the appliance. • Load and unload the basket carefully. Refer to "The water softener". • Even using multi-functional tabs use rinse aid and multi-tablets together. Contact an Authorised Service Centre. Odours inside of the door. • The level of salt is low, check the refill indicator. • The cap of the...
... still remain, clean the appliance with low temperature. • The rinse aid dispenser is a leak in the appliance. • Load and unload the basket carefully. Refer to "The water softener". • Even using multi-functional tabs use rinse aid and multi-tablets together. Contact an Authorised Service Centre. Odours inside of the door. • The level of salt is low, check the refill indicator. • The cap of the...


