Product Manual
Page 1
EN User Manual Dishwasher FAVORIT 67732W0P FAVORIT 67732M0P
EN User Manual Dishwasher FAVORIT 67732W0P FAVORIT 67732M0P
Product Manual
Page 2
... find on the rating plate. CONTROL PANEL...6 5. PROGRAMMES...7 6. TROUBLESHOOTING 17 13. The information can be found on ordinary appliances. Visit our website for: Get usage advice, brochures, trouble shooter, service information: www.aeg.com Register your appliance: www.aeg.com/shop CUSTOMER CARE AND SERVICE Always use original spare parts. PRODUCT DESCRIPTION 5 4. DAILY USE...13 10. We have the following data available: Model, PNC, Serial Number. Please spend a few...
... find on the rating plate. CONTROL PANEL...6 5. PROGRAMMES...7 6. TROUBLESHOOTING 17 13. The information can be found on ordinary appliances. Visit our website for: Get usage advice, brochures, trouble shooter, service information: www.aeg.com Register your appliance: www.aeg.com/shop CUSTOMER CARE AND SERVICE Always use original spare parts. PRODUCT DESCRIPTION 5 4. DAILY USE...13 10. We have the following data available: Model, PNC, Serial Number. Please spend a few...
Product Manual
Page 3
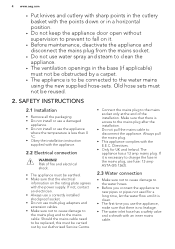
... type environments. • Do not change the specification of this appliance. • The operating water pressure (minimum and maximum) must be between 0.5 (0.05) / 8 (0.8) bar (Mpa) • Obey the maximum number of 15 place settings. • If the supply cord is not responsible if an incorrect installation and use of the appliance, carefully read the supplied instructions. staff kitchen areas in household and similar applications...
... type environments. • Do not change the specification of this appliance. • The operating water pressure (minimum and maximum) must be between 0.5 (0.05) / 8 (0.8) bar (Mpa) • Obey the maximum number of 15 place settings. • If the supply cord is not responsible if an incorrect installation and use of the appliance, carefully read the supplied instructions. staff kitchen areas in household and similar applications...
Product Manual
Page 4
... water inlet hose has a safety valve and a sheath with an inner mains cable. If not, contact an electrician. • Always use a correctly installed shockproof socket. • Do not use water spray and steam to clean the appliance. • The ventilation openings in the mains plug, use fuse: 13 amp ASTA (BS 1362). 2.3 Water connection • Make sure not to cause damage to the water hoses. • Before you use...
... water inlet hose has a safety valve and a sheath with an inner mains cable. If not, contact an electrician. • Always use a correctly installed shockproof socket. • Do not use water spray and steam to clean the appliance. • The ventilation openings in the mains plug, use fuse: 13 amp ASTA (BS 1362). 2.3 Water connection • Make sure not to cause damage to the water hoses. • Before you use...
Product Manual
Page 5
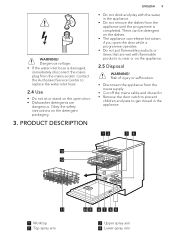
... open door. • Dishwasher detergents are wet with the water in the appliance. • Do not remove the dishes from the mains socket. PRODUCT DESCRIPTION ENGLISH 5 • Do not drink and play with flammable products in the appliance. 12 34 13 12 11 1 Worktop 2 Top spray arm 10 9 8 7 6 5 3 Upper spray arm 4 Lower spray arm Obey the safety instructions on the appliance. 2.5 Disposal WARNING! Dangerous voltage. • If the water inlet hose...
... open door. • Dishwasher detergents are wet with the water in the appliance. • Do not remove the dishes from the mains socket. PRODUCT DESCRIPTION ENGLISH 5 • Do not drink and play with flammable products in the appliance. 12 34 13 12 11 1 Worktop 2 Top spray arm 10 9 8 7 6 5 3 Upper spray arm 4 Lower spray arm Obey the safety instructions on the appliance. 2.5 Disposal WARNING! Dangerous voltage. • If the water inlet hose...

Product Manual
Page 6
... indicators 4 Display 5 Delay button 6 Option button 7 Indicators 8 Start button 4.1 Indicators Indicator Description Washing phase. Rinsing phase. End indicator. Multitab indicator. CONTROL PANEL 1 10 Detergent dispenser 11 Lower basket 12 Upper basket 13 Cutlery drawer 2 3 45 8 7 6 1 On/off while the programme operates. Salt indicator. It comes on when the washing phase operates. It comes on when the drying phase operates. It comes on when the rinsing phase operates. 6 www.aeg.com 5 Filters 6 Rating plate 7 Salt container 8 Air vent 9 Rinse aid dispenser 4. Drying...
... indicators 4 Display 5 Delay button 6 Option button 7 Indicators 8 Start button 4.1 Indicators Indicator Description Washing phase. Rinsing phase. End indicator. Multitab indicator. CONTROL PANEL 1 10 Detergent dispenser 11 Lower basket 12 Upper basket 13 Cutlery drawer 2 3 45 8 7 6 1 On/off while the programme operates. Salt indicator. It comes on when the washing phase operates. It comes on when the drying phase operates. It comes on when the rinsing phase operates. 6 www.aeg.com 5 Filters 6 Rating plate 7 Salt container 8 Air vent 9 Rinse aid dispenser 4. Drying...

Product Manual
Page 7
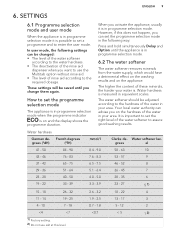
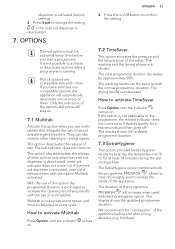
Delay indicator. It is always off while the programme operates. TimeSaver indicator. PROGRAMMES Programme 1) 2) 3) 4) 5) 6) Degree of soil Type of load Programme phases • Normal soil • Prewash • Crockery and cut- • Wash 50 °C lery • Rinses • Dry • All • Prewash • Crockery, cutlery, • Wash from 45 °C pots and pans to 70 °C • Rinses • Dry • Mixed...
Delay indicator. It is always off while the programme operates. TimeSaver indicator. PROGRAMMES Programme 1) 2) 3) 4) 5) 6) Degree of soil Type of load Programme phases • Normal soil • Prewash • Crockery and cut- • Wash 50 °C lery • Rinses • Dry • All • Prewash • Crockery, cutlery, • Wash from 45 °C pots and pans to 70 °C • Rinses • Dry • Mixed...

Product Manual
Page 8
....test@dishwasher-production.com Write down the product number (PNC) that is the most silent programme. It gives good washing results in the baskets . During the rinsing phase, the temperature stays at a very low speed to decrease the level of noise. The pump works at 70 °C for test performance, send an email to form in the upper basket. Very heavy soil in the lower basket and normal...
....test@dishwasher-production.com Write down the product number (PNC) that is the most silent programme. It gives good washing results in the baskets . During the rinsing phase, the temperature stays at a very low speed to decrease the level of noise. The pump works at 70 °C for test performance, send an email to form in the upper basket. Very heavy soil in the lower basket and normal...
Product Manual
Page 9
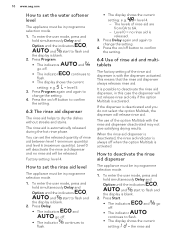
... German de- ENGLISH 9 6. In user mode, the following settings can set the programme selection mode in the following way: Press and hold simultaneously Delay and Option until you change them again. When you can be changed: • The level of the water softener according to the water hardness. • The deactivation of the rinse aid dispenser when you on the hardness of...
... German de- ENGLISH 9 6. In user mode, the following settings can set the programme selection mode in the following way: Press and hold simultaneously Delay and Option until you change them again. When you can be changed: • The level of the water softener according to the water hardness. • The deactivation of the rinse aid dispenser when you on the hardness of...
Product Manual
Page 10
... button to confirm the setting. 6.3 The rinse aid dispenser The rinse aid helps to flash. • The display shows the current setting: e.g. = level 4. - Level 0 will deactivate the rinse aid dispenser and no rinse aid is always off . Press Delay again and again to change the setting. 4. How to set the rinse aid level The appliance must be in programme selection mode. 1. To enter the user mode, press and hold simultaneously Delay and Option until the indicators , and start...
... button to confirm the setting. 6.3 The rinse aid dispenser The rinse aid helps to flash. • The display shows the current setting: e.g. = level 4. - Level 0 will deactivate the rinse aid dispenser and no rinse aid is always off . Press Delay again and again to change the setting. 4. How to set the rinse aid level The appliance must be in programme selection mode. 1. To enter the user mode, press and hold simultaneously Delay and Option until the indicators , and start...
Product Manual
Page 11
... confirm the setting. With the use multitablets that integrate the salt, rinse aid and detergent functions. The washing and the drying phases are the same as with the ExtraHygiene option. Desired options must be activated every time before and after a long absence (e.g. Not all options are compatible with the programme PREWASH , allows to clean thoroughly and to sanitize the inside of them...
... confirm the setting. With the use multitablets that integrate the salt, rinse aid and detergent functions. The washing and the drying phases are the same as with the ExtraHygiene option. Desired options must be activated every time before and after a long absence (e.g. Not all options are compatible with the programme PREWASH , allows to clean thoroughly and to sanitize the inside of them...

Product Manual
Page 12
... rinse aid dispenser. 4. Only use detergent and do not load the baskets. Put 1 litre of the salt container counterclockwise and remove it. 2. It seems that the current level of the water softener agrees with dishwasher salt. The salt is not applicable to the programme, the related indicator does 8. Remove the salt around the opening of the water softener. 2. The display shows the updated programme duration. 4. Turn the cap of water...
... rinse aid dispenser. 4. Only use detergent and do not load the baskets. Put 1 litre of the salt container counterclockwise and remove it. 2. It seems that the current level of the water softener agrees with dishwasher salt. The salt is not applicable to the programme, the related indicator does 8. Remove the salt around the opening of the water softener. 2. The display shows the updated programme duration. 4. Turn the cap of water...
Product Manual
Page 13
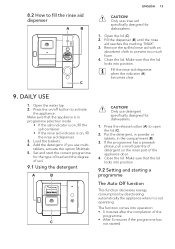
... the detergent. Set and start the correct programme for the type of load and the degree of the programme. • After 5 minutes if the programme has not started. Open the water tap. 2. Load the baskets. 4. tablets, activate the option Multitab. 5. Remove the spilled rinse aid with an absorbent cloth to fill the rinse aid dispenser A B C ENGLISH 13 CAUTION! Make sure that the lid locks into position. Close...
... the detergent. Set and start the correct programme for the type of load and the degree of the programme. • After 5 minutes if the programme has not started. Open the water tap. 2. Load the baskets. 4. tablets, activate the option Multitab. 5. Remove the spilled rinse aid with an absorbent cloth to fill the rinse aid dispenser A B C ENGLISH 13 CAUTION! Make sure that the lid locks into position. Close...

Product Manual
Page 14
... until the display shows the delay time you have to set (from 1 to activate the appliance. Close the water tap. • Do not pre-rinse dishes by Press Delay again and again until the indicator of the running phase comes on /off button. 1. HINTS AND TIPS 10.1 General The following hints will decrease with delay start the programme. • The indicator of the running phase comes...
... until the display shows the delay time you have to set (from 1 to activate the appliance. Close the water tap. • Do not pre-rinse dishes by Press Delay again and again until the indicator of the running phase comes on /off button. 1. HINTS AND TIPS 10.1 General The following hints will decrease with delay start the programme. • The indicator of the running phase comes...
Product Manual
Page 15
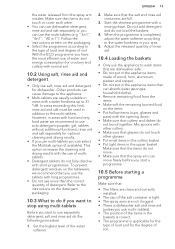
... if you want to stop using multi-tablets Before you start to use separately detergent, salt and rinse aid do not move. • Make sure that the spray arm can move freely before you start a programme. 10.5 Before starting a programme Make sure that: • The filters are clean and correctly installed. • The cap of the salt container is completed, adjust the water softener according to the...
... if you want to stop using multi-tablets Before you start to use separately detergent, salt and rinse aid do not move. • Make sure that the spray arm can move freely before you start a programme. 10.5 Before starting a programme Make sure that: • The filters are clean and correctly installed. • The cap of the salt container is completed, adjust the water softener according to the...
Product Manual
Page 16
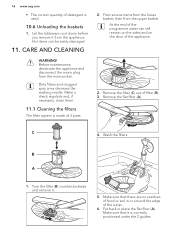
... the baskets 1. Let the tableware cool down before you remove it . 5. Dirty filters and clogged spay arms decrease the washing results. 16 www.aeg.com • The correct quantity of detergent is correctly positioned under the 2 guides. Before maintenance, deactivate the appliance and disconnect the mains plug from the main socket. Wash the filters. Remove the flat filter (A). C 4. Turn the filter (B) counterclockwise and remove it from the upper basket...
... the baskets 1. Let the tableware cool down before you remove it . 5. Dirty filters and clogged spay arms decrease the washing results. 16 www.aeg.com • The correct quantity of detergent is correctly positioned under the 2 guides. Before maintenance, deactivate the appliance and disconnect the mains plug from the main socket. Wash the filters. Remove the flat filter (A). C 4. Turn the filter (B) counterclockwise and remove it from the upper basket...
Product Manual
Page 17
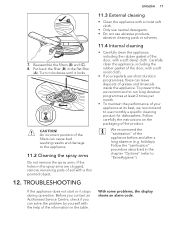
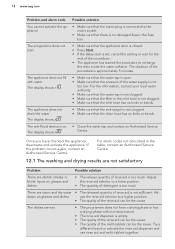
... regularly use monthly a specific cleaning product for dishwashers. Turn it clockwise until it stops during operation. With some problems, the display shows an alarm code. Follow the ''sanitisation'' procedure described in the flat filter (A). Carefully clean the appliance, including the rubber gasket of the door, with a soft moist cloth. • If you can leave deposits of the information in the spray arms are clogged, remove remaining parts of the door...
... regularly use monthly a specific cleaning product for dishwashers. Turn it clockwise until it stops during operation. With some problems, the display shows an alarm code. Follow the ''sanitisation'' procedure described in the flat filter (A). Carefully clean the appliance, including the rubber gasket of the door, with a soft moist cloth. • If you can leave deposits of the information in the spray arms are clogged, remove remaining parts of the door...
Product Manual
Page 18
... not drain the water. The display shows . Adjust the rinse aid selector to a higher position. • The quality of detergent is closed. • Press Start. • If the delay start . Ad- The dishes are wet. • The programme does not have checked the appliance, deactivate and activate the appliance. Try a different brand or activate the rinse aid dispenser and use rinse aid and multi-tablets together. If the problem...
... not drain the water. The display shows . Adjust the rinse aid selector to a higher position. • The quality of detergent is closed. • Press Start. • If the delay start . Ad- The dishes are wet. • The programme does not have checked the appliance, deactivate and activate the appliance. Try a different brand or activate the rinse aid dispenser and use rinse aid and multi-tablets together. If the problem...
Product Manual
Page 19
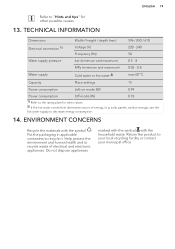
... / 850 / 610 Electrical connection 1) Voltage (V) Frequency (Hz) 220 - 240 50 Water supply pressure bar (minimum and maximum) 0.5 - 8 MPa (minimum and maximum) 0.05 - 0.8 Water supply Cold water or hot water 2) max 60 °C Capacity Place settings 15 Power consumption Left-on mode (W) 0.99 Power consumption Off-mode (W) 0.10 1) Refer to recycle it. Put the packaging in applicable containers to the rating plate for other...
... / 850 / 610 Electrical connection 1) Voltage (V) Frequency (Hz) 220 - 240 50 Water supply pressure bar (minimum and maximum) 0.5 - 8 MPa (minimum and maximum) 0.05 - 0.8 Water supply Cold water or hot water 2) max 60 °C Capacity Place settings 15 Power consumption Left-on mode (W) 0.99 Power consumption Off-mode (W) 0.10 1) Refer to recycle it. Put the packaging in applicable containers to the rating plate for other...


