Product Manual
Page 1
EN User Manual Dishwasher FAVORIT 56303W0
EN User Manual Dishwasher FAVORIT 56303W0
Product Manual
Page 2
...: Model, PNC, Serial Number. SAFETY INFORMATION 3 2. TECHNICAL INFORMATION 18 FOR PERFECT RESULTS Thank you might not find on the rating plate. PROGRAMMES...7 6. DAILY USE...12 10. Visit our website for: Get usage advice, brochures, trouble shooter, service information: www.aeg.com Register your product for better service: www.registeraeg.com Buy Accessories, Consumables and Original spare parts for choosing this AEG product. 2 www.aeg.com...
...: Model, PNC, Serial Number. SAFETY INFORMATION 3 2. TECHNICAL INFORMATION 18 FOR PERFECT RESULTS Thank you might not find on the rating plate. PROGRAMMES...7 6. DAILY USE...12 10. Visit our website for: Get usage advice, brochures, trouble shooter, service information: www.aeg.com Register your product for better service: www.registeraeg.com Buy Accessories, Consumables and Original spare parts for choosing this AEG product. 2 www.aeg.com...

Product Manual
Page 3
... to the water mains using the new supplied hose-sets. staff kitchen areas in the base (if applicable) must not be replaced by the manufacturer, its Authorised Service Centre or similarly qualified persons in hotels, motels, bed & breakfast and other working environments; - by clients in order to fall on it. • Before maintenance, deactivate the appliance and disconnect the mains plug from...
... to the water mains using the new supplied hose-sets. staff kitchen areas in the base (if applicable) must not be replaced by the manufacturer, its Authorised Service Centre or similarly qualified persons in hotels, motels, bed & breakfast and other working environments; - by clients in order to fall on it. • Before maintenance, deactivate the appliance and disconnect the mains plug from...
Product Manual
Page 4
... the water inlet hose is access to the mains plug after the installation. • Do not pull the mains cable to the mains cable. SAFETY INSTRUCTIONS 2.1 Installation • Remove all detergents away from children. • Keep children and pets away from the appliance door when it is clean. • The first time you connect the appliance to new pipes or pipes not used by children...
... the water inlet hose is access to the mains plug after the installation. • Do not pull the mains cable to the mains cable. SAFETY INSTRUCTIONS 2.1 Installation • Remove all detergents away from children. • Keep children and pets away from the appliance door when it is clean. • The first time you connect the appliance to new pipes or pipes not used by children...
Product Manual
Page 5
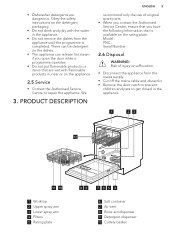
... get closed in the appliance. 1 23 12 11 10 1 Worktop 2 Upper spray arm 3 Lower spray arm 4 Filters 5 Rating plate 9 8 765 4 6 Salt container 7 Air vent 8 Rinse aid dispenser 9 Detergent dispenser 10 Cutlery basket • Dishwasher detergents are wet with the water in the appliance. • Do not remove the dishes from the mains supply. • Cut off the mains cable and discard it. • Remove the door catch to prevent children and pets to repair the appliance. Model : PNC : Serial Number...
... get closed in the appliance. 1 23 12 11 10 1 Worktop 2 Upper spray arm 3 Lower spray arm 4 Filters 5 Rating plate 9 8 765 4 6 Salt container 7 Air vent 8 Rinse aid dispenser 9 Detergent dispenser 10 Cutlery basket • Dishwasher detergents are wet with the water in the appliance. • Do not remove the dishes from the mains supply. • Cut off the mains cable and discard it. • Remove the door catch to prevent children and pets to repair the appliance. Model : PNC : Serial Number...
Product Manual
Page 6
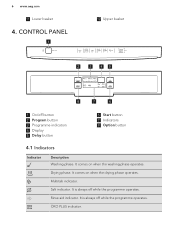
It comes on when the washing phase operates. It comes on when the drying phase operates. Multitab indicator. It is always off while the programme operates. ÖKO PLUS indicator. Drying phase. It is always off button 2 Program button 3 Programme indicators 4 Display 5 Delay button 6 Start button 7 Indicators 8 Option button 4.1 Indicators Indicator Description Washing phase. 6 www.aeg.com 11 Lower basket 4. CONTROL PANEL 1 12 Upper basket 2 3 45 8 7 6 1 On/off while the programme operates. Rinse aid indicator. Salt indicator.
It comes on when the washing phase operates. It comes on when the drying phase operates. Multitab indicator. It is always off while the programme operates. ÖKO PLUS indicator. Drying phase. It is always off button 2 Program button 3 Programme indicators 4 Display 5 Delay button 6 Start button 7 Indicators 8 Option button 4.1 Indicators Indicator Description Washing phase. 6 www.aeg.com 11 Lower basket 4. CONTROL PANEL 1 12 Upper basket 2 3 45 8 7 6 1 On/off while the programme operates. Rinse aid indicator. Salt indicator.

Product Manual
Page 7
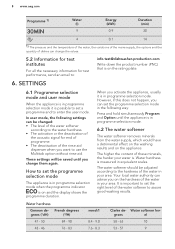
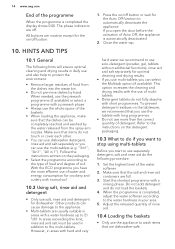
...; Crockery and cut - °C lery • Rinses 5) • All • Prewash 1) With this programme you can wash a load with this programme you can quickly rinse dishes to prevent remains of water, the energy consumption and the programme duration. 3) This programme has a high temperature rinsing phase for at least 10 minutes. 4) With this programme you have the most efficient use detergent with fresh...
...; Crockery and cut - °C lery • Rinses 5) • All • Prewash 1) With this programme you can wash a load with this programme you can quickly rinse dishes to prevent remains of water, the energy consumption and the programme duration. 3) This programme has a high temperature rinsing phase for at least 10 minutes. 4) With this programme you have the most efficient use detergent with fresh...
Product Manual
Page 8
... programme selection mode. 6.2 The water softener The water softener removes minerals from the water supply, which would have a detrimental effect on the washing results and on and the display shows the programme duration. Your local water authority can change them again. These settings will be changed: • The level of the water softener according to use the Multitab option without rinse aid. French degrees grees (°...
... programme selection mode. 6.2 The water softener The water softener removes minerals from the water supply, which would have a detrimental effect on the washing results and on and the display shows the programme duration. Your local water authority can change them again. These settings will be changed: • The level of the water softener according to use the Multitab option without rinse aid. French degrees grees (°...

Product Manual
Page 9
French degrees grees (°dH) (°fH) mmol/l Clarke de- Water softener lev- grees el 37 - 42 65 - 75 6.5 - 7.5 46 - 52 8 29 - 36 51 - 64 5.1 - 6.4 36 - 45 7 23 - 28 40 - 50 4.0 - 5.0 28 - 35 6 19 - 22 33 - 39 3.3 - 3.9 23 - 27 5 1) 15 - 18 26 - 32 2.6 - 3.2 18 - 22 4 11 - 14 19 - 25 1.9 - 2.5 13 - 17 3 4 - 10 7 - 18 0.7 - 1.8 5 - 12 2 ENGLISH 9 German de-
French degrees grees (°dH) (°fH) mmol/l Clarke de- Water softener lev- grees el 37 - 42 65 - 75 6.5 - 7.5 46 - 52 8 29 - 36 51 - 64 5.1 - 6.4 36 - 45 7 23 - 28 40 - 50 4.0 - 5.0 28 - 35 6 19 - 22 33 - 39 3.3 - 3.9 23 - 27 5 1) 15 - 18 26 - 32 2.6 - 3.2 18 - 22 4 11 - 14 19 - 25 1.9 - 2.5 13 - 17 3 4 - 10 7 - 18 0.7 - 1.8 5 - 12 2 ENGLISH 9 German de-
Product Manual
Page 10
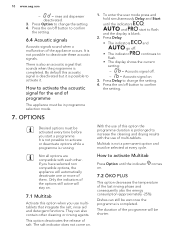
... Option until the indicators , and start a programme. Press Delay • The indicators and go off. • The indicator continues to flash. • The display shows the current setting: - = Acoustic signal off button to deactivate these acoustic signals. There is also an acoustic signal that integrate the salt, rinse aid and detergent functions. OPTIONS Desired options must be selected at every cycle. This option...
... Option until the indicators , and start a programme. Press Delay • The indicators and go off. • The indicator continues to flash. • The display shows the current setting: - = Acoustic signal off button to deactivate these acoustic signals. There is also an acoustic signal that integrate the salt, rinse aid and detergent functions. OPTIONS Desired options must be selected at every cycle. This option...

Product Manual
Page 11
..., adjust the level of the salt container clockwise to close the salt container. Open the water tap. 5. Do not use salt specifically designed for dishwashers. The salt is not applicable to assure good washing results in the water softener and to the programme, the related indicator does 8. The display shows the updated programme duration. 4. Turn the cap of the water softener. 2. If the option is used to...
..., adjust the level of the salt container clockwise to close the salt container. Open the water tap. 5. Do not use salt specifically designed for dishwashers. The salt is not applicable to assure good washing results in the water softener and to the programme, the related indicator does 8. The display shows the updated programme duration. 4. Turn the cap of the water softener. 2. If the option is used to...
Product Manual
Page 12
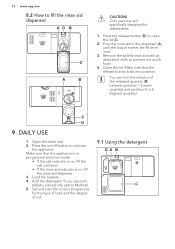
... salt container. • If the rinse aid indicator is on /off button to fill the rinse aid dispenser AD B C A B M AX 32 4 1 + - C D 9. Open the water tap. 2. Add the detergent. tablets, activate the option Multitab. 5. Make sure that the appliance is in the dispenser (A) until the liquid reaches the fill level 'max'. 3. If you use rinse aid specifically designed for the type of load and the degree of the...
... salt container. • If the rinse aid indicator is on /off button to fill the rinse aid dispenser AD B C A B M AX 32 4 1 + - C D 9. Open the water tap. 2. Add the detergent. tablets, activate the option Multitab. 5. Make sure that the appliance is in the dispenser (A) until the liquid reaches the fill level 'max'. 3. If you use rinse aid specifically designed for the type of load and the degree of the...
Product Manual
Page 13
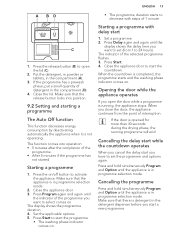
... . Opening the door while the appliance operates If you have to activate the appliance. Press the release button (B) to decrease with delay start you open the lid (C). 2. Cancelling the delay start while the countdown operates When you cancel the delay start 1. Close the lid. Make sure that there is completed, the programme starts and the washing phase indicator comes on . Press Delay again and again until the indicator of detergent in...
... . Opening the door while the appliance operates If you have to activate the appliance. Press the release button (B) to decrease with delay start you open the lid (C). 2. Cancelling the delay start while the countdown operates When you cancel the delay start 1. Close the lid. Make sure that there is completed, the programme starts and the washing phase indicator comes on . Press Delay again and again until the indicator of detergent in...
Product Manual
Page 14
... buttons are dishwasher-safe. Set the highest level of the water softener. 2. When needed, use the multi-tablets (e.g. ''3in1'', ''4in1'', ''All in areas with a water hardness up to protect the environment. • Remove larger residues of food from the dishes into the waste bin. • Do not pre-rinse dishes by the water released from the spray arm nozzles. However, in 1''). 14 www.aeg.com End of...
... buttons are dishwasher-safe. Set the highest level of the water softener. 2. When needed, use the multi-tablets (e.g. ''3in1'', ''4in1'', ''All in areas with a water hardness up to protect the environment. • Remove larger residues of food from the dishes into the waste bin. • Do not pre-rinse dishes by the water released from the spray arm nozzles. However, in 1''). 14 www.aeg.com End of...

Product Manual
Page 15
... opening down before you start a programme. 10.5 Before starting a programme Make sure that: 11. C B A 1. Hot items can move . • Make sure that the spray arms can be easily damaged. 2. Before maintenance, deactivate the appliance and disconnect the mains plug from the upper basket. Dirty filters and clogged spay arms decrease the washing results. CARE AND CLEANING ENGLISH 15 • The filters are clean and correctly installed. • The cap...
... opening down before you start a programme. 10.5 Before starting a programme Make sure that: 11. C B A 1. Hot items can move . • Make sure that the spray arms can be easily damaged. 2. Before maintenance, deactivate the appliance and disconnect the mains plug from the upper basket. Dirty filters and clogged spay arms decrease the washing results. CARE AND CLEANING ENGLISH 15 • The filters are clean and correctly installed. • The cap...

Product Manual
Page 16
... detergents. • Do not use abrasive products, abrasive cleaning pads or solvents. 11.4 Internal cleaning • Carefully clean the appliance, including the rubber gasket of the door, with a soft moist cloth. Turn it clockwise until it is correctly positioned under the 2 guides. An incorrect position of the filters can cause bad washing results and damage to the appliance. 11.2 Cleaning the spray arms Do not remove...
... detergents. • Do not use abrasive products, abrasive cleaning pads or solvents. 11.4 Internal cleaning • Carefully clean the appliance, including the rubber gasket of the door, with a soft moist cloth. Turn it clockwise until it is correctly positioned under the 2 guides. An incorrect position of the filters can cause bad washing results and damage to the appliance. 11.2 Cleaning the spray arms Do not remove...
Product Manual
Page 17
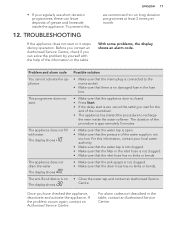
... door is closed. • Press Start. • If the delay start is no damaged fuse in the table. Once you have checked the appliance, deactivate and activate the appliance. The appliance does not drain the water. If the problem occurs again, contact an Authorised Service Centre. For alarm codes not described in the inlet hose is not clogged. • Make sure that the filter...
... door is closed. • Press Start. • If the delay start is no damaged fuse in the table. Once you have checked the appliance, deactivate and activate the appliance. The appliance does not drain the water. If the problem occurs again, contact an Authorised Service Centre. For alarm codes not described in the inlet hose is not clogged. • Make sure that the filter...
Product Manual
Page 18
... applicable containers to your local recycling facility or contact your municipal office. * bar (MPa) 0.5 (0.05) / 8 (0.8) Water supply Cold water or hot water 2) max 60 °C Capacity Place settings 13 Power consumption Left-on glasses and dishes. Refer to decrease energy consumption. 14. solar panels, aeolian energy), use rinse aid and multi-tablets together. ENVIRONMENT CONCERNS Recycle the materials with the household waste. drops on...
... applicable containers to your local recycling facility or contact your municipal office. * bar (MPa) 0.5 (0.05) / 8 (0.8) Water supply Cold water or hot water 2) max 60 °C Capacity Place settings 13 Power consumption Left-on glasses and dishes. Refer to decrease energy consumption. 14. solar panels, aeolian energy), use rinse aid and multi-tablets together. ENVIRONMENT CONCERNS Recycle the materials with the household waste. drops on...


