
Product Manual
Page 2
... data available: Model, PNC, Serial Number. TROUBLESHOOTING 26 13. PRODUCT DESCRIPTION 6 4. Warning / Caution-Safety information General information and tips Environmental information Subject to give you impeccable performance for many years, with innovative technologies that you might not find on the rating plate. 2 www.aeg.com CONTENTS 1. SAFETY INFORMATION 3 2. USING THE ACCESSORIES 12 9. ADDITIONAL FUNCTIONS 14 10. CARE AND CLEANING 23 12. Please...
... data available: Model, PNC, Serial Number. TROUBLESHOOTING 26 13. PRODUCT DESCRIPTION 6 4. Warning / Caution-Safety information General information and tips Environmental information Subject to give you impeccable performance for many years, with innovative technologies that you might not find on the rating plate. 2 www.aeg.com CONTENTS 1. SAFETY INFORMATION 3 2. USING THE ACCESSORIES 12 9. ADDITIONAL FUNCTIONS 14 10. CARE AND CLEANING 23 12. Please...
Product Manual
Page 3
...; This appliance can be kept away unless continuously supervised. 1.2 General Safety • Only a qualified person must install this appliance and replace the cable. • Internally the appliance becomes hot when in accessories or ovenware. • Before maintenance cut the power supply. The manufacturer is not responsible if an incorrect installation and use oven gloves to remove or put in...
...; This appliance can be kept away unless continuously supervised. 1.2 General Safety • Only a qualified person must install this appliance and replace the cable. • Internally the appliance becomes hot when in accessories or ovenware. • Before maintenance cut the power supply. The manufacturer is not responsible if an incorrect installation and use oven gloves to remove or put in...
Product Manual
Page 4
... replaced, this appliance. • Remove all the packaging. • Do not install or use a damaged appliance. • Obey the installation instruction supplied with the appliance. • Always be careful when you move the appliance because it is damaged, it cannot be removed without tools. Should the mains cable need to units with the same height. 2.2 Electrical connection WARNING! Only a qualified person must install...
... replaced, this appliance. • Remove all the packaging. • Do not install or use a damaged appliance. • Obey the installation instruction supplied with the appliance. • Always be careful when you move the appliance because it is damaged, it cannot be removed without tools. Should the mains cable need to units with the same height. 2.2 Electrical connection WARNING! Only a qualified person must install...
Product Manual
Page 5
...: - Do not close the furniture panel until the appliance has cooled down completely after you open door. • Do not use the appliance as a work surface or as a storage surface. • Open the appliance door carefully. Risk of injury, burns and electrical shock or explosion. • Use this appliance in operation. Hot air can be careful when you remove or install the accessories. • Discoloration...
...: - Do not close the furniture panel until the appliance has cooled down completely after you open door. • Do not use the appliance as a work surface or as a storage surface. • Open the appliance door carefully. Risk of injury, burns and electrical shock or explosion. • Use this appliance in operation. Hot air can be careful when you remove or install the accessories. • Discoloration...
Product Manual
Page 6
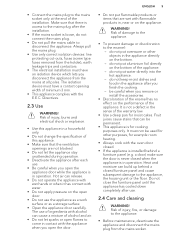
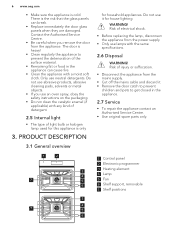
... an Authorised Service Centre. • Use original spare parts only. 1 2 4 3 7 2 1 1 Control panel 2 Electronic programmer 3 Heating element 3 4 Lamp 4 5 5 Fan 6 6 Shelf support, removable 7 Shelf positions 3 5 4 4 7 3 5 2 1 6 Only use lamps with the same specifications. 2.6 Disposal WARNING! There is heavy! • Clean regularly the appliance to get closed in the appliance can break. • Replace immediately the door glass panels when they are damaged. Do not use an oven spray, obey the safety instructions on...
... an Authorised Service Centre. • Use original spare parts only. 1 2 4 3 7 2 1 1 Control panel 2 Electronic programmer 3 Heating element 3 4 Lamp 4 5 5 Fan 6 6 Shelf support, removable 7 Shelf positions 3 5 4 4 7 3 5 2 1 6 Only use lamps with the same specifications. 2.6 Disposal WARNING! There is heavy! • Clean regularly the appliance to get closed in the appliance can break. • Replace immediately the door glass panels when they are damaged. Do not use an oven spray, obey the safety instructions on...
Product Manual
Page 7
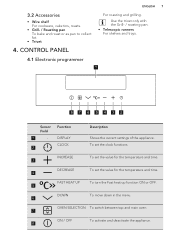
... main oven. 7 ON / OFF To activate and deactivate the appliance. 8 CONTROL PANEL For roasting and grilling. INCREASE To set the value for the temperature and time. 3 DECREASE To set the clock functions. ENGLISH 7 3.2 Accessories • Wire shelf For cookware, cake tins, roasts. • Grill- / Roasting pan To bake and roast or as pan to collect fat. • Trivet 4. DISPLAY CLOCK 2 Description Shows the current settings of the appliance. Use the...
... main oven. 7 ON / OFF To activate and deactivate the appliance. 8 CONTROL PANEL For roasting and grilling. INCREASE To set the value for the temperature and time. 3 DECREASE To set the clock functions. ENGLISH 7 3.2 Accessories • Wire shelf For cookware, cake tins, roasts. • Grill- / Roasting pan To bake and roast or as pan to collect fat. • Trivet 4. DISPLAY CLOCK 2 Description Shows the current settings of the appliance. Use the...
Product Manual
Page 8
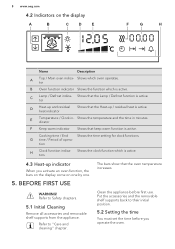
.... 4.3 Heat-up indicator When you operate the oven. tor D Heat-up / residual heat is active. G time / Period of opera- tion H Clock function indicators Shows the clock function which oven operates. Put the accessories and the removable shelf supports back to their initial position. 5.2 Setting the time You must set the time before first use. Shows the temperature and the time in - WARNING! C Lamp / Defrost indica- Refer to "Care and cleaning" chapter...
.... 4.3 Heat-up indicator When you operate the oven. tor D Heat-up / residual heat is active. G time / Period of opera- tion H Clock function indicators Shows the clock function which oven operates. Put the accessories and the removable shelf supports back to their initial position. 5.2 Setting the time You must set the time before first use. Shows the temperature and the time in - WARNING! C Lamp / Defrost indica- Refer to "Care and cleaning" chapter...
Product Manual
Page 9
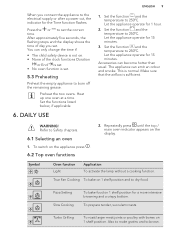
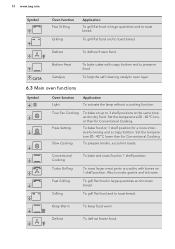
.... DAILY USE ENGLISH 9 1. True Fan Cooking To bake on the appliance press . 6.2 Top oven functions 2. After approximately five seconds, the flashing stops and the display shows the time of the clock functions Duration or End is set. • No oven function is set. 5.3 Preheating Preheat the empty appliance to 250ºC. Let the appliance operate for the Time function flashes. To prepare tender, succulent roasts. WARNING! Set the...
.... DAILY USE ENGLISH 9 1. True Fan Cooking To bake on the appliance press . 6.2 Top oven functions 2. After approximately five seconds, the flashing stops and the display shows the time of the clock functions Duration or End is set. • No oven function is set. 5.3 Preheating Preheat the empty appliance to 250ºC. Let the appliance operate for the Time function flashes. To prepare tender, succulent roasts. WARNING! Set the...
Product Manual
Page 10
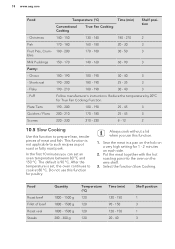
... Fan Cooking Pizza Setting Slow Cooking To bake on 1 shelf position. Set the temperature 20 - 40 °C lower than for Conventional Cooking. Defrost To defrost frozen food. To grill flat food and to toast bread. To bake food on 1 shelf position. To roast larger meat joints or poultry with crispy bottom and to preserve food. To help the self-cleaning catalytic oven layer. 6.3 Main oven...
... Fan Cooking Pizza Setting Slow Cooking To bake on 1 shelf position. Set the temperature 20 - 40 °C lower than for Conventional Cooking. Defrost To defrost frozen food. To grill flat food and to toast bread. To bake food on 1 shelf position. To roast larger meat joints or poultry with crispy bottom and to preserve food. To help the self-cleaning catalytic oven layer. 6.3 Main oven...
Product Manual
Page 11
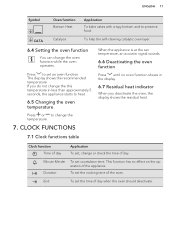
... appliance starts to heat. 6.5 Changing the oven temperature Press or to change the temperature. 7. Press to preserve food. The display shows the recommended temperature. To help the self-cleaning catalytic oven layer. 6.4 Setting the oven function You can change or check the time of the appliance. End To set , change the oven function while the oven operates. Clock function Time of day Application To set the time of the oven. Minute Minder Duration To set the cooking time of...
... appliance starts to heat. 6.5 Changing the oven temperature Press or to change the temperature. 7. Press to preserve food. The display shows the recommended temperature. To help the self-cleaning catalytic oven layer. 6.4 Setting the oven function You can change or check the time of the appliance. End To set , change the oven function while the oven operates. Clock function Time of day Application To set the time of the oven. Minute Minder Duration To set the cooking time of...
Product Manual
Page 12
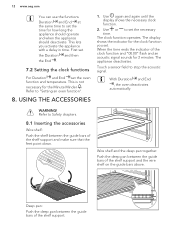
... the appliance should operate and when the appliance should deactivate. USING THE ACCESSORIES 1. Touch a sensor field to "Setting an oven function". 8. Refer to set the time for 2 minutes. This lets you set the oven function and temperature. With Duration and End , the oven deactivates automatically. When the time ends the indicator of the shelf support. Deep pan: Push the deep pan between the guide bars of...
... the appliance should operate and when the appliance should deactivate. USING THE ACCESSORIES 1. Touch a sensor field to "Setting an oven function". 8. Refer to set the time for 2 minutes. This lets you set the oven function and temperature. With Duration and End , the oven deactivates automatically. When the time ends the indicator of the shelf support. Deep pan: Push the deep pan between the guide bars of...

Product Manual
Page 14
... fan When the appliance operates, the cooling fan activates automatically to show "LOC". Do not set an oven function. 2. Put the deep pan into the deep pan so that the supports of the appliance cool. You can activate the function only when the oven operates. Touch and hold and at the same time, until the display stops to keep the surfaces of the wire...
... fan When the appliance operates, the cooling fan activates automatically to show "LOC". Do not set an oven function. 2. Put the deep pan into the deep pan so that the supports of the appliance cool. You can activate the function only when the oven operates. Touch and hold and at the same time, until the display stops to keep the surfaces of the wire...
Product Manual
Page 15
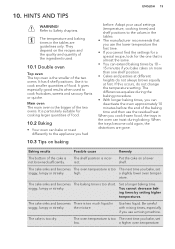
... results when used . 10.1 Double oven Top oven The top oven is almost the same. • You can bake or roast differently to the appliance you had 10.3 Tips on more than one shelf position. • Cakes and pastries at first. If this occurs, do not always brown equally at different heights do not change the temperature setting. When the trays become...
... results when used . 10.1 Double oven Top oven The top oven is almost the same. • You can bake or roast differently to the appliance you had 10.3 Tips on more than one shelf position. • Cakes and pastries at first. If this occurs, do not always brown equally at different heights do not change the temperature setting. When the trays become...
Product Manual
Page 18
... - 230 210 - 230 8 - 12 2 10.5 Slow Cooking Use this function for True Fan Cooking Function. Put the meat together with the hot roasting pan into the oven on each side. 2. Shortcrust 190 - 200 180 - 190 25 - 35 3 - Flaky 190 - 210 180 - 190 30 - 40 3 - Always cook without a lid when you can set , the oven continues to prepare lean, tender pieces of...
... - 230 210 - 230 8 - 12 2 10.5 Slow Cooking Use this function for True Fan Cooking Function. Put the meat together with the hot roasting pan into the oven on each side. 2. Shortcrust 190 - 200 180 - 190 25 - 35 3 - Flaky 190 - 210 180 - 190 30 - 40 3 - Always cook without a lid when you can set , the oven continues to prepare lean, tender pieces of...
Product Manual
Page 19
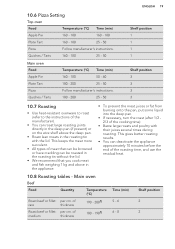
... 1 1 1 1 Shelf position 3 3 3 3 10.7 Roasting • Use heat-resistant ovenware to roast (refer to the instructions of the manufacturer). • You can roast large roasting joints directly in the deep pan (if present) or on the wire shelf above in the roasting tin with their juices several times during roasting. ENGLISH 19 10.6 Pizza Setting Top oven Food Temperature (°C) Time (min) Apple Pie Plate Tart Pizza 160 - 180...
... 1 1 1 1 Shelf position 3 3 3 3 10.7 Roasting • Use heat-resistant ovenware to roast (refer to the instructions of the manufacturer). • You can roast large roasting joints directly in the deep pan (if present) or on the wire shelf above in the roasting tin with their juices several times during roasting. ENGLISH 19 10.6 Pizza Setting Top oven Food Temperature (°C) Time (min) Apple Pie Plate Tart Pizza 160 - 180...

Product Manual
Page 24
... number of the shelf support away from the side wall and remove it . 2. Keep children away when you remove the door from the oven. Before activating the catalytic cleaning remove all the accessories from the appliance. Set the CATA function. The door is at a high temperature. Pull the rear end of glass panels is different for different models. Always turn the oven light on a regular basis. 1. Clean the oven floor...
... number of the shelf support away from the side wall and remove it . 2. Keep children away when you remove the door from the oven. Before activating the catalytic cleaning remove all the accessories from the appliance. Set the CATA function. The door is at a high temperature. Pull the rear end of glass panels is different for different models. Always turn the oven light on a regular basis. 1. Clean the oven floor...
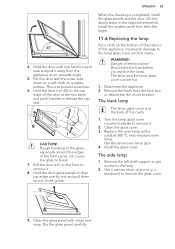
Product Manual
Page 25
... completed, install the glass panels and the door. The back lamp The lamp glass cover is at the two sides and push inwards to prevent scratches. 6. Clean the glass cover. 3. Replace the oven lamp with water and soap. Remove the left shelf support to get access to remove the glass cover. 9. Hold the door trim (B) on each side and pull it away from the fuse box or deactivate the circuit breaker. ENGLISH...
... completed, install the glass panels and the door. The back lamp The lamp glass cover is at the two sides and push inwards to prevent scratches. 6. Clean the glass cover. 3. Replace the oven lamp with water and soap. Remove the left shelf support to get access to remove the glass cover. 9. Hold the door trim (B) on each side and pull it away from the fuse box or deactivate the circuit breaker. ENGLISH...
Product Manual
Page 26
... cooking process ends. TROUBLESHOOTING WARNING! The lamp does not operate. Do not leave the dishes in the oven settle on . Problem Possible cause Remedy The oven does not heat up . Set the clock. The Child Lock is Refer to "Using the Child Lock". 26 www.aeg.com 3. Clean the glass cover. 4. Replace the lamp with a suitable 300 °C heat-resistant lamp. 5. Install the glass cover. 6. The clock is released. The oven does not heat...
... cooking process ends. TROUBLESHOOTING WARNING! The lamp does not operate. Do not leave the dishes in the oven settle on . Problem Possible cause Remedy The oven does not heat up . Set the clock. The Child Lock is Refer to "Using the Child Lock". 26 www.aeg.com 3. Clean the glass cover. 4. Replace the lamp with a suitable 300 °C heat-resistant lamp. 5. Install the glass cover. 6. The clock is released. The oven does not heat...
Product Manual
Page 27
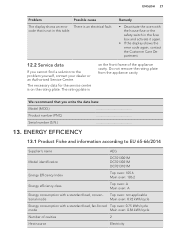
... problem yourself, contact your dealer or an Authorised Service Centre. The rating plate is not in the fuse box and activate it again. • If the display shows the error code again, contact the Customer Care Department. 12.2 Service data If you write the data here: Model (MOD.) Product number (PNC) Serial number (S.N.) 13. Remedy • Deactivate the oven with a standard load, fan-forced Top oven: 0.75 kWh/cycle mode...
... problem yourself, contact your dealer or an Authorised Service Centre. The rating plate is not in the fuse box and activate it again. • If the display shows the error code again, contact the Customer Care Department. 12.2 Service data If you write the data here: Model (MOD.) Product number (PNC) Serial number (S.N.) 13. Remedy • Deactivate the oven with a standard load, fan-forced Top oven: 0.75 kWh/cycle mode...
Product Manual
Page 28
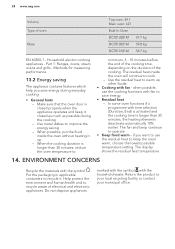
... energy during the cooking. - The fan and lamp continue to warm up . - Part 1: Ranges, ovens, steam ovens and grills - Use the residual heat to operate. • Keep food warm - if you save energy. • Residual heat - ENVIRONMENT CONCERNS Recycle the materials with time selection (Duration, End) is activated and the cooking time is longer than 30 minutes, the heating elements deactivate automatically 10% earlier. Return the product to keep...
... energy during the cooking. - The fan and lamp continue to warm up . - Part 1: Ranges, ovens, steam ovens and grills - Use the residual heat to operate. • Keep food warm - if you save energy. • Residual heat - ENVIRONMENT CONCERNS Recycle the materials with time selection (Duration, End) is activated and the cooking time is longer than 30 minutes, the heating elements deactivate automatically 10% earlier. Return the product to keep...


