Product Manual
Page 4
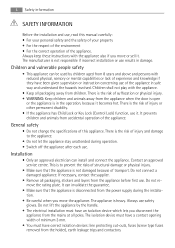
... animals from the appliance when the door is open or the appliance is in the operation, because it . Contact an approved service centre. Do not remove the rating plate. Always use of the appliance. Children and vulnerable people safety • This appliance can install and connect the appliance. General safety • Do not change the specifications of this manual carefully: • For your personal safety...
... animals from the appliance when the door is open or the appliance is in the operation, because it . Contact an approved service centre. Do not remove the rating plate. Always use of the appliance. Children and vulnerable people safety • This appliance can install and connect the appliance. General safety • Do not change the specifications of this manual carefully: • For your personal safety...

Product Manual
Page 5
... not replace or change the mains cable. Safety information 5 • Before the installation, make sure that the kitchen cabinet has the recess dimensions applicable. • Make sure that the electrical data on the rating plate agree with special connection system. Do not touch the heating elements in operation. do not put hot water directly into the appliance; - There is only for domestic use the appliance...
... not replace or change the mains cable. Safety information 5 • Before the installation, make sure that the kitchen cabinet has the recess dimensions applicable. • Make sure that the electrical data on the rating plate agree with special connection system. Do not touch the heating elements in operation. do not put hot water directly into the appliance; - There is only for domestic use the appliance...

Product Manual
Page 6
... from deteriorating • Use a deep baking tray for household appliances use an oven spray, follow the instructions from the manufacturer. • Do not clean the glass door with alcohol can break. ant surface of the inner glass can break and shatter. • When the door glass panels are wet with flammable products, and/or fusible objects (made of fire • Open the door carefully. 6 Safety information •...
... from deteriorating • Use a deep baking tray for household appliances use an oven spray, follow the instructions from the manufacturer. • Do not clean the glass door with alcohol can break. ant surface of the inner glass can break and shatter. • When the door glass panels are wet with flammable products, and/or fusible objects (made of fire • Open the door carefully. 6 Safety information •...

Product Manual
Page 7
... an approved service centre. • Use only original spare parts. There is the risk of suffocation. Discard the door catch. Product description 7 • Disconnect the appliance from the power supply before the replacement of physical injury or damage - Cut off the mains cable and discard it. - PRODUCT DESCRIPTION General overview 23 4 56 1 7 8 5 4 13 3 9 2 1 10 11 12 1 Control panel 2 Control knob for oven functions 3 Power lamp...
... an approved service centre. • Use only original spare parts. There is the risk of suffocation. Discard the door catch. Product description 7 • Disconnect the appliance from the power supply before the replacement of physical injury or damage - Cut off the mains cable and discard it. - PRODUCT DESCRIPTION General overview 23 4 56 1 7 8 5 4 13 3 9 2 1 10 11 12 1 Control panel 2 Control knob for oven functions 3 Power lamp...

Product Manual
Page 8
Refer to collect fat. BEFORE FIRST USE WARNING! 8 Before first use 5 Control knob for temperature 6 Power lamp 7 Heating element 8 Oven lamp 9 Fan 10 Rear wall heating element 11 Bottom heat 12 Shelf support, removable 13 Shelf positions Accessories • Nonstick wire shelf For cookware, cake tins, roasts. • Trivet For roasting and grilling. Use the trivet only with the grill/roasting pan. • Grill / roasting pan To bake and roast or as pan to "Safety information" chapter.
Refer to collect fat. BEFORE FIRST USE WARNING! 8 Before first use 5 Control knob for temperature 6 Power lamp 7 Heating element 8 Oven lamp 9 Fan 10 Rear wall heating element 11 Bottom heat 12 Shelf support, removable 13 Shelf positions Accessories • Nonstick wire shelf For cookware, cake tins, roasts. • Trivet For roasting and grilling. Use the trivet only with the grill/roasting pan. • Grill / roasting pan To bake and roast or as pan to "Safety information" chapter.
Product Manual
Page 9
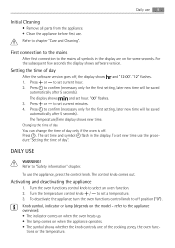
... Cleaning • Remove all symbols in the display. First connection to the mains After first connection to select an oven function. 2. To use the appliance, press the control knob. Turn the oven functions control knob to the mains all parts from the appliance. • Clean the appliance before first use the procedure "Setting the time of the cooking zones, the oven func- Refer to set a temperature. 3. Press or to chapter "Care...
... Cleaning • Remove all symbols in the display. First connection to the mains After first connection to select an oven function. 2. To use the appliance, press the control knob. Turn the oven functions control knob to the mains all parts from the appliance. • Clean the appliance before first use the procedure "Setting the time of the cooking zones, the oven func- Refer to set a temperature. 3. Press or to chapter "Care...
Product Manual
Page 10
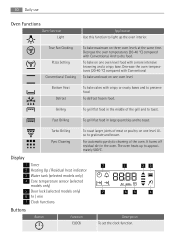
.... Display 1 Timer 7 2 Heating Up / Residual heat indicator 3 Water tank (selected models only) 4 Core temperature sensor (selected models only) 5 Door lock (selected models only) 7 6 hr / min 7 Clock functions 1 23 65 4 Buttons Button Function CLOCK Description To set the clock function. It burns off residual dirt in the oven. The oven heats up the oven interior. Turbo Grilling To roast larger joints of the oven. True Fan Cooking Pizza Setting Conventional Cooking To bake maximum on one oven level. Decrease the oven temperatures (20...
.... Display 1 Timer 7 2 Heating Up / Residual heat indicator 3 Water tank (selected models only) 4 Core temperature sensor (selected models only) 5 Door lock (selected models only) 7 6 hr / min 7 Clock functions 1 23 65 4 Buttons Button Function CLOCK Description To set the clock function. It burns off residual dirt in the oven. The oven heats up the oven interior. Turbo Grilling To roast larger joints of the oven. True Fan Cooking Pizza Setting Conventional Cooking To bake maximum on one oven level. Decrease the oven temperatures (20...

Product Manual
Page 11
... oven stops. To set a countdown time. Use only when the oven function is set to set , change or control the time of the oven. Use only when the oven function is set to set a countdown (maximum 23 h 59 min) This function has no effect on the operation of day. Setting the MINUTE MINDER Use to set how long the oven operates. Clock functions 11 Button , Function MINUS, PLUS Description To set a value for time Heat-up / Residual heat...
... oven stops. To set a countdown time. Use only when the oven function is set to set , change or control the time of the oven. Use only when the oven function is set to set a countdown (maximum 23 h 59 min) This function has no effect on the operation of day. Setting the MINUTE MINDER Use to set how long the oven operates. Clock functions 11 Button , Function MINUS, PLUS Description To set a value for time Heat-up / Residual heat...
Product Manual
Page 12
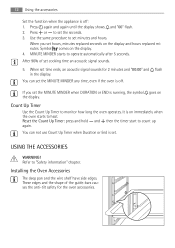
... the display. You can not use Count Up Timer when Duration or End is off . It is off : 1. USING THE ACCESSORIES WARNING! Installing the Oven Accessories The deep pan and the wire shelf have side edges. Use the same procedure to set time ends, an acoustic signal sounds for the oven accessories. If you set hours, minutes replaced seconds on immediately when the oven starts to heat. Reset...
... the display. You can not use Count Up Timer when Duration or End is off . It is off : 1. USING THE ACCESSORIES WARNING! Installing the Oven Accessories The deep pan and the wire shelf have side edges. Use the same procedure to set time ends, an acoustic signal sounds for the oven accessories. If you set hours, minutes replaced seconds on immediately when the oven starts to heat. Reset...
Product Manual
Page 13
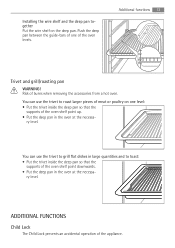
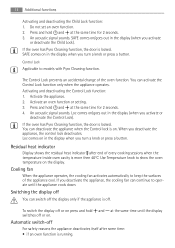
... to roast larger pieces of meat or poultry on the deep pan. ADDITIONAL FUNCTIONS Child Lock The Child Lock prevents an accidental operation of the oven levels. You can use the trivet to toast: • Put the trivet inside the deep pan so that the supports of burns when removing the accessories from a hot oven. ry level. Push the deep pan between the guide-bars...
... to roast larger pieces of meat or poultry on the deep pan. ADDITIONAL FUNCTIONS Child Lock The Child Lock prevents an accidental operation of the oven levels. You can use the trivet to toast: • Put the trivet inside the deep pan so that the supports of burns when removing the accessories from a hot oven. ry level. Push the deep pan between the guide-bars...
Product Manual
Page 14
... the display. Cooling fan When the appliance operates, the cooling fan activates automatically to operate until the display switches off the display only if the appliance is on in the display (when you turn a knob or press a button. Control Lock Applicable to show the oven temperature on /goes out in the display when you activate or deactivate the Child Lock). Press and hold and at the same time...
... the display. Cooling fan When the appliance operates, the cooling fan activates automatically to operate until the display switches off the display only if the appliance is on in the display (when you turn a knob or press a button. Control Lock Applicable to show the oven temperature on /goes out in the display when you activate or deactivate the Child Lock). Press and hold and at the same time...
Product Manual
Page 15
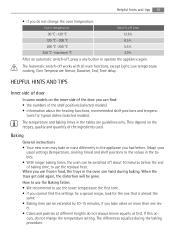
... you can twist during the baking procedure. How to use the Baking Tables • We recommend to use the residual heat. Oven temperature Switch-off works with all oven functions, except Light, Low temperature cooking, Core Temperature Sensor, Duration, End, Time delay. HELPFUL HINTS AND TIPS Inner side of door In some models on more than one lev- Baking General instructions • Your new oven may bake or roast differently to operate the appliance again. curs...
... you can twist during the baking procedure. How to use the Baking Tables • We recommend to use the residual heat. Oven temperature Switch-off works with all oven functions, except Light, Low temperature cooking, Core Temperature Sensor, Duration, End, Time delay. HELPFUL HINTS AND TIPS Inner side of door In some models on more than one lev- Baking General instructions • Your new oven may bake or roast differently to operate the appliance again. curs...

Product Manual
Page 19
... bles True Fan Cooking 1 160 - 170 30 - 60 1) Pre-heat the oven Baking times cannot be reduced by setting higher tempera- Pay attention to Too much liquid in the mixture mixing times, especially if using mixing machines Cake is too dry Oven temperature too low Set oven temperature higher Cake is too dry Baking time too long Set a shorter baking time Cake browns unevenly Oven temperature too high and Set a lower oven temperature baking time too...
... bles True Fan Cooking 1 160 - 170 30 - 60 1) Pre-heat the oven Baking times cannot be reduced by setting higher tempera- Pay attention to Too much liquid in the mixture mixing times, especially if using mixing machines Cake is too dry Oven temperature too low Set oven temperature higher Cake is too dry Baking time too long Set a shorter baking time Cake browns unevenly Oven temperature too high and Set a lower oven temperature baking time too...

Product Manual
Page 23
...). Helpful hints and tips 23 Type of calzone) 2 1) Pre-heat the oven 2) Use deep pan 180 - 200 1) 15 - 25 Defrosting Remove the food packaging. Do not cover it with twist-off and bayonet type lids, or metal tins. • Use the first shelf from Alsace) 2 230 - 2501) 12 - 20 Piroggen (Russian version of baking Shelf position Temperature °C Time Min.
...). Helpful hints and tips 23 Type of calzone) 2 1) Pre-heat the oven 2) Use deep pan 180 - 200 1) 15 - 25 Defrosting Remove the food packaging. Do not cover it with twist-off and bayonet type lids, or metal tins. • Use the first shelf from Alsace) 2 230 - 2501) 12 - 20 Piroggen (Russian version of baking Shelf position Temperature °C Time Min.
Product Manual
Page 25
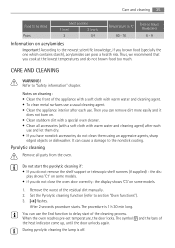
... 3 1/4 Temperature in °C 60 - 70 Time in hours (Guideline) 6 - 9 Information on acrylamides Important! Remove the worst of the heat indicator come up, until the door unlocks again. The symbol and the bars of the residual dirt manually. 2. the display shows 'C3' on . • Clean stubborn dirt with a special oven cleaner. • Clean all parts from the oven. Care and cleaning 25 Food to delay start the pyrolytic cleaning...
... 3 1/4 Temperature in °C 60 - 70 Time in hours (Guideline) 6 - 9 Information on acrylamides Important! Remove the worst of the heat indicator come up, until the door unlocks again. The symbol and the bars of the residual dirt manually. 2. the display shows 'C3' on . • Clean stubborn dirt with a special oven cleaner. • Clean all parts from the oven. Care and cleaning 25 Food to delay start the pyrolytic cleaning...

Product Manual
Page 26
... pins on the bottom of the interior of electrical shock. The oven lamp and the lamp glass cover can remove the shelf support to the front! 2 1 Oven lamp WARNING! It prevents damage to remove it. To install the shelf support follow the procedure in the display PYR after end of the pyrolytic cleaning function; • if you use or , when is a risk of the...
... pins on the bottom of the interior of electrical shock. The oven lamp and the lamp glass cover can remove the shelf support to the front! 2 1 Oven lamp WARNING! It prevents damage to remove it. To install the shelf support follow the procedure in the display PYR after end of the pyrolytic cleaning function; • if you use or , when is a risk of the...

Product Manual
Page 27
Remove the door. 2. B Turn the lamp glass cover counterclockwise to remove it. Install the glass cover. Fully press clamping levers (A) on each side and pull it . To install the door follow the procedure in reverse. Removing and cleaning the door glass panels 1. Pull the door trim to the front to remove it goes. 2. Care and cleaning 27 Replacing the oven lamp: 1. Clean the glass cover. 3. You can find the lamp glass cover at the two sides and push inwards...
Remove the door. 2. B Turn the lamp glass cover counterclockwise to remove it. Install the glass cover. Fully press clamping levers (A) on each side and pull it . To install the door follow the procedure in reverse. Removing and cleaning the door glass panels 1. Pull the door trim to the front to remove it goes. 2. Care and cleaning 27 Replacing the oven lamp: 1. Clean the glass cover. 3. You can find the lamp glass cover at the two sides and push inwards...
Product Manual
Page 28
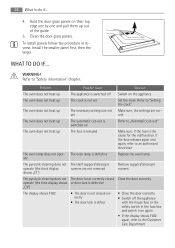
... oven does not heat up out of the guide 5. Remove support/telescopic runners Close the door correctly • Close the door correctly • Switch off The clock is not set The necessary settings are not set The automatic cut -out" Make sure, if the fuse is the cause for the malfunction. To install panels follow the procedure in the fuse box and switch it on again • If the display...
... oven does not heat up out of the guide 5. Remove support/telescopic runners Close the door correctly • Close the door correctly • Switch off The clock is not set The necessary settings are not set The automatic cut -out" Make sure, if the fuse is the cause for the malfunction. To install panels follow the procedure in the fuse box and switch it on again • If the display...
Product Manual
Page 29
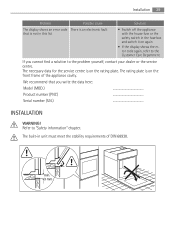
... the rating plate. The rating plate is on the front frame of DIN 68930. min. 3 mm Refer to the problem yourself, contact your dealer or the service centre. The built-in the fuse box and switch it on again • If the display shows the error code again, refer to the Customer Care Department If you write the data here: Model (MOD.) Product number (PNC) Serial number (S.N.) INSTALLATION WARNING! Installation 29 Problem...
... the rating plate. The rating plate is on the front frame of DIN 68930. min. 3 mm Refer to the problem yourself, contact your dealer or the service centre. The built-in the fuse box and switch it on again • If the display shows the error code again, refer to the Customer Care Department If you write the data here: Model (MOD.) Product number (PNC) Serial number (S.N.) INSTALLATION WARNING! Installation 29 Problem...
Product Manual
Page 32
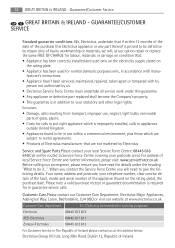
... undertake all service work under the heading "What to be defective by reason only of faulty workmanship or materials, we will need to give the following details: Your name, address and postcode, your telephone number, clear concise details of the fault, model and serial number of the appliance (found to be in use , neglect, light bulbs, removable parts of Ireland Customer Care.Please contact...
... undertake all service work under the heading "What to be defective by reason only of faulty workmanship or materials, we will need to give the following details: Your name, address and postcode, your telephone number, clear concise details of the fault, model and serial number of the appliance (found to be in use , neglect, light bulbs, removable parts of Ireland Customer Care.Please contact...


