Product Manual
Page 2
... baking 16 Roasting with your new appliance. 2 Contents Thank you much joy with Turbo Grill 17 Preserving 21 Drying 21 CARE AND CLEANING 22 Pyrolytic cleaning 22 Shelf rails 23 Oven lamp 23 Oven door and glass panels 24 WHAT TO DO IF... 25 INSTALLATION 26 DISPOSAL 28 GREAT BRITAIN & IRELAND - CONTENTS SAFETY INFORMATION 2 Children and vulnerable people safety 3 General safety 3 Installation 3 Electrical connection 4 Use 4 Care and cleaning...
... baking 16 Roasting with your new appliance. 2 Contents Thank you much joy with Turbo Grill 17 Preserving 21 Drying 21 CARE AND CLEANING 22 Pyrolytic cleaning 22 Shelf rails 23 Oven lamp 23 Oven door and glass panels 24 WHAT TO DO IF... 25 INSTALLATION 26 DISPOSAL 28 GREAT BRITAIN & IRELAND - CONTENTS SAFETY INFORMATION 2 Children and vulnerable people safety 3 General safety 3 Installation 3 Electrical connection 4 Use 4 Care and cleaning...

Product Manual
Page 3
... have a contact opening width of injury or other appliances and units. • The appliance cannot be used by the handle. • The electrical installation must have an isolation device which lets you move or sell it . If necessary, contact the supplier. • Remove all poles. Do not remove the rating plate. Always use results in operation. It can install and connect the appliance...
... have a contact opening width of injury or other appliances and units. • The appliance cannot be used by the handle. • The electrical installation must have an isolation device which lets you move or sell it . If necessary, contact the supplier. • Remove all poles. Do not remove the rating plate. Always use results in operation. It can install and connect the appliance...
Product Manual
Page 4
... accessories become hot during use the appliance as a work surface or storage surface. • The interior of fats or other foodstuff can break. • Keep the appliance clean at all times. Contact the service centre. • Make...replace or change the mains cable. This is on the open door. • Always close the appliance door when you open the door while the appliance is in a fire. • Regular cleaning prevents the surface material from the power supply. • Before maintenance, make sure that the glass panels can result in operation. do not put any objects directly...
... accessories become hot during use the appliance as a work surface or storage surface. • The interior of fats or other foodstuff can break. • Keep the appliance clean at all times. Contact the service centre. • Make...replace or change the mains cable. This is on the open door. • Always close the appliance door when you open the door while the appliance is in a fire. • Regular cleaning prevents the surface material from the power supply. • Before maintenance, make sure that the glass panels can result in operation. do not put any objects directly...
Product Manual
Page 5
... cleaning agents, abrasive sponges and stain removers • If you use of ingredients with alcohol can repair or work on the appliance. You must replace them. Disposal of the appliance • To prevent the risk of fire • Open the door carefully. The appliance becomes very hot. Heat resistant surface of the inner glass can break and shatter. • When the door glass panels...
... cleaning agents, abrasive sponges and stain removers • If you use of ingredients with alcohol can repair or work on the appliance. You must replace them. Disposal of the appliance • To prevent the risk of fire • Open the door carefully. The appliance becomes very hot. Heat resistant surface of the inner glass can break and shatter. • When the door glass panels...
Product Manual
Page 7
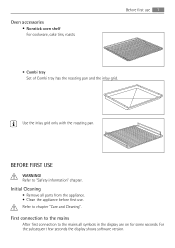
... only with the roasting pan. For the subsequent few seconds the display shows software version. Refer to chapter "Care and Cleaning". Oven accessories • Nonstick oven shelf For cookware, cake tins, roasts. First connection to the mains After first connection to the mains all parts from the appliance. • Clean the appliance before first use 7 • Combi tray Set of Combi tray has the roasting pan and the...
... only with the roasting pan. For the subsequent few seconds the display shows software version. Refer to chapter "Care and Cleaning". Oven accessories • Nonstick oven shelf For cookware, cake tins, roasts. First connection to the mains After first connection to the mains all parts from the appliance. • Clean the appliance before first use 7 • Combi tray Set of Combi tray has the roasting pan and the...

Product Manual
Page 8
... 5 seconds) . Turn the temperature control knob / to preserve food Bottom Heat To bake cakes with crispy or crusty bases and to set new time use the appliance, press the control knob. " 12 " flashes. 1. The control knob comes out. To bake on one oven level. True Fan Cooking Pizza Setting Conventional Cooking To bake maximum on one oven level food with Conventional. Oven Functions Oven function Application Light Use this function to set current...
... 5 seconds) . Turn the temperature control knob / to preserve food Bottom Heat To bake cakes with crispy or crusty bases and to set new time use the appliance, press the control knob. " 12 " flashes. 1. The control knob comes out. To bake on one oven level. True Fan Cooking Pizza Setting Conventional Cooking To bake maximum on one oven level food with Conventional. Oven Functions Oven function Application Light Use this function to set current...

Product Manual
Page 9
Also to 'Setting the time of day'. The oven heats up / Residual heat indicator If you activate an oven function, the bars in large quantities and to toast. To set how long the oven operates. Display 1 Timer 6 2 Heating Up / Residual heat indicator 3 Door lock 4 Food Sensor 5 hr / min 6 Clock functions 6 1 23 53 4 Buttons Button Function CLOCK Description To set the clock function. , MINUS, PLUS To set a countdown time. Clock Functions 9 Oven function Defrost Application To defrost frozen...
Also to 'Setting the time of day'. The oven heats up / Residual heat indicator If you activate an oven function, the bars in large quantities and to toast. To set how long the oven operates. Display 1 Timer 6 2 Heating Up / Residual heat indicator 3 Door lock 4 Food Sensor 5 hr / min 6 Clock functions 6 1 23 53 4 Buttons Button Function CLOCK Description To set the clock function. , MINUS, PLUS To set a countdown time. Clock Functions 9 Oven function Defrost Application To defrost frozen...

Product Manual
Page 10
... to switch between Time of set the MINUTE MINDER any button or open the oven door to stop the sound. Press again and again until the display shows and " 00 " flash. 2. After 90% of day and END time set hours, minutes replaced seconds on the display. 4. 10 Clock Functions SYMBOL FUNCTION END DESCRIPTION Use only when the oven function is to be activate and deactivate auto- to...
... to switch between Time of set the MINUTE MINDER any button or open the oven door to stop the sound. Press again and again until the display shows and " 00 " flash. 2. After 90% of day and END time set hours, minutes replaced seconds on the display. 4. 10 Clock Functions SYMBOL FUNCTION END DESCRIPTION Use only when the oven function is to be activate and deactivate auto- to...

Product Manual
Page 11
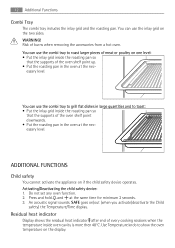
...) roasting pan. Installing the oven shelf and (deep) roasting pan together Put the oven shelf on immediately when the oven starts to the bottom. Using the Accessories 11 If you set . Refer to see the Counter function. The Timer/Residual heat symbol shows relation between the guide-bars of one of the oven levels. Press and hold and then the Counter start to monitor how long the oven operates. These...
...) roasting pan. Installing the oven shelf and (deep) roasting pan together Put the oven shelf on immediately when the oven starts to the bottom. Using the Accessories 11 If you set . Refer to see the Counter function. The Timer/Residual heat symbol shows relation between the guide-bars of one of the oven levels. Press and hold and then the Counter start to monitor how long the oven operates. These...
Product Manual
Page 12
... heat indicator Display shows the residual heat indicator after end of burns when removing the accessories from a hot oven. Use Temperature knob to toast: • Put the inlay grid inside oven cavity is more then 40°C. WARNING! Risk of every cooking sessions when the temperature inside the roasting pan so that the supports of the oven shelf point downwards. • Put the roasting pan in the oven at...
... heat indicator Display shows the residual heat indicator after end of burns when removing the accessories from a hot oven. Use Temperature knob to toast: • Put the inlay grid inside oven cavity is more then 40°C. WARNING! Risk of every cooking sessions when the temperature inside the roasting pan so that the supports of the oven shelf point downwards. • Put the roasting pan in the oven at...
Product Manual
Page 13
... oven functions, except Light, Low temperature cooking, Food sensor, Duration, End, Time delay. True Fan Cooking che Madeira cake/ fruit cakes True Fan Cooking Sponge cake True Fan Cooking Sponge cake Conventional Cooking Flan base - Oven temperature Switch-off For safety reasons the appliance deactivates itself after some models on the inner side of the oven door you deactivate the appliance, the cooling fan can find: • the numbers of the ingredients used...
... oven functions, except Light, Low temperature cooking, Food sensor, Duration, End, Time delay. True Fan Cooking che Madeira cake/ fruit cakes True Fan Cooking Sponge cake True Fan Cooking Sponge cake Conventional Cooking Flan base - Oven temperature Switch-off For safety reasons the appliance deactivates itself after some models on the inner side of the oven door you deactivate the appliance, the cooling fan can find: • the numbers of the ingredients used...
Product Manual
Page 14
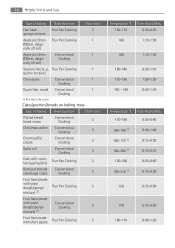
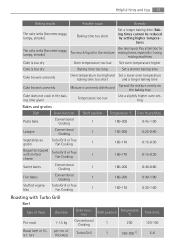
... Fan Cooking 1 quiche lorraine) Cheesecake Conventional 1 Cooking Quark flan, round Conventional 1 Cooking 1) Pre-heat the oven Cakes/pastries/breads on baking trays Type of baking Oven function Oven level Flan base - nally off set ) Apple pie (2tins Conventional 1 Ø20cm, diago- Cooking nally off set ) Savoury flan (e. 14 Helpful hints and tips Type of baking Oven function Oven level Plaited bread/ bread crown Conventional Cooking 3 Christmas stollen Conventional Cooking...
... Fan Cooking 1 quiche lorraine) Cheesecake Conventional 1 Cooking Quark flan, round Conventional 1 Cooking 1) Pre-heat the oven Cakes/pastries/breads on baking trays Type of baking Oven function Oven level Flan base - nally off set ) Apple pie (2tins Conventional 1 Ø20cm, diago- Cooking nally off set ) Savoury flan (e. 14 Helpful hints and tips Type of baking Oven function Oven level Plaited bread/ bread crown Conventional Cooking 3 Christmas stollen Conventional Cooking...

Product Manual
Page 16
... of baking True Fan Cooking True Fan Cooking Shelf positions from bottom Temperature in °C 2 levels 3 levels Time Hours:Mins. 16 Helpful hints and tips Multileveled Baking Cakes/pastries/breads on baking Baking results Possible cause Remedy The cake is not browned enough underneath Wrong oven level Place cake lower The cake sinks (becomes soggy, lumpy, streaky) Oven temperature too high Use a slightly lower setting
... of baking True Fan Cooking True Fan Cooking Shelf positions from bottom Temperature in °C 2 levels 3 levels Time Hours:Mins. 16 Helpful hints and tips Multileveled Baking Cakes/pastries/breads on baking Baking results Possible cause Remedy The cake is not browned enough underneath Wrong oven level Place cake lower The cake sinks (becomes soggy, lumpy, streaky) Oven temperature too high Use a slightly lower setting
Product Manual
Page 17
... is too dry Oven temperature too low Set oven temperature higher Cake is too dry Baking time too long Set a shorter baking time Cake browns unevenly Oven temperature too high and Set a lower oven temperature baking time too short and a longer baking time Cake browns unevenly Mixture is unevenly distributed Spread the mixture evenly on the baking tray Cake does not cook in the mixture Use less liquid. of meat Quantity Pot roast Roast beef or...
... is too dry Oven temperature too low Set oven temperature higher Cake is too dry Baking time too long Set a shorter baking time Cake browns unevenly Oven temperature too high and Set a lower oven temperature baking time too short and a longer baking time Cake browns unevenly Mixture is unevenly distributed Spread the mixture evenly on the baking tray Cake does not cook in the mixture Use less liquid. of meat Quantity Pot roast Roast beef or...
Product Manual
Page 22
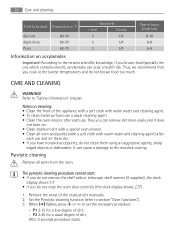
... you cook at the lowest temperatures and do not close the oven door correctly (the clock display shows „C3") . 1. When flashes, press or to "Safety information" chapter. P2 2:45 for a low degree of the appliance with a soft cloth with warm water and cleaning agent) after each use . Thus, we recommend that you do not brown food too much. Remove...
... you cook at the lowest temperatures and do not close the oven door correctly (the clock display shows „C3") . 1. When flashes, press or to "Safety information" chapter. P2 2:45 for a low degree of the appliance with a soft cloth with warm water and cleaning agent) after each use . Thus, we recommend that you do not brown food too much. Remove...

Product Manual
Page 23
Care and cleaning 23 To change length of the heat indicator come up, until the door unlocks again. The symbol and the bars of selected procedure ( P1 or P2 ), press to set , then press or to set temperature, the door locks. To install the shelf rail follow the procedure in the display PYR after end of the cleaning process. Cleaning reminder To remind you use the End...
Care and cleaning 23 To change length of the heat indicator come up, until the door unlocks again. The symbol and the bars of selected procedure ( P1 or P2 ), press to set , then press or to set temperature, the door locks. To install the shelf rail follow the procedure in the display PYR after end of the cleaning process. Cleaning reminder To remind you use the End...

Product Manual
Page 24
... glass cover and the cavity. Use the same oven lamp type. 4. CAUTION! To install the door follow the procedure in reverse. Replacing the oven lamp: 1. Clean the glass cover. 3. Removing and cleaning the door glass panels 1. CAUTION! Open the oven door as far as it . CAUTION! 24 Care and cleaning Before you remove the door from the appliance. The door is heavy! Hold of the oven door with one hand on the bottom of the interior of glass panels...
... glass cover and the cavity. Use the same oven lamp type. 4. CAUTION! To install the door follow the procedure in reverse. Replacing the oven lamp: 1. Clean the glass cover. 3. Removing and cleaning the door glass panels 1. CAUTION! Open the oven door as far as it . CAUTION! 24 Care and cleaning Before you remove the door from the appliance. The door is heavy! Hold of the oven door with one hand on the bottom of the interior of glass panels...
Product Manual
Page 25
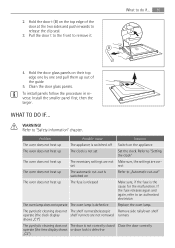
.../oven shelf operate (the clock display shelf runners are cor- 2. Hold the door glass panels on the appliance The oven does not heat up The automatic cut -out" The oven does not heat up The necessary settings are not Make sure, the settings are not removed runners shows „C1") The pyrolytic cleaning does not The door is not correctly closed Close the door correctly operate (the time display shows or door lock...
.../oven shelf operate (the clock display shelf runners are cor- 2. Hold the door glass panels on the appliance The oven does not heat up The automatic cut -out" The oven does not heat up The necessary settings are not Make sure, the settings are not removed runners shows „C1") The pyrolytic cleaning does not The door is not correctly closed Close the door correctly operate (the time display shows or door lock...
Product Manual
Page 26
... oven cavity. The rating plate is an electronic fault that you cannot find a solution to "Safety information" chapter. Refer to the problem yourself, contact your dealer or the service centre. The built-in the fuse box and switch it on again • If the display shows the error code again, refer to the Customer Care Department If you write the data here: Model (MOD.) Product number (PNC) Serial number (S.N.) INSTALLATION...
... oven cavity. The rating plate is an electronic fault that you cannot find a solution to "Safety information" chapter. Refer to the problem yourself, contact your dealer or the service centre. The built-in the fuse box and switch it on again • If the display shows the error code again, refer to the Customer Care Department If you write the data here: Model (MOD.) Product number (PNC) Serial number (S.N.) INSTALLATION...
Product Manual
Page 29
....uk Customer Care Department, Tel: (Calls may be recorded for labour, materials or carriage on condition that: • Appliance has been correctly installed and used for normal domestic purposes only, in use , neglect, light bulbs, removable parts of the appliance (found to be routed to your postcode area). GREAT BRITAIN & IRELAND - ufacturer's instructions. • Appliance hasn't been serviced, maintained, repaired, taken...
....uk Customer Care Department, Tel: (Calls may be recorded for labour, materials or carriage on condition that: • Appliance has been correctly installed and used for normal domestic purposes only, in use , neglect, light bulbs, removable parts of the appliance (found to be routed to your postcode area). GREAT BRITAIN & IRELAND - ufacturer's instructions. • Appliance hasn't been serviced, maintained, repaired, taken...


