Specification Sheet
Page 1
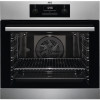
... your dish. Its clear screen enables you to adjust the timer with accuracy and precision. It has a new convection system called Hot Air, which ensures hot air circulates evenly throughout the oven cavity. Achieving even results time after time demands precisely controlled heat, distributed consistently throughout your dish The timer display provides an at a low temperature. • Compared with antifingerprint •Energy efficiency...
... your dish. Its clear screen enables you to adjust the timer with accuracy and precision. It has a new convection system called Hot Air, which ensures hot air circulates evenly throughout the oven cavity. Achieving even results time after time demands precisely controlled heat, distributed consistently throughout your dish The timer display provides an at a low temperature. • Compared with antifingerprint •Energy efficiency...
User Manual
Page 2
... innovative technologies that you might not find on the rating plate. Warning / Caution-Safety information General information and tips Environmental information Subject to change without notice. 1. SAFETY INSTRUCTIONS 4 3. CARE AND CLEANING 19 11. The information can be found on ordinary appliances. PRODUCT DESCRIPTION 6 4. DAILY USE...7 6. CLOCK FUNCTIONS 9 7. When contacting our Authorised Service Centre, ensure that help make life simpler features you...
... innovative technologies that you might not find on the rating plate. Warning / Caution-Safety information General information and tips Environmental information Subject to change without notice. 1. SAFETY INSTRUCTIONS 4 3. CARE AND CLEANING 19 11. The information can be found on ordinary appliances. PRODUCT DESCRIPTION 6 4. DAILY USE...7 6. CLOCK FUNCTIONS 9 7. When contacting our Authorised Service Centre, ensure that help make life simpler features you...
User Manual
Page 3
... taken to avoid touching heating elements. Care should be activated. • Children shall not carry out cleaning and user maintenance of it cools down. ENGLISH 3 manufacturer is in a safe and accessible location for any maintenance, disconnect the appliance from the appliance when it operates or when it appropriately. • Keep children and pets away from the power supply.
... taken to avoid touching heating elements. Care should be activated. • Children shall not carry out cleaning and user maintenance of it cools down. ENGLISH 3 manufacturer is in a safe and accessible location for any maintenance, disconnect the appliance from the appliance when it operates or when it appropriately. • Keep children and pets away from the power supply.
User Manual
Page 4
... that the parameters on the rating plate are compatible with the electrical ratings of the mains power supply. • Always use a correctly installed shockproof socket. • Do not use a damaged appliance. • Follow the installation instruction supplied with the appliance. • Always take care when moving the appliance as it must be operated with the wiring rules. 2. 4 www.aeg.com • Ensure that the...
... that the parameters on the rating plate are compatible with the electrical ratings of the mains power supply. • Always use a correctly installed shockproof socket. • Do not use a damaged appliance. • Follow the installation instruction supplied with the appliance. • Always take care when moving the appliance as it must be operated with the wiring rules. 2. 4 www.aeg.com • Ensure that the...
User Manual
Page 5
... finish the cooking. - Do not close the furniture panel until the appliance has cooled down completely after you open the appliance door while the appliance is for moist cakes. Always pull the mains plug. • Use only correct isolation devices: line protecting cut-outs, fuses (screw type fuses removed from the holder), earth leakage trips and contactors. • The electrical installation must...
... finish the cooking. - Do not close the furniture panel until the appliance has cooled down completely after you open the appliance door while the appliance is for moist cakes. Always pull the mains plug. • Use only correct isolation devices: line protecting cut-outs, fuses (screw type fuses removed from the holder), earth leakage trips and contactors. • The electrical installation must...

User Manual
Page 6
... 1 Control panel 2 Knob for the oven functions 3 Power lamp / symbol 7 4 Electronic programmer 5 Knob for this appliance is cold. There is heavy! • Clean regularly the appliance to prevent children or pets from the power supply. • Only use it . • Remove the door catch to prevent the deterioration of light bulb or halogen lamp used for the temperature 8 6 Temperature indicator / symbol 9 7 Heating element 8 Lamp 10 9 Fan 10...
... 1 Control panel 2 Knob for the oven functions 3 Power lamp / symbol 7 4 Electronic programmer 5 Knob for this appliance is cold. There is heavy! • Clean regularly the appliance to prevent children or pets from the power supply. • Only use it . • Remove the door catch to prevent the deterioration of light bulb or halogen lamp used for the temperature 8 6 Temperature indicator / symbol 9 7 Heating element 8 Lamp 10 9 Fan 10...
User Manual
Page 7
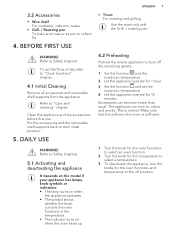
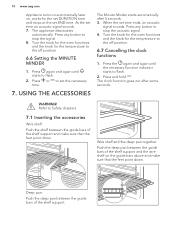
... temperature. 4. Let the appliance operate for 1 hour. 3. DAILY USE WARNING! Refer to select an oven function. 2. To deactivate the appliance, turn the knobs for the oven functions to Safety chapters. This is sufficient. 1. Put the accessories and the removable shelf supports back to the off the remaining grease. 1. 3.2 Accessories • Wire shelf For cookware, cake tins, roasts. • Grill- / Roasting pan To bake...
... temperature. 4. Let the appliance operate for 1 hour. 3. DAILY USE WARNING! Refer to select an oven function. 2. To deactivate the appliance, turn the knobs for the oven functions to Safety chapters. This is sufficient. 1. Put the accessories and the removable shelf supports back to the off the remaining grease. 1. 3.2 Accessories • Wire shelf For cookware, cake tins, roasts. • Grill- / Roasting pan To bake...
User Manual
Page 8
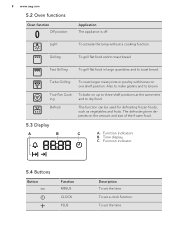
... 5.4 Buttons Button Function MINUS CLOCK PLUS Description To set a clock function. To bake on up to three shelf positions at the same time ing and to toast bread. The defrosting time depends on one shelf position. Function indicators B. Turbo Grilling To roast larger meat joints or poultry with bones on the amount and size of the frozen food. 5.3 Display A B C A. Time display C. To set the time. 8 www.aeg...
... 5.4 Buttons Button Function MINUS CLOCK PLUS Description To set a clock function. To bake on up to three shelf positions at the same time ing and to toast bread. The defrosting time depends on one shelf position. Function indicators B. Turbo Grilling To roast larger meat joints or poultry with bones on the amount and size of the frozen food. 5.3 Display A B C A. Time display C. To set the time. 8 www.aeg...
User Manual
Page 9
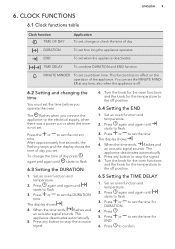
... any button to the off position. 6.5 Setting the TIME DELAY 1. Press again and again until starts to flash. 3. MINUTE MINDER To set how long the appliance operates. The flashes when you operate the oven. Set an oven function and temperature. 2. When the time ends, flashes and an acoustic signal sounds. Set an oven function and temperature. 2. Press or to set . Press to the electrical supply, when there was a power cut...
... any button to the off position. 6.5 Setting the TIME DELAY 1. Press again and again until starts to flash. 3. MINUTE MINDER To set how long the appliance operates. The flashes when you operate the oven. Set an oven function and temperature. 2. When the time ends, flashes and an acoustic signal sounds. Set an oven function and temperature. 2. Press or to set . Press to the electrical supply, when there was a power cut...
User Manual
Page 10
... to the off position. 6.7 Cancelling the clock functions 1. Turn the knob for the oven functions and the knob for the temperature to set END time. Deep pan: Push the deep pan between the guide bars of the shelf support and the wire shelf on , works for the temperature to stop the signal. 8. USING THE ACCESSORIES The Minute Minder starts automatically after some seconds. Press and hold...
... to the off position. 6.7 Cancelling the clock functions 1. Turn the knob for the oven functions and the knob for the temperature to set END time. Deep pan: Push the deep pan between the guide bars of the shelf support and the wire shelf on , works for the temperature to stop the signal. 8. USING THE ACCESSORIES The Minute Minder starts automatically after some seconds. Press and hold...
User Manual
Page 11
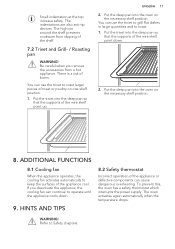
...pan so that the supports of the appliance or defective components can use the trivet to toast. 1. If you remove the accessories from slipping of the appliance cool. There is a risk of meat or poultry on the necessary shelf position. 8. To prevent this, the oven has a safety thermostat which interrupts the power... devices. Be careful when you deactivate the appliance, the cooling fan can use the trivet to grill flat dishes in large quantities and to roast larger pieces of burns. HINTS AND TIPS 8.2 Safety thermostat Incorrect operation of the wire shelf point down...
...pan so that the supports of the appliance or defective components can use the trivet to toast. 1. If you remove the accessories from slipping of the appliance cool. There is a risk of meat or poultry on the necessary shelf position. 8. To prevent this, the oven has a safety thermostat which interrupts the power... devices. Be careful when you deactivate the appliance, the cooling fan can use the trivet to grill flat dishes in large quantities and to roast larger pieces of burns. HINTS AND TIPS 8.2 Safety thermostat Incorrect operation of the wire shelf point down...
User Manual
Page 12
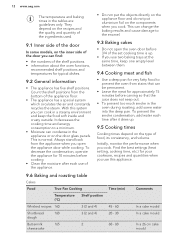
.... • To prevent too much smoke in the tables are guidelines only. This is up . 9.5 Cooking times Cooking times depend on the components when you cook. 12 www.aeg.com The temperature and baking times in the oven during roasting, add some models, on the door glass panels. To decrease the condensation, operate the appliance for typical dishes. 9.2 General information • The appliance has five shelf positions.
.... • To prevent too much smoke in the tables are guidelines only. This is up . 9.5 Cooking times Cooking times depend on the components when you cook. 12 www.aeg.com The temperature and baking times in the oven during roasting, add some models, on the door glass panels. To decrease the condensation, operate the appliance for typical dishes. 9.2 General information • The appliance has five shelf positions.
User Manual
Page 14
... - 190 2 Cannelloni1) 180 - 190 2 1) Preheat the oven for 10 minutes. 14 www.aeg.com Food Plate tarts True Fan Cooking Temperature (°C) Shelf position 170 2 Time (min) 45 - 70 Rich fruit cake 150 2 110 - 120 Victoria sand- 160 wich 1) Preheat the oven for 10 minutes. 2 (left and right) 50 - 60 Bread and pizza Food True Fan Cooking Time (min) Temperature (°C) Shelf position White...
... - 190 2 Cannelloni1) 180 - 190 2 1) Preheat the oven for 10 minutes. 14 www.aeg.com Food Plate tarts True Fan Cooking Temperature (°C) Shelf position 170 2 Time (min) 45 - 70 Rich fruit cake 150 2 110 - 120 Victoria sand- 160 wich 1) Preheat the oven for 10 minutes. 2 (left and right) 50 - 60 Bread and pizza Food True Fan Cooking Time (min) Temperature (°C) Shelf position White...
User Manual
Page 18
... - 30 Turn halfway through the drying time, open the door and let it cool down for 60 - 70 5 - 6 3 1 / 4 sour Mushrooms 50 - 60 6 - 8 3 1 / 4 Herbs 40 - 50 2 - 3 3 1 / 4 Fruit Food Plums Apricots Temperature (°C) Time (h) 60 - 70 60 - 70 8 - 10 8 - 10 Shelf position 1 position 3 3 2 positions 1 / 4 1 / 4 True Fan Cooking • Cover trays with grease proof paper or baking parchment. • For a better result, stop the oven halfway...
... - 30 Turn halfway through the drying time, open the door and let it cool down for 60 - 70 5 - 6 3 1 / 4 sour Mushrooms 50 - 60 6 - 8 3 1 / 4 Herbs 40 - 50 2 - 3 3 1 / 4 Fruit Food Plums Apricots Temperature (°C) Time (h) 60 - 70 60 - 70 8 - 10 8 - 10 Shelf position 1 position 3 3 2 positions 1 / 4 1 / 4 True Fan Cooking • Cover trays with grease proof paper or baking parchment. • For a better result, stop the oven halfway...
User Manual
Page 19
... shelf support away from the side wall. 2. Set the function . 3. Set the temperature to the nonstick coating. 10.2 Stainless steel or aluminium appliances Clean the oven door with the same precautions. 10.3 Cleaning the door gasket • Regularly do not clean them dry. Clean the oven control panel with a damp cloth or sponge only. The risk is higher for the grill pan. • Clean stubborn dirt with warm...
... shelf support away from the side wall. 2. Set the function . 3. Set the temperature to the nonstick coating. 10.2 Stainless steel or aluminium appliances Clean the oven door with the same precautions. 10.3 Cleaning the door gasket • Regularly do not clean them dry. Clean the oven control panel with a damp cloth or sponge only. The risk is higher for the grill pan. • Clean stubborn dirt with warm...
User Manual
Page 20
..., clean the inside of burns. 10.6 Cleaning the oven door The oven door has three glass panels.You can close if you try to remove the glass panels before you remove the oven door. Open the door fully and hold the two door hinges. 3. Hold the door glass panels by their top edge and carefully pull them . CAUTION! Lift and turn the levers on the two hinges. 4. Let the appliance operate for 30 minutes. 5. 20 www.aeg...
..., clean the inside of burns. 10.6 Cleaning the oven door The oven door has three glass panels.You can close if you try to remove the glass panels before you remove the oven door. Open the door fully and hold the two door hinges. 3. Hold the door glass panels by their top edge and carefully pull them . CAUTION! Lift and turn the levers on the two hinges. 4. Let the appliance operate for 30 minutes. 5. 20 www.aeg...
User Manual
Page 21
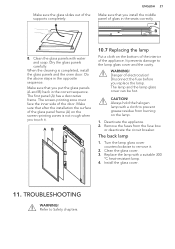
... lamp with water and soap. Deactivate the appliance. 2. Install the glass cover. 11. Clean the glass panels with a cloth to remove it . AB 10.7 Replacing the lamp Put a cloth on the lamp. 1. Dry the glass panels carefully. The first panel (A) has a decorative frame. Turn the lamp glass cover counterclockwise to prevent grease residue from the fuse box or deactivate the circuit breaker. A B 8. The screen-printing zone must face the...
... lamp with water and soap. Deactivate the appliance. 2. Install the glass cover. 11. Clean the glass panels with a cloth to remove it . AB 10.7 Replacing the lamp Put a cloth on the lamp. 1. Dry the glass panels carefully. The first panel (A) has a decorative frame. Turn the lamp glass cover counterclockwise to prevent grease residue from the fuse box or deactivate the circuit breaker. A B 8. The screen-printing zone must face the...
User Manual
Page 22
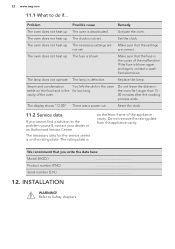
... the oven. Reset the clock. 11.2 Service data If you write the data here: Model (MOD.) Product number (PNC) Serial number (S.N.) 12. INSTALLATION WARNING! Set the clock. The lamp is blown. Do not remove the rating plate from the appliance cavity. The oven does not heat up . Activate the oven. The oven does not heat up . The necessary settings are correct. Make sure that you cannot find a solution to the problem yourself...
... the oven. Reset the clock. 11.2 Service data If you write the data here: Model (MOD.) Product number (PNC) Serial number (S.N.) 12. INSTALLATION WARNING! Set the clock. The lamp is blown. Do not remove the rating plate from the appliance cavity. The oven does not heat up . Activate the oven. The oven does not heat up . The necessary settings are correct. Make sure that you cannot find a solution to the problem yourself...
User Manual
Page 23
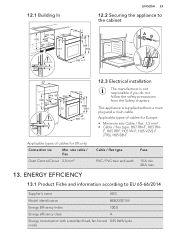
... Oven Control Circuit 2,5 mm² Cable / flex type Fuse PVC / PVC twin and earth 15 A min. 20 A max. 13. F, H05 RRF, H05 VV-F, H05 V2V2-F (T90), H05 BB-F Applicable types of cables for UK only Connection via Min. 12.1 Building In ENGLISH 23 12.2 Securing the appliance to EU 65-66/2014 Supplier's name AEG Model identification BEB231011M...
... Oven Control Circuit 2,5 mm² Cable / flex type Fuse PVC / PVC twin and earth 15 A min. 20 A max. 13. F, H05 RRF, H05 VV-F, H05 V2V2-F (T90), H05 BB-F Applicable types of cables for UK only Connection via Min. 12.1 Building In ENGLISH 23 12.2 Securing the appliance to EU 65-66/2014 Supplier's name AEG Model identification BEB231011M...

User Manual
Page 24
... containers to cook. 24 www.aeg.com Number of cavities Heat source Volume Type of electrical and electronic appliances. Methods for measuring performance. 13.2 Energy saving The appliance contains features which help you put the food inside the oven will continue to recycle it closed as much as possible during everyday cooking. General hints Make sure that the oven door is longer...
... containers to cook. 24 www.aeg.com Number of cavities Heat source Volume Type of electrical and electronic appliances. Methods for measuring performance. 13.2 Energy saving The appliance contains features which help you put the food inside the oven will continue to recycle it closed as much as possible during everyday cooking. General hints Make sure that the oven door is longer...


