
Product Manual
Page 4
... packaging. • Do not install or use of the appliance must install this appliance. • Remove all packaging away from children. • Keep children and pets away from the other appliances and units. • Make sure that the electrical information on the rating plate agrees with the same height. They must be made by the handle. • Keep the...
... packaging. • Do not install or use of the appliance must install this appliance. • Remove all packaging away from children. • Keep children and pets away from the other appliances and units. • Make sure that the electrical information on the rating plate agrees with the same height. They must be made by the handle. • Keep the...

Product Manual
Page 5
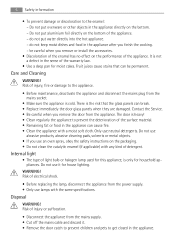
... plug. • Use only correct isolation devices: line protecting cut-outs, fuses (screw type fuses re- Risk of live and insulated parts must be removed without tools. • Connect the mains plug to the mains cable. Do not touch the heating ele- Risk of minimum 3 mm. Make sure that there is hot. • The shock protection of injury, burns or electric...
... plug. • Use only correct isolation devices: line protecting cut-outs, fuses (screw type fuses re- Risk of live and insulated parts must be removed without tools. • Connect the mains plug to the mains cable. Do not touch the heating ele- Risk of minimum 3 mm. Make sure that there is hot. • The shock protection of injury, burns or electric...
Product Manual
Page 6
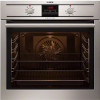
... you remove or install the accessories. • Discoloration of the warranty law. • Use a deep pan for moist cakes. Do not use an oven spray, obey the safety instructions on the bottom of the appliance. Do not put water directly into the hot appliance. - do not put ovenware or other objects in the appliance can break. • Replace immediately the door glass panels...
... you remove or install the accessories. • Discoloration of the warranty law. • Use a deep pan for moist cakes. Do not use an oven spray, obey the safety instructions on the bottom of the appliance. Do not put water directly into the hot appliance. - do not put ovenware or other objects in the appliance can break. • Replace immediately the door glass panels...

Product Manual
Page 7
PRODUCT DESCRIPTION General overview 23 1 Product description 7 4 56 7 8 5 4 13 3 9 2 1 10 11 12 1 Control panel 2 Control knob for oven functions 3 Power lamp/symbol 4 Electronic programmer 5 Control knob for temperature 6 Temperature lamp/symbol/indicator 7 Heating element 8 Oven lamp 9 Fan 10 Rear wall heating element 11 Bottom heat 12 Shelf support, removable 13 Shelf positions
PRODUCT DESCRIPTION General overview 23 1 Product description 7 4 56 7 8 5 4 13 3 9 2 1 10 11 12 1 Control panel 2 Control knob for oven functions 3 Power lamp/symbol 4 Electronic programmer 5 Control knob for temperature 6 Temperature lamp/symbol/indicator 7 Heating element 8 Oven lamp 9 Fan 10 Rear wall heating element 11 Bottom heat 12 Shelf support, removable 13 Shelf positions

Product Manual
Page 8
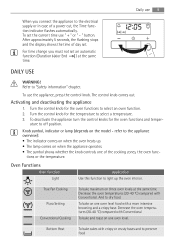
Refer to collect fat. • Trivet For roasting and grilling. Initial Cleaning • Remove all parts from the appliance. • Clean the appliance before first use Accessories • Nonstick wire shelf For cookware, cake tins, roasts. • Grill / roasting pan To bake and roast or as pan to chapter "Care and Cleaning". BEFORE FIRST USE WARNING! Setting the time The oven only operates after time set. 8 Before first use . Use the trivet only with the grill/roasting pan. Refer to "Safety information" chapter.
Refer to collect fat. • Trivet For roasting and grilling. Initial Cleaning • Remove all parts from the appliance. • Clean the appliance before first use Accessories • Nonstick wire shelf For cookware, cake tins, roasts. • Grill / roasting pan To bake and roast or as pan to chapter "Care and Cleaning". BEFORE FIRST USE WARNING! Setting the time The oven only operates after time set. 8 Before first use . Use the trivet only with the grill/roasting pan. Refer to "Safety information" chapter.
Product Manual
Page 9
... knob controls one oven level. To bake on one oven level food with Conventional To bake and roast on when the oven heats up the oven interior. refer to the electrical supply or in case of day set. Decrease the oven temperatures (20-40 °C) compared with a more intensive browning and a crispy base. To set the current time use the appliance, press the control knob. For time change you connect the...
... knob controls one oven level. To bake on one oven level food with Conventional To bake and roast on when the oven heats up the oven interior. refer to the electrical supply or in case of day set. Decrease the oven temperatures (20-40 °C) compared with a more intensive browning and a crispy base. To set the current time use the appliance, press the control knob. For time change you connect the...

Product Manual
Page 10
... be switched on and off time for browning food e.g. To roast larger joints of day Minute minder Duration End Application Shows the time. gratin. 12 3 2 6 5 4 CLOCK FUNCTIONS Clock function Time of meat or poultry on the operation of the grill and to toast. 10 Clock functions Oven function Defrost Grilling Fast Grilling Turbo Grilling Electronic programmer 1 Function indicators 2 Function indicators 3 Time display 4 Button "+" 5 Selection button 6 Button...
... be switched on and off time for browning food e.g. To roast larger joints of day Minute minder Duration End Application Shows the time. gratin. 12 3 2 6 5 4 CLOCK FUNCTIONS Clock function Time of meat or poultry on the operation of the grill and to toast. 10 Clock functions Oven function Defrost Grilling Fast Grilling Turbo Grilling Electronic programmer 1 Function indicators 2 Function indicators 3 Time display 4 Button "+" 5 Selection button 6 Button...

Product Manual
Page 11
... the wire shelf have side edges. Using the accessories 11 2. These edges and the shape of the guide-bars causes the anti-tilt safety for 2 minutes. To set the time for Minute minder , Duration or End , use "+" or "-" button. Push any button to "Safety information" chapter. The related function indicator comes on. tion. Turn the oven functions control knob and the temperature control...
... the wire shelf have side edges. Using the accessories 11 2. These edges and the shape of the guide-bars causes the anti-tilt safety for 2 minutes. To set the time for Minute minder , Duration or End , use "+" or "-" button. Push any button to "Safety information" chapter. The related function indicator comes on. tion. Turn the oven functions control knob and the temperature control...
Product Manual
Page 12
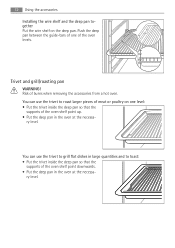
... can use the trivet to grill flat dishes in large quantities and to roast larger pieces of meat or poultry on the deep pan. Trivet and grill/roasting pan WARNING! Push the deep pan between the guide-bars of one level: • Put the trivet inside the deep pan so that the supports of burns when removing the accessories from a hot oven. ry...
... can use the trivet to grill flat dishes in large quantities and to roast larger pieces of meat or poultry on the deep pan. Trivet and grill/roasting pan WARNING! Push the deep pan between the guide-bars of one level: • Put the trivet inside the deep pan so that the supports of burns when removing the accessories from a hot oven. ry...
Product Manual
Page 13
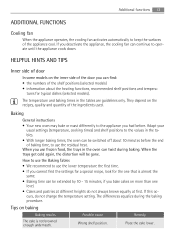
... at different heights do not change the temperature setting. How to use the lower temperature the first time. • If you can continue to use the Baking Tables • We recommend to operate until the appliance cools down. Place the cake lower. The temperature and baking times in the oven can be gone. Baking General instructions • Your new oven may bake or roast differently to use frozen food, the trays in...
... at different heights do not change the temperature setting. How to use the lower temperature the first time. • If you can continue to use the Baking Tables • We recommend to operate until the appliance cools down. Place the cake lower. The temperature and baking times in the oven can be gone. Baking General instructions • Your new oven may bake or roast differently to use frozen food, the trays in...
Product Manual
Page 14
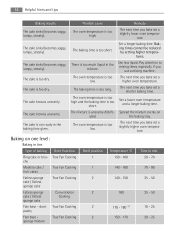
... Remedy The oven temperature is too low. Set a longer baking time. tures. Pay attention to mixing times, especially if you bake set a slightly higher oven tempera- The cake is too short. The cake browns unevenly. Set a lower oven temperature and a longer baking time. the baking tray. The oven temperature is too high and the baking time is too dry. The next time you bake set a higher oven temperature. Use less liquid. The baking time is too dry. Baking times cannot...
... Remedy The oven temperature is too low. Set a longer baking time. tures. Pay attention to mixing times, especially if you bake set a slightly higher oven tempera- The cake is too short. The cake browns unevenly. Set a lower oven temperature and a longer baking time. the baking tray. The oven temperature is too high and the baking time is too dry. The next time you bake set a higher oven temperature. Use less liquid. The baking time is too dry. Baking times cannot...

Product Manual
Page 18
... deep pan. • Roast lean meats in a roasting tin with a lid. of thickness Turbo Grilling 1 170 - 180 1) 8 - 10 1) Preheat the oven Pork Type of thickness Turbo Grilling 1 190 - 200 1) 5 - 6 Roast beef or fillet: medium per cm. Turbo Grilling or bles True Fan Cooking 1 160 - 170 30 - 60 1) Pre-heat the oven Roasting Roasting dishes • Use heat-resistant ovenware to roast (please read the instructions of meat, that...
... deep pan. • Roast lean meats in a roasting tin with a lid. of thickness Turbo Grilling 1 170 - 180 1) 8 - 10 1) Preheat the oven Pork Type of thickness Turbo Grilling 1 190 - 200 1) 5 - 6 Roast beef or fillet: medium per cm. Turbo Grilling or bles True Fan Cooking 1 160 - 170 30 - 60 1) Pre-heat the oven Roasting Roasting dishes • Use heat-resistant ovenware to roast (please read the instructions of meat, that...
Product Manual
Page 21
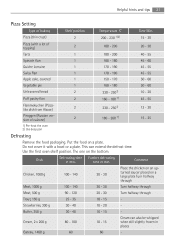
...Piroggen (Russian version of baking Shelf position Temperature °C Time Min. This can also be whipped when still slightly frozen in min. The one on a plate. Dish Defrosting time Further defrosting in places ...Turn halfway through Meat, 500 g 90 - 120 20 - 30 Turn halfway through Trout, 150 g 25 - 35 10 - 15 - Use the first oven shelf position. Butter, 250 g 30 - 40 10 - 15 - Strawberries, 300 g 30 - 40 10 - 20 - Helpful hints and tips 21 Pizza Setting Type of calzone) 2 180 - 200 1) 15 - 25 1) Pre-heat the oven 2) Use deep pan Defrosting Remove...
...Piroggen (Russian version of baking Shelf position Temperature °C Time Min. This can also be whipped when still slightly frozen in min. The one on a plate. Dish Defrosting time Further defrosting in places ...Turn halfway through Meat, 500 g 90 - 120 20 - 30 Turn halfway through Trout, 150 g 25 - 35 10 - 15 - Use the first oven shelf position. Butter, 250 g 30 - 40 10 - 15 - Strawberries, 300 g 30 - 40 10 - 20 - Helpful hints and tips 21 Pizza Setting Type of calzone) 2 180 - 200 1) 15 - 25 1) Pre-heat the oven 2) Use deep pan Defrosting Remove...

Product Manual
Page 22
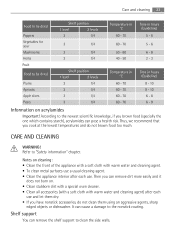
... fruit Preserve Temperature in °C Cooking time until Continue to 100°C (see the table). Open the appliance door and let the appliance cool down. After that finish the drying process. Carrots 1) 160 - 170 50 - 60 5 - 10 Cucumbers 160 - 170 50 - 60 - Bottom Heat Things to note: • Use only preserve jars of water into the baking tray to...
... fruit Preserve Temperature in °C Cooking time until Continue to 100°C (see the table). Open the appliance door and let the appliance cool down. After that finish the drying process. Carrots 1) 160 - 170 50 - 60 5 - 10 Cucumbers 160 - 170 50 - 60 - Bottom Heat Things to note: • Use only preserve jars of water into the baking tray to...
Product Manual
Page 23
... not burn on. • Clean stubborn dirt with a special oven cleaner. • Clean all accessories (with a soft cloth with warm water and cleaning agent. • To clean metal surfaces use a usual cleaning agent. • Clean the appliance interior after each use and let them using an aggressive agents, sharp edged objects or dishwasher. Shelf support You can remove the shelf support to the newest scientific...
... not burn on. • Clean stubborn dirt with a special oven cleaner. • Clean all accessories (with a soft cloth with warm water and cleaning agent. • To clean metal surfaces use a usual cleaning agent. • Clean the appliance interior after each use and let them using an aggressive agents, sharp edged objects or dishwasher. Shelf support You can remove the shelf support to the newest scientific...

Product Manual
Page 24
... circuit breaker. To install the shelf support follow the procedure in reverse. CAUTION! There is a risk of the side wall to the front! 2 1 Oven lamp WARNING! Before you change the oven lamp: • Deactivate the appliance. • Remove the fuses from the back of electrical shock. Clean the glass cover. 3. Turn the lamp glass cover counterclockwise to the lamp glass cover and the cavity. Use the same oven lamp type. 4. Install the glass cover...
... circuit breaker. To install the shelf support follow the procedure in reverse. CAUTION! There is a risk of the side wall to the front! 2 1 Oven lamp WARNING! Before you change the oven lamp: • Deactivate the appliance. • Remove the fuses from the back of electrical shock. Clean the glass cover. 3. Turn the lamp glass cover counterclockwise to the lamp glass cover and the cavity. Use the same oven lamp type. 4. Install the glass cover...

Product Manual
Page 25
... (A) on the ceiling to clean. To install the door follow the procedure in opposite sequence. The ceiling is a risk of glass panels if different for the different models. CAUTION! Remove the shelf supports. 2. Install the heating element in reverse. Hold the heating element with the two hands at an up angle. Care and cleaning 25 Ceiling You can fold down the heating element on the two door hinges. 3. WARNING!
... (A) on the ceiling to clean. To install the door follow the procedure in opposite sequence. The ceiling is a risk of glass panels if different for the different models. CAUTION! Remove the shelf supports. 2. Install the heating element in reverse. Hold the heating element with the two hands at an up angle. Care and cleaning 25 Ceiling You can fold down the heating element on the two door hinges. 3. WARNING!
Product Manual
Page 26
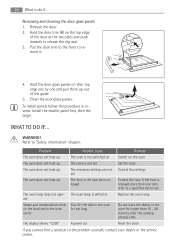
... necessary settings are not Control the settings set The oven does not heat up out of the door at the two sides and push inwards to do if... Remove the door. 2. WARNING! Removing and cleaning the door glass panels 1. Hold the door glass panels on the oven The oven does not heat up The clock is released more than 15 - 20 minutes after the cooking process ends The display shows "12.00" A power cut Reset the clock...
... necessary settings are not Control the settings set The oven does not heat up out of the door at the two sides and push inwards to do if... Remove the door. 2. WARNING! Removing and cleaning the door glass panels 1. Hold the door glass panels on the oven The oven does not heat up The clock is released more than 15 - 20 minutes after the cooking process ends The display shows "12.00" A power cut Reset the clock...
Product Manual
Page 27
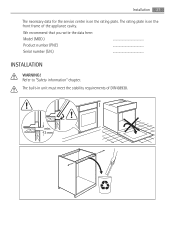
min. 3 mm The built-in unit must meet the stability requirements of the appliance cavity. Installation 27 The necessary data for the service centre is on the rating plate. We recommend that you write the data here: Model (MOD.) Product number (PNC) Serial number (S.N.) INSTALLATION WARNING! The rating plate is on the front frame of DIN 68930. Refer to "Safety information" chapter.
min. 3 mm The built-in unit must meet the stability requirements of the appliance cavity. Installation 27 The necessary data for the service centre is on the rating plate. We recommend that you write the data here: Model (MOD.) Product number (PNC) Serial number (S.N.) INSTALLATION WARNING! The rating plate is on the front frame of DIN 68930. Refer to "Safety information" chapter.
Product Manual
Page 31
... which is in use , neglect, light bulbs, removable parts of glass, plastic. • Costs for normal domestic purposes only, in guarantee service calls. Guarantee/Customer Service 31 GB IE GREAT BRITAIN & IRELAND - For address of Electrolux manufacturer that : • Appliance has been correctly installed and used only on the electricity supply stated on the rating plate. • Appliance has been used for calls to...
... which is in use , neglect, light bulbs, removable parts of glass, plastic. • Costs for normal domestic purposes only, in guarantee service calls. Guarantee/Customer Service 31 GB IE GREAT BRITAIN & IRELAND - For address of Electrolux manufacturer that : • Appliance has been correctly installed and used only on the electricity supply stated on the rating plate. • Appliance has been used for calls to...


