Product Manual
Page 3
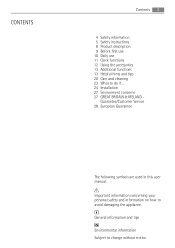
... this user manual: Important information concerning your personal safety and information on how to change without notice. General information and tips Environmental information Subject to avoid damaging the appliance. CONTENTS Contents 3 4 Safety information 5 Safety instructions 8 Product description 9 Before first use 10 Daily use 11 Clock functions 12 Using the accessories 13 Additional functions 13 Helpful hints and tips 20 Care and cleaning...
... this user manual: Important information concerning your personal safety and information on how to change without notice. General information and tips Environmental information Subject to avoid damaging the appliance. CONTENTS Contents 3 4 Safety information 5 Safety instructions 8 Product description 9 Before first use 10 Daily use 11 Clock functions 12 Using the accessories 13 Additional functions 13 Helpful hints and tips 20 Care and cleaning...

Product Manual
Page 4
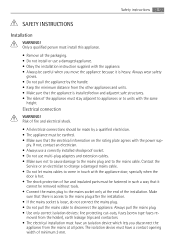
... not use a steam cleaner to clean the appliance. • Before maintenance cut the power supply. • Do not use oven gloves to remove or put in shattering of the glass. • To remove the shelf supports first pull the front of experience and knowledge if they can be used by children aged from the appliance when it operates or when it . • Cleaning and user...
... not use a steam cleaner to clean the appliance. • Before maintenance cut the power supply. • Do not use oven gloves to remove or put in shattering of the glass. • To remove the shelf supports first pull the front of experience and knowledge if they can be used by children aged from the appliance when it operates or when it . • Cleaning and user...
Product Manual
Page 5
... it cannot be careful when you disconnect the appliance from the holder), earth leakage trips and contactors. • The electrical installation must install this appliance. • Remove all poles. If not, contact an electrician. • Always use a correctly installed shockproof socket. • Do not use a damaged appliance. • Obey the installation instruction supplied with the same height. Contact the Service or an...
... it cannot be careful when you disconnect the appliance from the holder), earth leakage trips and contactors. • The electrical installation must install this appliance. • Remove all poles. If not, contact an electrician. • Always use a correctly installed shockproof socket. • Do not use a damaged appliance. • Obey the installation instruction supplied with the same height. Contact the Service or an...

Product Manual
Page 6
... or electric shock or explosion. • Use this appliance in a household environment. • Do not change the specification of ingredients with water. • Do not apply pressure on the open door. • Do not use oven gloves to the enamel: - Always use the appliance as a work surface or...in operation. Do not put water directly into the hot appliance. - Care and Cleaning WARNING! Do not put flammable products or items that the ventilation openings are in the appliance directly on the performance of the warranty law. • Use a deep pan for moist cakes. The use ....
... or electric shock or explosion. • Use this appliance in a household environment. • Do not change the specification of ingredients with water. • Do not apply pressure on the open door. • Do not use oven gloves to the enamel: - Always use the appliance as a work surface or...in operation. Do not put water directly into the hot appliance. - Care and Cleaning WARNING! Do not put flammable products or items that the ventilation openings are in the appliance directly on the performance of the warranty law. • Use a deep pan for moist cakes. The use ....
Product Manual
Page 7
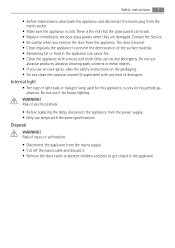
... the risk that the glass panels can cause fire. • Clean the appliance with any kind of electrical shock. • Before replacing the lamp, disconnect the appliance from the mains supply. • Cut off the mains cable and discard it for household appliances. Contact the Service. • Be careful when you use neutral detergents. Safety instructions 7 • Before maintenance, deactivate...
... the risk that the glass panels can cause fire. • Clean the appliance with any kind of electrical shock. • Before replacing the lamp, disconnect the appliance from the mains supply. • Cut off the mains cable and discard it for household appliances. Contact the Service. • Be careful when you use neutral detergents. Safety instructions 7 • Before maintenance, deactivate...

Product Manual
Page 9
Setting the time The oven only operates after time set. BEFORE FIRST USE WARNING! Refer to chapter "Care and Cleaning". Initial Cleaning • Remove all parts from the appliance. • Clean the appliance before first use 9 • Grill / roasting pan To bake and roast or as pan to collect fat. • Trivet For roasting and grilling. Use the trivet only with the grill/roasting pan. Refer to "Safety information" chapter. Before first use . Accessories • Wire shelf For cookware, cake tins, roasts.
Setting the time The oven only operates after time set. BEFORE FIRST USE WARNING! Refer to chapter "Care and Cleaning". Initial Cleaning • Remove all parts from the appliance. • Clean the appliance before first use 9 • Grill / roasting pan To bake and roast or as pan to collect fat. • Trivet For roasting and grilling. Use the trivet only with the grill/roasting pan. Refer to "Safety information" chapter. Before first use . Accessories • Wire shelf For cookware, cake tins, roasts.

Product Manual
Page 10
... appliance turn the control knobs for the temperature to off position. Oven functions Oven function Light Application To activate the oven lamp without flavour transference. To make toast. After approximately 5 seconds, the flashing stops and the display shows the time of the cooking zones, the oven func- Activating and deactivating the appliance 1. True Fan Cooking Defrost To roast or roast and bake food with the same cooking temperature, on...
... appliance turn the control knobs for the temperature to off position. Oven functions Oven function Light Application To activate the oven lamp without flavour transference. To make toast. After approximately 5 seconds, the flashing stops and the display shows the time of the cooking zones, the oven func- Activating and deactivating the appliance 1. True Fan Cooking Defrost To roast or roast and bake food with the same cooking temperature, on...

Product Manual
Page 11
... the functions Duration and End the oven stops automatically. 4. To set a countdown time. Set an oven function and temperature (necessary only for 2 minutes. In this case first set the switch-off automatically later. To set how long the oven has to stop the signal. To set Duration , then End . Electronic programmer 1 Function indicators 2 Function indicators 3 Time display 4 Button "+" 5 Selection button 6 Button "-" Clock functions 11 12 3 2 6 5 4 CLOCK FUNCTIONS Clock function Time of the...
... the functions Duration and End the oven stops automatically. 4. To set a countdown time. Set an oven function and temperature (necessary only for 2 minutes. In this case first set the switch-off automatically later. To set how long the oven has to stop the signal. To set Duration , then End . Electronic programmer 1 Function indicators 2 Function indicators 3 Time display 4 Button "+" 5 Selection button 6 Button "-" Clock functions 11 12 3 2 6 5 4 CLOCK FUNCTIONS Clock function Time of the...

Product Manual
Page 12
... hold button "- After some seconds the clock function goes out. ". USING THE ACCESSORIES WARNING! Refer to off position. Installing the Oven Accessories The deep pan and the wire shelf have side edges. Cancelling the clock functions 1. Trivet and grill/roasting pan WARNING! Installing the wire shelf and the deep pan together Put the wire shelf on the deep pan. Turn the oven functions control knob and the temperature control knob...
... hold button "- After some seconds the clock function goes out. ". USING THE ACCESSORIES WARNING! Refer to off position. Installing the Oven Accessories The deep pan and the wire shelf have side edges. Cancelling the clock functions 1. Trivet and grill/roasting pan WARNING! Installing the wire shelf and the deep pan together Put the wire shelf on the deep pan. Turn the oven functions control knob and the temperature control knob...
Product Manual
Page 13
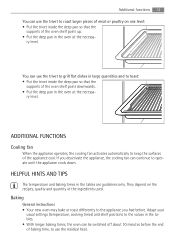
... deep pan in the oven at the necessa- Baking General instructions • Your new oven may bake or roast differently to operate until the appliance cools down. ry level. HELPFUL HINTS AND TIPS The temperature and baking times in the tables are guidelines only. ry level. You can use the residual heat. Additional functions 13 You can use the trivet to roast larger pieces of meat or...
... deep pan in the oven at the necessa- Baking General instructions • Your new oven may bake or roast differently to operate until the appliance cools down. ry level. HELPFUL HINTS AND TIPS The temperature and baking times in the tables are guidelines only. ry level. You can use the residual heat. Additional functions 13 You can use the trivet to roast larger pieces of meat or...

Product Manual
Page 14
..., the trays in the baking time given. Tips on more than one level: Baking in the mixture. The oven temperature is too dry. The next time you bake set a slightly lower oven tempera- Baking times cannot be gone. Use less liquid. The cake is too high. Spread the mixture evenly on one level. • Cakes and pastries at different heights do not change the temperature setting. The...
..., the trays in the baking time given. Tips on more than one level: Baking in the mixture. The oven temperature is too dry. The next time you bake set a slightly lower oven tempera- Baking times cannot be gone. Use less liquid. The cake is too high. Spread the mixture evenly on one level. • Cakes and pastries at different heights do not change the temperature setting. The...
Product Manual
Page 15
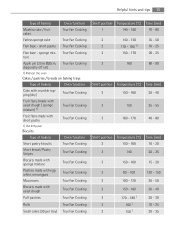
... Fan Cooking diagonally off set) 1) Preheat the oven Cakes / pastries / breads on baking trays Type of baking Oven function Cake with crumble topping (dry) True Fan Cooking Fruit flans (made with yeast dough / sponge mixture) 1) True Fan Cooking Fruit flans made with short pastry True Fan Cooking 1) Use deep pan Biscuits Type of baking Oven function Madeira cake / fruit cakes True Fan Cooking Fatless sponge cake Flan base - short pastry True Fan Cooking...
... Fan Cooking diagonally off set) 1) Preheat the oven Cakes / pastries / breads on baking trays Type of baking Oven function Cake with crumble topping (dry) True Fan Cooking Fruit flans (made with yeast dough / sponge mixture) 1) True Fan Cooking Fruit flans made with short pastry True Fan Cooking 1) Use deep pan Biscuits Type of baking Oven function Madeira cake / fruit cakes True Fan Cooking Fatless sponge cake Flan base - short pastry True Fan Cooking...

Product Manual
Page 19
... 6 - 8 Toast / Toast 1) 5 1 - 3 1 - 3 Toast with topping 4 6 - 8 - 1) Preheat the oven Defrosting Remove the food packaging. Cream, 2 x 200 g 80 - 100 10 - 15 Cream can extend the defrost time. time in min. Strawberries, 300 g 30 - 40 10 - 20 - Open the appliance door and let the appliance cool down. For best results: deactivate the appliance after half the time required. Use the first oven shelf position.
... 6 - 8 Toast / Toast 1) 5 1 - 3 1 - 3 Toast with topping 4 6 - 8 - 1) Preheat the oven Defrosting Remove the food packaging. Cream, 2 x 200 g 80 - 100 10 - 15 Cream can extend the defrost time. time in min. Strawberries, 300 g 30 - 40 10 - 20 - Open the appliance door and let the appliance cool down. For best results: deactivate the appliance after half the time required. Use the first oven shelf position.
Product Manual
Page 20
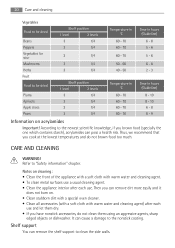
... one which contains starch), acrylamides can remove dirt more easily and it does not burn on. • Clean stubborn dirt with a special oven cleaner. • Clean all accessories (with a soft cloth with warm water and cleaning agent. • To clean metal surfaces use a usual cleaning agent. • Clean the appliance interior after each use and let them using an aggressive agents, sharp edged...
... one which contains starch), acrylamides can remove dirt more easily and it does not burn on. • Clean stubborn dirt with a special oven cleaner. • Clean all accessories (with a soft cloth with warm water and cleaning agent. • To clean metal surfaces use a usual cleaning agent. • Clean the appliance interior after each use and let them using an aggressive agents, sharp edged...
Product Manual
Page 21
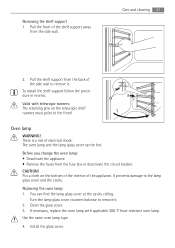
... the appliance. • Remove the fuses from the back of the appliance. Replacing the oven lamp: 1. Use the same oven lamp type. 4. Turn the lamp glass cover counterclockwise to remove it . 2. Pull the front of electrical shock. If necessary, replace the oven lamp with telescopic runners: The retaining pins on the bottom of the interior of the side wall to remove it . Care and cleaning 21 2. Put a cloth...
... the appliance. • Remove the fuses from the back of the appliance. Replacing the oven lamp: 1. Use the same oven lamp type. 4. Turn the lamp glass cover counterclockwise to remove it . 2. Pull the front of electrical shock. If necessary, replace the oven lamp with telescopic runners: The retaining pins on the bottom of the interior of the side wall to remove it . Care and cleaning 21 2. Put a cloth...
Product Manual
Page 22
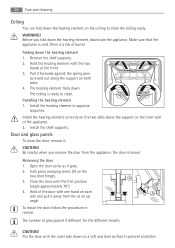
... that the appliance is heavy! Hold the heating element with one hand on both sides. 4. Install the heating element in reverse. Hold of the appliance. 2. Door and glass panels To clean the door, remove it goes. 2. CAUTION! Open the door as far as it . Put the door with the outer side down on the inner wall of the door with the two hands at an up...
... that the appliance is heavy! Hold the heating element with one hand on both sides. 4. Install the heating element in reverse. Hold of the appliance. 2. Door and glass panels To clean the door, remove it goes. 2. CAUTION! Open the door as far as it . Put the door with the outer side down on the inner wall of the door with the two hands at an up...
Product Manual
Page 23
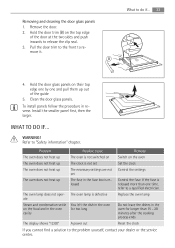
... than 15 - 20 minutes after the cooking process ends The display shows "12.00" A power cut Reset the clock If you cannot find a solution to a qualified electrician. Hold the door glass panels on the top edge of the guide 5. Removing and cleaning the door glass panels 1. Problem Possible cause Remedy The oven does not heat up The fuse in the fuse box is not switched on Switch on the food and in the...
... than 15 - 20 minutes after the cooking process ends The display shows "12.00" A power cut Reset the clock If you cannot find a solution to a qualified electrician. Hold the door glass panels on the top edge of the guide 5. Removing and cleaning the door glass panels 1. Problem Possible cause Remedy The oven does not heat up The fuse in the fuse box is not switched on Switch on the food and in the...
Product Manual
Page 24
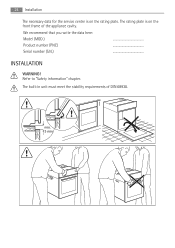
The built-in unit must meet the stability requirements of the appliance cavity. min. 3 mm We recommend that you write the data here: Model (MOD.) Product number (PNC) Serial number (S.N.) INSTALLATION WARNING! The rating plate is on the front frame of DIN 68930. Refer to "Safety information" chapter. 24 Installation The necessary data for the service centre is on the rating plate.
The built-in unit must meet the stability requirements of the appliance cavity. min. 3 mm We recommend that you write the data here: Model (MOD.) Product number (PNC) Serial number (S.N.) INSTALLATION WARNING! The rating plate is on the front frame of DIN 68930. Refer to "Safety information" chapter. 24 Installation The necessary data for the service centre is on the rating plate.
Product Manual
Page 27
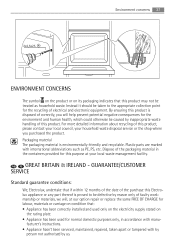
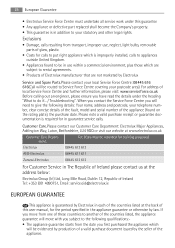
...; Appliance has been correctly installed and used only on the electricity supply stated on the rating plate. • Appliance has been used for normal domestic purposes only, in the containers provided for this purpose at our option repair or replace the same FREE OF CHARGE for labour, ...by inappropriate waste handling of this product. Packaging material The packaging material is disposed of correctly, you purchased the product. Plastic parts are marked with by person not authorised by us. facturer's instructions. • Appliance hasn't been serviced, maintained, repaired, taken apart or...
...; Appliance has been correctly installed and used only on the electricity supply stated on the rating plate. • Appliance has been used for normal domestic purposes only, in the containers provided for this purpose at our option repair or replace the same FREE OF CHARGE for labour, ...by inappropriate waste handling of this product. Packaging material The packaging material is disposed of correctly, you purchased the product. Plastic parts are marked with by person not authorised by us. facturer's instructions. • Appliance hasn't been serviced, maintained, repaired, taken apart or...
Product Manual
Page 28
... in addition to your telephone number, clear concise details of the fault, model and serial number of this user manual, for the period specified in each of the countries listed at the back of the appliance (found on the rating plate), the purchase date. For address of glass, plastic. • Costs for in use , neglect, light bulbs, removable parts of local Service Force Centre and further information...
... in addition to your telephone number, clear concise details of the fault, model and serial number of this user manual, for the period specified in each of the countries listed at the back of the appliance (found on the rating plate), the purchase date. For address of glass, plastic. • Costs for in use , neglect, light bulbs, removable parts of local Service Force Centre and further information...


