Installation Guide
Page 1
Installation Guide EscaladeTM ATA RAID Controller Supports the 7000 and 8000 series PN 720-0038-04, Revision A April 29, 2003
Installation Guide EscaladeTM ATA RAID Controller Supports the 7000 and 8000 series PN 720-0038-04, Revision A April 29, 2003

Installation Guide
Page 3
...7500-8, 7500-12 7 Escalade 8000 Serial ATA Family (includes 8500-4, 8500-8, 8500-12 8 Package Contents 9 Escalade 7000 series Parallel ATA RAID Controller 9 Escalade 8000 series Serial ATA RAID Controller 9 CBL...RAID Controller 14 Install the Escalade ATA RAID Controller in the computer . 15 Connect the drives to the interface cables 16 Installing a Serial ATA RAID Controller 18 Connect the interface cables to the Escalade Serial ATA RAID Controller 18 Connect the drives to the interface cables 20 Check your installation and close the case 22 Check motherboard boot sequence 22 3ware...
...7500-8, 7500-12 7 Escalade 8000 Serial ATA Family (includes 8500-4, 8500-8, 8500-12 8 Package Contents 9 Escalade 7000 series Parallel ATA RAID Controller 9 Escalade 8000 series Serial ATA RAID Controller 9 CBL...RAID Controller 14 Install the Escalade ATA RAID Controller in the computer . 15 Connect the drives to the interface cables 16 Installing a Serial ATA RAID Controller 18 Connect the interface cables to the Escalade Serial ATA RAID Controller 18 Connect the drives to the interface cables 20 Check your installation and close the case 22 Check motherboard boot sequence 22 3ware...

Installation Guide
Page 4
3ware Escalade ATA RAID Controller Installation Guide Determining your configuration 26 Displaying advance details 28 Creating a disk array 28 Determining your configuration 30 Specifying a Hot Spare 34 Changing an existing configuration 35 Modifying a disk array 35 Deleting a disk array 35 How to maintain or verify a disk array 36 Rebuilding a mirrored disk array 37 Rebuilding a RAID... Limited Warranty 53 Exclusions 53 State Law Provisions 54 Obtaining Warranty Protection 54 3ware Technical Support and Services 54 Sales and ordering information 55 Feedback on this manual 55 iv
3ware Escalade ATA RAID Controller Installation Guide Determining your configuration 26 Displaying advance details 28 Creating a disk array 28 Determining your configuration 30 Specifying a Hot Spare 34 Changing an existing configuration 35 Modifying a disk array 35 Deleting a disk array 35 How to maintain or verify a disk array 36 Rebuilding a mirrored disk array 37 Rebuilding a RAID... Limited Warranty 53 Exclusions 53 State Law Provisions 54 Obtaining Warranty Protection 54 3ware Technical Support and Services 54 Sales and ordering information 55 Feedback on this manual 55 iv
Installation Guide
Page 5
... Disk Array Display 37 Figure 13. List of Figures Figure 1. 8-Port Escalade 7500-8 ATA RAID Controller Layout 14 Figure 2. 12-Port Escalade 8500-12 Serial ATA RAID Controller with Serial ATA Converter Installed 22 Figure 4. 3ware BIOS Tool 25 Figure 5. Disk Array Configuration Main Display, RAID 1 Ex- Create Disk Array Display, RAID 5 Example . . . . . 31 Figure 10. Delete Disk Array Display 36 Figure...
... Disk Array Display 37 Figure 13. List of Figures Figure 1. 8-Port Escalade 7500-8 ATA RAID Controller Layout 14 Figure 2. 12-Port Escalade 8500-12 Serial ATA RAID Controller with Serial ATA Converter Installed 22 Figure 4. 3ware BIOS Tool 25 Figure 5. Disk Array Configuration Main Display, RAID 1 Ex- Create Disk Array Display, RAID 5 Example . . . . . 31 Figure 10. Delete Disk Array Display 36 Figure...

Installation Guide
Page 7
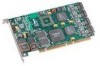
...is not available on selecting the Escalade ATA RAID Controller as your RAID data storage and management system. Twinstor, Command Queuing, Elevator Seeking, R5Fusion (R5Fusion is PCI 32 bit / 33 Mhz) • Management. 3DM Disk Management Utility or 3ware Com- This user guide gives ... RAID Controller. Redhat, SuSE. (Drivers available in this manual also supports the following legacy products: 7410, 7810, 7450 (now 7500-4), 7850 (now 7500-8), and 7210. • True Hardware RAID. Features Escalade 7000 Parallel ATA Family (includes 7000-2, 7500-4, 7500-4LP, 7500-8, 7500-12) The ...
...is not available on selecting the Escalade ATA RAID Controller as your RAID data storage and management system. Twinstor, Command Queuing, Elevator Seeking, R5Fusion (R5Fusion is PCI 32 bit / 33 Mhz) • Management. 3DM Disk Management Utility or 3ware Com- This user guide gives ... RAID Controller. Redhat, SuSE. (Drivers available in this manual also supports the following legacy products: 7410, 7810, 7450 (now 7500-4), 7850 (now 7500-8), and 7210. • True Hardware RAID. Features Escalade 7000 Parallel ATA Family (includes 7000-2, 7500-4, 7500-4LP, 7500-8, 7500-12) The ...

Installation Guide
Page 8
...; 3ware Release Notes • 3ware Installation Guide Escalade 8000 series Serial ATA RAID Controller • Escalade Serial ATA RAID Controller in Open Source.) • Performance. ATA Command Readback, SMART Monitoring, Dynamic Sector Repair, Rebuild Pacing, Rebuild Scheduling, Background Media Scan, Hot Swap, Hot Spare, Hardware Health Monitoring, Scheduled Verify Escalade 8000 Serial ATA Family (includes 8500-4, 85008, 8500-12) • True Hardware RAID.
...; 3ware Release Notes • 3ware Installation Guide Escalade 8000 series Serial ATA RAID Controller • Escalade Serial ATA RAID Controller in Open Source.) • Performance. ATA Command Readback, SMART Monitoring, Dynamic Sector Repair, Rebuild Pacing, Rebuild Scheduling, Background Media Scan, Hot Swap, Hot Spare, Hardware Health Monitoring, Scheduled Verify Escalade 8000 Serial ATA Family (includes 8500-4, 85008, 8500-12) • True Hardware RAID.

Installation Guide
Page 9
... interface cables. The 12-port 7000 board requires one per port) • Power Converter Adapter (one full size PCI slot. . Drives must be followed to avoid damaging computer components and accessories when installing or removing the EscaladeATA RAID Controller. • When ... save data elsewhere before changing your data! 3ware Escalade ATA RAID Controller Installation Guide CBL-P-SATA (Parallel to Serial Drive Converter Kit) • Escalade CBL-P-SATA (one per port) • Jumper(s) for converter (if not already installed) • 3ware Installation Guide Tools Required • An ESD...
... interface cables. The 12-port 7000 board requires one per port) • Power Converter Adapter (one full size PCI slot. . Drives must be followed to avoid damaging computer components and accessories when installing or removing the EscaladeATA RAID Controller. • When ... save data elsewhere before changing your data! 3ware Escalade ATA RAID Controller Installation Guide CBL-P-SATA (Parallel to Serial Drive Converter Kit) • Escalade CBL-P-SATA (one per port) • Jumper(s) for converter (if not already installed) • 3ware Installation Guide Tools Required • An ESD...
Installation Guide
Page 10
...system case. 12 www.3ware.com Ensure that they do not impede the flow of cooling air from inserting them upside-down. • Interface cables are fragile and must be crimped or pinched. Mechanical Concerns Be careful when installing the EscaladeATA RAID Controller into your ..., contact, lead or component on the motherboard before installing. 3ware Escalade ATA RAID Controller Installation Guide • Handle the ATA RAID Controller by its edges or by the black rail and metal bracket at its slot on theATA RAID Controller. Excessive force can damage the board, the cables, your...
...system case. 12 www.3ware.com Ensure that they do not impede the flow of cooling air from inserting them upside-down. • Interface cables are fragile and must be crimped or pinched. Mechanical Concerns Be careful when installing the EscaladeATA RAID Controller into your ..., contact, lead or component on the motherboard before installing. 3ware Escalade ATA RAID Controller Installation Guide • Handle the ATA RAID Controller by its edges or by the black rail and metal bracket at its slot on theATA RAID Controller. Excessive force can damage the board, the cables, your...
Installation Guide
Page 11
...result in your system. www.3ware.com 13 Turn off power to the computer and disconnect the power cord from the outlet. 2 Open the computer case according to the manufacturer's instructions. 3 Disconnect the disks from theATA RAID Controller and discard. Reusing interface cables...the old ATA RAID Controller. To remove an existing Escalade ATA RAID Controller 1 If the computer is not recommended. Save the screw for installing the new controller. 5 Gently remove the ATA RAID Controller from the PCI slot. 6 Remove the cables from the existing Escalade ATA RAID Controller installed in ...
...result in your system. www.3ware.com 13 Turn off power to the computer and disconnect the power cord from the outlet. 2 Open the computer case according to the manufacturer's instructions. 3 Disconnect the disks from theATA RAID Controller and discard. Reusing interface cables...the old ATA RAID Controller. To remove an existing Escalade ATA RAID Controller 1 If the computer is not recommended. Save the screw for installing the new controller. 5 Gently remove the ATA RAID Controller from the PCI slot. 6 Remove the cables from the existing Escalade ATA RAID Controller installed in ...
Installation Guide
Page 12
... cord from the outlet. 2 Open the computer case according to the ATA RAID Controller. it will be easier if you are ground Plug cable to page18 "Installing a SerialATA RAID Controller". 3ware Escalade ATA RAID Controller Installation Guide Installing a Parallel ATA RAID Controller Note: If you install the ATA RAID Controller next to an open slot. 4 Remove the metal filler bracket for the...
... cord from the outlet. 2 Open the computer case according to the ATA RAID Controller. it will be easier if you are ground Plug cable to page18 "Installing a SerialATA RAID Controller". 3ware Escalade ATA RAID Controller Installation Guide Installing a Parallel ATA RAID Controller Note: If you install the ATA RAID Controller next to an open slot. 4 Remove the metal filler bracket for the...

Installation Guide
Page 13
... of an interface cable not connected to set them . The range of theATA RAID Controller directly above the slot until it into place. Note: Continue to secure the filler bracket in step 4. 3ware Escalade ATA RAID Controller Installation Guide Hint: While the ATA RAID Controller runs properly in any PCI slot, not all pins make proper contact with...
... of an interface cable not connected to set them . The range of theATA RAID Controller directly above the slot until it into place. Note: Continue to secure the filler bracket in step 4. 3ware Escalade ATA RAID Controller Installation Guide Hint: While the ATA RAID Controller runs properly in any PCI slot, not all pins make proper contact with...

Installation Guide
Page 14
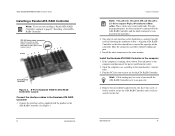
... pins make proper contact with the PCI slot pins when pushed into place. The www.3ware.com 19 Note: The connectors on plate) Power Converter Adapter Connector Serial ATA Cable Connector Jumper Settings Figure 2. 12-Port Escalade 8500-12 Serial ATA RAID Controller with CBL-P-SATA (Parallel to Serial ATA Converter) Connect the interface cables to the...
... pins make proper contact with the PCI slot pins when pushed into place. The www.3ware.com 19 Note: The connectors on plate) Power Converter Adapter Connector Serial ATA Cable Connector Jumper Settings Figure 2. 12-Port Escalade 8500-12 Serial ATA RAID Controller with CBL-P-SATA (Parallel to Serial ATA Converter) Connect the interface cables to the...

Installation Guide
Page 15
...drives 1 If your drive) or Master. 20 www.3ware.com Hardware Installation 2 Install two jumpers on the edge of each converter is keyed to ensure proper installation. To operate properly, the Escalade ATA RAID Controller requires that drives be adjacent to the drive's power...select the end of an interface cable not connected to the ATA RAID Controller and plug it into the Converter. 3ware Escalade ATA RAID Controller Installation Guide Escalade ATA RAID Controller is fully seated. 7 Check that the ATA RAID Controller's metal bracket covers the hole in the case and secure the ...
...drives 1 If your drive) or Master. 20 www.3ware.com Hardware Installation 2 Install two jumpers on the edge of each converter is keyed to ensure proper installation. To operate properly, the Escalade ATA RAID Controller requires that drives be adjacent to the drive's power...select the end of an interface cable not connected to the ATA RAID Controller and plug it into the Converter. 3ware Escalade ATA RAID Controller Installation Guide Escalade ATA RAID Controller is fully seated. 7 Check that the ATA RAID Controller's metal bracket covers the hole in the case and secure the ...

Installation Guide
Page 16
... utility, ensure that the cables do not interfere with Serial ATA Converter Installed Check your boot device precedes the Escalade ATA RAID Controller in boot order. 22 www.3ware.com If you have other components in the case or block the flow of the drives are connected to Serial... Converter) Figure 3. 3ware Escalade ATA RAID Controller Installation Guide CBL-P-SATA (Parallel to the ATA RAID Controller and it is installed in its slot, verify that your installation and close the case 1 After all of...
... utility, ensure that the cables do not interfere with Serial ATA Converter Installed Check your boot device precedes the Escalade ATA RAID Controller in boot order. 22 www.3ware.com If you have other components in the case or block the flow of the drives are connected to Serial... Converter) Figure 3. 3ware Escalade ATA RAID Controller Installation Guide CBL-P-SATA (Parallel to the ATA RAID Controller and it is installed in its slot, verify that your installation and close the case 1 After all of...

Installation Guide
Page 17
...available to a drive that as you are creating your array, you are two methods for the faulted drive. 3ware Disk Array Configuration Utility 3ware Disk Array Configuration Utility The 3ware Disk Array Configuration Utility allows you may designate a drive as a Hot Spare through the 3DM configure page....3ware.com 23 Hot Swap is the label given to the operating system as a spare. You can also specify an available drive as Hot Spares. The ATA RAID Controller shares one IRQ on the selected drive. Hot spare and hot swap Hot Spare is the term applied to the Escalade ATA RAID Controller...
...available to a drive that as you are creating your array, you are two methods for the faulted drive. 3ware Disk Array Configuration Utility 3ware Disk Array Configuration Utility The 3ware Disk Array Configuration Utility allows you may designate a drive as a Hot Spare through the 3DM configure page....3ware.com 23 Hot Swap is the label given to the operating system as a spare. You can also specify an available drive as Hot Spares. The ATA RAID Controller shares one IRQ on the selected drive. Hot spare and hot swap Hot Spare is the term applied to the Escalade ATA RAID Controller...
Installation Guide
Page 18
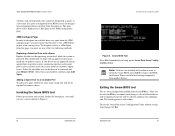
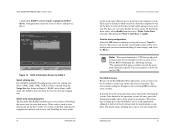
3ware Escalade ATA RAID Controller Installation Guide volumes, and, consequently, they cannot be done with a Spare Replace the ... system from the 3DM configure page, you see a screen similar to Figure 4. 24 www.3ware.com 3ware Disk Array Configuration Utility Figure 4. 3ware BIOS Tool Press Alt-3 immediately to be displayed as spares at the operating system level while... the system is not a JBOD drive or part of an existing array. To exit the 3ware Disk Array Configuration Utility without saving your system. Select the same checkbox and then click Add Spare. Before...
3ware Escalade ATA RAID Controller Installation Guide volumes, and, consequently, they cannot be done with a Spare Replace the ... system from the 3DM configure page, you see a screen similar to Figure 4. 24 www.3ware.com 3ware Disk Array Configuration Utility Figure 4. 3ware BIOS Tool Press Alt-3 immediately to be displayed as spares at the operating system level while... the system is not a JBOD drive or part of an existing array. To exit the 3ware Disk Array Configuration Utility without saving your system. Select the same checkbox and then click Add Spare. Before...

Installation Guide
Page 19
.... ated with an array and hot spares. • Disk Arrays lists any existing arrays along with their member disks. 26 www.3ware.com 3ware Disk Array Configuration Utility Figure 5. 3ware Escalade ATA RAID Controller Installation Guide Determining your configuration Caution: Configuring a disk array writes format-type data onto its member disks and overwrites all the files...
.... ated with an array and hot spares. • Disk Arrays lists any existing arrays along with their member disks. 26 www.3ware.com 3ware Disk Array Configuration Utility Figure 5. 3ware Escalade ATA RAID Controller Installation Guide Determining your configuration Caution: Configuring a disk array writes format-type data onto its member disks and overwrites all the files...

Installation Guide
Page 20
... Alt-C for "Create Array" Alt-D for "Delete Array" Alt-M for "Maintain Array" Alt-R for a Mirrored Array www.3ware.com 29 You may include from the Available Drives section. Selecting Drives for "Rebuild Array" Figure 6. To include drives that are part ... Screen Creating a disk array To create an array, first select the drives to the main 3ware Disk Array Configuration screen. 3ware Disk Array Configuration Utility Note: Accelerate keys. 3ware Escalade ATA RAID Controller Installation Guide Displaying advance details Selecting Shift-F5 will show the software versions (BIOS, Firmware, ...
... Alt-C for "Create Array" Alt-D for "Delete Array" Alt-M for "Maintain Array" Alt-R for a Mirrored Array www.3ware.com 29 You may include from the Available Drives section. Selecting Drives for "Rebuild Array" Figure 6. To include drives that are part ... Screen Creating a disk array To create an array, first select the drives to the main 3ware Disk Array Configuration screen. 3ware Disk Array Configuration Utility Note: Accelerate keys. 3ware Escalade ATA RAID Controller Installation Guide Displaying advance details Selecting Shift-F5 will show the software versions (BIOS, Firmware, ...
Installation Guide
Page 21
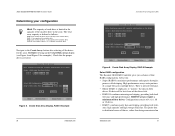
...3ware Escalade ATA RAID Controller Installation Guide Determining your configuration Hint: The capacity of each drive is limited to the capacity of four RAID configurations. Check that the proper drives are listed. Create Disk Array Display, RAID 5 Example Select RAID configuration The Escalade ATA RAID Controller...from these drives: Port 0 - Create a disk array from these drives: Port 1 - RAID 10 arrays require a minimum of 4, 6, 8, 10 or 12 drives. • RAID 5: combines parity data and striping, providing fault tolerance, high capacity and high storage efficiency....
...3ware Escalade ATA RAID Controller Installation Guide Determining your configuration Hint: The capacity of each drive is limited to the capacity of four RAID configurations. Check that the proper drives are listed. Create Disk Array Display, RAID 5 Example Select RAID configuration The Escalade ATA RAID Controller...from these drives: Port 0 - Create a disk array from these drives: Port 1 - RAID 10 arrays require a minimum of 4, 6, 8, 10 or 12 drives. • RAID 5: combines parity data and striping, providing fault tolerance, high capacity and high storage efficiency....
Installation Guide
Page 22
... selecting OK to ten minutes. IBM-DTLAI-n3i8t78R1A5ID5 Array Unit Port 3 - RAID 1 does not allow the user to 12 drives. 3ware Disk Array Configuration Available Drives: Port 0 - For RAID 5 Arrays Because of 64K, 128K, 256K, 512K or 1M are first ... space available exceeds the maximum allowable capacity. Select write cache properties The Escalade ATA RAID Controller gives you always want the computer to its next task. 3ware Escalade ATA RAID Controller Installation Guide a single disk. RAID 5 arrays require a minimum of disabling the write cache for your computer...
... selecting OK to ten minutes. IBM-DTLAI-n3i8t78R1A5ID5 Array Unit Port 3 - RAID 1 does not allow the user to 12 drives. 3ware Disk Array Configuration Available Drives: Port 0 - For RAID 5 Arrays Because of 64K, 128K, 256K, 512K or 1M are first ... space available exceeds the maximum allowable capacity. Select write cache properties The Escalade ATA RAID Controller gives you always want the computer to its next task. 3ware Escalade ATA RAID Controller Installation Guide a single disk. RAID 5 arrays require a minimum of disabling the write cache for your computer...