
Installation Guide
Page 3
... 7500-4, 7500-4LP, 7500-8, 7500-12 7 Escalade 8000 Serial ATA Family (includes 8500-4, 8500-8, 8500-12 8 Package Contents 9 Escalade 7000 series Parallel ATA RAID Controller 9 Escalade 8000 series Serial ATA RAID Controller 9 CBL-P-SATA (Parallel to Serial ...Escalade Serial ATA RAID Controller 18 Connect the drives to the interface cables 20 Check your installation and close the case 22 Check motherboard boot sequence 22 3ware Disk Array Configuration Utility 23 Hot spare and hot swap 23 BIOS Screen 23 3DM Configure Page 24 Invoking the 3ware BIOS tool 24 Exiting the 3ware BIOS...
... 7500-4, 7500-4LP, 7500-8, 7500-12 7 Escalade 8000 Serial ATA Family (includes 8500-4, 8500-8, 8500-12 8 Package Contents 9 Escalade 7000 series Parallel ATA RAID Controller 9 Escalade 8000 series Serial ATA RAID Controller 9 CBL-P-SATA (Parallel to Serial ...Escalade Serial ATA RAID Controller 18 Connect the drives to the interface cables 20 Check your installation and close the case 22 Check motherboard boot sequence 22 3ware Disk Array Configuration Utility 23 Hot spare and hot swap 23 BIOS Screen 23 3DM Configure Page 24 Invoking the 3ware BIOS tool 24 Exiting the 3ware BIOS...
Installation Guide
Page 5
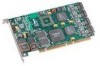
... with CBL-P-SATA (Parallel to Replace Faulted Drive, RAID 1 Example 42 Figure 17. Create Disk Array Display, RAID 0 Example . . . . . 30 Figure 9. Delete Disk Array Display 36 Figure 12. ample 27 Figure 6. Degraded RAID 10 Array Drive When Not in Use . . ... Selecting Drives for RAID 5 32 Figure 11. Degraded RAID 1 Array Drive When Not in Use . . 38 Figure 14. List of Figures Figure 1. 8-Port Escalade 7500-8 ATA RAID Controller Layout 14 Figure 2. 12-Port Escalade 8500-12 Serial ATA RAID Controller with Serial ATA Converter Installed 22 Figure 4. 3ware BIOS Tool 25 Figure ...
... with CBL-P-SATA (Parallel to Replace Faulted Drive, RAID 1 Example 42 Figure 17. Create Disk Array Display, RAID 0 Example . . . . . 30 Figure 9. Delete Disk Array Display 36 Figure 12. ample 27 Figure 6. Degraded RAID 10 Array Drive When Not in Use . . ... Selecting Drives for RAID 5 32 Figure 11. Degraded RAID 1 Array Drive When Not in Use . . 38 Figure 14. List of Figures Figure 1. 8-Port Escalade 7500-8 ATA RAID Controller Layout 14 Figure 2. 12-Port Escalade 8500-12 Serial ATA RAID Controller with Serial ATA Converter Installed 22 Figure 4. 3ware BIOS Tool 25 Figure ...

Installation Guide
Page 7
... 64 bit / 33 Mhz (7000-2 is not available on selecting the Escalade ATA RAID Controller as your Escalade ATA RAID Controller. mand Line Interface • BIOS. Before you begin installing. Features Escalade 7000 Parallel ATA Family (includes 7000-2, 7500-4, 7500-4LP, 7500-8, 7500-12) The information in Open Source.) • Performance. Parallel UltraDMA 133, 100, 66, 33 • Bus...
... 64 bit / 33 Mhz (7000-2 is not available on selecting the Escalade ATA RAID Controller as your Escalade ATA RAID Controller. mand Line Interface • BIOS. Before you begin installing. Features Escalade 7000 Parallel ATA Family (includes 7000-2, 7500-4, 7500-4LP, 7500-8, 7500-12) The information in Open Source.) • Performance. Parallel UltraDMA 133, 100, 66, 33 • Bus...

Installation Guide
Page 8
..., Dynamic Sector Repair, Rebuild Pacing, Rebuild Scheduling, Background Media Scan, Hot Swap, Hot Spare, Hardware Health Monitoring, Scheduled Verify Escalade 8000 Serial ATA Family (includes 8500-4, 85008, 8500-12) • True Hardware RAID. Field Upgradeable Firmware, BIOS, 3DM and Drivers • Data Integrity. PC99, PnP, BBS Compliant • Windows Support. 3ware Escalade ATA RAID Controller Installation Guide • Field Upgrades.
..., Dynamic Sector Repair, Rebuild Pacing, Rebuild Scheduling, Background Media Scan, Hot Swap, Hot Spare, Hardware Health Monitoring, Scheduled Verify Escalade 8000 Serial ATA Family (includes 8500-4, 85008, 8500-12) • True Hardware RAID. Field Upgradeable Firmware, BIOS, 3DM and Drivers • Data Integrity. PC99, PnP, BBS Compliant • Windows Support. 3ware Escalade ATA RAID Controller Installation Guide • Field Upgrades.

Installation Guide
Page 17
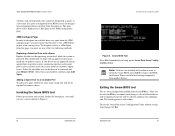
... available to the operating system as a Hot Spare through the 3DM configure page. 3ware Disk Array Configuration Utility 3ware Disk Array Configuration Utility The 3ware Disk Array Configuration Utility allows you to the Escalade ATA RAID Controller. Hot spare and hot swap Hot Spare is the label given to the process... to create disk arrays by using 3DM, with a pre-assigned spare. You can also specify an available drive as a spare. BIOS Screen When designating spare in it is assumed that is done by combining disks, deleting disks or breaking disk arrays back into their member...
... available to the operating system as a Hot Spare through the 3DM configure page. 3ware Disk Array Configuration Utility 3ware Disk Array Configuration Utility The 3ware Disk Array Configuration Utility allows you to the Escalade ATA RAID Controller. Hot spare and hot swap Hot Spare is the label given to the process... to create disk arrays by using 3DM, with a pre-assigned spare. You can also specify an available drive as a spare. BIOS Screen When designating spare in it is assumed that is done by combining disks, deleting disks or breaking disk arrays back into their member...
Installation Guide
Page 18
...the drive is not a JBOD drive or part of an existing array. To exit the 3ware Disk Array Configuration Utility without saving your configuration. 3ware Escalade ATA RAID Controller Installation Guide volumes, and, consequently, they cannot be designated as spares at the operating system ...level while the system is powered. If a spare is designated in the BIOS screen, the designation and configuration is...
...the drive is not a JBOD drive or part of an existing array. To exit the 3ware Disk Array Configuration Utility without saving your configuration. 3ware Escalade ATA RAID Controller Installation Guide volumes, and, consequently, they cannot be designated as spares at the operating system ...level while the system is powered. If a spare is designated in the BIOS screen, the designation and configuration is...

Installation Guide
Page 20
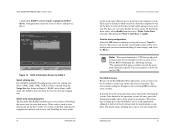
...for "Rebuild Array" Figure 6. 3ware Escalade ATA RAID Controller Installation Guide Displaying advance details Selecting Shift-F5 will show the software versions (BIOS, Firmware, monitor) and slot # of an existing disk array you must first delete the array. 28 www.3ware.com Figure 7. You may ... disk array To create an array, first select the drives to the main 3ware Disk Array Configuration screen. 3ware Disk Array Configuration Utility Note: Accelerate keys. An asterisk in the BIOS configuration screen, if a user hits the corresponding accelerate keys, it immediately highlights...
...for "Rebuild Array" Figure 6. 3ware Escalade ATA RAID Controller Installation Guide Displaying advance details Selecting Shift-F5 will show the software versions (BIOS, Firmware, monitor) and slot # of an existing disk array you must first delete the array. 28 www.3ware.com Figure 7. You may ... disk array To create an array, first select the drives to the main 3ware Disk Array Configuration screen. 3ware Disk Array Configuration Utility Note: Accelerate keys. An asterisk in the BIOS configuration screen, if a user hits the corresponding accelerate keys, it immediately highlights...
Installation Guide
Page 22
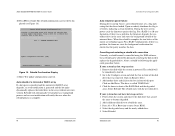
...RAID 5 Select striping size For a RAID 0 or RAID 10 configuration select the striping size. If you attempt to 12 drives. 3ware Disk Array Configuration Available Drives: Port 0 - QUANTUM FIREBALLP KX27.3 512 M Disk Arrays: Array Unit 1 - 3 drive 64K RAID 5 Port 1 - Select write cache properties The Escalade ATA RAID Controller... Unit Port 3 - BIOS Initialization Screen for Write Cache State is that the RAID 5 can be instances when you must disable the write cache. Note: The current limitation is functional. 3ware Escalade ATA RAID Controller Installation Guide a single disk...
...RAID 5 Select striping size For a RAID 0 or RAID 10 configuration select the striping size. If you attempt to 12 drives. 3ware Disk Array Configuration Available Drives: Port 0 - QUANTUM FIREBALLP KX27.3 512 M Disk Arrays: Array Unit 1 - 3 drive 64K RAID 5 Port 1 - Select write cache properties The Escalade ATA RAID Controller... Unit Port 3 - BIOS Initialization Screen for Write Cache State is that the RAID 5 can be instances when you must disable the write cache. Note: The current limitation is functional. 3ware Escalade ATA RAID Controller Installation Guide a single disk...
Installation Guide
Page 28
3ware Escalade ATA RAID Controller Installation Guide 10 Press F8 to update configurations and exit. Port 3 - Auto rebuild of the mirrored drive. Upon an orderly shutdown the flag is powered. For a RAID 1 or 10 configuration, if there was removed. For a RAID 5 configuration, if there is a problem, the ...firmware starts the background verification that checks that caused the array to become degraded. 2 Add a different disk drive to rebuild the array. 3 Press Alt + F3 at Boot time to enter 3ware BIOS. 4 Select the degraded...
3ware Escalade ATA RAID Controller Installation Guide 10 Press F8 to update configurations and exit. Port 3 - Auto rebuild of the mirrored drive. Upon an orderly shutdown the flag is powered. For a RAID 1 or 10 configuration, if there was removed. For a RAID 5 configuration, if there is a problem, the ...firmware starts the background verification that checks that caused the array to become degraded. 2 Add a different disk drive to rebuild the array. 3 Press Alt + F3 at Boot time to enter 3ware BIOS. 4 Select the degraded...
Installation Guide
Page 29
Note: If the rebuild is not started in the 3ware BIOS, the new drive cannot be used to the operating system. 46 www.3ware.com 3ware Escalade ATA RAID Controller Installation Guide 6 Press F8 to start a rebuild with the drive attached will make the drive appear as a single disk (JBOD) to rebuild the degraded array. Booting with this drive.
Note: If the rebuild is not started in the 3ware BIOS, the new drive cannot be used to the operating system. 46 www.3ware.com 3ware Escalade ATA RAID Controller Installation Guide 6 Press F8 to start a rebuild with the drive attached will make the drive appear as a single disk (JBOD) to rebuild the degraded array. Booting with this drive.
Installation Guide
Page 32
... not critical for operation. A cable plugged in the case. Use a screwdriver to 3ware's support web page at http://www.3ware.com/NewFaq/3ware.htm. Q2: The system doesn't begin booting (no BIOS runs) when the ATA RAID controller is installed but is removed. Troubleshooting Troubleshooting: Problems and Solutions Note: For more troubleshooting tips and frequently asked...
... not critical for operation. A cable plugged in the case. Use a screwdriver to 3ware's support web page at http://www.3ware.com/NewFaq/3ware.htm. Q2: The system doesn't begin booting (no BIOS runs) when the ATA RAID controller is installed but is removed. Troubleshooting Troubleshooting: Problems and Solutions Note: For more troubleshooting tips and frequently asked...
Installation Guide
Page 33
... with the motherboard. To operate properly the ATA RAID controller requires that the drives are not connected properly to see if you motherboard has been tested by 3ware. Your drives are all properly jumpered. There may...3ware.com/products/compatibility.asp to the ATA RAID controller. Q4: Some of the drives do not appear in the Disk Array Configuration Utility's main display. Reinstall the hardware and reboot. Please check the Motherboard Compatibility List on your drive) or Master. 50 www.3ware.com 3ware Escalade ATA RAID Controller Installation Guide Q3: The 3ware BIOS...
... with the motherboard. To operate properly the ATA RAID controller requires that the drives are not connected properly to see if you motherboard has been tested by 3ware. Your drives are all properly jumpered. There may...3ware.com/products/compatibility.asp to the ATA RAID controller. Q4: Some of the drives do not appear in the Disk Array Configuration Utility's main display. Reinstall the hardware and reboot. Please check the Motherboard Compatibility List on your drive) or Master. 50 www.3ware.com 3ware Escalade ATA RAID Controller Installation Guide Q3: The 3ware BIOS...
Installation Guide
Page 38
... 15, 16 ATA/133 15, 16 ATA/66 14, 15, 17, 19, 20, 21 Auto rebuild 44, 45 Auto rebuild of a mirrored array 44 B BIOS 25, 49 BIOS tool 24 C Cancelling rebuild 45 Compliance and Conformity 51 D Deleting a disk array 35 Determining your configuration 26 Disk Array Configuration Utility 50 Disk Arrays... H Hardware Installation 13 hot spare 23, 34 M Maintaining a disk array 36 Modifying a disk array 35 motherboard boot sequence 22 P PCI 16, 19 Personal safety 11 R RAID 31 RAID 0 31 RAID 1 31, 37 RAID 10 31 RAID 5 31, 39 Rebuild Array 42 Rebuilding 45 www.3ware.com 57 www...
... 15, 16 ATA/133 15, 16 ATA/66 14, 15, 17, 19, 20, 21 Auto rebuild 44, 45 Auto rebuild of a mirrored array 44 B BIOS 25, 49 BIOS tool 24 C Cancelling rebuild 45 Compliance and Conformity 51 D Deleting a disk array 35 Determining your configuration 26 Disk Array Configuration Utility 50 Disk Arrays... H Hardware Installation 13 hot spare 23, 34 M Maintaining a disk array 36 Modifying a disk array 35 motherboard boot sequence 22 P PCI 16, 19 Personal safety 11 R RAID 31 RAID 0 31 RAID 1 31, 37 RAID 10 31 RAID 5 31, 39 Rebuild Array 42 Rebuilding 45 www.3ware.com 57 www...