
Installation Guide
Page 2
... and Back Plate 10 Upper and Lower Horizontal Support Arm Installation 11 Install Mobile Cart Stabilizer 12 Attach Hanger to Projection Board 13 Projector Installation...14 Route Control Cable...15 Attaching to the Stand...15 Route Cables in Stand...16 Attach the... Projector...17 Assemble the Arm Extension 18 Safety Pin Installation...19 Technical Specification...20 The 3M logo and 3M are the properties of their respective owners. Other trademarks used herein are trademarks of Contents Important...
... and Back Plate 10 Upper and Lower Horizontal Support Arm Installation 11 Install Mobile Cart Stabilizer 12 Attach Hanger to Projection Board 13 Projector Installation...14 Route Control Cable...15 Attaching to the Stand...15 Route Cables in Stand...16 Attach the... Projector...17 Assemble the Arm Extension 18 Safety Pin Installation...19 Technical Specification...20 The 3M logo and 3M are the properties of their respective owners. Other trademarks used herein are trademarks of Contents Important...

Installation Guide
Page 4
This cart must be used with a "UL Listed" projector from the 3M™ SCPxxx series projectors Screen maximum size is 96 inches diagonal and maximum total weight on cart is 145 lbs. Collapse, fold and secure arm -- Maximum weight ...capacity is 96 inches diagaonal CAUTION: Read Accompanying Documentation. It is intended for future reference. Intended Use: This 3M™ SCP700 Series...
This cart must be used with a "UL Listed" projector from the 3M™ SCPxxx series projectors Screen maximum size is 96 inches diagonal and maximum total weight on cart is 145 lbs. Collapse, fold and secure arm -- Maximum weight ...capacity is 96 inches diagaonal CAUTION: Read Accompanying Documentation. It is intended for future reference. Intended Use: This 3M™ SCP700 Series...

Installation Guide
Page 5
... not climb on, hang on the mobile stand. -- Inspect the mobile stand and mounts periodically to use only 3M approved replacement parts. -- including board, wall mount, projector, and shelf contents. • Read, understand and follow all safety information contained in the Assembly/Installation Guide prior... with tripping: -- Do not exceed a maximum screen size of the ball on the mobile stand other than the 3M approved projector mounts and applicable 3M approved projectors and white boards. -- Replace all fasteners remain tight and that no damage has occurred. If gas shock fails, do...
... not climb on, hang on the mobile stand. -- Inspect the mobile stand and mounts periodically to use only 3M approved replacement parts. -- including board, wall mount, projector, and shelf contents. • Read, understand and follow all safety information contained in the Assembly/Installation Guide prior... with tripping: -- Do not exceed a maximum screen size of the ball on the mobile stand other than the 3M approved projector mounts and applicable 3M approved projectors and white boards. -- Replace all fasteners remain tight and that no damage has occurred. If gas shock fails, do...

Installation Guide
Page 7
... and locked into place. The back support assembly must be in how to moving the SCP700 Series Mobile Stand: The projector must be done prior to assemble and utilize your 3M SCP700 Series Mobile Stand. Back Plate Upper Horizontal Support Arm Bracket Adjustment Lower Horizontal Support Arm Spring Load Handle Bracket Adjustment...
... and locked into place. The back support assembly must be in how to moving the SCP700 Series Mobile Stand: The projector must be done prior to assemble and utilize your 3M SCP700 Series Mobile Stand. Back Plate Upper Horizontal Support Arm Bracket Adjustment Lower Horizontal Support Arm Spring Load Handle Bracket Adjustment...

Installation Guide
Page 14
... (back plate) Keyhole Slot Folding Wall Mount Back Plate Leveling Screw BackPlate 4 5 The rear caster wheels must be in place. © 3M 2010. Step 2. Projector Back Plate Mounting Hole 4 - Step 1. Remove the Folding Wall Mount from back plate. 14 Step 3. Leave screws protruding about 3/8" from the... Slot 2 - Swing the arm up until it locks in the locked position before attaching the arm mount or projector to the projector cart. Install screws M8 x 20mm into back plate (Legend 5). Projector Mounting Plate Leveling Screw 3 - Folding Wall Mount hanging screw locations 5 -
... (back plate) Keyhole Slot Folding Wall Mount Back Plate Leveling Screw BackPlate 4 5 The rear caster wheels must be in place. © 3M 2010. Step 2. Projector Back Plate Mounting Hole 4 - Step 1. Remove the Folding Wall Mount from back plate. 14 Step 3. Leave screws protruding about 3/8" from the... Slot 2 - Swing the arm up until it locks in the locked position before attaching the arm mount or projector to the projector cart. Install screws M8 x 20mm into back plate (Legend 5). Projector Mounting Plate Leveling Screw 3 - Folding Wall Mount hanging screw locations 5 -

Installation Guide
Page 17
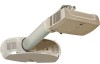
Place the projector top-down in the packaging insert. Step 2. All Rights Reserved. 17 Step 4. 3M™ SCP700 Series Mobile Stand Attach the Projector Assembly and Installation Guide Step 1. Step 3. Remove the three covers from the mounting screw holes. Using two screws and the thumbscrew, attach the mounting bracket to the mounting bracket with three screws. © 3M 2010. Attach the projector to the end of the arm extension as shown.
Place the projector top-down in the packaging insert. Step 2. All Rights Reserved. 17 Step 4. 3M™ SCP700 Series Mobile Stand Attach the Projector Assembly and Installation Guide Step 1. Step 3. Remove the three covers from the mounting screw holes. Using two screws and the thumbscrew, attach the mounting bracket to the mounting bracket with three screws. © 3M 2010. Attach the projector to the end of the arm extension as shown.

Installation Guide
Page 19
...Component Control Step 5. See page 11. Step 8. When the projector arm is on unit and change image size by loosening thumb screw. Step 5. Connect the cables to the projector according to release the projector arm for use. © 3M 2010. Power on the safety tab. Step 2. Step 4.... When the safety pin is not in the safety tab, gently release the projector arm. All Rights Reserved. 19 If using...
...Component Control Step 5. See page 11. Step 8. When the projector arm is on unit and change image size by loosening thumb screw. Step 5. Connect the cables to the projector according to release the projector arm for use. © 3M 2010. Power on the safety tab. Step 2. Step 4.... When the safety pin is not in the safety tab, gently release the projector arm. All Rights Reserved. 19 If using...


