
Safety Guide
Page 1
All Rights Reserved. 3 Digital Easel Product Safety Guide Including Installation Instructions December 2005 • 78-6970-9432-0 • Copyright © 2005, 3M Company.
All Rights Reserved. 3 Digital Easel Product Safety Guide Including Installation Instructions December 2005 • 78-6970-9432-0 • Copyright © 2005, 3M Company.
Safety Guide
Page 3
... indoors via a USB data communications cable connected to the use of this 3MTM Digital Easel, model DE343. Use in an outdoor operation has not been tested and could result in death or serious injury and/or property damage. This 3M Digital Easel is not intended for use more than one person when installing or removing the...
... indoors via a USB data communications cable connected to the use of this 3MTM Digital Easel, model DE343. Use in an outdoor operation has not been tested and could result in death or serious injury and/or property damage. This 3M Digital Easel is not intended for use more than one person when installing or removing the...

Safety Guide
Page 4
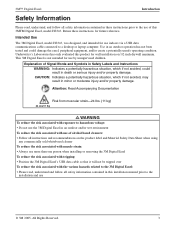
...: • Always provide proper adult supervision when using the 3M Digital Easel around children • Always place the 3M Digital Easel on a stable and level surface • Install the 3M Digital Easel on a wall with choking: • Keep batteries away from children and pets. 4 © 3M 2005. All Rights Reserved. Introduction 3M™ Digital Easel WARNING To reduce the risk associated with...
...: • Always provide proper adult supervision when using the 3M Digital Easel around children • Always place the 3M Digital Easel on a stable and level surface • Install the 3M Digital Easel on a wall with choking: • Keep batteries away from children and pets. 4 © 3M 2005. All Rights Reserved. Introduction 3M™ Digital Easel WARNING To reduce the risk associated with...

Safety Guide
Page 5
... reduce the risk associated with the wall surface using one person when installing or removing the 3M Digital Easel 4. 3M™ Digital Easel Installation Note: Photos and/or illustrations may not depict actual hardware used. 3. Open the top side of the 3M Digital Easel. • Make sure mounting hardware is securely anchored to a solid structure. • Proper installation must...
... reduce the risk associated with the wall surface using one person when installing or removing the 3M Digital Easel 4. 3M™ Digital Easel Installation Note: Photos and/or illustrations may not depict actual hardware used. 3. Open the top side of the 3M Digital Easel. • Make sure mounting hardware is securely anchored to a solid structure. • Proper installation must...
Safety Guide
Page 6
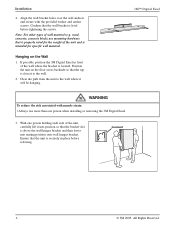
... the unit on the floor on the Wall 1. Note: For other types of the unit, carefully lift it will be hanging. 3M™ Digital Easel WARNING To reduce the risk associated with the provided washer and anchor screws. With one person when installing or removing the... 3M Digital Easel. 3. wood, concrete, concrete block) use more than one person holding each side of wall material (e.g. If possible, position the 3M Digital Easel in place before tightening the screws. Clear the path from the unit to ...
... the unit on the floor on the Wall 1. Note: For other types of the unit, carefully lift it will be hanging. 3M™ Digital Easel WARNING To reduce the risk associated with the provided washer and anchor screws. With one person when installing or removing the... 3M Digital Easel. 3. wood, concrete, concrete block) use more than one person holding each side of wall material (e.g. If possible, position the 3M Digital Easel in place before tightening the screws. Clear the path from the unit to ...
Safety Guide
Page 7
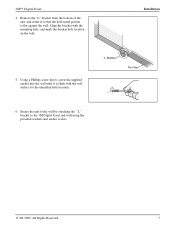
.... 7 Installation 5. Align the bracket with the wall surface for the identified hole location. 6. 3M™ Digital Easel 4. Secure the unit to the wall by attaching the "L" bracket to the 3M Digital Easel and wall using the provided washers and anchor screws. © 3M 2005. Using a Phillips screw driver, screw the supplied anchor into the wall until it...
.... 7 Installation 5. Align the bracket with the wall surface for the identified hole location. 6. 3M™ Digital Easel 4. Secure the unit to the wall by attaching the "L" bracket to the 3M Digital Easel and wall using the provided washers and anchor screws. © 3M 2005. Using a Phillips screw driver, screw the supplied anchor into the wall until it...