Safety Guide
Page 6
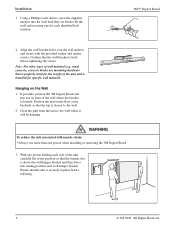
...screws. Align the wall bracket holes over the wall anchors and secure with the wall surface using one person when installing or removing the 3M Digital Board 3. Hanging on its backside so that the top is securely in front of wall material (e.g. Installation 3. Ensure that is ...properly rated for specific wall material. Using a Phillips screw driver, screw the supplied anchors into position so that the wall bracket is intended for the weight of the unit, carefully lift it will be ...
...screws. Align the wall bracket holes over the wall anchors and secure with the wall surface using one person when installing or removing the 3M Digital Board 3. Hanging on its backside so that the top is securely in front of wall material (e.g. Installation 3. Ensure that is ...properly rated for specific wall material. Using a Phillips screw driver, screw the supplied anchors into position so that the wall bracket is intended for the weight of the unit, carefully lift it will be ...
Safety Guide
Page 7
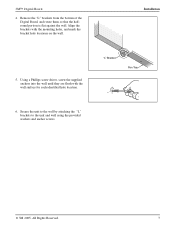
...unit to the wall by attaching the "L" brackets to the unit and wall using the provided washers and anchor screws. © 3M 2005. Using a Phillips screw driver, screw the supplied anchors into the wall until they are flush with the mounting holes, and mark the bracket hole locations on ...the wall. 3M™ Digital Board 4. Align the brackets with the wall surface for each identified hole location. 6. Remove the "L" brackets...
...unit to the wall by attaching the "L" brackets to the unit and wall using the provided washers and anchor screws. © 3M 2005. Using a Phillips screw driver, screw the supplied anchors into the wall until they are flush with the mounting holes, and mark the bracket hole locations on ...the wall. 3M™ Digital Board 4. Align the brackets with the wall surface for each identified hole location. 6. Remove the "L" brackets...