
Hardware Installation Guide
Page 1
AA Published August 2006 Wireless LAN Mobility System Wireless LAN Switch and Controller Hardware Installation Guide WX4400 WX1200 WXR100 WX2200 3CRWX440095A 3CRWX120695A 3CRWXR10095A 3CRWX220095A http://www.3Com.com/ Part No. 10015410 Rev.
AA Published August 2006 Wireless LAN Mobility System Wireless LAN Switch and Controller Hardware Installation Guide WX4400 WX1200 WXR100 WX2200 3CRWX440095A 3CRWX120695A 3CRWXR10095A 3CRWX220095A http://www.3Com.com/ Part No. 10015410 Rev.
Hardware Installation Guide
Page 3
...WX2200 Status LEDs 16 WXR100 LEDs 17 Software Features 19 Management Features 19 Layer 2 Switching Features 19 IP Services 20 Authentication, Authorization, and Accounting 20 Roaming 20 RF Management 21 2 INSTALLING AND CONNECTING A WX SWITCH Unpacking a WX Switch 23 Installation Requirements and Recommendations 25 3Com Wireless... Switch Manager Network Plan 25 Installation Location 25 Cable Requirements 26
...WX2200 Status LEDs 16 WXR100 LEDs 17 Software Features 19 Management Features 19 Layer 2 Switching Features 19 IP Services 20 Authentication, Authorization, and Accounting 20 Roaming 20 RF Management 21 2 INSTALLING AND CONNECTING A WX SWITCH Unpacking a WX Switch 23 Installation Requirements and Recommendations 25 3Com Wireless... Switch Manager Network Plan 25 Installation Location 25 Cable Requirements 26
Hardware Installation Guide
Page 4
... Switch 30 Equipment Rack Installation 31 Tabletop Installation 33 Installing a Power Supply in a WX4400 Switch 34 Installing a New Power Supply 34 Replacing a Power Supply 35 Powering On a WX Switch 37 Powering On a WXR100 Switch 37 Connecting to a Serial ...or Other 10/100 Ethernet Device 39 Connecting to Gigabit Ethernet Devices 42 A WX TECHNICAL SPECIFICATIONS B WX TROUBLESHOOTING C OBTAINING SUPPORT FOR YOUR 3COM PRODUCTS Register Your Product to Gain Service Benefits 57 Solve Problems Online 57 Purchase Extended Warranty and Professional Services 58 Access Software Downloads 58 Contact...
... Switch 30 Equipment Rack Installation 31 Tabletop Installation 33 Installing a Power Supply in a WX4400 Switch 34 Installing a New Power Supply 34 Replacing a Power Supply 35 Powering On a WX Switch 37 Powering On a WXR100 Switch 37 Connecting to a Serial ...or Other 10/100 Ethernet Device 39 Connecting to Gigabit Ethernet Devices 42 A WX TECHNICAL SPECIFICATIONS B WX TROUBLESHOOTING C OBTAINING SUPPORT FOR YOUR 3COM PRODUCTS Register Your Product to Gain Service Benefits 57 Solve Problems Online 57 Purchase Extended Warranty and Professional Services 58 Access Software Downloads 58 Contact...
Hardware Installation Guide
Page 5
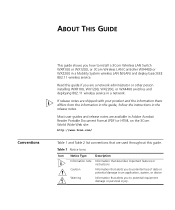
... in Adobe Acrobat Reader Portable Document Format (PDF) or HTML on the 3Com World Wide Web site: http://www.3com.com/ Table 1 and Table 2 list conventions that alerts you to install a 3Com Wireless LAN Switch WXR100 or WX1200, or 3Com Wireless LAN Controller WX4400 or WX2200 in the release notes. Most user guides and release notes are shipped with your product...
... in Adobe Acrobat Reader Portable Document Format (PDF) or HTML on the 3Com World Wide Web site: http://www.3com.com/ Table 1 and Table 2 list conventions that alerts you to install a 3Com Wireless LAN Switch WXR100 or WX1200, or 3Com Wireless LAN Controller WX4400 or WX2200 in the release notes. Most user guides and release notes are shipped with your product...

Hardware Installation Guide
Page 7
... wireless LAN (WLAN) using the 3Com Wireless LAN Switch Manager (3WXM). „ Wireless LAN Switch Manager User's Guide This guide shows you how to plan, configure, deploy, and manage a Mobility System wireless LAN (WLAN) using the 3WXM interface. „ Wireless LAN Switch and Controller Hardware Installation Guide This guide provides instructions and specifications for installing a WX wireless switch in a Mobility System WLAN. „ Wireless LAN Switch and Controller...
... wireless LAN (WLAN) using the 3Com Wireless LAN Switch Manager (3WXM). „ Wireless LAN Switch Manager User's Guide This guide shows you how to plan, configure, deploy, and manage a Mobility System wireless LAN (WLAN) using the 3WXM interface. „ Wireless LAN Switch and Controller Hardware Installation Guide This guide provides instructions and specifications for installing a WX wireless switch in a Mobility System WLAN. „ Wireless LAN Switch and Controller...
Hardware Installation Guide
Page 9
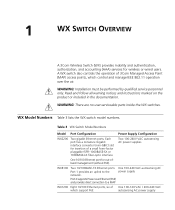
...100-120 VAC / 200-240 VAC which control and manage IEEE 802.11 operation over Ethernet (PoE) and provides direct connection to the power supply network. 1 WX SWITCH OVERVIEW A 3Com Wireless Switch (WX) provides mobility and authentication, ...WX2200 Two gigabit Ethernet ports. Two 100-240V VAC autosensing AC power supplies One 10/100 Ethernet port for wireless or wired users. WX Model Numbers Table 3 lists the WX switch model numbers. Port 2 supports Power over the air. WARNING: There are no user-serviceable parts inside the WX switches. WARNING: Installation...
...100-120 VAC / 200-240 VAC which control and manage IEEE 802.11 operation over Ethernet (PoE) and provides direct connection to the power supply network. 1 WX SWITCH OVERVIEW A 3Com Wireless Switch (WX) provides mobility and authentication, ...WX2200 Two gigabit Ethernet ports. Two 100-240V VAC autosensing AC power supplies One 10/100 Ethernet port for wireless or wired users. WX Model Numbers Table 3 lists the WX switch model numbers. Port 2 supports Power over the air. WARNING: There are no user-serviceable parts inside the WX switches. WARNING: Installation...
Hardware Installation Guide
Page 10
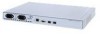
... a 1000BASE-TX copper interface and a Gigabit interface converter (GBIC) slot for insertion of a WX2200 switch. WX2200 Switch A WX2200 switch is one RU high and also can be installed in a standard 48.26-cm (19-inch) equipment rack or on a tabletop. Figure 1 3Com WX2200 Switch Power supplies Serial console port Provide an Earthing Connection 90 - 240V~ / 50...
... a 1000BASE-TX copper interface and a Gigabit interface converter (GBIC) slot for insertion of a WX2200 switch. WX2200 Switch A WX2200 switch is one RU high and also can be installed in a standard 48.26-cm (19-inch) equipment rack or on a tabletop. Figure 1 3Com WX2200 Switch Power supplies Serial console port Provide an Earthing Connection 90 - 240V~ / 50...

Hardware Installation Guide
Page 11
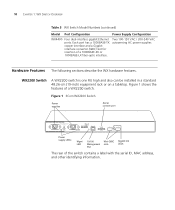
... and result in a loss of air. Figure 2 shows the external hardware features of equipment functionality or permanent damage. Stacked WXR100 switches can be installed on a tabletop. Figure 2 3Com WXR100 Switch CAUTION: Do not stack WXR100 switches. The underside of the switch contains a label with the serial ID, MAC address and other identifying...
... and result in a loss of air. Figure 2 shows the external hardware features of equipment functionality or permanent damage. Stacked WXR100 switches can be installed on a tabletop. Figure 2 3Com WXR100 Switch CAUTION: Do not stack WXR100 switches. The underside of the switch contains a label with the serial ID, MAC address and other identifying...

Hardware Installation Guide
Page 12
Figure 3 3Com WX1200 Switch-Control Features Power supply Serial console port Power supply LED 10/100 Ethernet 10/100 and MAP uplink ports Ethernet ports 10/100 and MAP/PoE LEDs The rear of a WX1200 switch. 12 CHAPTER 1: WX SWITCH OVERVIEW WX1200 Switch A WX1200 switch is one RU high and can be installed in a standard 48.26-cm (19-inch) equipment rack or on a tabletop. Figure 3 shows the external hardware features of the switch contains a label with the serial ID, MAC address, and other identifying information.
Figure 3 3Com WX1200 Switch-Control Features Power supply Serial console port Power supply LED 10/100 Ethernet 10/100 and MAP uplink ports Ethernet ports 10/100 and MAP/PoE LEDs The rear of a WX1200 switch. 12 CHAPTER 1: WX SWITCH OVERVIEW WX1200 Switch A WX1200 switch is one RU high and can be installed in a standard 48.26-cm (19-inch) equipment rack or on a tabletop. Figure 3 shows the external hardware features of the switch contains a label with the serial ID, MAC address, and other identifying information.

Hardware Installation Guide
Page 13
Hardware Features 13 WX4400 Switch A WX4400 switch is two rack units (RUs) high and can be installed in a standard 48.26-cm (19-inch) equipment rack or on a tabletop. Figure 4 3Com WX4400 Switch-Control Features Power supply LED Power supply Serial Flash Eject Mgmt console port card slot button LED 100-240V 50/60...
Hardware Features 13 WX4400 Switch A WX4400 switch is two rack units (RUs) high and can be installed in a standard 48.26-cm (19-inch) equipment rack or on a tabletop. Figure 4 3Com WX4400 Switch-Control Features Power supply LED Power supply Serial Flash Eject Mgmt console port card slot button LED 100-240V 50/60...

Hardware Installation Guide
Page 23
... feet, a documentation pack, and release notes. 2 INSTALLING AND CONNECTING A WX SWITCH Unpacking a WX Switch Before installing a WX switch, you might need to generate a network plan with 3Com Wireless Switch Manager. (See "3Com Wireless Switch Manager Network Plan" on page 25.) The shipping... carton for a WX switch contains the following items: „ One WX switch, containing one power supply (except for the WX2200...
... feet, a documentation pack, and release notes. 2 INSTALLING AND CONNECTING A WX SWITCH Unpacking a WX Switch Before installing a WX switch, you might need to generate a network plan with 3Com Wireless Switch Manager. (See "3Com Wireless Switch Manager Network Plan" on page 25.) The shipping... carton for a WX switch contains the following items: „ One WX switch, containing one power supply (except for the WX2200...

Hardware Installation Guide
Page 24
24 CHAPTER 2: INSTALLING AND CONNECTING A WX SWITCH Figure 6 WX4400 Switch Shipping Carton Contents WX switch with installed power supply Documentation pack Serial cable Power cord Rack-mount brackets Rubber feet Before you begin installation: 1 Open the carton and carefully remove the contents, if you have not already done so. 2 Place the packing materials back in the carton and save the carton. 3 Verify that you received each item in the previous list. If any item is missing or damaged, contact 3Com.
24 CHAPTER 2: INSTALLING AND CONNECTING A WX SWITCH Figure 6 WX4400 Switch Shipping Carton Contents WX switch with installed power supply Documentation pack Serial cable Power cord Rack-mount brackets Rubber feet Before you begin installation: 1 Open the carton and carefully remove the contents, if you have not already done so. 2 Place the packing materials back in the carton and save the carton. 3 Verify that you received each item in the previous list. If any item is missing or damaged, contact 3Com.
Hardware Installation Guide
Page 25
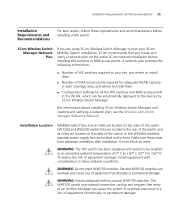
... and tested to be automatically deployed to the devices by 3Com Wireless Switch Manager. (For information about installing 3Com Wireless Switch Manager and creating and verifying a network plan, see the Wireless LAN Switch Manager Reference Manual.) Installation Location WX4400 switch fans and air inlets are located on the... Do not stack WXR100 switches. To reduce the risk of equipment damage, install equipment with consideration to 122° F). WARNING: Ensure adequate airflow around WXR100 switches. WX1200 and WX2200 switch fans are located in the rear of the switch and air inlets ...
... and tested to be automatically deployed to the devices by 3Com Wireless Switch Manager. (For information about installing 3Com Wireless Switch Manager and creating and verifying a network plan, see the Wireless LAN Switch Manager Reference Manual.) Installation Location WX4400 switch fans and air inlets are located on the... Do not stack WXR100 switches. To reduce the risk of equipment damage, install equipment with consideration to 122° F). WARNING: Ensure adequate airflow around WXR100 switches. WX1200 and WX2200 switch fans are located in the rear of the switch and air inlets ...

Hardware Installation Guide
Page 26
You need a standard DB-9-male-to-DB-9-female PC modem cable. 26 CHAPTER 2: INSTALLING AND CONNECTING A WX SWITCH Cable Requirements To avoid installation problems, use Class 1 lasers. Table 6 Serial Console Pin Signals WX Pin 2 3 5 Usage Receive Transmit Ground PC Pin 3 2 5 Usage Transmit Receive Ground Network Cables Table 7 lists ...
You need a standard DB-9-male-to-DB-9-female PC modem cable. 26 CHAPTER 2: INSTALLING AND CONNECTING A WX SWITCH Cable Requirements To avoid installation problems, use Class 1 lasers. Table 6 Serial Console Pin Signals WX Pin 2 3 5 Usage Receive Transmit Ground PC Pin 3 2 5 Usage Transmit Receive Ground Network Cables Table 7 lists ...

Hardware Installation Guide
Page 27
... station such as a PC, printer, or server, use a straight-through cable. Table 8 Ethernet Interfaces Link Type 10/100BASE-T Cable Type Cat 5 copper Straight-through wiring. Installation Requirements and Recommendations 27 Table 7 Ethernet Interfaces (continued) Link Type 1000BASE-LX 1000BASE-TX Cable Type Connector Maximum Type Distance Single mode 9/10-µm fiber...
... station such as a PC, printer, or server, use a straight-through cable. Table 8 Ethernet Interfaces Link Type 10/100BASE-T Cable Type Cat 5 copper Straight-through wiring. Installation Requirements and Recommendations 27 Table 7 Ethernet Interfaces (continued) Link Type 1000BASE-LX 1000BASE-TX Cable Type Connector Maximum Type Distance Single mode 9/10-µm fiber...

Hardware Installation Guide
Page 28
The port automatically configures its pin signals accordingly. All wires in the cable. 28 CHAPTER 2: INSTALLING AND CONNECTING A WX SWITCH Table 9 10/100 Ethernet Straight-Through Pin Signals WX Switch Pin 1 2 3 4 5 6 7 8 Function RD+ RDTD+ PoE+ PoE+ TDPoEPoE- PoE is not supported ...
The port automatically configures its pin signals accordingly. All wires in the cable. 28 CHAPTER 2: INSTALLING AND CONNECTING A WX SWITCH Table 9 10/100 Ethernet Straight-Through Pin Signals WX Switch Pin 1 2 3 4 5 6 7 8 Function RD+ RDTD+ PoE+ PoE+ TDPoEPoE- PoE is not supported ...

Hardware Installation Guide
Page 29
...„ Front-mount or center-mount option for the WX4400 switch „ Front-mount option for each type of and Tools installation. Power cords Serial console cable Four adhesive rubber feet Power cord(s) Serial console cable Included with the Product Yes No Yes (one... make sure the switch is level in the equipment rack, is evenly distributed. Installation Requirements and Recommendations 29 Installation Hardware Table 10 lists the mounting hardware and tools required for the WX1200 and WX2200 switch Tabletop (applicable to all switch models) Required Hardware and Tools Mounting brackets...
...„ Front-mount or center-mount option for the WX4400 switch „ Front-mount option for each type of and Tools installation. Power cords Serial console cable Four adhesive rubber feet Power cord(s) Serial console cable Included with the Product Yes No Yes (one... make sure the switch is level in the equipment rack, is evenly distributed. Installation Requirements and Recommendations 29 Installation Hardware Table 10 lists the mounting hardware and tools required for the WX1200 and WX2200 switch Tabletop (applicable to all switch models) Required Hardware and Tools Mounting brackets...

Hardware Installation Guide
Page 30
... be given to the electrical ratings on a tabletop. Do not install equipment such that the branch circuit current and voltage protection is required for a WX switch installed in a rack. The WX1200 and WX2200 mounting brackets support front mounting only. The WXR100 switch does not have... or permanent damage. Pay particular attention to the earthing connection for tabletop mounting. 30 CHAPTER 2: INSTALLING AND CONNECTING A WX SWITCH Installing a WX Switch You can mount a WX1200, WX4400, or WX2200 switch in a standard 48.26-cm (19-inch) equipment rack or on the rack to provide...
... be given to the electrical ratings on a tabletop. Do not install equipment such that the branch circuit current and voltage protection is required for a WX switch installed in a rack. The WX1200 and WX2200 mounting brackets support front mounting only. The WXR100 switch does not have... or permanent damage. Pay particular attention to the earthing connection for tabletop mounting. 30 CHAPTER 2: INSTALLING AND CONNECTING A WX SWITCH Installing a WX Switch You can mount a WX1200, WX4400, or WX2200 switch in a standard 48.26-cm (19-inch) equipment rack or on the rack to provide...

Hardware Installation Guide
Page 31
...-Mount Equipment Rack First, attach brackets to these figures as you perform the procedure. Then, install chassis into rack. You can install a WX4400 switch into a front-mount or center-mount Installation equipment rack. Installing a WX Switch 31 Equipment Rack You can install a WX2200 or WX1200 switch into a front-mount equipment rack. „ Figure 7 shows how to...
...-Mount Equipment Rack First, attach brackets to these figures as you perform the procedure. Then, install chassis into rack. You can install a WX4400 switch into a front-mount or center-mount Installation equipment rack. Installing a WX Switch 31 Equipment Rack You can install a WX2200 or WX1200 switch into a front-mount equipment rack. „ Figure 7 shows how to...

Hardware Installation Guide
Page 32
WARNING: 3Com recommends that the bracket flange is flush with the remaining steps. If you accidentally drop the WX switch, you ask someone to the WX switch. 4 Repeat for the other bracket. Then, install chassis into rack. 1 Remove the four bracket screws from each side of the WX switch. 2 Align a bracket over ...the switch. „ For a center-mount equipment rack, align the bracket so that you can be injured and the switch can be damaged. 32 CHAPTER 2: INSTALLING AND CONNECTING A WX SWITCH Figure 8 WX4400 Installation-Center-Mount Equipment Rack First, attach brackets to chassis.
WARNING: 3Com recommends that the bracket flange is flush with the remaining steps. If you accidentally drop the WX switch, you ask someone to the WX switch. 4 Repeat for the other bracket. Then, install chassis into rack. 1 Remove the four bracket screws from each side of the WX switch. 2 Align a bracket over ...the switch. „ For a center-mount equipment rack, align the bracket so that you can be injured and the switch can be damaged. 32 CHAPTER 2: INSTALLING AND CONNECTING A WX SWITCH Figure 8 WX4400 Installation-Center-Mount Equipment Rack First, attach brackets to chassis.