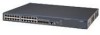
Getting Started Guide
Page 3
...Introduction 7 Switch 4800G 24-Port 8 Switch 4800G PWR 48-Port 11 Switch 4800G PWR 24-Port 13 Switch 4800G 24-Port SFP 17 Switch 4800G 48-Port 18 System Specifications of the Switch 4800G Series 22 Pluggable Modules 22 Optional Interface Modules 23 CX4 Cable 24 2 PREPARATING TO INSTALL THE SWITCH Safety ...Switch on a Workbench 38 Connecting the Power Cables and the Grounding Cable 38 Connecting the Console Cable 46 Installing and Removing Optional Interface Modules 47 Installing and Removing the Dedicated CX4 Cable 50 Verifying the Installation 51 4 INITIAL POWER-ON Setting Up the Configuration...
...Introduction 7 Switch 4800G 24-Port 8 Switch 4800G PWR 48-Port 11 Switch 4800G PWR 24-Port 13 Switch 4800G 24-Port SFP 17 Switch 4800G 48-Port 18 System Specifications of the Switch 4800G Series 22 Pluggable Modules 22 Optional Interface Modules 23 CX4 Cable 24 2 PREPARATING TO INSTALL THE SWITCH Safety ...Switch on a Workbench 38 Connecting the Power Cables and the Grounding Cable 38 Connecting the Console Cable 46 Installing and Removing Optional Interface Modules 47 Installing and Removing the Dedicated CX4 Cable 50 Verifying the Installation 51 4 INITIAL POWER-ON Setting Up the Configuration...
Getting Started Guide
Page 4
... 70 6 MAINTENANCE AND TROUBLESHOOTING Software Loading Failure 73 Password Loss 73 Power Supply Failure 74 Configuration System Failure 74 A LIGHTNING PROTECTION FOR THE SWITCH Installating the Lightning Arrester for AC Power (Socket Strip with Lightning Protection) 75 Installation of ...Lightning Arrester for Network Port 76 B 3COM NETWORK MANAGEMENT 3Com Network Supervisor 79 3Com Network Director 79 3Com Network Access Manager 80 3Com Enterprise Management ...
... 70 6 MAINTENANCE AND TROUBLESHOOTING Software Loading Failure 73 Password Loss 73 Power Supply Failure 74 Configuration System Failure 74 A LIGHTNING PROTECTION FOR THE SWITCH Installating the Lightning Arrester for AC Power (Socket Strip with Lightning Protection) 75 Installation of ...Lightning Arrester for Network Port 76 B 3COM NETWORK MANAGEMENT 3Com Network Supervisor 79 3Com Network Director 79 3Com Network Access Manager 80 3Com Enterprise Management ...
Getting Started Guide
Page 5
... guide describes the 3Com® Switch 4800G and how to software and product documentation: http://www.3com.com Table 1 lists icon conventions that are used to an application, system, or device. It assumes a working knowledge of data or potential damage to interconnect LANs. c Caution w Warning Information that alerts you to configure your Switch 4800G. ■ Switch 4800G Configuration Guide- Provides...
... guide describes the 3Com® Switch 4800G and how to software and product documentation: http://www.3com.com Table 1 lists icon conventions that are used to an application, system, or device. It assumes a working knowledge of data or potential damage to interconnect LANs. c Caution w Warning Information that alerts you to configure your Switch 4800G. ■ Switch 4800G Configuration Guide- Provides...
Getting Started Guide
Page 30
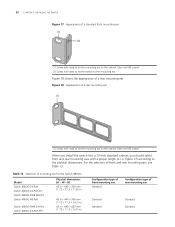
Table 13 Selection of mounting ear for the Switch 4800G Model Switch 4800G 24-Port Switch 4800G 24-Port-DC Switch 4800G PWR 48-Port Switch 4800G 48-Port Switch 4800G PWR 24-Port Switch 4800G 24-Port SFP Physical dimensions (H × W × D) 43.6 × 440 × 300 mm (1.72 × 17.3 × 11.8 in.) 43...cabinet (Use one M6 screw) When you install the switch into a 19-inch standard cabinet, you should select front and rear mounting ears with a proper length (L1 in .) Configuration type of front mounting ear Standard Configuration type of front and rear mounting ears, see Table 13...
Table 13 Selection of mounting ear for the Switch 4800G Model Switch 4800G 24-Port Switch 4800G 24-Port-DC Switch 4800G PWR 48-Port Switch 4800G 48-Port Switch 4800G PWR 24-Port Switch 4800G 24-Port SFP Physical dimensions (H × W × D) 43.6 × 440 × 300 mm (1.72 × 17.3 × 11.8 in.) 43...cabinet (Use one M6 screw) When you install the switch into a 19-inch standard cabinet, you should select front and rear mounting ears with a proper length (L1 in .) Configuration type of front mounting ear Standard Configuration type of front and rear mounting ears, see Table 13...
Getting Started Guide
Page 47
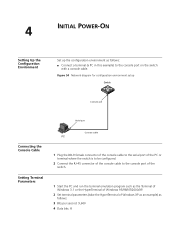
...and be configured. 2 Connect the RJ-45 connector of the console cable to the console port of the console cable to the PC before connecting the RJ-45 connector to the switch. ■ When disconnecting a PC from the switch. Installing and Removing Optional Interface Modules The Switch 4800G provide two... DSR CTS Direction DB-9 7 4 3 1 5 2 6 8 Connection Procedure When you want to use the terminal to configure the switch, follow these steps to connect a terminal device to the switch using the console cable: 1 Plug the DB-9 female connector of the console cable to the serial port of the PC...
...and be configured. 2 Connect the RJ-45 connector of the console cable to the console port of the console cable to the PC before connecting the RJ-45 connector to the switch. ■ When disconnecting a PC from the switch. Installing and Removing Optional Interface Modules The Switch 4800G provide two... DSR CTS Direction DB-9 7 4 3 1 5 2 6 8 Connection Procedure When you want to use the terminal to configure the switch, follow these steps to connect a terminal device to the switch using the console cable: 1 Plug the DB-9 female connector of the console cable to the serial port of the PC...
Getting Started Guide
Page 53
...connector of the console cable to the serial port of the PC or terminal where the switch is to be configured. 2 Connect the RJ-45 connector of the console cable to the console port of the switch. 1 Start the PC and run the terminal emulation program such as the Terminal of ...the HyperTerminal of Windows XP as an example) as follows: ■ Connect a terminal (a PC in this example) to the console port on the switch with a console cable. 4 INITIAL POWER-ON Setting Up the Configuration Environment Set up the configuration environment as follows: 3 Bits per second: 9,600 4 Data bits: 8
...connector of the console cable to the serial port of the PC or terminal where the switch is to be configured. 2 Connect the RJ-45 connector of the console cable to the console port of the switch. 1 Start the PC and run the terminal emulation program such as the Terminal of ...the HyperTerminal of Windows XP as an example) as follows: ■ Connect a terminal (a PC in this example) to the console port on the switch with a console cable. 4 INITIAL POWER-ON Setting Up the Configuration Environment Set up the configuration environment as follows: 3 Bits per second: 9,600 4 Data bits: 8
Getting Started Guide
Page 57
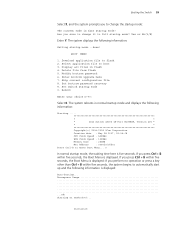
... normal, the waiting time is properly connected; Delete file from flash 5. and the configuration parameters have the same Boot ROM display style. The system waits two seconds for configuration has been started; Set bootrom password recovery 9. The normal startup mode takes a little...the startup mode, refer to enter the Boot Menu. For the setting of Switch 4800G 48-Port as an example: Starting...... * * * 3Com Switch 4800G 48-Port BOOTROM, Version 205 * * * Copyright(c) 2004-2008 3Com Corporation. Display all files in fast mode and the waiting time here is ...
... normal, the waiting time is properly connected; Delete file from flash 5. and the configuration parameters have the same Boot ROM display style. The system waits two seconds for configuration has been started; Set bootrom password recovery 9. The normal startup mode takes a little...the startup mode, refer to enter the Boot Menu. For the setting of Switch 4800G 48-Port as an example: Starting...... * * * 3Com Switch 4800G 48-Port BOOTROM, Version 205 * * * Copyright(c) 2004-2008 3Com Corporation. Display all files in fast mode and the waiting time here is ...

Getting Started Guide
Page 58
... Delete files from the flash Modify the password of Boot ROM Enter BootROM upgrade menu Skip current configuration files Restore the Boot ROM password Set the startup mode of the switch Reboot the switch Select your choice 0 to 9 ■ If you want to change the boot mode to normal... boot Display all files in flash Delete file from flash Modify bootrom password Enter bootrom upgrade menu Skip current configuration file Set bootrom password recovery Set switch startup mode Reboot Enter your choice(0-9): Description Boot menu Download the application files to the flash Select application files...
... Delete files from the flash Modify the password of Boot ROM Enter BootROM upgrade menu Skip current configuration files Restore the Boot ROM password Set the startup mode of the switch Reboot the switch Select your choice 0 to 9 ■ If you want to change the boot mode to normal... boot Display all files in flash Delete file from flash Modify bootrom password Enter bootrom upgrade menu Skip current configuration file Set bootrom password recovery Set switch startup mode Reboot Enter your choice(0-9): Description Boot menu Download the application files to the flash Select application files...
Getting Started Guide
Page 59
... other than Ctrl + B within five seconds, the Boot Menu is fast startup mode! Starting at 0x80100000... Initialize: Booting the Switch 59 Select 9, and the system prompts you to change it to full startup mode? BOOT MENU 1. Select application file to enter... Enter Y. Display all files in normal startup mode and displays the following information: Starting...... * * * 3Com Switch 4800G 48-Port BOOTROM, Version 205 * * * Copyright(c) 2004-2008 3Com Corporation. Skip current configuration file 8. Set switch startup mode 0. The system reboots in flash 4.
... other than Ctrl + B within five seconds, the Boot Menu is fast startup mode! Starting at 0x80100000... Initialize: Booting the Switch 59 Select 9, and the system prompts you to change it to full startup mode? BOOT MENU 1. Select application file to enter... Enter Y. Display all files in normal startup mode and displays the following information: Starting...... * * * 3Com Switch 4800G 48-Port BOOTROM, Version 205 * * * Copyright(c) 2004-2008 3Com Corporation. Skip current configuration file 8. Set switch startup mode 0. The system reboots in flash 4.
Getting Started Guide
Page 60
... appearance of "Press ENTER to get started . For detailed descriptions about the configuration commands and CLI, refer to 3Com Switch 4800G Family Operation Manual and 3Com Switch 4800G Family Command Manual. Please check leds FINISHED! Flash fast selftest OK! Subslot 2 (LSP1XP2P) selftest OK! n The 3Com Series switches provide abundant command views. Press Enter. User interface aux0 is displayed: You...
... appearance of "Press ENTER to get started . For detailed descriptions about the configuration commands and CLI, refer to 3Com Switch 4800G Family Operation Manual and 3Com Switch 4800G Family Command Manual. Please check leds FINISHED! Flash fast selftest OK! Subslot 2 (LSP1XP2P) selftest OK! n The 3Com Series switches provide abundant command views. Press Enter. User interface aux0 is displayed: You...
Getting Started Guide
Page 62
... to XModem XModem is a file transfer protocol that is set on the switch). If the check succeeds, the receiving program sends an acknowledgement packet and the sending program proceeds to flash 2. Download application file to send another packet; Skip current configuration file 8. and if you want to enter the Boot Menu at...
... to XModem XModem is a file transfer protocol that is set on the switch). If the check succeeds, the receiving program sends an acknowledgement packet and the sending program proceeds to flash 2. Download application file to send another packet; Skip current configuration file 8. and if you want to enter the Boot Menu at...
Getting Started Guide
Page 63
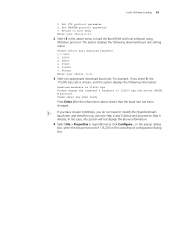
Return to boot menu Enter your choice(0-3): 2 Select 3 in the console port configuration dialog box. n If you have chosen 9,600 bps, you do not need to Step 6 directly. Return Enter your download baudrate: 1.* 9600 2. 19200 3. 38400 4. 57600 5. 115200 0.... to 115200 bps and select XMODE M protocol Press enter key when ready Press Enter after the information above information. 4 Select File > Properties in HyperTerminal, click Configure... Local Software Loading 63 2. Set XMODEM protocol parameter 0. In this case, the system will not display the above shows that the baud rate has been...
Return to boot menu Enter your choice(0-3): 2 Select 3 in the console port configuration dialog box. n If you have chosen 9,600 bps, you do not need to Step 6 directly. Return Enter your download baudrate: 1.* 9600 2. 19200 3. 38400 4. 57600 5. 115200 0.... to 115200 bps and select XMODE M protocol Press enter key when ready Press Enter after the information above information. 4 Select File > Properties in HyperTerminal, click Configure... Local Software Loading 63 2. Set XMODEM protocol parameter 0. In this case, the system will not display the above shows that the baud rate has been...
Getting Started Guide
Page 65
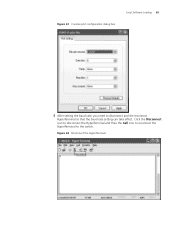
Figure 61 Console port configuration dialog box Local Software Loading 65 5 After setting the baud rate, you need to the switch. Figure 62 Disconnect the HyperTerminal Click the Disconnect icon to disconnect the HyperTerminal and then the Call icon to reconnect the HyperTerminal to disconnect and the reconnect HyperTerminal so that the baud rate setting can take effect.
Figure 61 Console port configuration dialog box Local Software Loading 65 5 After setting the baud rate, you need to the switch. Figure 62 Disconnect the HyperTerminal Click the Disconnect icon to disconnect the HyperTerminal and then the Call icon to reconnect the HyperTerminal to disconnect and the reconnect HyperTerminal so that the baud rate setting can take effect.
Getting Started Guide
Page 68
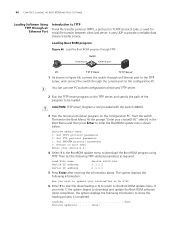
... press Enter to enter the BootROM update menu shown below: Bootrom update menu: 1. c CAUTION: TFTP server program is not provided with the Switch 4800G. 3 Run the terminal emulation program on the TFTP server, and specify the path of the program to be loaded. Then enter the Boot ...Enter your choice(0-9):" select 6 in Figure 66, connect the switch through an Ethernet port to the TFTP server, and connect the switch through the console port to the configuration PC. Then set the following TFTP-related parameters as both configuration device and TFTP server. 2 Run the TFTP server program ...
... press Enter to enter the BootROM update menu shown below: Bootrom update menu: 1. c CAUTION: TFTP server program is not provided with the Switch 4800G. 3 Run the terminal emulation program on the TFTP server, and specify the path of the program to be loaded. Then enter the Boot ...Enter your choice(0-9):" select 6 in Figure 66, connect the switch through an Ethernet port to the TFTP server, and connect the switch through the console port to the configuration PC. Then set the following TFTP-related parameters as both configuration device and TFTP server. 2 Run the TFTP server program ...
Getting Started Guide
Page 69
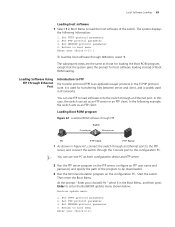
...FTP user name and password, and specify the path of the program to be downloaded. 3 Run the terminal emulation program on the configuration PC. In the following information: 1. Return to boot menu Enter your choice(0-3):1 To load the host software through an Ethernet port.... 67 Load BootROM software through the Console port to FTP File transfer protocol (FTP) is widely used for host software loading instead of the switch. Set XMODEM protocol parameter 0. Set XMODEM protocol parameter 0. The subsequent steps are the same as an FTP client. Set FTP protocol parameter...
...FTP user name and password, and specify the path of the program to be downloaded. 3 Run the terminal emulation program on the configuration PC. In the following information: 1. Return to boot menu Enter your choice(0-3):1 To load the host software through an Ethernet port.... 67 Load BootROM software through the Console port to FTP File transfer protocol (FTP) is widely used for host software loading instead of the switch. Set XMODEM protocol parameter 0. Set XMODEM protocol parameter 0. The subsequent steps are the same as an FTP client. Set FTP protocol parameter...
Getting Started Guide
Page 70
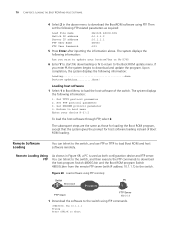
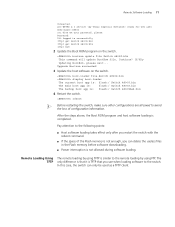
Set TFTP protocol parameter 2. The subsequent steps are the same as both configuration device and FTP server. Loading host software 1 Select 1 in Boot Menu to abort ftp 10.1.1.1 Trying ... Upon completion, the system displays the following information... FTP Server 10.1.1 .1 1 Download the software to the switch. Set FTP protocol parameter 3. Remote Software Loading You can telnet to the switch, and then execute the FTP commands to download the host program Switch 4800G.bin and the Boot ROM program Switch 4800G.btm from the remote FTP server (with IP address 10.1.1.1)...
Set TFTP protocol parameter 2. The subsequent steps are the same as both configuration device and FTP server. Loading host software 1 Select 1 in Boot Menu to abort ftp 10.1.1.1 Trying ... Upon completion, the system displays the following information... FTP Server 10.1.1 .1 1 Download the software to the switch. Set FTP protocol parameter 3. Remote Software Loading You can telnet to the switch, and then execute the FTP commands to download the host program Switch 4800G.bin and the Boot ROM program Switch 4800G.btm from the remote FTP server (with IP address 10.1.1.1)...
Getting Started Guide
Page 71
...software loading. bootrom update file Switch 4800G.btm This command will update BootRom file, Continue? [Y/N]y Updating BootRom, please wait... The TFTP only difference is that it is similar to the switch. reboot n Before restarting the switch, make sure other configurations are all saved to the following...using TFTP is TFTP that you restart the switch with the reboot command. ■ If the space of configuration information. In this case, the switch can delete the useless files in successfully [ftp] get Switch 4800G.bin [ftp] get Switch 4800G.btm [ftp] bye 2 Update the ...
...software loading. bootrom update file Switch 4800G.btm This command will update BootRom file, Continue? [Y/N]y Updating BootRom, please wait... The TFTP only difference is that it is similar to the switch. reboot n Before restarting the switch, make sure other configurations are all saved to the following...using TFTP is TFTP that you restart the switch with the reboot command. ■ If the space of configuration information. In this case, the switch can delete the useless files in successfully [ftp] get Switch 4800G.bin [ftp] get Switch 4800G.btm [ftp] bye 2 Update the ...
Getting Started Guide
Page 73
...loading procedure. ■ If so, view the loading procedure information displayed on the HyperTerminal to boot 3. Skip current configuration file 8. Set switch startup mode 0. After the switch is restarted, the user password is any input error, restart the loading procedure with your choice(0-9): Select 7, and then... restart the switch. 6 MAINTENANCE AND TROUBLESHOOTING Software Loading Failure If software loading fails, the system still runs the original version. In this...
...loading procedure. ■ If so, view the loading procedure information displayed on the HyperTerminal to boot 3. Skip current configuration file 8. Set switch startup mode 0. After the switch is restarted, the user password is any input error, restart the loading procedure with your choice(0-9): Select 7, and then... restart the switch. 6 MAINTENANCE AND TROUBLESHOOTING Software Loading Failure If software loading fails, the system still runs the original version. In this...

Getting Started Guide
Page 74
... the cause may lie in the parameter setting error at the configuration terminal, the cause might lie in the console cable or the settings of the switch fails by viewing the PWR LED on the configuration terminal. Please perform the corresponding check. Verify the following terminal ...parameter (such as HyperTerminal). Configuration System Failure After the switch is powered on and the system is illegible ...
... the cause may lie in the parameter setting error at the configuration terminal, the cause might lie in the console cable or the settings of the switch fails by viewing the PWR LED on the configuration terminal. Please perform the corresponding check. Verify the following terminal ...parameter (such as HyperTerminal). Configuration System Failure After the switch is powered on and the system is illegible ...
Getting Started Guide
Page 79
...■ View network events ■ Generate reports in user-defined formats ■ Launch embedded device configuration tools 3NS is performing. It can be found at www.3com.com/network_management 3Com® Network Supervisor (3NS) is a standalone application that graphically discovers, maps, and monitors the ... and the ability to address networks of all levels of these and other 3Com Network Management Solutions can also offer optimization suggestions, making this application ideal for 3Com device configurations as well as firmware and agent upgrades. 3ND makes it easy to carry...
...■ View network events ■ Generate reports in user-defined formats ■ Launch embedded device configuration tools 3NS is performing. It can be found at www.3com.com/network_management 3Com® Network Supervisor (3NS) is a standalone application that graphically discovers, maps, and monitors the ... and the ability to address networks of all levels of these and other 3Com Network Management Solutions can also offer optimization suggestions, making this application ideal for 3Com device configurations as well as firmware and agent upgrades. 3ND makes it easy to carry...


