
Quick Start Guide
Page 1
... describes the basic steps necessary to as the NJ1000. Throughout this guide, the 3Com® IntelliJack Gigabit Switch NJ1000 (3CNJ1000) is a 5-port, unmanaged gigabit Ethernet switch that fits into most standard electrical wall outlets or data port openings. Quick Start Guide 3Com® IntelliJack® Gigabit Switch NJ1000 3CNJ1000 Part Number: 10016679 Rev AB Published: June...
... describes the basic steps necessary to as the NJ1000. Throughout this guide, the 3Com® IntelliJack Gigabit Switch NJ1000 (3CNJ1000) is a 5-port, unmanaged gigabit Ethernet switch that fits into most standard electrical wall outlets or data port openings. Quick Start Guide 3Com® IntelliJack® Gigabit Switch NJ1000 3CNJ1000 Part Number: 10016679 Rev AB Published: June...
Quick Start Guide
Page 9
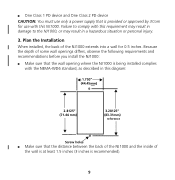
... mm) 3.28125" (83.31mm) reference Screw holes ■ Make sure that the wall opening where the NJ1000 is provided or approved by 3Com for 0.5 inches. ■ One Class 1 PD device and One Class 2 PD device CAUTION: You must use only a power supply that is being installed complies with the NEMA-WD6 standard, as described in...
... mm) 3.28125" (83.31mm) reference Screw holes ■ Make sure that the wall opening where the NJ1000 is provided or approved by 3Com for 0.5 inches. ■ One Class 1 PD device and One Class 2 PD device CAUTION: You must use only a power supply that is being installed complies with the NEMA-WD6 standard, as described in...
Quick Start Guide
Page 10
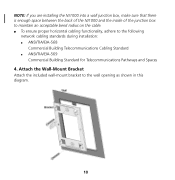
..., make sure that there is enough space between the back of the NJ1000 and the inside of the junction box to maintain an acceptable bend radius on the cable. ■ To ensure proper horizontal cabling functionality, adhere to the wall opening as shown in this diagram. 10 Attach the Wall-Mount Bracket...
..., make sure that there is enough space between the back of the NJ1000 and the inside of the junction box to maintain an acceptable bend radius on the cable. ■ To ensure proper horizontal cabling functionality, adhere to the wall opening as shown in this diagram. 10 Attach the Wall-Mount Bracket...
Quick Start Guide
Page 11
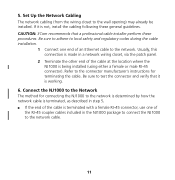
... one end of the cable is being installed (using either a female or male RJ-45 connector). CAUTION: 3Com recommends that it is working. 6. Be sure to adhere to local safety and regulatory codes during the cable installation. 1 Connect one of the RJ-45 coupler cables included in...is terminated, as described in the NJ1000 package to connect the NJ1000 to test the connector and verify that a professional cable installer perform these general guidelines. Connect the NJ1000 to the Network The method for terminating the cable. Refer to the wall opening) may already be installed.
... one end of the cable is being installed (using either a female or male RJ-45 connector). CAUTION: 3Com recommends that it is working. 6. Be sure to adhere to local safety and regulatory codes during the cable installation. 1 Connect one of the RJ-45 coupler cables included in...is terminated, as described in the NJ1000 package to connect the NJ1000 to test the connector and verify that a professional cable installer perform these general guidelines. Connect the NJ1000 to the Network The method for terminating the cable. Refer to the wall opening) may already be installed.