
Quick Start Guide
Page 1
... Part Number: 10016679 Rev AB Published: June 2008 The 3Com® IntelliJack Gigabit Switch NJ1000 (3CNJ1000) is referred to install and configure your NJ1000. Unless otherwise indicated, 3Com registered trademarks are registered in other countries. 3Com, the 3Com logo, and IntelliJack are registered trademarks of 3Com Corporation. All Rights Reserved. This Quick Start Guide describes the basic...
... Part Number: 10016679 Rev AB Published: June 2008 The 3Com® IntelliJack Gigabit Switch NJ1000 (3CNJ1000) is referred to install and configure your NJ1000. Unless otherwise indicated, 3Com registered trademarks are registered in other countries. 3Com, the 3Com logo, and IntelliJack are registered trademarks of 3Com Corporation. All Rights Reserved. This Quick Start Guide describes the basic...
Quick Start Guide
Page 2
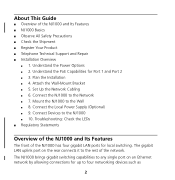
... devices such as 2 Plan the Installation ■ 4. Set Up the Network Cabling ■ 6. Connect the Local Power Supply (Optional) ■ 9. Attach the Wall-Mount Bracket ■ 5. Connect Devices to the Network ■ 7. Understand the Power Options ■ 2. The NJ1000 brings gigabit switching capabilities to any single port on the rear connects it to the Wall...
... devices such as 2 Plan the Installation ■ 4. Set Up the Network Cabling ■ 6. Connect the Local Power Supply (Optional) ■ 9. Attach the Wall-Mount Bracket ■ 5. Connect Devices to the Network ■ 7. Understand the Power Options ■ 2. The NJ1000 brings gigabit switching capabilities to any single port on the rear connects it to the Wall...
Quick Start Guide
Page 3
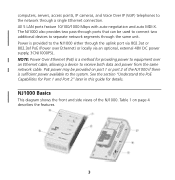
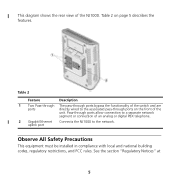
...Ethernet connection. NOTE: Power Over Ethernet (PoE) is provided to the NJ1000 either through the uplink port via an optional, external 48V DC power supply, 3CNJ1000PSL. Power is a method for details. NJ1000 Basics This diagram shows the front and side views of the NJ1000 if there is sufficient power available to the system....Port 1 and Port 2" later in this guide for providing power to equipment over Ethernet) or locally via 802.3at or 802.3af PoE (Power over an Ethernet cable, allowing a device to receive both data and power from the same network cable. Table 1 on port 1 or...
...Ethernet connection. NOTE: Power Over Ethernet (PoE) is provided to the NJ1000 either through the uplink port via an optional, external 48V DC power supply, 3CNJ1000PSL. Power is a method for details. NJ1000 Basics This diagram shows the front and side views of the NJ1000 if there is sufficient power available to the system....Port 1 and Port 2" later in this guide for providing power to equipment over Ethernet) or locally via 802.3at or 802.3af PoE (Power over an Ethernet cable, allowing a device to receive both data and power from the same network cable. Table 1 on port 1 or...
Quick Start Guide
Page 4
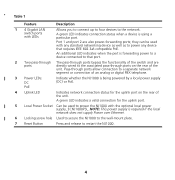
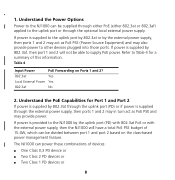
... LED indicates when the port is being powered by a local power supply (DC) or PoE. 4 Uplink LED Indicates network connection status for the uplink port. 5 Local Power Socket Can be used to power the NJ1000 with the optional local power supply, 3CNJ1000PSL. A green LED indicates connection status when a device is required if the local network does not supply Power over Ethernet. 6 Locking screw hole Used to...
... LED indicates when the port is being powered by a local power supply (DC) or PoE. 4 Uplink LED Indicates network connection status for the uplink port. 5 Local Power Socket Can be used to power the NJ1000 with the optional local power supply, 3CNJ1000PSL. A green LED indicates connection status when a device is required if the local network does not supply Power over Ethernet. 6 Locking screw hole Used to...
Quick Start Guide
Page 5
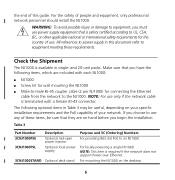
... to the associated pass-through ports bypass the functionality of the switch and are ports directly wired to a separate network segment or connection of the NJ1000. See the section "Regulatory Notices" at 5 Table 2 Feature Description 1 Two Pass-through The pass-through ports on page 5 describes the features. Table 2 on the front... of the unit. uplink port Observe All Safety Precautions This equipment must be installed in compliance with local and national building codes, regulatory restrictions, and FCC rules.
... to the associated pass-through ports bypass the functionality of the switch and are ports directly wired to a separate network segment or connection of the NJ1000. See the section "Regulatory Notices" at 5 Table 2 Feature Description 1 Two Pass-through The pass-through ports on page 5 describes the features. Table 2 on the front... of the unit. uplink port Observe All Safety Precautions This equipment must be installed in compliance with local and national building codes, regulatory restrictions, and FCC rules.
Quick Start Guide
Page 6
... 3 Part Number 3CNJ1000PSE 3CNJ1000PSL 3CNJ1000STAND Description Optional mid-span power injector Optional local power supply Optional desk stand Purpose and 3C (Ordering) Numbers For providing 802.3at PoE to an NJ1000 For locally powering a single NJ1000 NOTE: This item is terminated with each NJ1000: ■ NJ1000 ■ Screw kit for wall mounting the NJ1000 ■ Male-to the NJ1000. Check the Shipment The...
... 3 Part Number 3CNJ1000PSE 3CNJ1000PSL 3CNJ1000STAND Description Optional mid-span power injector Optional local power supply Optional desk stand Purpose and 3C (Ordering) Numbers For providing 802.3at PoE to an NJ1000 For locally powering a single NJ1000 NOTE: This item is terminated with each NJ1000: ■ NJ1000 ■ Screw kit for wall mounting the NJ1000 ■ Male-to the NJ1000. Check the Shipment The...
Quick Start Guide
Page 7
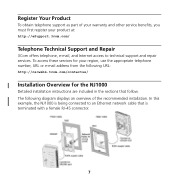
... telephone number, URL or e-mail address from the following URL: http://csoweb4.3com.com/contactus/ Installation Overview for your product at: http://eSupport.3com.com/ Telephone Technical Support and Repair 3Com offers telephone, e-mail, and Internet access to an Ethernet network cable that ...follow. Register Your Product To obtain telephone support as part of the recommended installation. To access these services for the NJ1000 Detailed ...
... telephone number, URL or e-mail address from the following URL: http://csoweb4.3com.com/contactus/ Installation Overview for your product at: http://eSupport.3com.com/ Telephone Technical Support and Repair 3Com offers telephone, e-mail, and Internet access to an Ethernet network cable that ...follow. Register Your Product To obtain telephone support as part of the recommended installation. To access these services for the NJ1000 Detailed ...
Quick Start Guide
Page 8
... PoE PSE budget of 15.4W, which can be able to the NJ1000 can power these combinations of this information. Refer to the NJ1000 by 802.3at through the optional local external power supply. If power is provided to Table 4 for Port 1 and Port 2 If power is supplied by the uplink port (PD) with 802.3at PoE or with...
... PoE PSE budget of 15.4W, which can be able to the NJ1000 can power these combinations of this information. Refer to the NJ1000 by 802.3at through the optional local external power supply. If power is provided to Table 4 for Port 1 and Port 2 If power is supplied by the uplink port (PD) with 802.3at PoE or with...
Quick Start Guide
Page 9
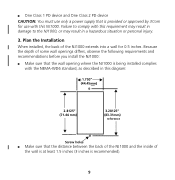
Because the depth of some wall openings differs, observe the following requirements and recommendations before you install the NJ1000: ■ Make sure that the wall opening where the NJ1000 is being installed complies with the NEMA-WD6 standard, as described in a hazardous situation or personal injury. ... sure that is provided or approved by 3Com for use only a power supply that the distance between the back of the NJ1000 and the inside of the NJ1000 extends into a wall for 0.5 inches. Failure to the NJ1000, or may result in this NJ1000. Plan the Installation When installed, the...
Because the depth of some wall openings differs, observe the following requirements and recommendations before you install the NJ1000: ■ Make sure that the wall opening where the NJ1000 is being installed complies with the NEMA-WD6 standard, as described in a hazardous situation or personal injury. ... sure that is provided or approved by 3Com for use only a power supply that the distance between the back of the NJ1000 and the inside of the NJ1000 extends into a wall for 0.5 inches. Failure to the NJ1000, or may result in this NJ1000. Plan the Installation When installed, the...
Quick Start Guide
Page 10
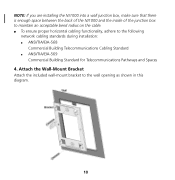
... a wall junction box, make sure that there is enough space between the back of the NJ1000 and the inside of the junction box to maintain an acceptable bend radius on the cable. ■ To ensure proper horizontal cabling functionality, adhere to ...
... a wall junction box, make sure that there is enough space between the back of the NJ1000 and the inside of the junction box to maintain an acceptable bend radius on the cable. ■ To ensure proper horizontal cabling functionality, adhere to ...
Quick Start Guide
Page 11
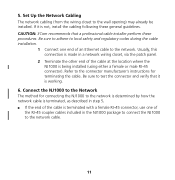
CAUTION: 3Com recommends that it is being installed (using either a female or male RJ-45 connector). Be sure to the network. Connect the NJ1000 to the network cable. 11 Usually, this connection is made in a network wiring closet, via the patch panel. 2 Terminate ...verify that a professional cable installer perform these general guidelines. Be sure to adhere to local safety and regulatory codes during the cable installation. 1 Connect one of the cable at the location where the NJ1000 is not, install the cabling following these procedures. 5. If it is terminated with a...
CAUTION: 3Com recommends that it is being installed (using either a female or male RJ-45 connector). Be sure to the network. Connect the NJ1000 to the network cable. 11 Usually, this connection is made in a network wiring closet, via the patch panel. 2 Terminate ...verify that a professional cable installer perform these general guidelines. Be sure to adhere to local safety and regulatory codes during the cable installation. 1 Connect one of the cable at the location where the NJ1000 is not, install the cabling following these procedures. 5. If it is terminated with a...
Quick Start Guide
Page 12
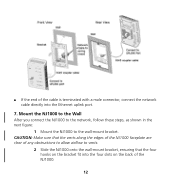
CAUTION: Make sure that the vents along the edges of the NJ1000 faceplate are clear of the NJ1000. 12 ■ If the end of the cable is terminated with a male connector, connect the network cable directly into the four slots on the back of any obstructions to allow airflow to the wall-mount bracket. Mount the NJ1000 to the Wall After you connect the NJ1000 to the network, follow these steps, as shown in the next figure: 1 Mount the NJ1000 to vents. 2 Slide the NJ1000 onto the wall-mount bracket, ensuring that the four hooks on the bracket fit into the Ethernet uplink port. 7.
CAUTION: Make sure that the vents along the edges of the NJ1000 faceplate are clear of the NJ1000. 12 ■ If the end of the cable is terminated with a male connector, connect the network cable directly into the four slots on the back of any obstructions to allow airflow to the wall-mount bracket. Mount the NJ1000 to the Wall After you connect the NJ1000 to the network, follow these steps, as shown in the next figure: 1 Mount the NJ1000 to vents. 2 Slide the NJ1000 onto the wall-mount bracket, ensuring that the four hooks on the bracket fit into the Ethernet uplink port. 7.
Quick Start Guide
Page 13
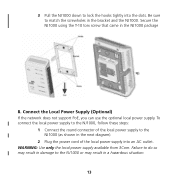
... hooks tightly into an AC outlet. WARNING: Use only the local power supply available from 3Com. To connect the local power supply to the NJ1000, follow these steps: 1 Connect the round connector of the local power supply to the NJ1000 (as shown in the bracket and the NJ1000. Be sure to the NJ1000 or may result in the NJ1000 package 8. Secure the NJ1000 using the T-10 torx...
... hooks tightly into an AC outlet. WARNING: Use only the local power supply available from 3Com. To connect the local power supply to the NJ1000, follow these steps: 1 Connect the round connector of the local power supply to the NJ1000 (as shown in the bracket and the NJ1000. Be sure to the NJ1000 or may result in the NJ1000 package 8. Secure the NJ1000 using the T-10 torx...
Quick Start Guide
Page 14
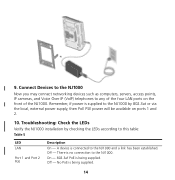
Off - No PoE is being supplied. Remember, if power is being supplied. 14 There is connected to the NJ1000. Off - Troubleshooting: Check the LEDs Verify the NJ1000 installation by 802.3at or via the local, external power supply, then PoE PSE power will be available on the front of the four LAN ports on ports 1 and 2. 10. A device is no...
Off - No PoE is being supplied. Remember, if power is being supplied. 14 There is connected to the NJ1000. Off - Troubleshooting: Check the LEDs Verify the NJ1000 installation by 802.3at or via the local, external power supply, then PoE PSE power will be available on the front of the four LAN ports on ports 1 and 2. 10. A device is no...
Quick Start Guide
Page 15
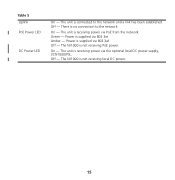
On - Power is no connection to the network and a link has been established. The NJ1000 is not receiving local DC power. 15 There is supplied via the optional local DC power supply, 3CN1000JPSL. Green - The unit is supplied via PoE from the network. Table 5 Uplink PoE Power LED DC Power LED On - Power is receiving power via 802.3af Off - On - The unit is receiving power via 802.3at Amber - The NJ1000 is not receiving PoE power. Off - The unit is connected to the network. Off -
On - Power is no connection to the network and a link has been established. The NJ1000 is not receiving local DC power. 15 There is supplied via the optional local DC power supply, 3CN1000JPSL. Green - The unit is supplied via PoE from the network. Table 5 Uplink PoE Power LED DC Power LED On - Power is receiving power via 802.3af Off - On - The unit is receiving power via 802.3at Amber - The NJ1000 is not receiving PoE power. Off - The unit is connected to the network. Off -