
Getting Started Guide
Page 1
SuperStack® 3 Switch 3812, Switch 3824, and Switch 3848 Getting Started Guide 3C17401 3C17400 3CR17402-91 http://www.3com.com/ Part No. DUA1740-0AAA03 Rev. 01 Published September 2004
SuperStack® 3 Switch 3812, Switch 3824, and Switch 3848 Getting Started Guide 3C17401 3C17400 3CR17402-91 http://www.3com.com/ Part No. DUA1740-0AAA03 Rev. 01 Published September 2004
Getting Started Guide
Page 3
...Online Documentation 9 Documentation Comments 10 1 INTRODUCING THE SUPERSTACK 3 SWITCH 3812, SWITCH 3824, AND SWITCH 3848 About the Switch 12 Summary of LEDs 23 Rear View Detail 16 Power Socket 17 Redundant Power System Socket (Switch 3848 only) 17 Default Settings 17 2 INSTALLING THE SWITCH Package Contents 20 Choosing a Suitable Site 20 Rack... 21 Placing Units On Top of Each Other 22 The Power-up Sequence 23 Powering-up the Switch 23 Checking for Correct Operation of Hardware Features 12 Switch - Front View Detail 13 10BASE-T/ 100BASE-TX/ 1000BASE-T Ports 14 Dual Personality SFP Ports 14...
...Online Documentation 9 Documentation Comments 10 1 INTRODUCING THE SUPERSTACK 3 SWITCH 3812, SWITCH 3824, AND SWITCH 3848 About the Switch 12 Summary of LEDs 23 Rear View Detail 16 Power Socket 17 Redundant Power System Socket (Switch 3848 only) 17 Default Settings 17 2 INSTALLING THE SWITCH Package Contents 20 Choosing a Suitable Site 20 Rack... 21 Placing Units On Top of Each Other 22 The Power-up Sequence 23 Powering-up the Switch 23 Checking for Correct Operation of Hardware Features 12 Switch - Front View Detail 13 10BASE-T/ 100BASE-TX/ 1000BASE-T Ports 14 Dual Personality SFP Ports 14...
Getting Started Guide
Page 4
Connecting a Redundant Power Supply (Switch 3848 only) 23 Choosing the Correct Cables 24 SFP Operation 25 Approved SFP Transceivers 25 Inserting an SFP Transceiver 25 Removing an SFP Transceiver 27 3 ... 32 Manually Configuring IP Information 32 Connecting to the Console Port 32 Viewing Automatically Configured IP Information 36 Using 3Com Network Supervisor 36 Connecting to the Console Port 36 Methods of Managing a Switch 39 Command Line Interface Management 39 Web Interface Management 40 SNMP Management 40 Setting Up Command Line Interface Management...
Connecting a Redundant Power Supply (Switch 3848 only) 23 Choosing the Correct Cables 24 SFP Operation 25 Approved SFP Transceivers 25 Inserting an SFP Transceiver 25 Removing an SFP Transceiver 27 3 ... 32 Manually Configuring IP Information 32 Connecting to the Console Port 32 Viewing Automatically Configured IP Information 36 Using 3Com Network Supervisor 36 Connecting to the Console Port 36 Methods of Managing a Switch 39 Command Line Interface Management 39 Web Interface Management 40 SNMP Management 40 Setting Up Command Line Interface Management...
Getting Started Guide
Page 5
Japan 57 B PIN-OUTS Null Modem Cable 59 PC-AT Serial Cable 60 Modem Cable 61 RJ-45 Pin Assignments 61 C TECHNICAL SPECIFICATIONS Switch 3812, Switch 3824, and Switch 3848 63 D OBTAINING SUPPORT FOR YOUR PRODUCT Register Your Product to Gain Service Benefits 65 Purchase Value-Added Services 65 Troubleshoot Online 65 Access Software Downloads 66 Contact Us 66 Telephone Technical Support and Repair 66 INDEX REGULATORY NOTICES A SAFETY INFORMATION Important Safety Information 52 L'information de Sécurité Importante 54 Wichtige Sicherheitsinformationen 56 Power Cord Set -
Japan 57 B PIN-OUTS Null Modem Cable 59 PC-AT Serial Cable 60 Modem Cable 61 RJ-45 Pin Assignments 61 C TECHNICAL SPECIFICATIONS Switch 3812, Switch 3824, and Switch 3848 63 D OBTAINING SUPPORT FOR YOUR PRODUCT Register Your Product to Gain Service Benefits 65 Purchase Value-Added Services 65 Troubleshoot Online 65 Access Software Downloads 66 Contact Us 66 Telephone Technical Support and Repair 66 INDEX REGULATORY NOTICES A SAFETY INFORMATION Important Safety Information 52 L'information de Sécurité Importante 54 Wichtige Sicherheitsinformationen 56 Power Cord Set -

Getting Started Guide
Page 7
... a basic working knowledge of other useful applications. an online guide which gives you need to install and use 3Com® SuperStack® 3 Switch 3812 (3C17401), Switch 3824 (3C17400), or Switch 3848 (3CR17402-91) in its default state. Most user guides and release notes are available in the release ...follow the instructions in Adobe Acrobat Reader Portable Document Format (PDF) or HTML on how to the 3Com SuperStack 3 Switch 3812, Switch 3824, or Switch 3848. ■ 3Com Network Supervisor - The guide is intended for use the web interface and command line interface to manage the...
... a basic working knowledge of other useful applications. an online guide which gives you need to install and use 3Com® SuperStack® 3 Switch 3812 (3C17401), Switch 3824 (3C17400), or Switch 3848 (3CR17402-91) in its default state. Most user guides and release notes are available in the release ...follow the instructions in Adobe Acrobat Reader Portable Document Format (PDF) or HTML on how to the 3Com SuperStack 3 Switch 3812, Switch 3824, or Switch 3848. ■ 3Com Network Supervisor - The guide is intended for use the web interface and command line interface to manage the...
Getting Started Guide
Page 9
...In addition to this guide, each Switch documentation set includes the following online documentation: ■ Switch Implementation Guide (PDF format). ■ Switch Management Interface Reference Guide (HTML format). ■ Other documentation relating to the Switch 3812, Switch 3824, or Switch 3848 (PDF format). It is ... Guide This guide contains: ■ a list of software features supported by each Switch. ■ a summary of the web interface and command line interface commands for the Switch. ■ Release Notes These notes provide information about the web interface and command...
...In addition to this guide, each Switch documentation set includes the following online documentation: ■ Switch Implementation Guide (PDF format). ■ Switch Management Interface Reference Guide (HTML format). ■ Other documentation relating to the Switch 3812, Switch 3824, or Switch 3848 (PDF format). It is ... Guide This guide contains: ■ a list of software features supported by each Switch. ■ a summary of the web interface and command line interface commands for the Switch. ■ Release Notes These notes provide information about the web interface and command...
Getting Started Guide
Page 10
...drive or server, you will help make our documentation more useful to you copy the Docs/referenceguide directory as a whole to 3Com at: pddtechpubs_comments@3com.com Please include the following information when commenting: Document title, Document part number (on the CD-ROM. Documentation Comments Your ... of the CD-ROM. 3Com recommends that you . They will need to access the CD-ROM contents via the root directory and copy the files from the CD-ROM to us. Example: Part Number DUA1740-0AAA03 SuperStack 3 Switch 3812, Switch 3824, and Switch 3848 Getting Started Guide Page...
...drive or server, you will help make our documentation more useful to you copy the Docs/referenceguide directory as a whole to 3Com at: pddtechpubs_comments@3com.com Please include the following information when commenting: Document title, Document part number (on the CD-ROM. Documentation Comments Your ... of the CD-ROM. 3Com recommends that you . They will need to access the CD-ROM contents via the root directory and copy the files from the CD-ROM to us. Example: Part Number DUA1740-0AAA03 SuperStack 3 Switch 3812, Switch 3824, and Switch 3848 Getting Started Guide Page...
Getting Started Guide
Page 11
1 INTRODUCING THE SUPERSTACK 3 SWITCH 3812, SWITCH 3824, AND SWITCH 3848 This chapter contains introductory information about the hardware and the following topics: ■ About the Switch ■ Switch - It covers summary information about the Switch 3812, Switch 3824, and Switch 3848 and how they can be used in your network. Rear View Detail ■ Default Settings Front View Detail ■ Switch -
1 INTRODUCING THE SUPERSTACK 3 SWITCH 3812, SWITCH 3824, AND SWITCH 3848 This chapter contains introductory information about the hardware and the following topics: ■ About the Switch ■ Switch - It covers summary information about the Switch 3812, Switch 3824, and Switch 3848 and how they can be used in your network. Rear View Detail ■ Default Settings Front View Detail ■ Switch -
Getting Started Guide
Page 12
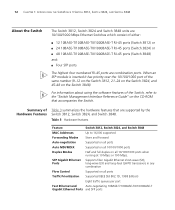
... 1: INTRODUCING THE SUPERSTACK 3 SWITCH 3812, SWITCH 3824, AND SWITCH 3848 About the Switch The Switch 3812, Switch 3824 and Switch 3848 units are 10/100/1000 Mbps Ethernet Switches which consist of the same number (9-12 on the Switch 3812, 21-24 on the Switch 3824, and 45-48 on the Switch 3848). When an...-negotiating 10BASE-T/100BASE-TX/1000BASE-T Gigabit Ethernet Ports and SFP ports Table 3 Hardware features Feature Switch 3812, Switch 3824, and Switch 3848 MAC Addresses Up to the "Switch Management Interface Reference Guide" on all 10/100/1000 ports when running at 10 Mbps or ...
... 1: INTRODUCING THE SUPERSTACK 3 SWITCH 3812, SWITCH 3824, AND SWITCH 3848 About the Switch The Switch 3812, Switch 3824 and Switch 3848 units are 10/100/1000 Mbps Ethernet Switches which consist of the same number (9-12 on the Switch 3812, 21-24 on the Switch 3824, and 45-48 on the Switch 3848). When an...-negotiating 10BASE-T/100BASE-TX/1000BASE-T Gigabit Ethernet Ports and SFP ports Table 3 Hardware features Feature Switch 3812, Switch 3824, and Switch 3848 MAC Addresses Up to the "Switch Management Interface Reference Guide" on all 10/100/1000 ports when running at 10 Mbps or ...
Getting Started Guide
Page 13
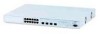
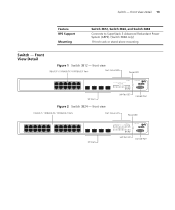
Front View Detail 13 Switch - Switch - Front View Detail Feature RPS Support Mounting Switch 3812, Switch 3824, and Switch 3848 Connects to SuperStack 3 Advanced Redundant Power System (ARPS). (Switch 3848 only) 19-inch rack or stand-alone mounting Figure 1 Switch 3812 - front view Figure 2 Switch 3824 - front view
Front View Detail 13 Switch - Switch - Front View Detail Feature RPS Support Mounting Switch 3812, Switch 3824, and Switch 3848 Connects to SuperStack 3 Advanced Redundant Power System (ARPS). (Switch 3848 only) 19-inch rack or stand-alone mounting Figure 1 Switch 3812 - front view Figure 2 Switch 3824 - front view
Getting Started Guide
Page 14
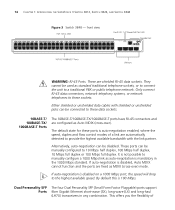
... be used as MDIX (cross-over ). This offers you the flexibility of a link are shielded RJ-45 data sockets. 14 CHAPTER 1: INTRODUCING THE SUPERSTACK 3 SWITCH 3812, SWITCH 3824, AND SWITCH 3848 Figure 3 Switch 3848 - They cannot be manually configured to the highest available speed. Alternatively, auto-negotiation can be disabled. If auto-negotiation is auto-negotiation...
... be used as MDIX (cross-over ). This offers you the flexibility of a link are shielded RJ-45 data sockets. 14 CHAPTER 1: INTRODUCING THE SUPERSTACK 3 SWITCH 3812, SWITCH 3824, AND SWITCH 3848 Figure 3 Switch 3848 - They cannot be manually configured to the highest available speed. Alternatively, auto-negotiation can be disabled. If auto-negotiation is auto-negotiation...
Getting Started Guide
Page 15
... A high speed (1000 Mbps) link is present, and the port is set to autobaud (up to a maximum of the Switch, and how to read their status according to your PC. The Switch 3812 and Switch 3824 have a DB-9 serial connector and need a serial cable to connect to color. Alternatively, auto-negotiation can be disabled...
... A high speed (1000 Mbps) link is present, and the port is set to autobaud (up to a maximum of the Switch, and how to read their status according to your PC. The Switch 3812 and Switch 3824 have a DB-9 serial connector and need a serial cable to connect to color. Alternatively, auto-negotiation can be disabled...
Getting Started Guide
Page 16
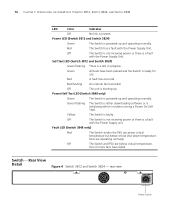
... normally. One or more fans have been passed and the Switch is initializing (which includes running a Power On Self Test). Rear View Detail Figure 4 Switch 3812 and Switch 3824 - Off The Switch is not receiving power or there is present. 16 CHAPTER 1: INTRODUCING THE SUPERSTACK 3 SWITCH 3812, SWITCH 3824, AND SWITCH 3848 LED Color Indicates Off No link is a fault...
... normally. One or more fans have been passed and the Switch is initializing (which includes running a Power On Self Test). Rear View Detail Figure 4 Switch 3812 and Switch 3824 - Off The Switch is not receiving power or there is present. 16 CHAPTER 1: INTRODUCING THE SUPERSTACK 3 SWITCH 3812, SWITCH 3824, AND SWITCH 3848 LED Color Indicates Off No link is a fault...
Getting Started Guide
Page 17
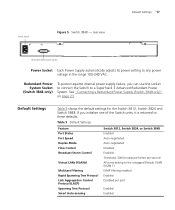
...Switch 3812, Switch 3824, or Switch 3848 Enabled Auto-negotiated Auto-negotiated Disabled Enabled Threshold: 3000 broadcast frames per port Enabled Enabled Redundant Power System Socket (Switch 3848 only) To protect against internal power supply failure, you initialize one of the Switch units, it is returned to a SuperStack... 3 Advanced Redundant Power System. If you can use this socket to connect the Switch to these defaults. rear view Default Settings 17 Redundant Power ...
...Switch 3812, Switch 3824, or Switch 3848 Enabled Auto-negotiated Auto-negotiated Disabled Enabled Threshold: 3000 broadcast frames per port Enabled Enabled Redundant Power System Socket (Switch 3848 only) To protect against internal power supply failure, you initialize one of the Switch units, it is returned to a SuperStack... 3 Advanced Redundant Power System. If you can use this socket to connect the Switch to these defaults. rear view Default Settings 17 Redundant Power ...
Getting Started Guide
Page 18
18 CHAPTER 1: INTRODUCING THE SUPERSTACK 3 SWITCH 3812, SWITCH 3824, AND SWITCH 3848 If you initialize a Switch unit by selecting System > Control > Initialize in the Web interface or by entering system control initialize in the Command Line Interface, the following settings are retained to allow you to connect to and manage the Switch: ■ IP Address ■ Subnet Mask ■ Default Gateway
18 CHAPTER 1: INTRODUCING THE SUPERSTACK 3 SWITCH 3812, SWITCH 3824, AND SWITCH 3848 If you initialize a Switch unit by selecting System > Control > Initialize in the Web interface or by entering system control initialize in the Command Line Interface, the following settings are retained to allow you to connect to and manage the Switch: ■ IP Address ■ Subnet Mask ■ Default Gateway
Getting Started Guide
Page 19
...lesen Sie die Sicherheitsanweisungen, die in Anhang A in Appendix A of Each Other ■ The Power-up the Switch 3812, Switch 3824, or Switch 3848. Avant d'installer ou d'enlever tout composant de Switch ou d'entamer une procédure de maintenance, lisez les informations relatives à la sécurité qui... ■ Package Contents ■ Choosing a Suitable Site ■ Rack-mounting ■ Placing Units On Top of this guide. 2 INSTALLING THE SWITCH This chapter contains the information you must read the safety information provided in diesem Handbuch aufgeführt sind.
...lesen Sie die Sicherheitsanweisungen, die in Anhang A in Appendix A of Each Other ■ The Power-up the Switch 3812, Switch 3824, or Switch 3848. Avant d'installer ou d'enlever tout composant de Switch ou d'entamer une procédure de maintenance, lisez les informations relatives à la sécurité qui... ■ Package Contents ■ Choosing a Suitable Site ■ Rack-mounting ■ Placing Units On Top of this guide. 2 INSTALLING THE SWITCH This chapter contains the information you must read the safety information provided in diesem Handbuch aufgeführt sind.
Getting Started Guide
Page 20
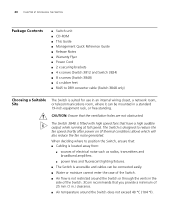
...Switch 3812 and Switch 3824) ■ 8 x screws (Switch 3848) ■ 4 x rubber feet ■ RJ45 to DB9 converter cable (Switch 3848 only) Choosing a Suitable Site The Switch is designed to position the Switch, ensure that: ■ Cabling is located away from: ■ sources of 25 mm (1 in the side of the Switch. 3Com... recommends that you provide a minimum of electrical noise such as radios, transmitters and broadband amplifiers. ■ power lines and fluorescent lighting fixtures. ■ The Switch is accessible and cables can be connected...
...Switch 3812 and Switch 3824) ■ 8 x screws (Switch 3848) ■ 4 x rubber feet ■ RJ45 to DB9 converter cable (Switch 3848 only) Choosing a Suitable Site The Switch is designed to position the Switch, ensure that: ■ Cabling is located away from: ■ sources of 25 mm (1 in the side of the Switch. 3Com... recommends that you provide a minimum of electrical noise such as radios, transmitters and broadband amplifiers. ■ power lines and fluorescent lighting fixtures. ■ The Switch is accessible and cables can be connected...
Getting Started Guide
Page 21
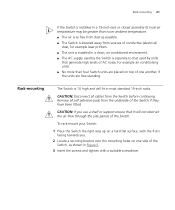
... they have been fitted. Remove all cables from the underside of the Switch. To rack-mount your Switch: 1 Place the Switch the right way up on top of one side of the Switch, as possible. ■ The Switch is situated away from sources of conductive (electrical) dust, for example laser printers. &#...9632; The unit is installed in a clean, air conditioned environment. ■ The AC supply used by the Switch is 1U high and will fit in Figure 6. 3 Insert the screws and tighten with the front facing towards you use a shelf or support ensure that...
... they have been fitted. Remove all cables from the underside of the Switch. To rack-mount your Switch: 1 Place the Switch the right way up on top of one side of the Switch, as possible. ■ The Switch is situated away from sources of conductive (electrical) dust, for example laser printers. &#...9632; The unit is installed in a clean, air conditioned environment. ■ The AC supply used by the Switch is 1U high and will fit in Figure 6. 3 Insert the screws and tighten with the front facing towards you use a shelf or support ensure that...
Getting Started Guide
Page 22
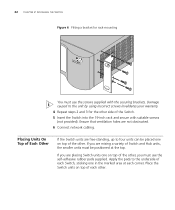
If you are not obstructed. 6 Connect network cabling. Ensure that ventilation holes are mixing a variety of Switch and Hub units, the smaller units must be placed one on top of the other , you are free-standing, up to four units can be .... If you must use the self-adhesive rubber pads supplied. Place the Switch units on top of the other . Placing Units On Top of Each Other If the Switch units are placing Switch units one on top of the Switch. 5 Insert the Switch into the 19-inch rack and secure with the securing brackets. Apply...
If you are not obstructed. 6 Connect network cabling. Ensure that ventilation holes are mixing a variety of Switch and Hub units, the smaller units must be placed one on top of the other , you are free-standing, up to four units can be .... If you must use the self-adhesive rubber pads supplied. Place the Switch units on top of the other . Placing Units On Top of Each Other If the Switch units are placing Switch units one on top of the Switch. 5 Insert the Switch into the 19-inch rack and secure with the securing brackets. Apply...
Getting Started Guide
Page 23
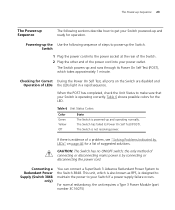
Table 6 Unit Status Colors Color Green Yellow Off State The Switch is designed to maintain the power to your Switch if a power supply failure occurs. Connecting a Redundant Power Supply (Switch 3848 only) You can connect a SuperStack 3 Advance Redundant Power System to get your power outlet. This unit, which takes approximately 1 minute. For normal redundancy, the...
Table 6 Unit Status Colors Color Green Yellow Off State The Switch is designed to maintain the power to your Switch if a power supply failure occurs. Connecting a Redundant Power Supply (Switch 3848 only) You can connect a SuperStack 3 Advance Redundant Power System to get your power outlet. This unit, which takes approximately 1 minute. For normal redundancy, the...


