
Owners Manual
Page 6
...the headlight bulb ...7-29 Replacing the tail/brake light bulb ...7-30 TABLE OF CONTENTS LOCATION OF IMPORTANT LABELS ...1-1 SAFETY INFORMATION ...2-1 DESCRIPTION ...3-1 Left view ...3-1 Right view ...3-2 Controls and instruments...3-3 INSTRUMENT AND CONTROL FUNCTIONS ...4-1 Main switch/steering lock ...4-1 Indicator lights and warning lights ...4-2 Multi-function meter unit ...4-3 Handlebar switches ...4-6 Clutch lever ...4-7 Shift pedal ...4-8 Brake lever ...4-8 Brake pedal ...4-8 Fuel tank cap ...4-9 Fuel ...4-9 Fuel tank breather/overflow hose ...4-11 Catalytic converter ...4-11 Rider seat...
...the headlight bulb ...7-29 Replacing the tail/brake light bulb ...7-30 TABLE OF CONTENTS LOCATION OF IMPORTANT LABELS ...1-1 SAFETY INFORMATION ...2-1 DESCRIPTION ...3-1 Left view ...3-1 Right view ...3-2 Controls and instruments...3-3 INSTRUMENT AND CONTROL FUNCTIONS ...4-1 Main switch/steering lock ...4-1 Indicator lights and warning lights ...4-2 Multi-function meter unit ...4-3 Handlebar switches ...4-6 Clutch lever ...4-7 Shift pedal ...4-8 Brake lever ...4-8 Brake pedal ...4-8 Fuel tank cap ...4-9 Fuel ...4-9 Fuel tank breather/overflow hose ...4-11 Catalytic converter ...4-11 Rider seat...
Owners Manual
Page 14
... adjust the suspension for hours or days in poorly ventilated or partially enclosed areas such as barns, garages, or carports. ● Do not run engine outdoors where engine exhaust can be drawn into a building through openings such as windows and doors. 2 Loading Adding accessories or cargo to your motorcycle can adversely affect stability and handling if the weight distribution of...
... adjust the suspension for hours or days in poorly ventilated or partially enclosed areas such as barns, garages, or carports. ● Do not run engine outdoors where engine exhaust can be drawn into a building through openings such as windows and doors. 2 Loading Adding accessories or cargo to your motorcycle can adversely affect stability and handling if the weight distribution of...

Owners Manual
Page 15
... carry cargo that change any way reduce ground clearance or cornering clearance, limit suspension travel, steering travel or control operation, or obscure lights or reflectors. • Accessories fitted to test the products that some aftermarket accessories or modifications are available only from his or her normal riding position. This vehicle is an important decision. If accessories are responsible for Yamaha vehicles. This improper...
... carry cargo that change any way reduce ground clearance or cornering clearance, limit suspension travel, steering travel or control operation, or obscure lights or reflectors. • Accessories fitted to test the products that some aftermarket accessories or modifications are available only from his or her normal riding position. This vehicle is an important decision. If accessories are responsible for Yamaha vehicles. This improper...
Owners Manual
Page 16
... solid parts of lights or engine power. ● ● ● 2 ● ● Aftermarket Tires and Rims The tires and rims that there are attached to observe following instructions before transporting the motorcycle in gear (for tire specifications and more information on the trailer or in the truck bed, and choke it in the "OFF" position and that came with a manual transmission). Shift the transmission in another vehicle. ● Remove...
... solid parts of lights or engine power. ● ● ● 2 ● ● Aftermarket Tires and Rims The tires and rims that there are attached to observe following instructions before transporting the motorcycle in gear (for tire specifications and more information on the trailer or in the truck bed, and choke it in the "OFF" position and that came with a manual transmission). Shift the transmission in another vehicle. ● Remove...
Owners Manual
Page 21
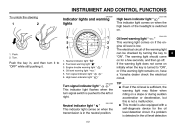
... it. 1. 2. 3. 4. 5. 6. Neutral indicator light " " Fuel level warning light " " Engine trouble warning light " Oil level warning light " " Turn signal indicator light " High beam indicator light " " " " Oil level warning light " " This warning light comes on if the engine oil level is pushed to the left or right. EAU11060 Neutral indicator light " " This indicator light comes on when the transmission is in the oil level detection EAU11254 6 5 4 1. If the warning light does not come on for the oil level detection circuit. INSTRUMENT AND CONTROL FUNCTIONS...
... it. 1. 2. 3. 4. 5. 6. Neutral indicator light " " Fuel level warning light " " Engine trouble warning light " Oil level warning light " " Turn signal indicator light " High beam indicator light " " " " Oil level warning light " " This warning light comes on if the engine oil level is pushed to the left or right. EAU11060 Neutral indicator light " " This indicator light comes on when the transmission is in the oil level detection EAU11254 6 5 4 1. If the warning light does not come on for the oil level detection circuit. INSTRUMENT AND CONTROL FUNCTIONS...
Owners Manual
Page 25
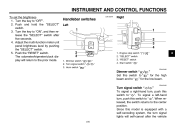
... turn signal lights will return to " " for the high beam and to the prior mode. Push and hold the "SELECT" switch. 3. EAU1234A Handlebar switches Left Right 1 1 2 3 4 2 3 1. Engine stop switch " "SELECT" switch "RESET" switch Start switch " " / " 4 EAU12400 Dimmer switch " / " Set this model is equipped with a self-canceling system, the turn , push this switch to "ON", and then release the "SELECT" switch after the vehicle 4-6 Turn the key to the center position. Horn switch " " 1. 2. 3. 4. Turn the key...
... turn signal lights will return to " " for the high beam and to the prior mode. Push and hold the "SELECT" switch. 3. EAU1234A Handlebar switches Left Right 1 1 2 3 4 2 3 1. Engine stop switch " "SELECT" switch "RESET" switch Start switch " " / " 4 EAU12400 Dimmer switch " / " Set this model is equipped with a self-canceling system, the turn , push this switch to "ON", and then release the "SELECT" switch after the vehicle 4-6 Turn the key to the center position. Horn switch " " 1. 2. 3. 4. Turn the key...
Owners Manual
Page 26
... brightness control mode of the ignition circuit cut-off system. (See page 4-15.) Clutch lever EAU44602 Horn switch " " Press this switch to " " to stop switch " / " Set this switch to the center position. "SELECT" switch This switch is moving, so that the turn signal lights can also be pulled rapidly and released slowly for detailed information. 4-7 The clutch lever is equipped with the starter. EAU41700 Clutch lever 1 4 The engine trouble warning light...
... brightness control mode of the ignition circuit cut-off system. (See page 4-15.) Clutch lever EAU44602 Horn switch " " Press this switch to " " to stop switch " / " Set this switch to the center position. "SELECT" switch This switch is moving, so that the turn signal lights can also be pulled rapidly and released slowly for detailed information. 4-7 The clutch lever is equipped with the starter. EAU41700 Clutch lever 1 4 The engine trouble warning light...
Owners Manual
Page 29
... leaded gasoline will extend spark plug life and reduce maintenance costs. If gasoline spills on your clothing, change your doctor immedi- NOTICE: Immediately wipe off spilled fuel with care. Your Yamaha engine has been designed to the fuel system or vehicle performance problems. 4 NOTICE Use only unleaded gasoline. Maximum fuel level 3. Handle gasoline with a clean, dry, soft cloth, since fuel may deteriorate painted surfaces or plastic...
... leaded gasoline will extend spark plug life and reduce maintenance costs. If gasoline spills on your clothing, change your doctor immedi- NOTICE: Immediately wipe off spilled fuel with care. Your Yamaha engine has been designed to the fuel system or vehicle performance problems. 4 NOTICE Use only unleaded gasoline. Maximum fuel level 3. Handle gasoline with a clean, dry, soft cloth, since fuel may deteriorate painted surfaces or plastic...
Owners Manual
Page 33
... of the ignition circuit cut -off . Read and understand the following section for any way. Special wrench 2. Extension bar 3. Take the shock absorber assembly to excessive gas pressure. EAU15305 Sidestand The sidestand is part of a damaged or worn-out shock absorber assembly yourself. Do not subject the shock absorber assembly to open flame or other high heat source. INSTRUMENT AND CONTROL FUNCTIONS ●...
... of the ignition circuit cut -off . Read and understand the following section for any way. Special wrench 2. Extension bar 3. Take the shock absorber assembly to excessive gas pressure. EAU15305 Sidestand The sidestand is part of a damaged or worn-out shock absorber assembly yourself. Do not subject the shock absorber assembly to open flame or other high heat source. INSTRUMENT AND CONTROL FUNCTIONS ●...
Owners Manual
Page 39
... of the following warning lights should come on for the corresponding warning light circuit check. 6-1 The engine stops automatically if left idling for more information. 1. Push the start switch. ● an engine auto-stop system. In order for the ignition circuit cut-off . ● Oil level warning light ● Fuel level warning light ● Engine trouble warning light ECA15484 6 NOTICE If a warning light does not come on initially when the key is a control or function...
... of the following warning lights should come on for the corresponding warning light circuit check. 6-1 The engine stops automatically if left idling for more information. 1. Push the start switch. ● an engine auto-stop system. In order for the ignition circuit cut-off . ● Oil level warning light ● Fuel level warning light ● Engine trouble warning light ECA15484 6 NOTICE If a warning light does not come on initially when the key is a control or function...

Owners Manual
Page 40
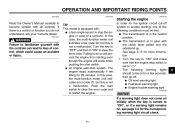
... a Yamaha dealer to start, release the start switch, wait a few seconds, and then try again. Do not crank the engine more than 10 seconds on . Shifting gears lets you control the amount of time with the transmission in the illustration. The gear positions are not designed to preserve the battery. Even with the engine off , accelerating, climbing hills, etc. Always use the clutch while changing gears to...
... a Yamaha dealer to start, release the start switch, wait a few seconds, and then try again. Do not crank the engine more than 10 seconds on . Shifting gears lets you control the amount of time with the transmission in the illustration. The gear positions are not designed to preserve the battery. Even with the engine off , accelerating, climbing hills, etc. Always use the clutch while changing gears to...
Owners Manual
Page 43
... Turn off the engine when performing maintenance unless otherwise specified. ● A running engine has moving parts that is an obligation of the vehicle owner/operator. PERIODIC MAINTENANCE AND ADJUSTMENT EAU17244 EWA15122 EAU17302 WARNING Periodic inspection, adjustment, and lubrication will keep your risk of injury or death during use , the maintenance intervals may need to be shortened. Maintenance, replacement, or repair of the emission control devices...
... Turn off the engine when performing maintenance unless otherwise specified. ● A running engine has moving parts that is an obligation of the vehicle owner/operator. PERIODIC MAINTENANCE AND ADJUSTMENT EAU17244 EWA15122 EAU17302 WARNING Periodic inspection, adjustment, and lubrication will keep your risk of injury or death during use , the maintenance intervals may need to be shortened. Maintenance, replacement, or repair of the emission control devices...
Owners Manual
Page 70
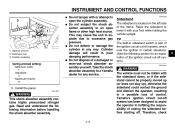
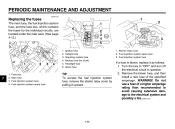
.... 2. WARNING! Do not use a fuse of the specified amperage. PERIODIC MAINTENANCE AND ADJUSTMENT EAU47134 Replacing the fuses The main fuse, the fuel injection system fuse, and the fuse box, which contains the fuses for clock) Headlight fuse Spare fuse 7 Fuse box Main fuse Fuel injection system fuse Fuel injection system spare fuse TIP To access the fuel injection system fuse, remove the starter relay cover by pulling it as follows. 1. Starter relay cover 2. Ignition fuse Taillight fuse Signaling system fuse...
.... 2. WARNING! Do not use a fuse of the specified amperage. PERIODIC MAINTENANCE AND ADJUSTMENT EAU47134 Replacing the fuses The main fuse, the fuel injection system fuse, and the fuse box, which contains the fuses for clock) Headlight fuse Spare fuse 7 Fuse box Main fuse Fuel injection system fuse Fuel injection system spare fuse TIP To access the fuel injection system fuse, remove the starter relay cover by pulling it as follows. 1. Starter relay cover 2. Ignition fuse Taillight fuse Signaling system fuse...
Owners Manual
Page 71
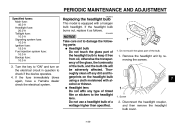
Screw 2. PERIODIC MAINTENANCE AND ADJUSTMENT EAU48513 Specified fuses: Main fuse: 40.0 A Headlight fuse: 20.0 A Taillight fuse: 10.0 A Signaling system fuse: 10.0 A Ignition fuse: 15.0 A Fuel injection system fuse: 10.0 A Backup fuse: 10.0 A Replacing the headlight bulb This model is equipped with alcohol or thinner. ● Headlight lens Do not affix any dirt and fingerprints on the electrical circuit in question to check if the device operates. 4. Thoroughly clean off any...
Screw 2. PERIODIC MAINTENANCE AND ADJUSTMENT EAU48513 Specified fuses: Main fuse: 40.0 A Headlight fuse: 20.0 A Taillight fuse: 10.0 A Signaling system fuse: 10.0 A Ignition fuse: 15.0 A Fuel injection system fuse: 10.0 A Backup fuse: 10.0 A Replacing the headlight bulb This model is equipped with alcohol or thinner. ● Headlight lens Do not affix any dirt and fingerprints on the electrical circuit in question to check if the device operates. 4. Thoroughly clean off any...
Owners Manual
Page 81
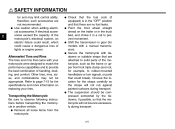
... the spark plug caps from becoming degraded in order to ground the spark plug electrodes while turning the engine over several times with the starter. (This will limit sparking during the next step.) d. Check and, if necessary, correct the tire air pressure, and then lift the motorcycle so that the electrodes are off the ground. Alternatively, turn the wheels a little every month in one spot. Cover the muffler outlet with oil.) WARNING! a. e. Store...
... the spark plug caps from becoming degraded in order to ground the spark plug electrodes while turning the engine over several times with the starter. (This will limit sparking during the next step.) d. Check and, if necessary, correct the tire air pressure, and then lift the motorcycle so that the electrodes are off the ground. Alternatively, turn the wheels a little every month in one spot. Cover the muffler outlet with oil.) WARNING! a. e. Store...
Owners Manual
Page 82
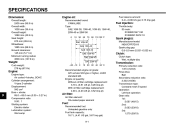
... US gal, 0.75 Imp.gal) Fuel injection: Throttle body: ID mark: XVS95D 5S71 00 XVS95DC 5S72 10 Spark plug(s): Manufacturer/model: NGK/CPR7EA-9 Spark plug gap: 0.8-0.9 mm (0.031-0.035 in) Clutch: Clutch type: Wet, multiple-disc Weight: Curb weight: 278 kg (613 lb) Transmission: Primary reduction ratio: 1.674 (72/43) Final drive: Belt Secondary reduction ratio: 2.333 (70/30) Transmission type: Constant mesh 5-speed Operation: Left foot operation...
... US gal, 0.75 Imp.gal) Fuel injection: Throttle body: ID mark: XVS95D 5S71 00 XVS95DC 5S72 10 Spark plug(s): Manufacturer/model: NGK/CPR7EA-9 Spark plug gap: 0.8-0.9 mm (0.031-0.035 in) Clutch: Clutch type: Wet, multiple-disc Weight: Curb weight: 278 kg (613 lb) Transmission: Primary reduction ratio: 1.674 (72/43) Final drive: Belt Secondary reduction ratio: 2.333 (70/30) Transmission type: Constant mesh 5-speed Operation: Left foot operation...
Owners Manual
Page 84
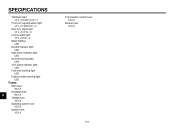
SPECIFICATIONS Tail/brake light: 12 V, 5.0 W/21.0 W × 1 Front turn signal/position light: 12 V, 21 W/5.0 W × 2 Rear turn signal light: 12 V, 21.0 W × 2 License plate light: 12 V, 3.8 W × 2 Meter lighting: LED Neutral indicator light: LED High beam indicator light: LED Oil level warning light: LED Turn signal indicator light: LED Fuel level warning light: LED Engine trouble warning light: LED Fuel injection system fuse: 10.0 A Backup fuse: 10.0 A Fuses: Main fuse: 40.0 A Headlight fuse: 20.0 A Taillight fuse: 10.0 A Signaling system fuse: 10.0 A Ignition fuse: 15.0 A 9 ...
SPECIFICATIONS Tail/brake light: 12 V, 5.0 W/21.0 W × 1 Front turn signal/position light: 12 V, 21 W/5.0 W × 2 Rear turn signal light: 12 V, 21.0 W × 2 License plate light: 12 V, 3.8 W × 2 Meter lighting: LED Neutral indicator light: LED High beam indicator light: LED Oil level warning light: LED Turn signal indicator light: LED Fuel level warning light: LED Engine trouble warning light: LED Fuel injection system fuse: 10.0 A Backup fuse: 10.0 A Fuses: Main fuse: 40.0 A Headlight fuse: 20.0 A Taillight fuse: 10.0 A Signaling system fuse: 10.0 A Ignition fuse: 15.0 A 9 ...
Owners Manual
Page 91
... the vehicle is free from the factory. Give notice to normal wear or routine maintenance. Operate and maintain the motorcycle as a result of owner abuse and/or lack of 50cc or greater, that the machine be one (1) year from defects in the appropriate Owner's Manual, and 2. THE PERIOD OF WARRANTY for Yamaha motorcycles originally equipped with headlight, stoplight, and turn signals...
... the vehicle is free from the factory. Give notice to normal wear or routine maintenance. Operate and maintain the motorcycle as a result of owner abuse and/or lack of 50cc or greater, that the machine be one (1) year from defects in the appropriate Owner's Manual, and 2. THE PERIOD OF WARRANTY for Yamaha motorcycles originally equipped with headlight, stoplight, and turn signals...
Owners Manual
Page 92
What are handled at the time of normal maintenance services, non-warranty repairs, accident and collision damages, and oil, oil filters, air filters, spark plugs, and brake shoes. If you have any specific questions on a new motorcycle cannot be inspected and re-registered by an authorized Yamaha motorcycle dealer for the policy to help you. A. Q. A. A. If a question or problem arises regarding the warranty, first contact the owner of "abnormal" strain...
What are handled at the time of normal maintenance services, non-warranty repairs, accident and collision damages, and oil, oil filters, air filters, spark plugs, and brake shoes. If you have any specific questions on a new motorcycle cannot be inspected and re-registered by an authorized Yamaha motorcycle dealer for the policy to help you. A. Q. A. A. If a question or problem arises regarding the warranty, first contact the owner of "abnormal" strain...
Owners Manual
Page 95
...18 Brake light switches...7-18 Brake pedal ...4-8 Fuel tank breather/overflow hose...4-11 Fuel tank cap...4-9 Fuses, replacing...7-28 Part locations ...3-1 R Rear suspension, lubricating ...7-24 RESET switch...4-7 Rider seat ...4-12 H Handlebar switches ...4-6 Headlight bulb, replacing...7-29 Helmet holder...4-12 High beam indicator light...4-2 Horn switch ...4-7 S Safety defects, reporting...10-3 Safety information...2-1 SELECT switch...4-7 Shifting...6-2 Shift pedal...4-8 Shock absorber assembly, adjusting ...4-13 Sidestand...4-14 Sidestand, checking and lubricating ...7-24 Spark plugs...
...18 Brake light switches...7-18 Brake pedal ...4-8 Fuel tank breather/overflow hose...4-11 Fuel tank cap...4-9 Fuses, replacing...7-28 Part locations ...3-1 R Rear suspension, lubricating ...7-24 RESET switch...4-7 Rider seat ...4-12 H Handlebar switches ...4-6 Headlight bulb, replacing...7-29 Helmet holder...4-12 High beam indicator light...4-2 Horn switch ...4-7 S Safety defects, reporting...10-3 Safety information...2-1 SELECT switch...4-7 Shifting...6-2 Shift pedal...4-8 Shock absorber assembly, adjusting ...4-13 Sidestand...4-14 Sidestand, checking and lubricating ...7-24 Spark plugs...